
Subscribe to Our Youtube Channel
Related Manuals for USX-MOUNT XAS002-01


Summary of Contents for USX-MOUNT XAS002-01
- Page 1 XAS002-01 INSTRUCTION MANUAL If you have any questions along the way, just message to us.We’re ready to help! USA-B2...
- Page 2 CAUTION: PLEASE READ ENTIRE MANUAL PRIOR TO USE AND SAVE THESE INSTRUCTIONS Before getting started, let’s check below lists to make sure it is just right for you! CAUTION: DO NOT exceed the maximum weight Does your soundbar No? Perfect – you may continue. indicated.
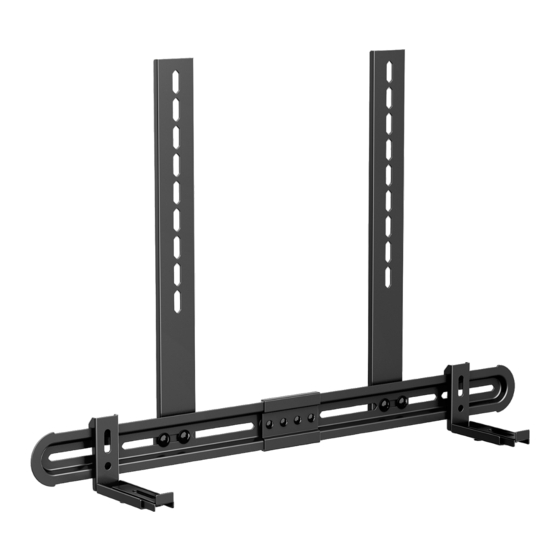
- Page 3 Dimensions RIGHT VIEW - Hook FRONT VIEW 88mm [3.46in] 464mm [18.27in] RIGHT VIEW - Hook 48mm [1.89in] 30mm 59mm [1.18in] [2.31in] 87mm [3.43in] 154mm [6.06in] 691mm [27.19in] WALL PLATE FRONT VIEW MAX:600mm [23.62in] 406mm [16.00in] MIN:150mm [5.91in] [0.31in] 203mm [8.00in] 610mm [24.00in] MAX:600mm[23.62in]...
-
Page 4: Parts And Hardware
Parts and Hardware WARNING: This product contains small items that could be a choking hazard if swallowed. Before starting assembly, verify all parts are included and undamaged. If any parts are missing or damaged, do not return the damaged item to your dealer; contact Customer Service. - Page 5 Hardware for Soundbar Installation Spacers Washers Screws 8x10mm M6x16mm M6x25mm 2.5mm M8x20mm M8x30mm M5x8mm...
- Page 6 STEP 1 Assemble Wall plate Tighten Wall plate STEP 2 Disassemble Your TV from the Mount Ⅰ Remove all cables Ⅱ Take off the TV Ⅲ Remove the TV from the mount brackets from your TV...
- Page 7 STEP 3 Attach Brackets to Wall Plate CAUTION: Check the horizontal distance of the TV before connecting the wall plate unit to the brackets. Horizontal distance of TV mounting holes Tighten (Depend on your TV VESA) Wall plate...
- Page 8 STEP 4 Attach the Assembled Soundbar Mount and TV Brackets to Your TV Tips: No need to use washer (g) when using M8 screw (b/d). Tips: Only the two threaded holes at the bottom of the TV VESA are allowed to install. Tips: Before attach the TV, check the vertical distance of TV and wall plate.
- Page 9 STEP 5 Hang the Whole Assembled Unit to the Mount CAUTION: This step requires 2 or more people to complete.
- Page 10 STEP 6 Assemble Your Soundbar with Soundbar Mount 6-1 Option 1 Install from the bottom with assembly holes. This installation method only applies to Soundbar with keyhole slots in the bottom. Loosen Tighten...
- Page 11 6-2 Option 2 Install from the back with assembly holes. This installation method only applies to the Soundbar with keyhole slots on the back. Loosen Tighten...
- Page 12 6-3 Option 3 Install the Soundbar without assembly holes or with keyhole slot This installation method is only for Soundbar without any keyhole slots, You can adjust the length of hooks and use hook and Loop to secure the soundbar on the hook. Loosen Tighten...
- Page 13 STEP 7 Hang and Secure the Soundbar Brackets Tighten CAUTION: This step requires 2 or more people to complete.
- Page 14 Below step for Soundbar Mount single use on the wall STEP 8 Option 1 Attach Wall Plate to Wall Wood Stud CAUTION: Avoid potential personal injury or property damage! ● Drywall covering the wall, must not exceed 5/8 in. (16 mm) ●...
- Page 15 3. Drill pilot holes using a 5/32 in. (4 mm) diameter drill bit. IMPORTANT: Pilot holes must be drilled to a depth of 2.36 in. (60 mm). Be sure to drill into the center of the studs. 4. Install wall plate using two lag bolts. Tighten the lag bolts only until they are pulled firmly against the wall plate.
- Page 16 STEP 8 Option 2 Attach Wall Plate to Solid Concrete Wall CAUTION: Avoid potential personal injury or property damage! ● Mount the wall plate assembly directly onto the concrete surface ● Minimum solid concrete thickness: 8 in. (203 mm) 1. Position the wall plate on the wall at your desired height. Level the wall plate and mark the hole locations.
- Page 17 3. Insert two anchors. CAUTION: Be sure the anchors are seated flush with the concrete surface. 4. Insert wall plate using two lag bolts. Tighten the lag bolts only until they are pulled firmly against the wall plate. CAUTION: Improper use could reduce the holding power of the lag bolt. DO NOT over-tighten the lag bolts.
- Page 18 STEP 9 Wall Plate Installation Integrity Test Before putting soundbar, please try to pull the wall plate to make sure that it has been assembled on the wall tightly.
- Page 19 STEP 10 Assemble Your Soundbar with Soundbar Mount 10-1 Option 1 Install from the bottom with assembly holes. This installation method only applies to Soundbar with keyhole slots in the bottom. Loosen Tighten...
- Page 20 10-2 Option 2 Install from the back with assembly holes. This installation method only applies to the Soundbar with keyhole slots on the back. Loosen Tighten...
- Page 21 10-3 Option 3 Install the Soundbar without assembly holes or with keyhole slot This installation method is only for Soundbar without any keyhole slots, You can adjust the length of hooks and use hook and Loop to secure the soundbar on the hook. Loosen Tighten...
- Page 22 STEP 11 Hang and Secure the Soundbar Brackets Tighten CAUTION: This step requires 2 or more people to complete.
Need help?
Do you have a question about the XAS002-01 and is the answer not in the manual?
Questions and answers