
Subscribe to Our Youtube Channel
Related Manuals for Campbell Aspen 10


Summary of Contents for Campbell Aspen 10
- Page 1 Getting Started Guide ™ Aspen With CampbellCloud Connectivity Revision: 09/2023 Copyright © 2023 Campbell Scientific, Inc.
-
Page 2: Table Of Contents
Table of Contents 1. Getting started 2. CampbellCloud 3. Install Aspen 10 3.1 Mounting 3.2 Grounding 3.3 Sensor connector 4. CampbellGo 4.1 Install app 4.2 Create an asset 4.3 Create a station 5. Field use 6. Observation mode 7. LED indicator 8. -
Page 3: Getting Started
Using Go to view real time data 2. CampbellCloud The Aspen 10 is set up to automatically send data to CampbellCloud. To ensure your data is accessible and organized you will need to create an organization account in CampbellCloud before installing the Aspen 10 in the field. - Page 4 1. Using a web browser go to www.campbell-cloud.com 2. Click CREATE ACCOUNT. 3. If you are the person who will be responsible for the organization account click CONTINUE TO SIGN UP. 2. CampbellCloud 2...
-
Page 5: Install Aspen
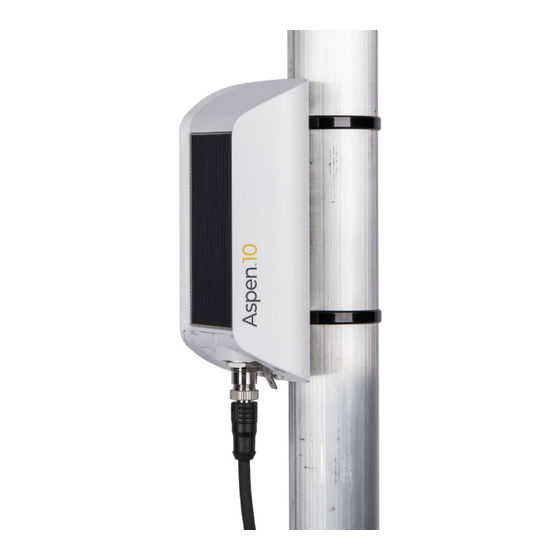
9. Click SIGN IN and proceed to CampbellCloud. 3. Install Aspen 10 The Aspen 10 is weather proof and does not need an additional enclosure. The integrated solar panel should be installed so it receives a minimum of four hours of sunlight per day. See Figure (p. - Page 6 Aspen 10 to optimize the solar panel angle in certain areas. Elsewhere, it should be mounted in a near-vertical orientation. Figure 3-1. Recommended solar panel orientation The following image shows a typical installation of an Aspen 10 with a RainVUE sensor.
-
Page 7: Mounting
1. If needed, install the snap-on 10° tilt spacer, see Figure 3-1 (p. 4). 2. Use simple cable ties (included) to mount the Aspen 10 to a vertical post. 3. Fit the extension cable connector to the sensor cable connector. Hand tighten the connectors. -
Page 8: Grounding
Aspen 10 and shunt transients away from electronics. Campbell Scientific recommends 14 AWG wire. Drive a ground rod close to the Aspen 10. Drive the rod at an angle if an impenetrable hard-pan layer exists. Crimp one end of the ground wire to the insulated push-on ground terminal and slide it onto the ground spade. -
Page 9: Sensor Connector
Ensure all local electrical codes are followed by having electrical equipment and grounding installed by a licensed electrician. 3.3 Sensor connector The Aspen 10 has an 8-pin M12 connector for approved cables and sensors. Individual pins and sockets are non-accessible. See product specifications ... -
Page 10: Campbellgo
3. Tap SIGN IN. 4. CampbellGo CampbellGo enables secure NFC/Bluetooth pairing between a smartphone and the Aspen 10. This simplifies the installation process with real- time sensor readings, diagnostic tools, and data- to-cloud delivery information while you are on- site. - Page 11 Name, (optional) Description, and (optional) labels. 7. Hold phone close to the NFC tap icon ))) on the side of the Aspen 10 until it vibrates and connects. 9. Tap NEXT. 10. This is a good time to check the orientation and angle of your installed Aspen 10.
-
Page 12: Create A Station
12. Adjust the installation direction and angle. 2. (Optional) Enter the station location. Tap Recommended solar panel orientation the lock/unlock button. In the unlocked (p. 4) position you can tap the location on the map. Tap the lock/unlock button again to save the station location. - Page 13 5. You will see the progress of your device communicating with Cloud. This could take several minutes to complete. 6. Once the process is complete you can view Live Data and other features through Go. 4. CampbellGo 11...
-
Page 14: Field Use
2. Enter your CampbellCloud user name and password. 3. Tap SIGN IN. 6. Hold phone close to the NFC tap icon ))) on the side of the Aspen 10 until it vibrates and connects. 4. Tap Connect. NOTE: Your home screen may be different. - Page 15 Aspen 10 is shown on the Status screen. Swipe up to see all fields 10. Tap the connection icon to disconnect from the Aspen 10 and return to your home 8. Select Live Data. screen. 11. Check the LED. It should periodically flash red and blue for the next ten minutes then turn off.
-
Page 16: Observation Mode
To make field work more efficient, observation mode allows an on-site technician to see measurements and publish data to Cloud at faster intervals than normal. Enter observation mode by direct connecting to an Aspen 10 using NFC Connect in CampbellGo or pressing the Power button. Entering observation mode causes the following things to happen: ... - Page 17 Typically caused by pressing the Power button for 3 seconds. Always on Cellular modem turning on or off Typical LED sequence when first installing an Aspen 10 and sensor is shown in the following table. Table 7-3: Installation LED activity Color and state Description...
-
Page 18: Recipes
LED may appear purple when red an blue LEDs are on at the same time. 8. Recipes The Aspen 10 must have a recipe in order to make measurements, store data, and publish data to CampbellCloud. Aspen 10 recipes contain programs that are executed on a precise schedule, based on the Aspen 10 internal clock. -
Page 19: Hygrovue™5
Table 8-2: ClimaVUE™50 recipe measurements Measurement Description Units Solar Solar flux density Rain Precipitation Strikes Lightning strike count count Dist Strike distance WindSpd Wind speed WindDir Wind direction ° MaxWindSpd Wind speed max. – 10 second gust AirTemp °C Air temperature Vapor pressure Barometric pressure (absolute) Relative humidity... -
Page 20: Rainvue™10
Table 8-4: HygroVUE™5 recipe measurements Measurement Description Units Temp Temperature °C Relative humidity 8.3 RainVUE™10 Table 8-5: RainVUE™10 recipe data intervals Publish to CampbellCloud Name Description Measurement interval interval Sample of all Ten minutes (two RainVUE10 Five minutes measurements measurement intervals) Sample of all 10 seconds when in 10 seconds when in... -
Page 21: Snowvue™10
8.4 SnowVUE™10 Table 8-7: SnowVUE™10 recipe data intervals Publish to CampbellCloud Name Description Measurement interval interval Sample of all SnowVUE10 One hour One hour measurements Sample of all 20 seconds when in 20 seconds when in Observations measurements observation mode observation mode Table 8-8: SnowVUE™10 recipe measurements Measurement... -
Page 22: Soilvue™10
8.5 SoilVUE™10 Table 8-9: SoilVUE™10 recipe data intervals Publish to CampbellCloud Name Description Measurement interval interval Sample of all SoilVUE One hour One hour measurements Sample of all 60 seconds when in 60 seconds when in Observations measurements observation mode observation mode Table 8-10: SoilVUE™10 recipe measurements Measurement... -
Page 23: Wintersense™Sdi-12
Table 8-10: SoilVUE™10 recipe measurements Measurement Description Units T_40 Temperature, 40 cm °C EC_40 Bulk Electrical Conductivity, 40 cm dS/m VWC_50 Volumetric Water Content, 50 cm Ka_50 Relative Permittivity, ɛ, 50 cm T_50 Temperature, 50 cm °C EC_50 Bulk Electrical Conductivity, 50 cm dS/m 8.6 Wintersense™SDI-12 Table 8-11: Wintersense SDI-12 recipe data intervals... -
Page 24: Appendix A. Glossary
Appendix A. Glossary asset Primarily this is a data source such as a data logger or Aspen 10. It can also be another piece of hardware. network A group of stations Near field communications onboard A collective term for the tasks that have to complete successfully in order for a data source asset to be correctly configured and send data to CampbellCloud. - Page 25 QR code Quick response barcode recipe A set of files that include the Aspen 10 program, settings and configuration for a specific sensor and application. station A group of assets Unique identifier user Individuals who have been added to an organization account. Users are assigned permissions via the Security Groups application.
- Page 26 Campbell Scientific Regional Offices Australia France Thailand Location: Garbutt, QLD Australia Location: Montrouge, France Location: Bangkok, Thailand Phone: 61.7.4401.7700 Phone: 0033.0.1.56.45.15.20 Phone: 66.2.719.3399 Email: info@campbellsci.com.au Email: info@campbellsci.fr Email: info@campbellsci.asia Website: www.campbellsci.com.au Website: www.campbellsci.fr Website: www.campbellsci.asia Brazil Germany Location: São Paulo, SP Brazil...
Need help?
Do you have a question about the Aspen 10 and is the answer not in the manual?
Questions and answers