Table of Contents
Advertisement
Advertisement
Table of Contents

Related Manuals for Campbell CR310


Summary of Contents for Campbell CR310
- Page 3 Table of Contents ..........................1 ETTING TARTED Overview ............................1 RS-232 ......................2 ONNECTING VIA EZ S ................. 4 ESTING OMMUNICATION AND OMPLETING ETUP ................... 5 ONNECTING THE ATALOGGER TO A OMPUTER ....................6 REATING A ROGRAM IN HORT ..................8 ENDING A ROGRAM TO THE ATALOGGER...
-
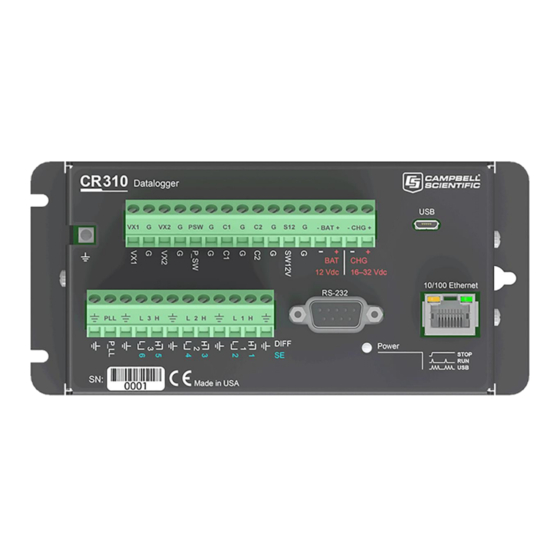
Page 5: G Etting S Tarted
Serial cable. • Datalogger support software. More in-depth study may require other Campbell Scientific publications, most of which are available online at www.campbellsci.com. Generally, if a particular feature of the datalogger requires a peripheral hardware device, more information is available in the help or manual written for that device. -
Page 6: C Onnecting Via Usb Or Rs-232
Connecting via USB or RS-232 Setting up a USB or RS-232 connection is a good way to begin communicating with your datalogger. Because these connections do not require configuration (like an IP address), you need only set up the communication between your computer and the datalogger. Initial setup instruction follows. - Page 7 12. Click Next. 13. Review the Communication Setup Summary. If you need to make changes, click the Previous button to return to a previous window and change the settings. Setup is now complete, and the EZSetup Wizard allows to you click Finish or click Next to test your communication, set the datalogger clock, and send a program to the datalogger.
-
Page 8: T Esting C Ommunication And C Ompleting Ez S Etup
Testing Communication and Completing EZ Setup 1. Using datalogger support software EZ Setup, access the Communication Test window. This window is accessed during EZ Setup (see "USB or RS-232 Communications" on page 2 for more information). Alternatively, you can double-click a datalogger from the station list to open the EZ Setup Wizard and access the Communication Test step from the left side of the window. -
Page 9: C Onnecting The D Atalogger To A C Omputer
Connecting the Datalogger to a Computer Once you have configured your connection (see "USB or RS-232 Communications" on page 2), you can connect the datalogger to your computer. • PC200W and PC400 users, select the datalogger from the list and click the Connect button ( •... - Page 10 Select 60 Hz Noise Rejection for North America and areas using 60 Hz ac voltage. Select 50 Hz Noise Rejection for most of the Eastern Hemisphere and areas that operate at 50 Hz. A second prompt lists sensor support options. Campbell Scientific, Inc. (US) is probably the best fit if you are outside Europe.
- Page 11 11. Use the Output Setup options to specify how often measurements are to be made and how often outputs are to be stored. Note that multiple output intervals can be specified, one for each output table (Table1 and Table2 tabs). For the example program, only one table is needed. Click the Table2 tab and click Delete Table.
-
Page 12: S Ending A P Rogram To The D Atalogger
Sending a Program to the Datalogger The datalogger requires a CRBasic program to direct measurement, processing, control, and data storage operations. The program file may use the extension .CR300 or .dld. A good practice is to always retrieve data from the datalogger before sending a program; otherwise, data may be lost. -
Page 13: Working With Data
Working with Data By default, the datalogger includes three tables: Public, Status, and DataTableInfo. Each of these tables only contains the most recent measurements and information. • The Public table contains the measurements as they are made. It is updated at the scan interval set within the datalogger program. -
Page 14: C Ollecting D Ata
Collecting Data The datalogger writes to data tables according to the schedule set within the CRBasic program. After the program has been running for enough time to generate data records, data may be collected and reviewed via your datalogger support software. Collections may be done manually, or automatically through scheduled collections set in LoggerNet Setup. -
Page 15: V Iewing H Istoric D Ata
Viewing Historic Data View historic data in a spreadsheet format using View Pro. View Pro also contains tools for visualizing data in several graphical layouts. Follow a tutorial or use the following instructions: Once the datalogger has had ample time to take multiple measurements, you can collect and review the data.
Need help?
Do you have a question about the CR310 and is the answer not in the manual?
Questions and answers