Table of Contents
Advertisement
Quick Links
COMBO/51
Installation & User Instructions
This manual provides information on how to control the Roam Combo X Router using
your devices internet browser. Most of these functions can be completed easier and
faster using the Maxview Roam Combo X App. See the Roam Combo App instruction
manual for more information.
UK contact:
Helpline:
+44 (0)1553 811000
Email:
support@maxview.co.uk
Web:
www.maxview.co.uk
Maxview reserve the right to change specifications without prior notice
9111458 Iss 1
Roam Combo X Powered by
Roam Combo X
Maxview Address:
Maxview Ltd, Garage Lane, Setchey, King's Lynn, Norfolk. PE33 0AT. UK
We have partnered up with one of the largest
suppliers of Wi-Fi products worldwide.
Advertisement
Table of Contents

Related Manuals for Maxview COMBO/51


Summary of Contents for Maxview COMBO/51
- Page 1 This manual provides information on how to control the Roam Combo X Router using your devices internet browser. Most of these functions can be completed easier and faster using the Maxview Roam Combo X App. See the Roam Combo App instruction manual for more information.
-
Page 2: Table Of Contents
Introduction Thank you for purchasing this product, should you have any difficulty using your Roam Combo X Combo Combo please contact our friendly Customer Helpline on +44 (0)1553 811000 or email support@maxview.co.uk. Contents Record your Purchase Router - Changing the Primary Internet Source... -
Page 3: Product Contents
- Hack Saw Choosing a Service Provider To use the Maxview Roam Combo X, you will need a suitable data SIM card (sold separately). The Maxview Roam Combo X -pis unlocked, so you can use any service provider. The best package will depend on many factors such as data usage, budget, location of travel and usage habits, however pre-paid data plans are usually more cost effective. -
Page 4: Accessories
Accessories - Sold separately Roam Combo Extension Cables Roam Combo 230V PSU Extension cables can be purchased separately to 230V ac to 12V dc Power Supply Unit allow a flexible mounting position to the router. to power a Roam Combo. For indoor use only. 1 metre MXL050/EXT1 3 metres... -
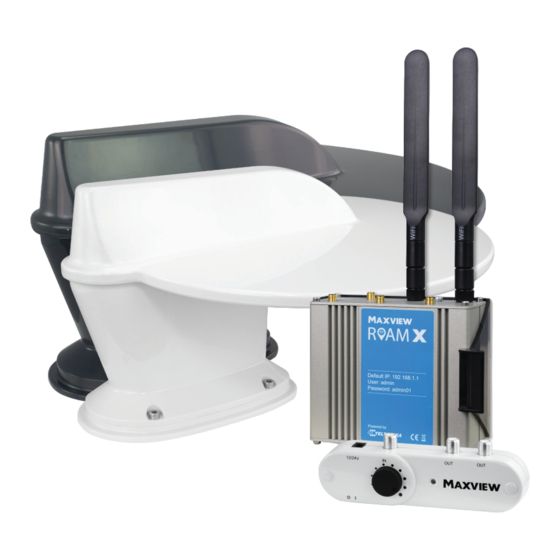
Page 5: Antenna Installation
Antenna Installation Instructions... - Page 6 Mounting Foot Towards front of vehicle with wet seal and Clamping Tool...
- Page 7 X = 2mm Y = 25mm Front of vehicle Choose a location, ensure the antenna is positioned on a flat surface and is clear from obstructions. Use the included template and drill 5 x 2mm holes. Use hole position (Y) as a pilot hole to drill a larger 25mm hole.
-
Page 8: Signal Booster Installation
Signal Booster (For TV) Installation Instructions... - Page 9 Cable routing Route Coaxial Cable inside vehicle to Variable Signal Booster which should be located near your TV/ Receiver. Note cable can be shortened to suit application. Please Note: When fitting the Signal Booster and Router, there should be as much distance between the two units as possible.
- Page 10 Fitting F Connector If you decide to shorten the cable please see below method of preparing cable. Cut cable to required length. Strip Strip away 10mm of inner Cut off inner copper wire to away 12mm of outer insulation. insulation around the inner wire. extend 3mm beyond plug body.
- Page 11 Router (For Internet) Installation Instructions...
-
Page 12: Inserting Sim Card
Inserting Sim Card Remove the supplied Pin located at the bottom of Use this pin to firmly press on SIM eject button. the router. This is located next to the SIM slot. It is not necessary to apply force to the SIM tray itself. This may damage Please note your Pin maybe located in the included the router. -
Page 13: Router Installation
2 x No.6 Screws provided. IMPORTANT - To prevent damage take Note: Make sure the ‘Maxview Logo’ is care to ensure the centre pins are horizontal and in the correct orientation. - Page 14 Attach the Wi-Fi antennas to the bottom Connect the 12V power lead or the 230V PSU connectors. These are marked ‘Wi-FI’. These should be (available to order separately) and route the lead to positioned so they are vertical. your power source. Place the router into the mounting bracket.
- Page 15 Router (For Internet) Getting Connected and Basic Functions...
-
Page 16: Get To Know Your Router
Get to know your Router Mobile signal strength Mobile network Front View indication LEDs type LEDs WAN type LEDs Holders SIM needle Power Socket LAN Ethernet Wan Ethernet Power Reset Button Ports Port Back View Mobile AUX Mobile MAIN GNSS Attenna Antenna Connection Antenna Connection Connector... -
Page 17: Getting Online
Getting Online Now your Roam Combo X is installed and you have inserted the SIM card, it’s time to get connected. To do this, you will need to be using a device which can connect to a Wi-Fi network such as a smart phone, Smart TV, tablet or laptop. - Page 18 Option B: QR Code If your device is able to read QR codes (Android 9 or newer and IOS 11 or newer), simply point your device camera at the QR code on the back on the router. When prompted, select ‘join’. Your device will automatically connect to the Roam Combo X Router.
-
Page 19: Factory Reset
Connecting to a device using an Ethernet Cable If your device does not support Wi-Fi or you would like to maximise the reliability of your connection, you can access the Roam Combo X internet connection by connecting the Ethernet Cable between the LAN ports on the router and your device. - Page 20 Router (For Internet) Advanced Functions and Changing Router Settings For most users changing these settings is not necessary. We only recommend accessing and changing settings in the Web User Interface if necessary and we do not recommend changing settings which have not been outlined in this booklet.
-
Page 21: Connecting To The Web User Interface
Advanced Functions and Changing Router Settings All of the settings and functionality of the Roam Combo X Router are changed using the Web User Interface. This can be accessed using a browser when your device is connected to the Roam Combo Wi-Fi network. The Roam Combo X Router is very powerful and there are many settings in here which can be adjusted to suit your requirements. - Page 22 When accessing the Web User Interface for the first time, you will be offered the chance to use the Set Up Wizard. This can be used to set up the router’s most relevant parameters, such as changing the hotspot username and password. Competent users can navigate through other settings, however we recommend skipping the Set Up Wizard as it is not strictly necessary to change any of these settings.
-
Page 23: Logging Out Of The Web User Interface
Logging out of the Web User Interface Once you have finished using the Web User Interface, you should log out. We recommend doing this every time you have finished using the Web User Interface. Select ‘Log Out’ in the top right hand corner and Once you have logged out you can now close confirm you wish to log out. - Page 24 Changing the Primary Internet Source from 3G/4G to Wi-Fi Did you know? The functions in this section can be completed easier and faster using the Maxview Roam Combo X App. See the Roam Combo X App instruction manual for more information.
- Page 25 This can be done using a separate device with Wi-Fi connectivity, such as a mobile phone, laptop or tablet. It is easier and faster to switch between 3G/4G and Wi-Fi using the Maxview Roam Combo X App. See the Roam Combo X App instruction manual for more information.
- Page 26 Next the wireless connection you wish to connect to click ‘Join Network” Enter the password for the network and network name if you choose to do so. Then click ‘Submit’ Hit the enable button to turn on.
- Page 27 Your router will now connect to your chosen wifi network. However the connection your router uses for to connect to the internet will depend on your WAN configuration setting, To change connection priority drag and drop each connection in the order desired. Then save and apply.
-
Page 28: Changing The Routers Lan Ip Address
Changing the Routers LAN IP Address In some cases, the LAN IP Address of the Roam Combo X Router will be the same as the source Wi-Fi IP address. If this is the case, using Wi-Fi as the internet source will not work. To fix this, we must change the LAN IP Address of the Roam Combo X Router. - Page 29 Router (For Internet) Other Functions Did you know? The functions in this section can be completed easier and faster using the Maxview Roam Combo X App. See the Roam Combo X App instruction manual for more information.
-
Page 30: Managing And Removing Wi-Fi Connections
Managing and Removing Wi-Fi Connections Navigate to ‘Network’ and then ‘Wireless’. From here, you can then view and manage the most recent Wi-Fi connection listed under the Wireless Station Mode heading. This includes updating the password or removing it completely if it is no longer used. The Router will store the details of the most recently used Wi-Fi connection only. - Page 31 You will then see a list of the Wireless Access Points (hotspots) the router is creating. As standard, this will be for 2.4GHz and one for 5GHz. Select ‘pencil icon’ on the RUTX11_XXXX access point. You will now be transferred to the ‘Interface Configuration’ tab under the ‘General Set Up’ tab. In the ESSID box, input a new name (ESSID) for your router.
-
Page 32: Entering Sim Pin
When the changes are complete, you will see You can now navigate to your device’s Wi-Fi a web browser error page and your device will no settings and view available Wi-Fi networks. The longer be connected to the router. Because the Wi-Fi Roam Combo router hotspot will be displayed as your network has changed, the router will automatically chosen name. - Page 33 Controlling Data Usage This function can be used to sync your SIM card’s data allowance with the router. This configuration will not reset when the router is turned off so can be used to monitor usage and to understand when you are nearing your maximum allowance.
-
Page 34: Router Firmware Update
Router Firmware Update From time to time, new firmware will be available to download onto the Router X. It is not essential that the latest firmware is on the router, however we recommend keeping firmware up to date to ensure you have access to new feature releases and the latest security updates. -
Page 35: Additional Information
Terms and conditions In no event shall Maxview be liable for any indirect, incidental or consequential damages from the sale or use of the product. This disclaimer applies both during and after terms of the guarantee. This does not affect your statutory rights. -
Page 36: Year Guarantee
A guarantee authorisation must be obtained from Maxview prior to work commencing. c) Maxview is responsible for the cost of a replacement part if the original part is determined to be defective under the terms of the guarantee. - Page 37 That said, as the 5G network continues to expand, 5G may well benefit customers in years to come. To ensure customers are futureproofed for when 5G technology does provide a benefit, Maxview have therefore integrated 5G capabilities into the Roam Combo X antenna as standard. Please note, the Roam Combo X Router is a 3G/4G router and does not receive 5G.
- Page 38 17. What does the Maxview Roam X Combo App do? The Maxview Roam X Combo App is available free of charge to all customers who have purchased a Maxview Roam Combo X. It is available to download from the Android Google Play and Apple App Stores. The Roam Combo X App is designed to simplify some of the key functions of the Maxview Roam Combo X including set up, changing the Roam X Combo hotspot Wi-Fi name/password as well as switching between 3G/4G and Wi-Fi source.
- Page 39 Wi-Fi sources requiring use of a Captive Portal are not supported by the Maxview Roam Combo X and therefore cannot be used as an Wi-Fi source. In this instance we suggest you continue to use the 3G/4G connection or connect directly to the Wi-Fi connection with your Wi-Fi enabled device.
- Page 40 20. What is WAN Failover? Once Wi-Fi has been activated as the internet source, the Roam X Combo uses WAN failover as default. This feature is designed to overcome the need to manually switch the internet source between mobile and Wi-Fi.
-
Page 41: Certification And Environment
Great Britain. SIMPLIFIED EU DECLARATION OF CONFORMITY Hereby, Maxview Ltd. declares that the radio equipment described with this document is in compliance with Directive 2014/53/EU. The full text of the EU declaration of conformity is available at the following internet address:... - Page 42 Specifications 4G/5G Antenna Function Frequency 698-6000 MHz/5.9dBi -8.8dBi. Includes all 3G, 4G and 5G frequencies Gain: 5.9dBi - 8.8dBi Cable Length: 2 x 0.8m (Cable extensions available separately) Cable Type: 2 x SMA UHF Antenna Function Frequency Wideband for UHF TV Gain: 19dB with Signal Booster Cable Length:...
- Page 43 The Maxview Roam X Combo system uses a TELTONIKA NETWORKS UAB RUTX11 LTE router. Used Frequency Range of Built-In RF Module: UL f, MHz Band DL f, MHz GNSS 1559-1610 WCDMA 1920-1980 2110-2170 1710-1785 1805-1880 880-915 925-960 1920-1980 2110-2170 1710-1785...
- Page 44 The conformity assessment procedure referred to in Article 17 and detailed in Annex III of Directive 2014/53/ EU has been followed with the involvement of the following Notified Body: LGAI Technological Centre (APPLUS). Notified Body No.: 0370. Therefore is placed on the product. EU Type Examination Certificate No. 0370-RED-4982 More information can be found at: https://maxview.co.uk/certifications/...
Need help?
Do you have a question about the COMBO/51 and is the answer not in the manual?
Questions and answers