
Related Manuals for Air Techniques F3700T


Summary of Contents for Air Techniques F3700T
- Page 1 ScanX Classic & ScanX Intraoral Digital Imaging Systems Ins tr u ct io n M an u al ScanX Classic ScanX Intraoral Part No. F3700T Part No. F3600T...
-
Page 2: Table Of Contents
Classic & Intraoral CONGRATULATIONS Congratulations on your purchase of ScanX, the latest Digital Imaging System from Air Techniques, a leading manufacturer of equipment for the dental professional since 1962 . This manual covers the installation, operation and maintenance of: 1 . ScanX Intraoral Digital Imaging System, part number F3600T . -
Page 3: Purpose Of This Manual
The interior of each component of ScanX is only accessible by removing hardware with special tools and should only be opened and serviced by an authorized dealer service technician . Contact your local Air Techniques authorized dealer for service . Failure to heed this directive may result in equipment damage and voids the warranty . - Page 4 Stacking or using the scanner adjacent to other equipment may violate EMC compliance and interfere with the scanner operation . Do not use damaged Phosphor Storage Plates (PSPs). Damaged PSPs may not provide reliable diagnostic images . Page 4 Air Techniques, Inc.
- Page 5 WEEE Directive 2002/96/EC and must be disposed of only at the appropriate facilities for recovery and recycling. Indicates the ScanX is a UL Manufacturer: Listed product . Air Techniques, Inc. LABORATORY EQUIPMENT 1295 Walt Whitman Road 60CB E234737 Melville, New York 11747 USA Air Techniques, Inc.
-
Page 6: Unpacking And Inspection
Unpack each component of ScanX and inspect for physical damage such as scratched panels, damaged connectors, etc . If there is any damage, notify your Air Techniques authorized dealer immediately so corrective action can be taken . Save all cartons and packing materials to protect ScanX in the event that it is to be transported or shipped in the future . -
Page 7: Important Information
Any use that is not described in this manual as correct usage is considered as incorrect usage . The manufacturer is not to be held liable for any damage caused as a result of incorrect usage . The operator bears all risks . Air Techniques, Inc. Page 7... -
Page 8: System Description
Adjustable settings for optimum dynamic range . Sturdy, isolating/damping feet eliminate potential image quality issues due to vibration . Figure 1 . ScanX Classic (P/N F3700T) and ScanX Intraoral (P/N F3600T) Digital Imaging System, Page 8 Air Techniques, Inc. -
Page 9: Technical Data
Equipment not suitable for use in the presence of flammable anaesthetic mixture(s) . Electromagnetic Interference: Electromagnetic interference between the equipment and other devices can occur . Do not use the equipment in close conjunction with sensitive devices, or devices creating high electromagnetic disturbances . Air Techniques, Inc. Page 9... -
Page 10: Computer System Requirements
32 MB RAM or more recommended USB Port/Version USB 1 .1 required . USB 2 .0 or USB 3 .0 high-speed port recommended Keyboard, Mouse and Printer Required . Other Backup device and surge protector recommended . Page 10 Air Techniques, Inc. -
Page 11: Abbreviations
Super Video Graphics Array Commission Universal Serial Bus Image Management Software Underwriters Laboratories imaging plate Volts kilogram (10 gram) Watts, width Light emitting diode °C degree Celsius length lp/mm line pair per mm a measure of light intensity Air Techniques, Inc. Page 11... -
Page 12: System Setup
8 . With both ScanX and computer turned on, Windows detects ScanX as a new USB Device and the Found New Hardware Wizard will appear . Windows should automatically find the drivers installed from ScanX Drivers and Utilities Disk . Page 12 Air Techniques, Inc. - Page 13 ScanX POWER Receptacles Located on Right Rear Panel SUPPLY ScanX Underside Detail D Snap Slots Supports in Place Detail C Align Clips & Slots Quick Connect Clips Figure 2 . ScanX Power and Computer Connections Air Techniques, Inc. Page 13...
-
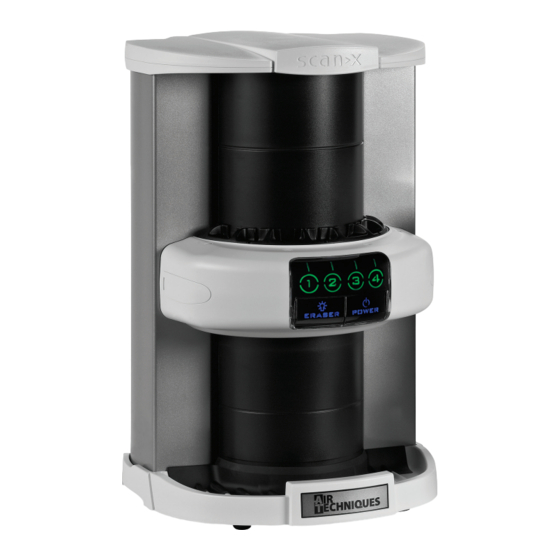
Page 14: Controls And Indicators
4. Illuminates green when activated by imaging software denoting that the imag- (Bi-Color LEDs) ing software is set to acquire images and the corresponding lane is ready to process a PSP plate. 5. Illuminates amber while the corresponding lane is busy processing. Page 14 Air Techniques, Inc. -
Page 15: Plate Care And Preparation
5 shows the configuration of a typical Intraoral Size #2 PSP while Figure 6 shows a typical extraoral plate . White or Sensitive Side Black Side or Tube or Printed Side or Front of PSP Back of PSP Sensitive Side Figure 5 . Intraoral PSP Configuration Figure 6 . Typical Extraoral Plate Configuration Air Techniques, Inc. Page 15... - Page 16 19 thru 21 for either intraoral or extraoral as necessary . This method scans the plate and then erases the plate . Using this method, the imaging software may acquire a “junk image” (scanned latent plate image) that should be subsequently deleted from the imaging software . Page 16 Air Techniques, Inc.
- Page 17 . Peel off the adhesive strip and seal the envelope as shown by Figure 8 . View A. View B. View C. Insert the PSP into the envelope. Peel off the adhesive strip. Seal the Barrier Envelope. Figure 8 . Sealing the PSP in the Barrier Envelope Air Techniques, Inc. Page 17...
-
Page 18: Intraoral Imaging Procedures
4 . Bring the Plate Transfer Box with all the exposed PSPs properly prepared to ScanX . The PSP is now ready to be scanned to read the image by performing the Intraoral Imaging Procedures . Figure 9 . Ejecting a Plate into the Plate Transfer Box Page 18 Air Techniques, Inc. - Page 19 LED Indicators (green / amber) ERASER POWER Switch / Status LED Switch / Status LED Indicator Illuminated Indicator Illuminated Blue Blue Figure 11 . Front Panel Indicators of Activated ScanX Set in the READY Mode Air Techniques, Inc. Page 19...
- Page 20 11 . Retrieve the processed (scanned and erased) PSPs for reuse or storage . Make sure not to scratch the sensitive surface or nick the edges when removing from the scanner outlet . 12 . View and save each scanned image using the user-supplied imaging software . Page 20 Air Techniques, Inc.
-
Page 21: Extraoral Imaging Procedures
4 . At this point, the track lights will turn amber, indicating the PSP has been sensed and the ScanX is transporting the PSP . Figure 13 . Feeding a Panoramic Plate into the ScanX Classic Air Techniques, Inc. Page 21... -
Page 22: Plate Erasing Options
. The PSP is transported through the unit as a normal scan but is not scanned . No image is acquired and the PSP is erased and ready for reuse as necessary . See Erasing PSPs on page 16 . Page 22 Air Techniques, Inc. -
Page 23: Maintenance
All service requiring access to the interior of the ScanX unit must be performed only by an authorized dealer service technician with the proper training. Service Requirement Schedule Kit Part No. Replace transport drive belts 2 years B7920 and springs Replace complete transport 4 years B7434 belt drive belt assembly Air Techniques, Inc. Page 23... -
Page 24: Troubleshooting
• Do not reuse the PSP if scratched or stained. • ScanX plate transport path may contain • Clean transport path using a ScanX Cleaning Sheet an obstruction, debris or dust. (P/N B2010, B2020, B3010 or B3020). Page 24 Air Techniques, Inc. -
Page 25: Warranty
Any item returned under warranty, will be repaired or replaced at our option at no charge provided that our inspection shall indicate it to have been defective . Air Techniques, Inc . is not liable for indirect or consequential damages or loss of any nature in connection with this equipment . Dealer labor, shipping and handling charges are not covered by this warranty . -
Page 26: Accessories
Extraoral Phosphor Storage Plates Description Order No. Panoramic Size 5 x 12 in. 73578-5 Panoramic Size 15 x 30 cm 73578-6 Cephalometric Size 8 x 10 in. 73578-8 TMJ Size 5 x 7 in. 73578-57 Page 26 Air Techniques, Inc. -
Page 27: Replacement Parts
24 VDC, 100 Watt, Power Supply Adapter B7495 IEC Power Cord Country Specific 2.0 USB Cable (2m) D5226 Plate Guides Size Order No. 73566-0 73566-1 73566-2 73566-3 73566-4 Plate Transfer Box • PN 73470, Qty. 1 Air Techniques, Inc. Page 27... -
Page 28: Appendix A, X-Ray Unit Settings
Incisor 0.13 s 11.8 0.13 s 0.13 s Premolar 0.18 s 16.4 0.18 s 0.18 s Molar 0.25 s 22.8 0.25 s 0.25 s Bite wing 0.27 s 24.6 0.27 s 0.27 s 10.4 Page 28 Air Techniques, Inc. - Page 29 70 kV mGycm Incisor 0.08 s 0.08 s 0.08 s Premolar 0.11 s 10.0 0.11 s 0.11 s Molar 0.14 s 12.8 0.14 s 0.14 s Bite wing 0.14 s 12.8 0.14 s 0.14 s Air Techniques, Inc. Page 29...
- Page 30 Classic & Intraoral NOTES Page 30 Air Techniques, Inc.
- Page 31 Classic & Intraoral NOTES Air Techniques, Inc. Page 31...
- Page 32 For over 50 years, Air Techniques has been a leading innovator and manufacturer of dental products . Our priority is ensuring complete satisfaction by manufacturing reliable products and providing excellent customer and technical support . Whether the need is digital imaging, utility room equipment or merchandise, Air Techniques can provide the solution via our network of authorized professional dealers .
Need help?
Do you have a question about the F3700T and is the answer not in the manual?
Questions and answers