Table of Contents
Advertisement
Quick Links
Advertisement
Table of Contents

Related Manuals for Cognex Advantage 182 Series


Summary of Contents for Cognex Advantage 182 Series
- Page 1 ® Advantage 182 Series Integrator's Guide 2023 May 24 Revision: x82.68...
-
Page 2: Legal Notices
Copyright © 2023. Cognex Corporation. All Rights Reserved. Portions of the hardware and software provided by Cognex may be covered by one or more U.S. and foreign patents, as well as pending U.S. and foreign patents listed on the Cognex web site at: cognex.com/patents. -
Page 3: Precautions
Precautions Precautions To reduce the risk of injury or equipment damage, observe the following precautions when you install the Cognex product: Connectivity is possible through 24 V DC (+10%) output connection using a UL or NTRL listed power supply. Any other voltage creates a risk of fire or shock and can damage the components. -
Page 4: Table Of Contents
Table of Contents Table of Contents Legal Notices Precautions Table of Contents Product Overview Communication Options Reader Layout Getting Started Setting up the Reader Accessories Cables Mounting Illumination Configuring In-Sight Vision Suite Develop a Job File Mechanical Information Advantage 182 Dimensions USB-C Connector Dimensions RJ-45 Connector Dimensions Device Label Information... - Page 5 Table of Contents For European Community Users...
-
Page 6: Product Overview
Product Overview Product Overview The Advantage 182 device is a compact smart camera with integrated lighting. Advantage 182 provides the following connection options: Standard RJ-45 Ethernet USB-C Communication Options Advantage 182 provides the following connection and communication options: Ethernet 10/100/1000 Standard RJ-45 Ethernet connection. -
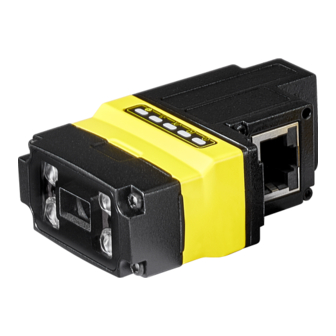
Page 7: Reader Layout
Product Overview Reader Layout The image and table below show the elements of the reader. Number Description Error LED indicator Communication LED indicator Pass/Fail LED indicator Train status/Trigger status LED indicator Power LED indicator RJ-45 Ethernet connector USB-C connector Note: For more information on LED functions, see the Status LEDs section in Communication Interfaces on page 23. -
Page 8: Getting Started
Using a USB-C cable connected to a USB-A or USB-C port. Using the Cognex USB-C – DB-15 cable: i. Connect the power supply to pin 5 of the DB-15 connector. ii. Use a DB-15 – USB-A adapter cable and connect it to a USB-A port. - Page 9 Getting Started 3. Connect the device to In-Sight Vision Suite. a. Launch In-Sight Vision Suite. b. Locate your Advantage device on the left side of the window. The device name conforms to the following: <Camera model><Mono/Color>-<last six characters of the MAC address> For example: ADV182C-93fce0 c.
-
Page 10: Accessories
Getting Started Accessories The following accessories are compatible with the Advantage 182. For more information, contact your local Cognex sales representative. Cables The following cables are compatible with Advantage 182 devices, and can be purchased separately: Accessory Product Number Illustration USB-C - DB15 right angle cable, 0.5m, Power, Input/Output, Serial... - Page 11 Getting Started Accessory Illustration Red LED Light White LED Light Blue LED Light High Speed Liquid Lens Red Bandpass Filters Blue Bandpass Filters Front Cover Assembly, Clear Front Cover Assembly, Polarized Front Cover Assembly, Diffuse...
-
Page 12: Configuring In-Sight Vision Suite
Getting Started Configuring In-Sight Vision Suite 1. Configure the network properties by clicking on the Network Settings button under Utilities. Note: If your Advantage device has a static IP address, then the device and the host system IP addresses have to be in the same subnet. - Page 13 Getting Started 2. On the left side of the PC Network Settings, select the network interface the device is connected to. 3. On the right side of the PC Network Settings, select Custom and click on Setup custom connection details, then enter the IP address and Subnet Mask of the PC.
-
Page 14: Develop A Job File
Getting Started Develop a Job File 1. Access the Spreadsheet editor by clicking on the Spreadsheet Connect button. 2. Adjust the trigger settings (for example trigger type and exposure value) by clicking on the Acquisition tab on the bottom right side of the screen. - Page 15 Getting Started 3. Set up the correct exposure. Note: If the image is not sharp enough you can adjust the focus distance of an unglued development camera by following the steps in Adjusting Focus Distance on page 34. Make sure to minimize highlight and black clipping. You can check this by clicking on the Show Image Saturation button: The system marks oversaturated pixels as follows: Red means clipping in the highlights.
- Page 16 5. Save the job file on the Advantage device or the host PC. For more information, click on the Help icon on the main screen of the In-Sight Vision Suite and open the In-Sight Spreadsheet Help document under Application Development, or contact your Cognex representative.
-
Page 17: Mechanical Information
Mechanical Information Mechanical Information The following sections provide mechanical information for the Advantage 182. Advantage 182 Dimensions The following figure shows the dimensions for the Advantage 182 in millimeters:... -
Page 18: Usb-C Connector Dimensions
Mechanical Information USB-C Connector Dimensions Advantage 182 uses USB-C connectors in straight and right-angled variants. The following images show the dimensions for the USB-C connectors in millimeters: Straight: Right-angled:... -
Page 19: Rj-45 Connector Dimensions
Mechanical Information RJ-45 Connector Dimensions Advantage 182 uses a right-angled RJ-45 connector. The following image shows the dimensions for the RJ-45 connector in millimeters:... -
Page 20: Device Label Information
Mechanical Information Device Label Information Advantage 182 devices receive the following labels during manufacturing: Device assembly label Configuration label Customer label The following figure shows the labels on the device: Environmental Maximum Conditions Operating 0 ─ +40 °C temperature Storage temperature -10 ─... -
Page 21: Electrical Information
Electrical Information Electrical Information This section provides information on the electrical characteristics of the Advantage 182 devices. You can power the device using the following options: Cognex USB-C – DB-15 cable USB-C – USB-A cable USB-C – USB-C cable Connectors Ethernet Standard RJ-45. -
Page 22: Power Characteristics
The Advantage 182 can only get power through a USB-C type connector. Power supply voltage range: 4.75 V – 5.25 V using the USB-C connector with Cognex or off the shelf USB-C cable 5.5 V – 24 V with Cognex USB-C – DB15 cable... -
Page 23: Communication Interfaces
Electrical Information Communication Interfaces Digital Input Lines The following figure shows a simplified block diagram of Input_0 of the Advantage 182 device. Inputs are not galvanic isolated, but need to be referenced to ground. Trigger Input Characteristics Polarity Rising edge User selectable polarity Rising or falling edge Voltage level... -
Page 24: Status Leds
Electrical Information Note: The output functionality only operates with a USB-C – DB15 cable. NPN (Pull Down) Output Type Characteristics Applied Voltage 24 V DC or less Residual voltage 0.85 V or less Maximum sink current 25 mA Short-circuit current 100 mA or less Short-circuit protection multifuse - 50 mA... - Page 25 Electrical Information Number Element Color/Status Meaning Error LED indicator This LED is on if the Advantage 182 detects an error. Communication LED Flashing This LED is flashing when the Advantage 182 indicator established the Ethernet connection. This LED is off when there is no Ethernet connection.
-
Page 26: Usb-C-Db15 Cable
Electrical Information USB-C-DB15 Cable The input and output functionalities of the Advantage 182 only work with the USB-C-DB15 cable. The cable is 0.5 m long, and is available with two types of USB connectors: Straight version 90 degrees version The DB15 connector has the following pin definition: Signal Description Number... - Page 27 Electrical Information Signal Description Number Name OUT_0 Open collector output channel 0. Depending on the configuration, an external pull up resistor might be necessary. Current must not exceed 25 mA. This signal has a resettable fuse protection that releases the line in case of a short circuit. IN_0 Digital Input 0 Connected...
-
Page 28: Optics And Lighting
Optics and Lighting Optics and Lighting This section provides an overview about the available lens, illumination options and field of view values. For more available options, please reach out to your local sales representative. Lens Lens Product Number 6.2 mm F6 114-20147-006 Note: High-Speed Liquid Lens (HSLL) is also available. -
Page 29: Fields Of View
Optics and Lighting Fields of View Note: Working distances are measured from the mounting holes. Working distance in mm Horizontal values in mm Vertical values in mm Pixel size in mm = 70 = 48.5 = 27.8 0.025 = 80 = 57.1 = 32.8 0.030... - Page 30 Optics and Lighting Working distance in mm Horizontal values in mm Vertical values in mm Pixel size in mm = 120 = 91.8 = 52.7 0.048 = 130 = 100.5 = 57.7 0.052 = 140 = 109.2 = 62.7 0.057 = 150 = 117.8 = 67.6...
-
Page 31: Changing Illumination Modules
Optics and Lighting Changing Illumination Modules This section provides a step-by-step process for changing the illumination module on a reader. 1. Power off the unit. 2. Unscrew the four screws, then take off the metal cover from the reader. 3. Remove the front cover gasket. - Page 32 Optics and Lighting 4. Remove the illumination module. 5. Install the new illumination module.
- Page 33 Optics and Lighting 6. Install the front cover gasket. 7. Install the front cover and tighten the screws, applying a recommended torque of 0.16 Nm.
-
Page 34: Adjusting Focus Distance
Optics and Lighting Adjusting Focus Distance You can manually adjust the focus of a development Advantage 182. Note: The version controlled cameras are glued and the focus cannot be adjusted. 1. Remove the front cover and the illumination module. For help, see steps 1-4 of Changing Illumination Modules on page 31. - Page 35 Optics and Lighting 4. Reinstall the lens cap. Make sure that the notch is pointing at 12 o’clock and the arrow on the lens aligns with the arrow on the mount. 5. Reassemble the camera. For help, see steps 5-7 of Changing Illumination Modules on page 31.
-
Page 36: Cleaning And Maintenance
Cleaning and Maintenance Cleaning and Maintenance Clean the Housing To clean the outside of the reader housing, use a small amount of mild detergent cleaner or isopropyl alcohol on a cleaning cloth. Do not pour the cleaner on the reader housing. You can also use cleaning agents containing alkyl ammonium chloride, such as liquid 3M Quant HB or Clorox disinfectant wipes, for surfaces that require cleaning of biological contamination without chemical alteration of the surface. -
Page 37: Regulations And Conformity
Regulations and Conformity Regulations and Conformity Note: For the most current CE and UKCA declarations and regulatory conformity information, see the Cognex support site: cognex.com/support. Advantage 182 readers have Regulatory Model number 50180 and meet or exceed the requirements of all applicable standards organizations for safe operation. -
Page 38: 中 国 大陆 Rohs (Information For China Rohs Compliance)
表 示用于本 部件的至 少一种 均 质 材料中所 含的危害 物 质超 过GB / T26572 - 2011 的限 制 要求 。 For European Community Users Cognex complies with Directive 2012/19/EU OF THE EUROPEAN PARLIAMENT AND OF THE COUNCIL of 4 July 2012 on waste electrical and electronic equipment (WEEE). - Page 39 Copyright © 2023 Cognex Corporation. All Rights Reserved.
Need help?
Do you have a question about the Advantage 182 Series and is the answer not in the manual?
Questions and answers