Table of Contents
Advertisement
Quick Links
WARNING: Bikes or rack falling in road can cause serious accidents resulting in bodily injury-do not use rack on any vehicle
on which it can not be properly mounted as described in this instruction sheet.
•
Rack should only be used on vehicles with 2" receiver hitches.
•
NEVER use on trailers or front of vehicles.
•
Bikes must be tied to rack using tie-downs, or additional straps if necessary.
•
Check periodically during use that all bolts and pins are tight, and that rack and bicycles are secure.
•
Never carry more than 2 bikes (max capacity 70 LB)
•
Drive conservatively, especially over bumps. Never use off-road.
•
Do not use if any part of the rack is damaged, worn, or missing. Contact
•
The presence of the cushion in the upper assembly of the functional model vertical tube requires it to be squeezed
deformation, the holes can be aligned.
A.
PARTES:
L
A
B
L
C
Base Assembly
Vertical Tube
Vertical tube upper assembly
External hexagon bolts M10*80
External hexagon bolts M10*65
Flat pad Θ10
Self-locking nuts
External hexagon bolts M8*20
Bouncing Pad Θ8
MODEL: DB-HMS22
- no tandems, mopeds, or recumbent. Car tail lights must remain visible.
FORWODE
B.
BOX SHOULD CONTAIN THE
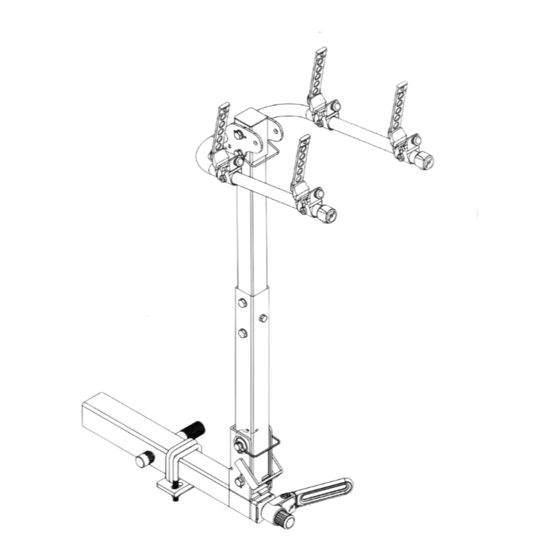
ASSEMBLING RACK:
FOLLOEING ITEMS:
STEP 1
K
•
Put two pieces of
D
(The two cylinders of K are inserted into the two
M
small holes).
•
Insert
in order with
E
•
After connecting
N
the hole in the base and use
F
O
G
P
L
H
Q
I
R
C
J
S
F
D
Flat pad Θ8
Round shims with positioning
Square pins
Heavy Duty Bullet Pads Θ10
Big Flat pad Θ10
Hexagonal nuts M10
U-connector
Fixed plate
Trailer lock
Trailer Lock Key
for replacement parts.
K
C
into the interior of
in advance.
B
C
into the inside of
, then connect them
D
F
F
G
-
-
-
fasteners.
B
C
and
, align the square tube with
L
to connect it to fix it.
B
K
G
F
K
K
IMPORTANT:
Because of the presence of the
cushion pad, so it needs to be
made to squeeze deformation,
the holes could be aligned.
INSTRUCTIONS
CAUTION: Use Forwode only in accordance with local motor vehicle and
traffic regulations.
• Install rack and load bicycles only at a safe distance away from moving
traffic.
• Make sure that all of rack and bicycles are kept at a safe distance from road
and hot exhaust.
• Only operate vehicle with rack in an upright, locked position.
• Bicycles should never extend beyond sides of vehicle.
• Remove rack from car, or fold carry arms down when not in use.
TOOLS REQUIRED: 2--5/8" WRENCH & 2--11/16" WRENCH;
STEP 2
A
B
•Plug
and
together, and connect the two holes on the side with two
E
F
F
G
sets of standard parts
-
-
-
locking.
H
•Connect one hole on the front side with
-
locking.
•TIGHTEN NUT AND BOLT FIRRRRRMLY
USING TRWO WRENCHES.
CAUTION:
In order to protect the product, increase
durability and reduce noise, a buffer pad
is added here. When the U-shaped crossbar
is folded, it is necessary to squeeze the
buffer pad hard, and then pull the pin.
E
UPON COMPLETION, BOTH PARTS
NOTE:
SHOULD BE FIRMLY JOINED TOGETHER.
IMPORTANT:
WHEN RACK IS IN AN UPRIGHT POSITRION.
WIRE RETAINER ON CLIP SHOULD
ALWAYS BE IN A CLOSED POSITION
TO KEEP RACK FROM FALLING OVER
DURING USE.
PAGE 1
OR 2--ADJUSTALE WRENCHES
I
J
-
A
F
G
F
B
H、I、J
Advertisement
Table of Contents

Related Manuals for FORWODE DB-HMS22


Summary of Contents for FORWODE DB-HMS22
- Page 1 WARNING: Bikes or rack falling in road can cause serious accidents resulting in bodily injury-do not use rack on any vehicle CAUTION: Use Forwode only in accordance with local motor vehicle and on which it can not be properly mounted as described in this instruction sheet.
- Page 2 SURE TO PROPERLY CLOSE THE WIRE RETAINER ON THE L CLIP. FORWODE LIFETIME WARRANTY: IF AN FORWODE BIKE RACK IS FOUND TO HAVE A DEFECT IN WORKMANSHIP OR MATERIAL OVER TRHE LIFETIME OF THE ORIGINAL PURCHASE,FORWODE WILL REPAIR OR REPLACE THE •...
Need help?
Do you have a question about the DB-HMS22 and is the answer not in the manual?
Questions and answers