Advertisement
Quick Links
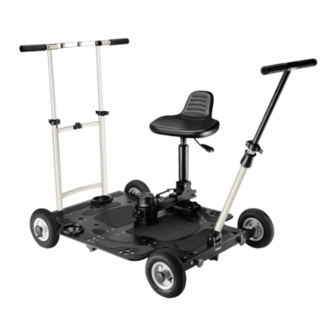
1
Foldable Camera Platform Dolly
(DL-FLDB-01)
A s s e m b l y M a n u a l
What's In The Box
Please inspect the contents of your shipped package to ensure you have received everything that is listed
below.
Seat
4 x Pneumatic Wheels
3 x Tripod Holder
Foldable Dolly Platform with
(Spiked Feet)
Push/Pull Bar
2 x 100 mm Bowl Adapter
Euro Mount with Seat
Rod Holder
Steering Bar
Seat Rod
4 x Track Wheels
360° Rotatable
4mm, 6mm Allen
Euro Mount
Wheels
Keys
All rights reserved.
No part of this document may be reproduced, stored in a retrieval system, or transmitted by any form or by any means,
electronic, mechanical, photo-copying, recording, or otherwise, except as may be expressly permitted by the applicable copyright
statutes or in writing by the Publisher.
Advertisement

Related Manuals for PROAIM DL-FLDB-01


Summary of Contents for PROAIM DL-FLDB-01
- Page 1 Foldable Camera Platform Dolly (DL-FLDB-01) A s s e m b l y M a n u a l What’s In The Box Please inspect the contents of your shipped package to ensure you have received everything that is listed below.
- Page 2 Functions Steering Bar Telescopic Push/ Pull Bar Maneuver in Preferred Camera dolly allows the Direction Adjustable Operator operator to maneuver the equipment using their preferred Seat method, offering flexibility. Comfort & Convenience Seat Break Adjust the Seat Positions Euro Mount Adapter Effortless and instant Seat Rod...
- Page 3 Foldable Platform Dolly Setup • As the Foldable Dolly is collapsed for packaging, open the Dolly by pulling it as shown in the image. • The Foldable Dolly is fully open. Feature: Dolly can be neatly folded and stowed away in a single package. The Dolly features two pre-mounted 100mm bowls on its platform, enabling you to capture low-level shots without additional equipment.
- Page 4 Pneumatic Wheels Setup • Loosen and remove the knob of the Foldable Dolly. • Loosen and remove all four knobs of the Dolly and insert Pneumatic Wheels, as shown in the image. • After attaching the Wheels, properly secure them by re-inserting and tightening the knobs for a secure attachment between the wheels and the Foldable Dolly.
- Page 5 Feature: A robust Euro Mount Adapter is also included for an effortless and instant installation via provided holes, allowing the setup to be mounted on the platform without any hassle. Euro Mount Adapter Euro Mount Adapter Compatibility with provided holes...
- Page 6 Seat Rod Holder Setup • Mount the Euro Mount with Seat Rod on the Foldable Dolly. • After mounting the Seat Rod, secure it using the knob, as shown in the image. 360° Rotatable Wheels Setup • Loosen bolts of the Rotatable Wheels using the Allen key to allow movement of the Wheels.
- Page 7 Seat Rod Setup • Loosen the ratchet knob of the Seat Rod and attach 360° Rotatable Wheels with it. • After attaching the Rotatable wheels, secure the setup using the ratchet knob as shown in the image. Feature: The Camera Dolly has a comfortable seat attached to the Euro Mount with Seat Rod Holder so you can capture your shots quickly while on the go.
- Page 8 Capture 360° Field of View Revolving Wheel Set...
- Page 9 Push/Pull Bar Assembly • Pull the knob of the Foldable Dolly to mount the Push/Pull Bar. • Insert the Push/Pull Bar on the provided holes of the Dolly platform. • After inserting the Push/Pull Bar, properly se- cure it using the knob. Telescopic Push/Pull Bar...
- Page 10 Steering Bar Assembly • Insert the Steering Bar by slightly loosening the knob. • To extend the length of the Steering Bar, un- lock its ratchet lever and pull the Bar upwards. • Unlock the ratchet lever of the Push/ Pull Bar and push the Bar upwards.
- Page 11 • Repeat the same process with the second Handle. • To set the Handle in its previous position, stretch it sideways and lock it. • The Handle is back in its position, as shown in the image. • A similar procedure has to be followed for movement of the Push/Pull Bar’s Handle press the push pin button and stretch out the Handle sideways.
- Page 12 Pneumatic wheels movement through Handle Telescopic Steering Bar...
- Page 13 Bazooka (Not Included) Setup • Mount the Bazooka (Not Included) on the Euro Adapter, as shown in the image. NOTE: Once the Bazooka is mounted, tighten the check nut with your hand, then lock the lever for more security, as shown in the images. The check nut rotates anti-clockwise, and the more you turn it, the tighter it will be.
- Page 14 • Unlock the red locking lever of the Fluid Head (Not Included) and remove its Quick Release Plate. • Attach the Quick Release Plate with the Cam- (Not Included). • After attaching the plate, tighten the screw using a screwdriver. •...
- Page 15 Push/Pull Bar Direction Change Assembly • Loosen the knob of the Platform Dolly and insert the Push/ Pull Bar in the provided holes. NOTE: The Push/ Pull Bar can also be mounted on the other side of the Dolly. • After attaching the Push/Pull Bar, re-tighten the knob to secure the attachment.
- Page 16 • With the help of the knob, the Tripod Holder Spiked Feet is properly secured on the platform of the Foldable Dolly. • Attach the other two Spiked Feet Holders using the same process. • Mount the Tripod Stand (Not Included) on the Foldable Dolly.
- Page 17 Track Wheels Setup • Attach the Track Wheels with the Foldable Dolly. • After attaching the Track Wheels, secure them by tightening the knob. Feature: The camera dolly ensures seamless in- tegration and smooth movement on the track system having a distance of 24.5 inches. •...
- Page 18 Head and use the locking lever to secure the camera. • The Setup is fully assembled on the 100mm bowl, as shown in the image. YOUR PROAIM FOLDABLE FLOOR TRACK VIDEO CAMERA PLATFORM DOLLY ALL DRESSED UP AND READY TO GO! (SHOWN WITH OPTIONAL ACCESSORIES)
- Page 19 Warranty: We offer one year warranty for our products from date of purchase. Within this period of time, we will repair it without charge for labor or parts. Warranty doesn’t cover transportation costs nor does it cover a product subjected to misuse or accidental damage. Warranty repairs are subjected to inspection and evaluation by us.
Need help?
Do you have a question about the DL-FLDB-01 and is the answer not in the manual?
Questions and answers