Advertisement
Installation and mounting manual for EK-XRES 100/140 Revo
This product is intended for installation only by expert users. Please consult with a qualified technician for installation. Improper installation may result in damage to your equipment. EK Water Blocks assumes no liability
whatsoever, expressed or implied, for the use of these products, nor their installation. The following instructions are subject to change without notice. Please visit our web site at
installation of this product please read important notice, disclosure and warranty conditions printed on the back of the box.
Before you start using this product please follow these basic guidelines:
1.
Please carefully read the manual before through before beginning with the installation process!
2.
The EK HFB and EK-ACF type fittings require only a small amount of force to screw them firmly in place since the liquid seal is ensured by the rubber o-ring gaskets.
3.
The use of corrosion inhibiting coolants is always recommended for any liquid cooling system.
STEP 1: PREPARING THE PUMP
Unscrew the ribbed threaded ring that attaches the Laing pump's
original factory top and the main pump core housing with motor.
Store the original top, the original o-ring gasket and the attaching
ring in a safe place.
Twist LEFT to unscrew!
STEP 3 (optional): USING POLYETHER ANTI-VORTEX FOAM or EK-HD Tube:
EK-XRES 100 Revo D5 series pump top / reservoir comes preinstalled with Anticyclone by default. In case your system suffers from excessive vortex issues, air bleeding
problems or if the pump is sucking in air you may replace the anticyclone with the enclosed polyether foam or EK-HD Tube. There are two ways to use the polyether anti-
vortex foam:
Default configuration
This is the default configuration of
EK-XRES 100 Revo D5
reservoir.
STEP 4: MOUNT THE EK-XRES 100/140 Revo D5 RESERVOIR INTO THE COMPUTER CHASSIS
By default the EK-XRES Revo D5 ships with EK-Revo D5 Holder. This holder is meant to be installed directly on the computer chassis. User may need to drill 4 (four) Φ5 mm
(enclosed sticker with designated holes) holes through the metal chassis using electric power drill if there are no appropriate mounting holes available. EK recommends users
to find an appropriate position in your computer chassis to install the EK-XRES Revo D5 pump assembly.
To sucessfully install the EK-XRES Revo D5 pump/reservoir assembly please complete the following steps:
1. Find an appropriate position for the unit inside (or perhaps outside) of your computer
chassis; drill mounting holes if needed. Sticker with designated holes position is enclosed.
Before drilling stick it to the Computer chassis.
2. Attach the EK-Revo D5 Holder to the computer chassis metal frame using enclosed 4
(four) M4x10 DIN7984 screws and PVC washers. Secure the screws using enclosed Allen
key 2.5mm..
3. Insert the rubber dumper into the EK-Revo D5 Holder. Insert the pump into the dumper.
And secure it using two M3x12 DIN7984 screws from the side of the holder. Use enclosed
2mm Allen key. Your installation is now complete.
(already done by EK)
Factory original
pump top
D5 pump body with
motor
PE foam – use whole
Use the foam as a whole to replace
series
the Anticyclone.
Mounting holes
D5 Series Reservoir
STEP 2: INSTALLING THE XRES D5
1. Install the EK-XRES Revo D5 onto the pump main motor housing. Make sure you install EK
provided 61x3mm o-ring gasket! Reseat the gasket if needed.
You can rotate the pump and use it in any direction except upside-down to best suit your
installation.
2. Secure the pump on the EK-XRES 100 Revo D5 using enclosed M74 Nut.
61x3mm sealing gasket (OR)
Rubber Dumper
PE foam – trim to fit recess
Trim the foam to size to fit into the
desired inlet recess on the EK-XRES
Revo D5 main body.
M4x10 screw+
(already done by EK)
Insert enclosed o-ring 16x2 into the
groove inside center hole and insert
enclosed EK-HD Tube 12/16.
Computer chassis
metal plate
washer
EK-Revo D5 Holder
th
Released on 28
of August, 2015.
www.ekwb.com
for updates. Before
EK-XRES D5
D5 pump body with motor
NUT M74
Pump holder
Screws M3x12
HD Tube
Outlet
Inlet
Advertisement
Table of Contents

Related Manuals for ekwb EK-XRES 140 Revo D5 Series


Summary of Contents for ekwb EK-XRES 140 Revo D5 Series
- Page 1 This product is intended for installation only by expert users. Please consult with a qualified technician for installation. Improper installation may result in damage to your equipment. EK Water Blocks assumes no liability whatsoever, expressed or implied, for the use of these products, nor their installation. The following instructions are subject to change without notice. Please visit our web site at www.ekwb.com for updates. Before installation of this product please read important notice, disclosure and warranty conditions printed on the back of the box.
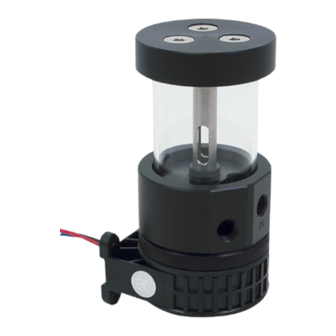
- Page 2 EK-XRES Revo D5 PWM (incl. pump) series reservoir pump combo featured 3 (three) G1/4 threaded ports on the main body of which 1 (one) is inlet and other is outlet. When reservoir is in upright position outlet port is positioned lower than inlet port. EKWB recommends using EK-ACF fittings with the EK-XRES Revo D5 PWM series reservoir pump combo units.
Need help?
Do you have a question about the EK-XRES 140 Revo D5 Series and is the answer not in the manual?
Questions and answers