Table of Contents
Advertisement
Quick Links
Advertisement
Table of Contents

Related Manuals for ekwb EK-MSI Z690 Carbon EK X


Summary of Contents for ekwb EK-MSI Z690 Carbon EK X
- Page 1 EK-MSI Z690 Carbon EK X MONOBLOCK USER GUIDE...
- Page 2 The following instructions are subject to change without notice. Please visit our web site at www. ekwb.com for updates. Before installation of this product please read important notice, disclosure and warranty conditions printed on the back of the box.
-
Page 3: Table Of Contents
TABLE OF CONTENT BOX CONTENTS PREPARING YOUR MOTHERBOARD REMOVING STOCK COOLER APPLYING THERMAL COMPOUND CUTTING THERMAL PADS PLACING THERMAL PADS ON THE MOTHERBOARD PLACING THE BLOCK ON TO MOTHERBOARD ATTACHING BLOCK ON THE MOTHERBOARD TECHNICAL SPECIFICATIONS AND WATER BLOCK PARTS CONNECTING THE D-RGB LED STRIP REQUIRED TOOLS SUPPORT AND SERVICE... -
Page 4: Box Contents
Allen Key 2.5mm (1 pc) M2.5 Adhesive Washer 0.7 mm (5 pcs) EK-MSI Z690 Carbon EK X EK TIM Thermal Grease (1 pc) Thermal PAD F 1.0 mm - (120x16mm) (2 pcs) Thermal PAD F 0.75 mm - (120x16mm) (2 pcs) -
Page 5: Preparing Your Motherboard
PREPARING YOUR MOTHERBOARD REMOVING STOCK COOLER Remove all encircled screws. There are four (4) MOSFET screws on MOSFET the back of the motherboard that needs to be removed. Additional SCREWS two (2) screws needs to be removed to remove the plastic I/O cover. Store the screws for later use. -
Page 6: Applying Thermal Compound
APPLYING THERMAL COMPOUND Thermal PAD F 0.75 mm (120 x 16 mm) Apply thermal compound on CPU heat spreader (IHS) with enclosed EK-TIM Ectotherm thermal grease. The quantity of about two rice 120 mm 0.75 mm grains is just about right (like shown on the picture on the left side). There is no need to cover the whole IHS. -
Page 7: Placing The Block On To Motherboard
PVC WASHER STEP 1 STEP 2 Place the EK-MSI Z690 Carbon EK X Monoblock series water block to the motherboard or vice versa (as shown on the photo). Make sure that mounting holes are aligned. STEP 2... -
Page 8: Attaching Block On The Motherboard
ATTACHING BLOCK ON THE MOTHERBOARD M2.5x5 AX1 SCREW PVC WASHER STEP 1 M4x12 DIN7984 Prior to fastening the screws please make sure the mounting holes on the motherboard’s circuit board are aligned with the water block. LGA 1700 Mosfet part: Use four (4) M2.5 x 5 AX1 Screws with PVC washers. BACKPLATE Tighten the screws evenly. -
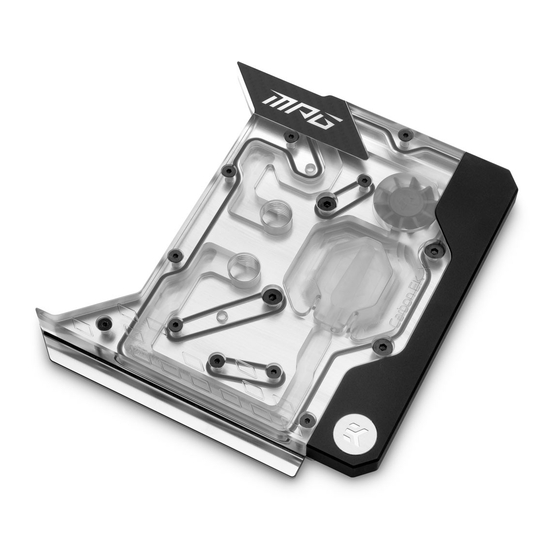
Page 9: Technical Specifications And Water Block Parts
TECHNICAL SPECIFICATIONS AND WATER BLOCK PARTS Position EAN Description Quantity 104178 Top Plate (Plexi) 104200 Plexi insert 104170 Copper plate N (Ni) 104172 Copper plate W (Ni) 104174 Copper plate M2 (Ni) – SSD 104175 Metal plate (Stainless Steel) 104177 Metal Pin (Ni) 104181 Stickout (Bl. - Page 10 Position EAN Description Quantity 102571 OR 4x1.5 100078 Coldplate OR 104213 Carbon EK X O-Ring Set - 10 -...
-
Page 11: Connecting The D-Rgb Led Strip
CONNECTING THE D-RGB LED STRIP Plug the 3-pin connector from Monoblock D-RGB LED strip to the motherboard. Please ensure that the arrow indicated on the connector is plugged into the +5V line as indicated on your motherboard. Failure to do so will damage your motherboard or LED strip. D-RGB HEADER RGB HEADER STEP 1... -
Page 12: Support And Service
SUPPORT AND SERVICE In case you need assistance or wish to order spare parts or a new mounting mechanism, please contact: https://www.ekwb.com/customer-support/ For spare parts orders, refer to the page with “TECHNICAL SPECIFICATIONS AND PRODUCT PARTS” where you can find the EAN number of each part you might need.
Need help?
Do you have a question about the EK-MSI Z690 Carbon EK X and is the answer not in the manual?
Questions and answers