Reolink Duo 2 WiFi - Security Camera Manual
- Operational instruction (19 pages) ,
- Manual (8 pages) ,
- Quick start manual (8 pages)
Advertisement
Introduction
Duo 2 WiFi can stitch two views into one with no gap, realizing true two-camera combination. It brings a smoother image with double field of view and without overlapping part! It can not only detect moving people and vehicles, but also detect your cats and dogs. Also, with the built-in mic and speaker, it's quite easy to respond to the coming person, car, or pet.
Specs

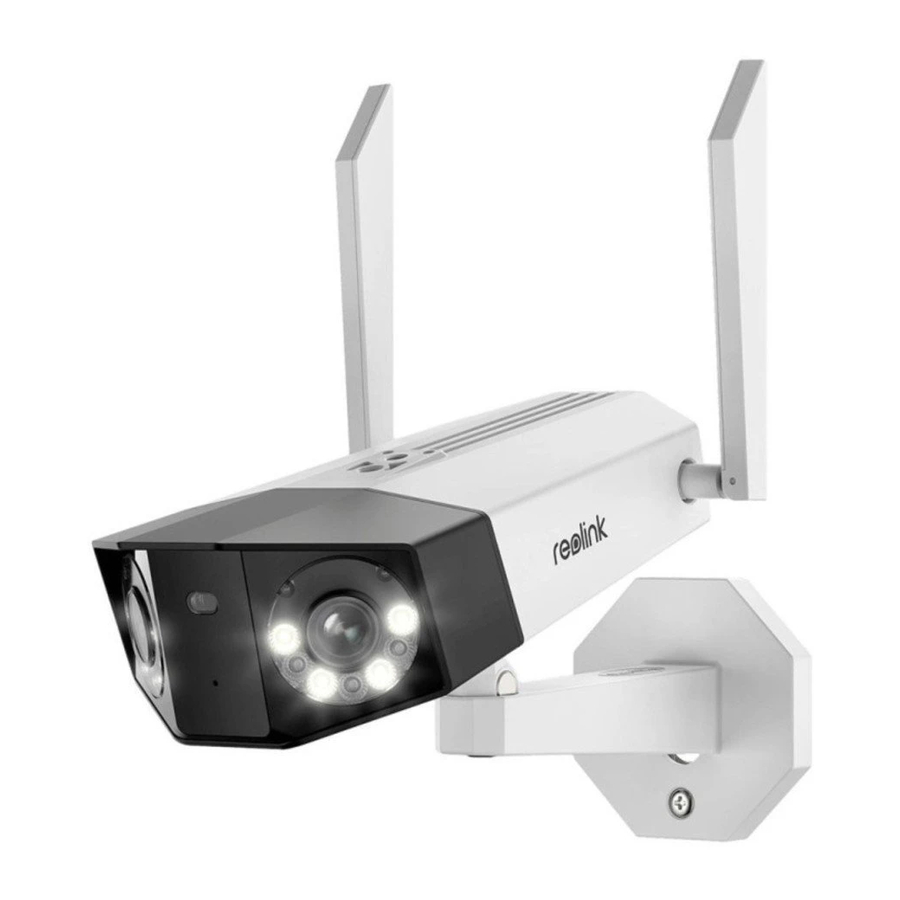
| 1 | Antenna |
| 2 | Lens |
| 3 | Daylight Sensor |
| 4 | Spotlight |
| 5 | IR LED |
| 6 | Mic |
| 7 | Mounting Bracket |

| 1 | Micro SD Card Slot |
| 2 | Reset Button |
| 3 | Speaker |
Setup and Install
Set up the Camera
What's in the Box
 Note: The package content may vary and update with different version and platforms, please take the below information only for a reference. And the actual package content are subject to the latest information on the product selling page.


Set up the Camera on the App
For initial setup, please power on this camera with a DC adapter and also connect the camera to your router LAN port with an Ethernet cable, and then follow the steps to set up your camera. Please make sure your camera and your phone are on the same network.
Step 1. Tap the icon ![]() on the top right corner.
on the top right corner.

Note: If you've enabled the Add Device Automatically option on the App's Settings page, you can tap this device on the Devices page and turn to Step 3 directly.
Step 2. Scan the QR code on the back of the camera. You may tap Light to enable a flashlight when setting up the camera in a dark environment.
If the phone doesn't respond, please tap Input UID/IP and then manually type in the UID (16-digit characters under the QR code of the camera). Then tap Next.

Step 3. Create the password for your camera. Then tap Next.

4. Name your camera. Then tap Next.

Step 5. Tap the WiFi network you want to join, and enter the password of the WiFi network.
Then tap Save to save the network configuration.

6. Done! The initialization of your camera is finished.

Note: If this device can't connect to the WiFi after you remove the Ethernet cable, you can connect it to the router again and see if it can pass the WiFi test.
Install the Camera
We offer you guides on different scenes in which the camera could be installed. Check out them respectively.
Mount the Camera on the Wall
Step 1. Screw the camera onto the wall.
- Drill holes in accordance with the mounting template.
- Next, secure the mounting plate to the wall with the upper two screws and hang the camera on it.
- Then fix the camera in position with the lower screw.

![warning]() Note: Use the drywall anchors included in the package if needed.
Note: Use the drywall anchors included in the package if needed.

Step 2. Adjust the camera's view.
Loosen the adjustment screw on the security mount with the screwdriver (also included in the box) and turn the camera until you get the ideal view.

Step 3. Fix the camera firmly.
Tighten the adjustment screw to keep the camera still.

Done! You've successfully mounted your camera on the wall.
Mount the Camera on the Ceiling
Step 1. Screw the camera onto the ceiling.
- Drill holes in accordance with the mounting template.
- Next, secure the mounting plate on the ceiling with the upper two screws and hang the camera on it.
- Then fix the camera in position with the lower screw.


Step 2. Adjust the camera's view.
Loosen the adjustment screw on the security mount with the screwdriver (also included in the box) and turn the camera until you get the ideal view.

Step 3. Fix the camera firmly.
Tighten the adjustment screw to keep the camera still.

Finished! Now you may start using your camera.

Documents / ResourcesDownload manual
Here you can download full pdf version of manual, it may contain additional safety instructions, warranty information, FCC rules, etc.
Advertisement


Need help?
Do you have a question about the Duo 2 WiFi and is the answer not in the manual?
Questions and answers