Advertisement
Available languages
Available languages
Quick Links
Advertisement

Subscribe to Our Youtube Channel
Related Manuals for Reolink Duo 2 PoE


Summary of Contents for Reolink Duo 2 PoE
- Page 1 E N/D E /FR /I T/E S Operational Instruction Apply to: Reolink Duo 2 PoE / WiFi...
-
Page 2: Table Of Contents
Content What's in the Box What's in the Box Camera Introduction Camera Antenna * Waterproof Lid Power Adapter * Connection Diagram Set up the Camera Mount the Camera Power * Mounting Plate Mounting Hole Troubleshooting Ethernet Cable Extension Cable Template Specification Notification of Compliance Quick Start Guide... -
Page 3: Camera Introduction
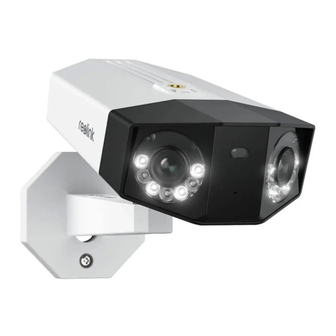
Camera Introduction WiFi Camera Antenna Micro SD Card Slot Daylight Sensor Reset Button *Press the reset button with a pin to restore factory settings. Lens Spotlights Infrared Lights Speaker Mounting Bracket Waterproof Lid Ethernet Port Power Port... - Page 4 PoE Camera Daylight Sensor Micro SD Card Slot Lens Reset Button *Press the reset button with a pin to restore factory settings. Spotlights Infrared Lights Mounting Bracket Speaker Waterproof Lid Ethernet Port Power Port NOTE: Actual camera appearance and components are subject to the model you purchased.
-
Page 5: Connection Diagram
Connection Diagram Set up the Camera Before initial setup, follow the steps below to connect your camera. Download and Launch the Reolink App or Client software, and follow the onscreen 1. Connect the camera to a LAN port on your router with an Ethernet cable. instructions to finish initial setup. 2. Use the power adapter to power on the camera. • On Smartphone Camera Power Adapter Scan to download the Reolink App. Router Power Cable Network Cable NOTE: • When setting up the WiFi camera, you need to follow the onscreen instructions to finish the NOTE: The connection diagram takes the WiFi camera as an example and also apply to WiFi configuration first. the PoE camera. For PoE Camera, please power the camera with a PoE Switch/Injector/ • If you are connecting the PoE camera to a Reolink PoE NVR, please set up the camera via Reolink PoE NVR or a DC 12V power adapter. (not included in the package) -
Page 6: Mount The Camera
Mount the Camera Mount the Camera to the Wall The following installation methods take the WiFi camera as an example and also apply to Installation Tips the PoE camera. • Do not face the camera towards any light sources. • Do not point the camera towards a glass window. Or, it may result in poor image quality because of the window glare by infrared LEDs, ambient lights or status lights. • Do not place the camera in a shaded area and point it towards a well-lit area. Or, it may result in poor image quality. To ensure best image quality, the lighting condition for both the camera and the capture object shall be the same. • To ensure better image quality, it’s recommended to clean the lens with a soft cloth from time to time. • Make sure the power ports are not directly exposed to water or moisture and not blocked by dirt or other elements. • With IP waterproof ratings, the camera can work properly under conditions like rain and snow. However, it doesn't mean the camera can work underwater. • Do not install the camera at places where rain and snow can hit the lens directly. Drill holes in accordance with the mounting template, Secure the mounting plate to the wall • The camera may work in extreme cold conditions as low as -25°C. Because when it is with the upper two screws and hang the camera on it. Then lock the camera in position powered on, the camera will produce heat. You may power on the camera indoors for a few with the lower screw. - Page 7 Mount the Camera to Ceiling To get the best field of view, loosen the adjustment screw on security mount and turn the camera. Drill holes in accordance with the mounting template, Secure the mounting plate to the wall Stiffen the adjustment with the upper two screws and hang the camera on it. Then lock the camera in position screw to lock the with the lower screw. camera.
-
Page 8: Troubleshooting
Troubleshooting • Power on the camera with another working 12V 2A DC adapter and see if it works. To get the best field Camera is not Powering on of view, loosen the If these won’t work, contact Reolink adjustment screw on Support. If your camera is not powering on, please security mount and try the following solutions: turn the camera. Picture is not Clear For PoE Camera If the picture from the camera is not clear, • Make sure your camera is powered on please try the following solutions: properly. The PoE camera should be powered by a PoE switch/injector, a • Check the camera lens for dirt, dust or Reolink NVR or a 12V power adapter. spiderwebs, please clean the lens with a • If the camera is connected to a PoE... -
Page 9: Specification
General in a particular installation.If this equipment (2) this device must accept any does cause harmful interference to radio Simplified EU Declaration interference received, including Dimension: 195 x 103 x 56mm or television, reception, which can be of Conformity interference that may cause undesired Weight: 590g determined by turning the equipment off operation. Changes or modifications not Operating Temperature: and on, the user is encouraged to try to Reolink declares that the WiFi camera is in expressly approved by the party -10°C~+55°C (14°F~131°F) correct the interference by one or more of compliance with the essential requirements responsible for compliance could void the Operating Humidity: 10% ~ 90% the following measures: and other relevant provisions of Directive user’s authority to operate the equipment. 2014/53/EU, the PoE camera is in • Reorient or relocate the receiving compliance with Directive 2014/30/EU. antenna. NOTE: The following notes are only for • Increase the separation between the WiFi camera. This equipment has been... - Page 10 Use of the product is subject to your responsibly to promote the sustainable agreement to the Terms of Service and reuse of material resources. To return your Privacy Policy Keep out of OPERATING FREQUENCY (For WiFi Version) used device, please use the return and reach of children. (the maximum transmitted power) collection systems or contact the retailer where the product was purchased. They 2412MHz --- 2472MHz (19dBm) can take this product for environmentally End User License Agreement 5150MHz --- 5350MHz (18dBm) safe recycling. 5470MHz --- 5725MHz (18dBm) By using the Product Software that is embedded on the Reolink product, you Limited Warranty agree to the terms of this End User License Agreement (“EULA”) between you and This product comes with a 2-year limited Reolink. warranty that is valid only if purchased from Reolink Official Store or a Reolink authorized reseller.
- Page 11 Contenu de la boîte Contenu Contenu de la boîte Introduction de la caméra Caméra Antenne * Couvercle étanche Adapteur d’alimentation * Diagramme de connexion Configurer la caméra Monter la caméra Câble Ethernet Rallonge électrique Plaque de montage Gabarit de trou de montage Dépannage Spécifications Avis de Conformité...
- Page 12 Introduction de la caméra Caméra WiFi Antenne Fente pour carte Micro SD Capteur de lumière du jour Bouton de réinitialisation *Appuyez sur le bouton de réinitialisation avec Microphone une aiguille pour restaurer les paramètres d’usine. Objectif Projecteur Lumières infrarouges Haut-parleur Support de montage Couvercle étanche Port Ethernet Port d’alimentation Français Français...
- Page 13 PoE Caméra Capteur de lumière du jour Fente pour carte Micro SD Microphone Objectif Bouton de réinitialisation *Appuyez sur le bouton de réinitialisation avec une aiguille pour restaurer les paramètres d’usine. Projecteur Lumières infrarouges Support de montage Haut-parleur Couvercle étanche Port Ethernet Port d’alimentation NOTA : L’apparence et les composants réels de la caméra dépendent du modèle que vous avez acheté. Français Français...
- Page 14 Diagramme de connexion Configurer la caméra Avant la configuration initiale, suivez les étapes ci-dessous pour connecter votre caméra. Télécharger et lancer l’application ou le Client Reolink, et suiver les instructions à l’écran pour 1. Connectez la caméra à un port LAN de votre routeur avec un câble Ethernet. terminer la configuration initiale. 2.Utilisez l’adaptateur d’alimentation pour allumer la caméra. Adapteur • Sur Smartphone Caméra d’alimentation Scanner pour télécharger l’application Reolink. Routeur Câble d’alimentation Câble réseau NOTA : NOTA : Le diagramme de connexion prend la caméra WiFi comme exemple et s’applique • Lors de la configuration de la caméra WiFi, vous devez d’abord suivre les instructions à également à la caméra PoE. Pour la caméra PoE, veuillez alimenter la caméra avec un l’écran pour terminer la configuration WiFi. commutateur/injecteur PoE, NVR PoE Reolink ou un adaptateur d’alimentation CC 12V. • Si vous connectez la caméra PoE à un Reolink PoE NVR, veuillez configurer la caméra via (non inclus dans le paquet) l’interface NVR. Français Français...
- Page 15 Monter la caméra Monter la caméra au mur • Assurez-vous que le port d’alimentation ne sont pas directement exposés à l’eau ou à l’humidité et qu’il n’est pas bloqués par la Les méthodes d’installation suivantes prennent la caméra WiFi comme exemple et Conseils d’installation saleté ou d’autres éléments. s’appliquent également à la caméra PoE. • Avec l’étanchéité IP, la caméra peut fonctionner correctement dans des • Ne pas mettre la caméra vers des conditions telles que la pluie et la neige. sources lumineuses. Cependant, cela ne signifie pas que la • Ne pas diriger la caméra vers la vitre. caméra peut fonctionner sous l’eau. Sinon, cela peut entraîner une mauvaise • Ne pas installer la caméra dans des qualité d’image en raison de la lumière vive endroits où la pluie et la neige peuvent de la vitre causée par les projecteurs, les frapper directement l’objectif. lumières ambiantes ou LED d’état. • La caméra peut fonctionner dans des • Ne pas placer la caméra dans une zone conditions de froid extrême jusqu’à -25°C.
- Page 16 Monter la caméra au plafond Pour obtenir le meilleur champ de vision, desserrez la vis de réglage sur le support de sécurité et tournez la caméra. Percez des trous conformément au gabarit de montage, fixez la plaque de montage au mur avec les deux vis supérieures et accrochez la caméra dessus. Verrouillez ensuite la caméra Serrez la vis de réglage en position avec la vis inférieure. pour fixer la caméra. Français Français...
- Page 17 • Allumez la caméra avec un autre vision, desserrez la Si votre caméra ne s’allume pas, veuillez adaptateur CC 12V/2A et voyez si cela vis de réglage sur le fonctionne. essayer les solutions suivantes : support de sécurité et tournez la caméra. Pour caméra PoE Si ces solutions ne fonctionnent pas, veuillez contacter le support Reolink. • Assurez-vous que votre caméra est correctement alimentée. La caméra PoE L’image n’est pas claire doit être alimentée par un commutateur/ injecteur PoE, le Reolink NVR ou un Si l’image de la caméra n’est pas claire, adaptateur d’alimentation 12V. veuillez essayer les solutions suivantes : • Si la caméra est connectée à un dispositif Serrez la vis de réglage PoE comme indiqué ci-dessus, connectez pour fixer la caméra. • Vérifiez l’objectif de la caméra pour la la caméra à un autre port PoE et voyez si...
- Page 18 Poids : 590 g approuvés par la partie responsable de la être déterminé en éteignant et en allumant • Restaurez la caméra aux paramètres Température de fonctionnement : conformité pourraient annuler l’autorité de l’équipement, l’utilisateur est encouragé à d’usine et vérifiez à nouveau. -10°C~+55°C (14°F~131°F) l’utilisateur à utiliser l’équipement. essayer de corriger l’interférence par une Humidité de fonctionnement : 10 % ~ 90 % ou plusieurs des mesures suivantes : Si ces solutions ne fonctionnent pas, NOTA : Les notes suivantes ne concernent veuillez contacter le support Reolink. • Réorienter ou relocaliser l’antenne de que la caméra WiFi. Cet équipement a réception été testé et déclaré conforme aux limites • Augmenter la séparation entre Spécifications applicables aux appareils numérique de l’équipement et le récepteur. Avis de Conformité classe B, conformément à la partie 15 des • Brancher l’équipement sur une prise règles de la FCC. Ces limites sont conçues de courant d’un circuit différent de celui Fonctionnalité du matériel pour fournir une protection raisonnable auquel le récepteur est connecté.
- Page 19 été Conditions et Confidentialité non contrôlé. Cet équipement doit être acheté. Ils peuvent prendre ce produit pour installé et utilisé avec une distance conformité UE simplifiée L’utilisation du produit est soumise à votre un recyclage sans danger pour minimale de 20 cm entre le radiateur et acceptation des Conditions d’utilisation Reolink déclare que la caméra WiFi est l’environnement. votre corps. et de la Politique de confidentialité conforme aux exigences essentielles et . Tenez-le hors de la aux autres dispositions pertinentes de la Garantie limitée FREQUENCE DE FONCTIONNEMENT portée des enfants. Directive 2014/53/UE, la caméra PoE est (Pour la version WiFi) conforme à la Directive 2014/30/UE.
Need help?
Do you have a question about the Duo 2 PoE and is the answer not in the manual?
Questions and answers