Table of Contents
Advertisement
Quick Links
1.800.561.8187
Short Form Instructions
Fill the membrane cap assembly before the first use. Follow Set Up
instructions before the first use. Read the entire manual before the first use.
Calibrate daily. Polarize weekly.
„ Dissolved Oxygen Measurement Procedure
1. Press ON/OFF button to turn meter ON.
2. Place TRACER in sample. Stir.
3. Wait for reading to stabilize.
4. Record result.
5. Press ON/OFF to turn meter off.
6. Rinse electrode.
7. Replace electrode cap.
www.
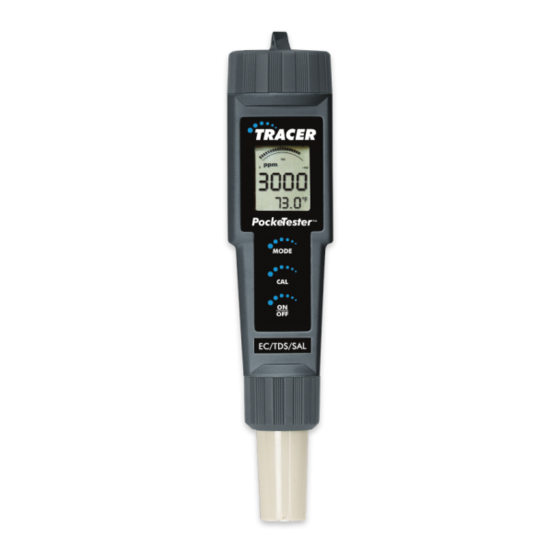
TRACER
DO PockeTester
Code 1761
FILL -
Before first use
POLARIZE -
CALIBRATE -
See Pages 9-12
WARNING! This set contains chemicals
that may be harmful if misused. Read
cautions on individual containers care-
fully. Not to be used by children except
under adult supervision.
information@itm.com
.com
TM
Weekly
Daily
Advertisement
Table of Contents

Related Manuals for LaMotte TRACER PockeTester


Summary of Contents for LaMotte TRACER PockeTester
- Page 1 TRACER DO PockeTester Code 1761 FILL - Before first use POLARIZE - Weekly CALIBRATE - Daily See Pages 9-12 Short Form Instructions Fill the membrane cap assembly before the first use. Follow Set Up instructions before the first use. Read the entire manual before the first use. Calibrate daily.
-
Page 2: Parts And Accessories
Display 2000 count, Dual function 3 ½ digit LCD with Bar graph Display size 24 mm x 20 mm Sensor Polarographic type Membrane Bonded membrane cap with threaded fitting Operating Temp. Range 0 to 50°C (32 to 122°F) ATC Range 0 to 50°C (32 to 122°F) Salinity Compensation 0 to 50 ppt in 1 ppt (part per thousand) increments Altitude compensation 6000 m (0 to 20,000 ft) in 300m (1000 ft) increments... -
Page 3: Meter Description
METER DESCRIPTION „ Front Panel Description 1. Battery compartment cover 2. LCD Display 3. MODE button 4. CAL button 5. ON/OFF button 6. Electrode Retaining Collar 7. Dissolved Oxygen Sensor 8. Bonded membrane cap assembly 9. Membrane & cathode (Note: The Electrode storage cap is not shown) „... - Page 4 will keep the electrode polarized and enables the user to make immediate measurements within a 7 day period without waiting for the electrode to re- polarize. Each time the Tracer is turned on, the polarization timer is reset and the 7 day polarization period is initiated. A small asterisk at the bottom right corner of the display will indicate that the polarization timer circuit is active only when the meter is off.
- Page 5 dissolved oxygen in parts per million (ppm). To change the mode: 1. Press and hold MODE for 2 seconds and the display will begin to scroll through the available units of measure : ◊ % saturation ◊ dissolved oxygen, mg/L (milligrams per liter) ◊...
- Page 6 3. Press CAL at any time to stop the data retrieval process and return the meter to the normal measurement mode. „ Clearing Stored Readings 1. With the meter ON press and hold ON/OFF for 4 seconds. 2. When ‘clr’ is shown on the display the memory is cleared. SET UP „...
- Page 7 and desirable since it will minimize air pockets in the solution. Air pockets can compromise dissolved oxygen measurements. If the electrode solution does not overflow, an insufficient amount was added. Repeat the process with a new membrance cap assembly if air bubbles or air pockets are visible when the meter is inverted.
-
Page 8: Dissolved Oxygen Measurement
2. Slowly stir the sample with the electrode and wait for the reading to stabilize. This may take a while, depending on the electrode history. 3. Press CAL until ‘CAL’ is shown on the display. The readings will blink ‘101.7’ and ‘SA’... -
Page 9: Operational Matrix
OPERATIONAL MATRIX Function / Power Mode Required Button Press Sequence Resulting Action Status Setting ON/OFF Momentary press of the ON/OFF button Water Saturated Place electrode in electrode cap. Press & Air Calibration hold CAL button for 2 seconds. Zero Calibration On Place electrode in zero DO solution. -
Page 10: Troubleshooting
Enter Altitude Press CAL button twice quickly. Unit Compensation enters Salinity Mode. Press CAL or SAL button for 2 seconds to enter Altitude Compensation Mode. ‘Ald” is displayed. Unit times out in 5 seconds if no button is pressed, reverts to previous mode. Changing Momentary press of the MODE button. -
Page 11: Maintenance
Unstable readings Insufficient electrolyte Replace electrolyte, and in probe. Air bubbles membrane cap assembly visible when probe inverted. Electrolyte is depleted Readings drift down Insufficient Stir sample with meter or move probe in sample stirring Slow response Dirty or damaged Replace electrolyte and membrane membrane cap... -
Page 12: Warranty
WARRANTY From the date of shipment: instrument for 1 year, probe for 6 months. For support, contact LaMotte’s Technical Support at This warranty does not apply to damages because of user misuse, operation outside of specification, improper maintenance or repair, or unauthorized modification.
Need help?
Do you have a question about the TRACER PockeTester and is the answer not in the manual?
Questions and answers