VEVOR KQ-1K Operating Manual
Vacuum pump and chamber kit
Hide thumbs
Also See for KQ-1K:
- Operating manual (128 pages) ,
- Original instruction (96 pages) ,
- Operating manual (16 pages)
Advertisement
Quick Links
Technical Support and E-Warranty Certificate www.vevor.com/support
VACUUM PUMP AND CHAMBER KIT
OPERATING MANUAL
We continue to be committed to provide you tools with competitive price.
"Save Half", "Half Price" or any other similar expressions used by us only represents an
estimate of savings you might benefit from buying certain tools with us compared to the major
top brands and doses not necessarily mean to cover all categories of tools offered by us. You
are kindly reminded to verify carefully when you are placing an order with us if you are
actually saving half in comparison with the top major brands.
Advertisement

Related Manuals for VEVOR KQ-1K


Summary of Contents for VEVOR KQ-1K
- Page 1 Technical Support and E-Warranty Certificate www.vevor.com/support VACUUM PUMP AND CHAMBER KIT OPERATING MANUAL We continue to be committed to provide you tools with competitive price. "Save Half", "Half Price" or any other similar expressions used by us only represents an estimate of savings you might benefit from buying certain tools with us compared to the major top brands and doses not necessarily mean to cover all categories of tools offered by us.
- Page 2 CustomerService@vevor.com This is the original instruction, please read all manual instructions carefully before operating. VEVOR reserves a clear interpretation of our user manual. The appearance of the product shall be subject to the product you received. Please forgive us that we won't inform you again if there are any technology or software updates on our product.
- Page 3 This product is subject to the provision of European Directive 2012/19/EU. The symbol showing a wheelie bin crossed through indicates that the product requires separate refuse collection in the European Union. This applies to the product and all accessories marked with this symbol. Products marked as such may not be discarded with normal domestic waste but must be taken to a collection point for recycling electrical and electronic devices.
-
Page 4: Safety Precautions
SAFETY PRECAUTIONS The warnings, precautions, and instructions provided in this manual cannot cover all possible situations that may occur. It is the operator's responsibility to exercise common sense and caution while using the equipment. Safety guidelines for handling your vacuum pump ... - Page 5 Safety guidelines for using the vacuum pump and chamber kit Pressure and Explosion Risk: Do not pump the vacuum chamber or increase pressure inside the tank higher than atmospheric pressure, as this can lead to an explosion. Weight and Lid Placement: Do not put any additional weight on the lid of the chamber.
- Page 6 15. Never put fingers or other objects inside the pump impeller cover. Keep your hair, clothing, gloves, and other objects that could get into the impeller away from moving parts. 16. Do not expose the device to rain or excessive moisture. 17.
-
Page 7: Getting Started
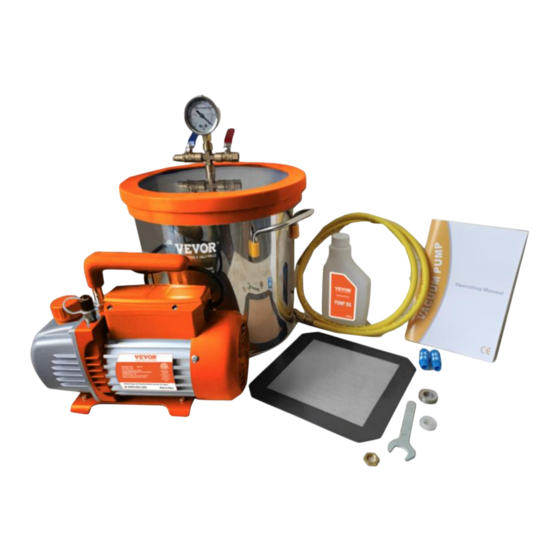
GETTING STARTED Vacuum pump and Chamber Kit package contents Model KQ-1K Voltage 120V/60Hz 220-240V/50Hz Free Air Displacement Ultimate Vacuum Motor Intake Fitting 1/4"SAE male; 1/4"SAE male; Oil Capacity Dimensions 290*120*220 290*120*220 Net Weight - 6 -... - Page 8 Vacuum Gauge Charging Hose Toughened Glass Manual Bucket Lid Vacuum Chamber Vacuum Pump Denoiser Silicone Pad Installation tools - 7 -...
- Page 9 Package Content List 3.5 CFM Vacuum Pump & 3 3.5CFM Vacuum Pump & 5 Gallon Set Name Gallon Vacuum Chamber Set Vacuum Chamber Set Vacuum Pumpx1 Vacuum Pumpx1 3 Gallon Vacuum Chamberx1 5 Gallon Vacuum Chamberx1 Charging Hosex1 Charging Hosex1 Toughened Glass Bucket Lidx1 Toughened Glass Bucket Lidx1 Packing...
- Page 10 OPERATION GUIDE FOR USING VACUUM PUMP AND CHAMBER KIT Installation of vacuum pump and chamber kit Check the parts: Before starting the installation process, make sure you have all the necessary parts to install the chamber lid and connect it to the vacuum pump.
- Page 11 Pulling vacuum and vacuum treatment Prepare the Item for treatment: Before beginning the procedure, prepare the item by stabilizing it or removing any excess moisture, dust, or debris. Place the Item in the Chamber: Put the item to be treated in the vacuum chamber, ensuring that it is positioned in the center and doesn't touch the sides or lid.
- Page 12 sucked into the chamber with pressure. If the pointer of the vacuum gauge is not in the null position or cannot pull the vacuum to the maximum, open the black cover on the gauge top and calibrate the pointer to normal. After vacuuming, slowly turn on the outlet valve to prevent damage to the vacuum gauge.
-
Page 13: Troubleshooting Guide
TROUBLESHOOTING GUIDE Problem Possible Cause Correction 1.Insufficient oil 1.Add oil up to the oil level line 2.Dirty oil 2.Replace the oil 3.Oil intake is blocked 3.Clean the oil intake or filter Low Degree Of Vacuum 4.Hose or gas inlet is clogged 4.Check the connecting pipes 5.Pump is unsuitable for the 5.Get a suitable pump for the application... - Page 14 EXPLODED DIAGRAM OF THE PUMP Made In China - 13 -...
- Page 16 Technical Support and E-Warranty Certificate www.vevor.com/support...
Need help?
Do you have a question about the KQ-1K and is the answer not in the manual?
Questions and answers