
Related Manuals for v.link VL2-DVD800


Summary of Contents for v.link VL2-DVD800
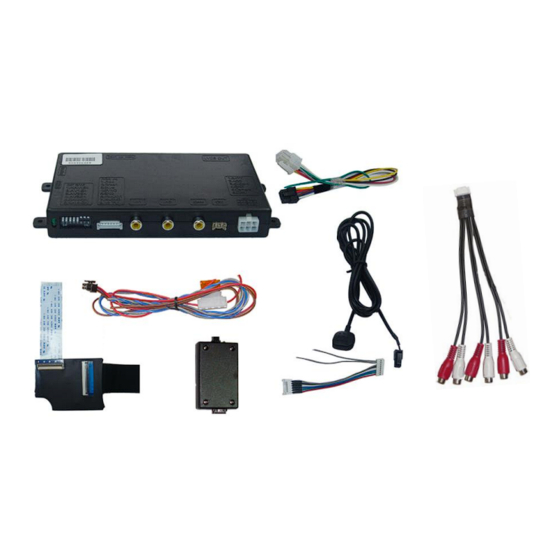
- Page 1 Video-inserter VL2-DVD800 for Opel DVD800/CD500 navigation systems Video-inserter with 2 video + RGB + rear-view camera input and GMLAN control audiostrada.pl Version 05.02.2013...
-
Page 2: Table Of Contents
Contents 1. Prior to installation 1.1. Delivery contents 1.2. Checking the compatibility of vehicle and accessories 1.3. Dip-switch settings 1.3.1. Enabling the interface’s video inputs (Dip 1-3) 1.3.2. Rear-view camera settings (dip 5) 1.3.3. Vehicle selection (Dip 7-8) 2. Installation 2.1. -
Page 3: Prior To Installation
Product features RGB-input for after-market navigation 2 video-inputs for after-market devices (e.g. DVD-Player, DVB-T tuner, …) Built-in audio-switch Rear-view camera input, automatically switching Factory rear-view camera compatible Switching of video through factory infotainment buttons ... -
Page 4: Checking The Compatibility Of Vehicle And Accessories
1.2. Checking the compatibility of vehicle and accessories Requirements Vehicle Buick LaCrosse, Opel Insignia, Astra J, Meriva 2010 Navigation/Radio DVD800/CD500 Limitations Video only The interface inserts ONLY video into the infotainment, for sound use the factory audio AUX-input. Not compatible with DVD900 navigation systems! 1.3. -
Page 5: Vehicle Selection (Dip 7-8)
1.3.3. Vehicle selection (dip 7-8) Choose the vehicle/navigation/monitor the interface is to be installed to and set dip 7 through 8 according to the below table. Vehicle/ Navigation Dip 7 Dip 8 7“-monitor with resolution 800x480 6.5”- monitor with resolution 480x240 2. -
Page 6: Connections
2.2. Connections backside monitor panel Keypad for video External source switching daughter PCB (additional option) Audio cable LVDS interface- cable Plug external daughter PCB between flex cable and flex cable socket of the monitor panel Video-interface Pin-definition white 6pin power connector Pin 1 (yellow) - Battery +12V Pin 3 (grey) -
Page 7: Installation Procedure - Function Check
2.3. Installation procedure – function check Follow the below procedure using the “Connections” scheme from chapter 2.2. as reference. Before the installation of the sources and the interface we recommend a first quick connection of the interface and test run to ensure that vehicle and product are compatible. Due to changes in production of the vehicle manufacturer there is always the possibility of incompatibility. -
Page 8: Picture Settings
2.4. Picture settings After installing the sources the picture settings can be changed using a pen on the buttons of the video interface. Press the MENU button to open settings menu on the OSD and to switch to the next setting. UP and DOWN change the corresponding values. The buttons are embedded in the housing to avoid accidental changes during or after installation. -
Page 9: Interface Operation
3. Interface operation 3.1. By factory infotainment buttons Some of the factory buttons can be used to execute interface functions. Press MUTE button (more than 1 second) to activate the interface video. Each press (more than 1 second) will switch to the next enabled input. If all inputs are enabled the order is: ...
Need help?
Do you have a question about the VL2-DVD800 and is the answer not in the manual?
Questions and answers