Daktronics Sportsound SSR-200 Installation Instructions
Hide thumbs
Also See for Sportsound SSR-200:
- Quick start manual (5 pages) ,
- Operation manual (38 pages) ,
- Quick start manual (5 pages)
Advertisement
Quick Links
Sportsound SSR-200 Installation & Commission Work Instructions
Task (Major Step)
Process / Key Points /
THESE ARE FIELD SERVICE INSTALLATION INSTRUCTIONS. REFER TO SUBCONTRACTOR SCOPE OF WORK FOR THEIR RESPONSIBILITIES.
1. Receive Equipment
a. Receive equipment.
b. Store all front-end control equipment in a secure location
F Unload equipment from truck
F Store control equipment in secure location
2. Inspect Equipment
a. Visually inspect the rack equipment for deep scratches,
F Inspect rack equipment for damage
b. Contact PM/PC about any damaged goods.
F Report damage to PM
3. Set up Control System
a. Remove front, top, and back covers from the rack.
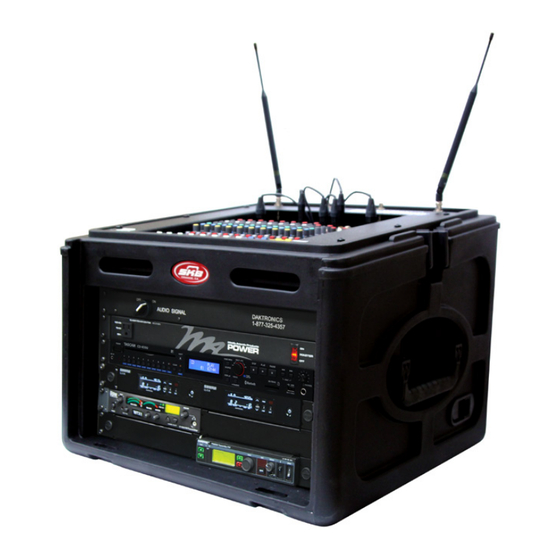
b. With optional wireless receiver(s) installed, position
F Remove front, top, and back covers
F Set antennas at 45° angles
F Connect Announcer's Interface to rack
F Connect microphone and headphones
c. Connect interface cable between announcer's
F Plug in power for announcer's interface
d. Set up wired microphone w/ stand and plug into
e. Power announcer's interface with provided power
4. Plug in and Turn on Rack
a. Plug control system into a power receptacle.
F Connect rack to power
F Connect rack to sound system input
b. Route the XLR cable from AUDIO OUT on the side of the
F Turn on power to the rack
c. Switch the power strip to the ON position.
F Turn AUDIO SIGNAL switch to ON
d. Switch the AUDIO SIGNAL to ON.
5. Inspect All Source Equipment LEDs
a. Verify mixer POWER LED is on.
b. Verify Announcer's Interface POWER LED is on.
F Verify mixer POWER LED is on
c. Verify one or both wireless receivers (if present) are
F Verify Announcer's Interface POWER LED is
on
d. Verify CD player is on.*
e. Verify optional Hearing Assist power is on.*
F Verify wireless receiver(s) powered on
f. Verify optional In-Ear Monitor power is on.*
F Verify CD player is on
F Verify optional Hearing Assist System is on
F Verify optional In-Ear Monitor System is on
6. Test Mixer & I/O Panel
a. Connect the LTIBLOX device between input 2 on the
F Connect music source into input 2
F Set channel gain
b. Verify PFL is enabled only on channel 2, use the GAIN
F Turn up channel fader
c. Turn up channel fader to desired level.
F Turn up maser fader
d. Turn up master fader to desired level.
e. Repeat testing for other inputs.
F Repeat testing for other inputs
f. Set controls back to original settings unless they were set
F Reset controls back to original settings
DD2298507
Rev 03
01 April 2019
Reason Why (if applicable)
or press box
to prevent damage or
theft. Control system
should not be left in an outdoor environment.
dents, chips, etc.
antennas outward at 45° angles as shown in image 3b.
Optional In-Ear Monitor antenna points straight up.
Optional ADA Hearing Assist antenna is wall mounted;
mount and connect based on manufacturer's
recommendation (within 25' of control rack).
interface and MIC 1 and AUX 1 on side of rack.
announcer's interface MIC 1 INPUT jack. Plug
headphones or headset into 1/4" jack.
supply. Use the outlets in the rack if possible.
Power for the control rack (and fiber box) shall NOT be
on the same circuit as the All Sport console.
rack to a wall plate (or fiber conversion box).
powered on.*
*LCDs display text when powered on.
mixer and a laptop/smartphone, and then play an
appropriate song.
knob to set channel gain, and then turn off PFL.
improperly.
Products Involved:
Tools Required / Reference Materials
SSR-200
•
Video Playlist: SSR-200 Control System
•
SSR-200 Gen II Operation Manual
(DD3159816)
This manual includes all drawings
referenced below.
3b. SSR-200 Rack
Section 3 of Operation Manual
•
•
SSR-200 Gen II Quick Start Guide
(DD3159573)
•
Section 3 of Operation Manual
•
SSR-200 Gen II Quick Start Guide
3c & 4b. Connections
(DD3159573)
5a. Mixer Power
Section 3 of Operation Manual
•
•
SSR-200 Gen II Quick Start Guide
(DD3159573)
201 Daktronics Drive
Brookings, SD 57006-5128
www.daktronics.com/support
800.325.8766
3c. Interface Cable
Fiber Box
(outdoor)
OR
Side View
Announcer's
Interface (Gen II)
5b. Announcer's
Interface Power
Page 1 of 2
Wall Plate
(indoor)
5c. Wireless Mic
Power
Advertisement

Related Manuals for Daktronics Sportsound SSR-200


Summary of Contents for Daktronics Sportsound SSR-200
- Page 1 Sportsound SSR-200 Installation & Commission Work Instructions Page 1 of 2 Products Involved: Task (Major Step) Process / Key Points / Reason Why (if applicable) Tools Required / Reference Materials SSR-200 THESE ARE FIELD SERVICE INSTALLATION INSTRUCTIONS. REFER TO SUBCONTRACTOR SCOPE OF WORK FOR THEIR RESPONSIBILITIES.
- Page 2 Sportsound SSR-200 Installation & Commission Work Instructions Page 2 of 2 Task (Major Step) Process / Key Points / Reason Why (if applicable) Tools Required / Reference Materials 7. Test Announcer’s Interface a. Talk into the microphone and ensure both MOMENTARY...
Need help?
Do you have a question about the Sportsound SSR-200 and is the answer not in the manual?
Questions and answers