Table of Contents
Advertisement
Owner's Manual
We'd like to take a moment to thank you for purchasing the DA-2496 (Digital
Audio Interface).
This document explains how to set up the DA-2496 system.
To avoid problems and enjoy optimal performance, please carefully follow
the setup instructions described in this document.
201b
Before using this unit, carefully read the sections entitled: "IMPORTANT
SAFETY INSTRUCTIONS" (p. 2), "USING THE UNIT SAFELY" (p.3, 4),
and "IMPORTANT NOTES" (p.5, 6). These sections provide important
information concerning the proper operation of the unit. Additionally, in
order to feel assured that you have gained a good grasp of every feature
provided by your new unit, this manual should be read in its entirety. The
manual should be saved and kept on hand as a convenient reference.
Copyright © 2001 ROLAND CORPORATION
All rights reserved. No part of this publication may be reproduced in any form
without the written permission of ROLAND CORPORATION.
Advertisement
Table of Contents

Subscribe to Our Youtube Channel
Related Manuals for Edirol DA-2496


Summary of Contents for Edirol DA-2496
- Page 1 Owner’s Manual We’d like to take a moment to thank you for purchasing the DA-2496 (Digital Audio Interface). This document explains how to set up the DA-2496 system. To avoid problems and enjoy optimal performance, please carefully follow the setup instructions described in this document.
-
Page 3: Using The Unit Safely
(except when this manual provides specific instructions directing you to do so). Refer all servicing to your retailer, the nearest Roland / EDIROL Service Center, or an authorized Roland / EDIROL distributor, as listed on the "Information"... - Page 4 • Before using the unit in a foreign country, consult with your retailer, the nearest Roland Service Center, or an authorized Roland distributor, as listed on the "Information" page.
-
Page 5: Important Notes
IMPORTANT NOTES 291b In addition to the items listed under “IMPORTANT SAFETY INSTRUCTIONS” and “USING THE UNIT SAFELY” on pages 3 and 4, please read and observe the following: Power Supply • Do not use this unit on the same power circuit with any device that will generate line noise (such as an electric motor or variable lighting system). - Page 6 MD recorders and other consumer digital-audio equipment as a copyright-protection feature.) • Do not use this unit for purposes that could infringe on a copyright held by a third party. Roland assumes no responsibility whatsoever with regard to any infringements of third-party copyrights arising through your use of this unit.
-
Page 7: Table Of Contents
Names of things and what they do ...10 DA-2496... 10 DA-PCI ... 13 DA-PCI (French language) ... 14 Preparations for using the DA-2496 ...15 Installing the DA-PCI... 16 Installation de la carte DA-PCI (French language)... 17 Driver installation and settings ... 18 DA-PCI Control Panel...32... -
Page 8: Before You Begin
Before you begin Check the included items The DA-2496 is shipped with the following items. After opening the package, please check that each of the included items is found. If any items are missing, contact the dealer from whom you purchased the DA-2496. -
Page 9: Main Features
The Direct Monitor function lets you monitor in real time without passing the data through your computer application. MIDI interface functionality The DA-2496 provides a set of MIDI IN/OUT connectors, allowing it to be connected to MIDI devices for synchronization via MTC. Included drivers The included dedicated drivers for the DA-2496 support ASIO 2.0 for both... -
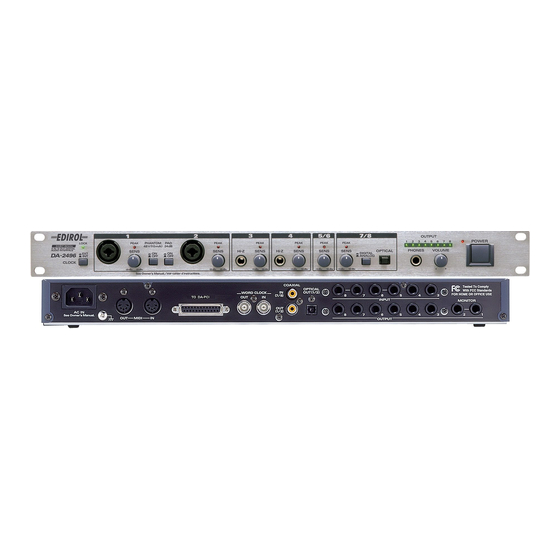
Page 10: Da-2496
DA-2496 Front panel fig.DA-2496 1. Clock select switch This switches between the DA-2496’s own internal clock and an external clock. (p. 40) 2. LOCK indicator This will light when word clock is being received correctly from the DA-PCI or another digital device. - Page 11 Control Panel, refer to DA-PCI Control Panel (p. 32). 8. Headphone volume knob This knob adjusts the volume of the headphones. 9. OUTPUT indicators When audio data is being output from the DA-2496, the corresponding output indicators will light to show the level. 10. Power switch fig.1-01aE This turns the power of the DA-2496 on/off.
-
Page 12: Rear Panel
5. WORD CLOCK IN/OUT connector Use this when synchronizing with a digital recorder. This is also used in order to synchronize multiple DA-2496 units that are used together. For details, refer to Synchronization settings (p. 41) 6. COAXIAL IN jack (7/8) Use this jack to input digital audio from a CD/MD/DAT. -
Page 13: Da-Pci
Set SW1:OFF and SW2:OFF. 3. Clock In, Clock Out connectors Use these to synchronize multiple DA-2496 units. To avoid the risk of damage to internal components that can be caused by static electricity, please carefully observe the following whenever you handle the board. -
Page 14: Da-Pci (French Language)
2. DP switch Set SW1:OFF and SW2:OFF. 3. Clock In, Clock Out connectors Use these to synchronize multiple DA-2496 units. Veuillez suivre attentivement les instructions suivantes quand vous manipulez la carte afin d’éviter tout risque d’endommagement des pièces internes par l’électricité... -
Page 15: Preparations For Using The Da-2496
Preparations for using the DA-2496 Note for Windows 2000 users If you are using Windows 2000, you must log on as Administrator when installing the VSC multi-pack. In addition, you must use the following procedure to check the Driver Signing Options settings. -
Page 16: Installing The Da-Pci
Fasten the DA-PCI using the screws that had held the PCI slot cover in place. Re-attach the cover of your computer. You must install the DA-PCI driver before you connect the DA-2496. Now please continue with Driver installation and settings (p. 18). • When circuit board installation is complete, double-check your work. -
Page 17: Installation De La Carte Da-Pci (French Language)
Fixer la carte DA-PCI à l'aide des vis qui retenaient le couvercle de la fente PCI. Remettre le boîtier de l'ordinateur en place et le fixer. Il faut installer le pilote de la carte DA-PCI avant de connecter la DA-2496. Poursuivre maintenant l'installation et le paramétrage du pilote (p. 18). 913(F) •... -
Page 18: Driver Installation And Settings
Driver installation and settings * You must install the DA-PCI driver before connecting the DA-2496. * Disconnect the DA-2496 from the DA-PCI before you start up your computer. The procedure for installation and settings will depend on your system. Please proceed to the explanation for your system. - Page 19 “OK.” Installation will be completed, and the Windows desktop will appear. Next, you need to connect the DA-2496 to the DA-PCI. Proceed to Connecting the DA-2496 to the DA-PCI (p. 23) . Windows 98 Start up your computer.
- Page 20 When the display indicates “Windows has finished installing the software that your new hardware device requires,” click “OK.” The Windows desktop will appear. Next, you need to connect the DA-2496 to the DA-PCI. Proceed to Connecting the DA-2496 to the DA-PCI (p. 23).
- Page 21 When the “Hardware type” dialog box appears, click “Sound, video, and game controllers,” and click [Next]. Insert the DA-PCI Driver CD-ROM (included with the DA-2496) into the CD-ROM drive. fig.3-4e When the “Select device driver” dialog box appears, click “Have disk.”...
- Page 22 When the dialog box shown at the right appears, click “Yes” to restart Windows. Next, you need to connect the DA-2496 to the DA-PCI. Proceed to Connecting the DA-2496 to the DA-PCI (p. 23). If the “Driver update notification” dialog box appears, click “Yes.”...
- Page 23 Turn off the power of your computer. Connect the PCI cable included with the DA-2496 to the “TO DA-PCI” connector on the rear of the DA-2496. Then connect the other end of the DA-PCI cable to the connector of the DA-PCI.
- Page 24 Preparations for using the DA-2496 Audio/MIDI input and output settings * If you are using the DA-2496 with a sequencer or similar application, please read the operation manual for your application. fig.017 Open the Control Panel. Click the Windows Start button, and from Settings, select the Control Panel.
- Page 25 Click [OK]. The window will close. This completes the basic settings for the DA-2496 and DA-PCI. If you want to use the Direct Monitor function of the digital mixer built into the DA-PCI, refer to DA-PCI Control Panel (p. 32).
- Page 26 Macintosh Use the following procedure to install the DA-PCI driver. * Disconnect the DA-2496 from your computer before starting up Macintosh. * Exit all applications before you begin installing the driver. * The DA-PCI OMS Driver included on the disc is provided as an additional module that allows the DA-PCI to be used with OMS.
- Page 27 ASIO Edirol DA-PCIv3: This is an ASIO 1 driver for Digital Performer, Cubase 3, Reason, Reaktor, Unity, and Peak. fig.04-34 Copy the Edirol DA-PCI Control Panel to your hard disk (e.g., desktop). Restart Mac OS. Preparations for using the DA-2496...
- Page 28 Turn off the power of your computer. Connect the PCI cable included with the DA-2496 to the “TO DA-PCI” connector on the rear of the DA-2496. Then connect the other end of the DA-PCI cable to the connector of the DA-PCI.
-
Page 29: Oms Settings
When the search ends, verify that DA-PCI 16 is listed in the OMS driver setting dialog box, and click [OK]. Preparations for using the DA-2496 If you are using the DA- 2496 with a sequencer, do not disconnect the MIDI cable connected to the DA-2496 while a song is playing back. - Page 30 Preparations for using the DA-2496 Verify that the DA-PCI 16 is listed in the OMS MIDI device setting dialog box. Click [OK]. A dialog box will appear, allowing you to save the settings file. Input the desired filename, and click [Save].
- Page 31 OMS Setup. If the Save dialog box appears, input a filename, and click [Save]. Sound Manager settings * If you are using the DA-2496 with a sequencer or similar application, please read the operation manual for your application. Sound Manager is the standard Mac OS digital sound specification. Sound Manager can handle only 16-bit two-channel input and output.
-
Page 32: Da-Pci Control Panel
DA-2496’s inputs to the DA-PCI from the DA-PCI to the DA-2496’s outputs DA Out Wav In from the DA-2496’s inputs to the application’s inputs Wav Out from the application to the Monitor Mixer and the DA-PCI Mixer Input from the application to the Monitor Mixer fig.BLOCK-DIAGLAM2... -
Page 33: Da-Pci Control Panel
DA-PCI Control Panel Monitor Mixer Here you can adjust the input levels of the signals that are sent from WavOut to the Monitor Mixer. fig.05-01 1. Save button Assign a name to settings and save them. (For the Macintosh version, this can be selected from the File menu.) 2. -
Page 34: Hardware Settings
• Int. Clock... The DA-PCI will be the word clock master. In this case, set the DA-2496’s clock select switch to the INT (internal) position. • Ext. Clock... The DA-PCI will synchronize to the DA-2496 (or to another DA-PCI). In this case, set the DA-2496 (or the other DA-PCI) to EXT (external). - Page 35 Int. Clock Sample Rate Select the sampling frequency when the Master Clock is set to Int. Clock. • Reset Rate When Idle... If this is checked, the sampling frequency will return to the value specified by the control panel when the device is released by the software.
-
Page 36: Troubleshooting
Is the DA-2496 clock select switch set correctly? Audio cannot be input or output unless the DA-2496’s clock select switch and the DA-PCI Control Panel “Master Clock” setting are set correctly. For details, refer to Connecting the DA-2496 to DA- PCI (p. - Page 37 When Word Clock is used, jitter from the master device may cause noise to occur. If you are using Word Clock with another digital device as the master and the DA-2496 and DA- PCI as the slave, jitter from the master device may cause noise to occur.
- Page 38 Troubleshooting When using Cubase on Windows 2000, can’t specify the audio output destination By performing the following procedure, you will be able to use four sets of audio with Cubase. 1. From the Panels menu, select VST Inputs. 2. Click the buttons indicated as DA In 1/2–DA In 7/8 and Mixer In L/R, getting them to light.
-
Page 39: About The Drivers
About the drivers When you install the DA-PCI, you will be able to use the following drivers. Refer to the manual for your software, and use the driver that best suits your environment. WDM driver Use this driver if you have set SONAR (or a similar application) to WDM driver mode. This provides the optimal audio performance, with high audio quality and low latency. - Page 40 DA-PCI. OMS MIDI driver (Macintosh) This is an OMS driver for handling DA-2496 MIDI on the Macintosh. OMS 2.3.3 or higher is required in order to use this. Opcode Corporation’s OMS 2.3.3 MIDI driver is included on the DA- PCI Driver CD-ROM.
-
Page 41: Synchronization Settings
Using the DA-2496/DA-PCI as the master Set both the DA-2496 and DA-PCI to Internal. In this case, even if a signal of a sampling frequency differing from that of the master is received at the digital input jack of the DA-2496, it will be converted into the sampling frequency of the master, and sent to the computer. - Page 42 Synchronization settings Using another hard disk recorder as the master Set both the DA-2496 and DA-PCI to External. In this case, the sampling frequency of the DA-2496 and DA-PCI will be the same as the sampling frequency specified on the master device.
-
Page 43: Synchronization Settings For Multiple Da-Pci Units
In order to synchronize multiple DA-PCI units, the sampling frequency of all DA-PCI and DA-2496 units must match, and they must be using the same word clock. As shown below, there are two ways in which the word clock can be shared. -
Page 44: Block Diagram
Block diagram... -
Page 45: Main Specifications
Main Specifications DA-2496 Singnal Processing AD conversion: 24-bit, 64 times oversampling (8 channels) DA conversion: 24-bit, 128 times oversampling (8 channels) Sampling Rate CLOCK SOURCE = INTERNAL: 22.05, 32, 44.1, 48, 88.2, 96 kHz CLOCK SOURCE = EXTERNAL: 32, 44.1, 48, 88.2, 96 kHz... - Page 46 Main Specifications Connectors Input jacks 1, 2: XLR type (phantom power), 1/4" TRS phone type Input jacks 3, 4: 1/4" TRS phone type, 1/4" phone type (Hi-Z) Input jacks 5 to 8: 1/4" TRS phone type Output jacks 1 to 8: 1/4" TRS phone type Headphones jack: Stereo 1/4"...
-
Page 47: Compliance Information Statement
Unauthorized changes or modification to this system can void the users authority to operate this equipment. This equipment requires shielded interface cables in order to meet FCC class B Limit. DECLARATION OF CONFORMITY Compliance Information Statement DA-2496 Model Name : Digital Audio Interface Type of Equipment :... - Page 48 Information When you need repair service, call your nearest EDIROL/Roland Service Center or authorized EDIROL/Roland distributor in your country as shown below. HONG KONG AUSTRALIA Tom Lee Music Co., Ltd. EDIROL Australia Pty. Ltd. Service Division 72 Central Avenue Oak Flats NSW 2529...
Need help?
Do you have a question about the DA-2496 and is the answer not in the manual?
Questions and answers