Table of Contents
Advertisement
Available languages
Available languages
Getting Started
Erste Schritte
Démarrage
Operazioni preliminari
Guía de iniciación
Thank you for purchasing the UA-5 USB Audio Interface.
Before using this unit, carefully read the sections entitled: "USING
THE UNIT SAFELY" and "IMPORTANT NOTES" (Getting
Started p. 2- p.4). These sections provide important information
concerning the proper operation of the unit. Additionally, in order
to feel assured that you have gained a good grasp of every feature
provided by your new unit, Getting Started should be read in its
entirety. The manual should be saved and kept on hand as a
convenient reference.
Copyright © 2001 ROLAND CORPORATION
All rights reserved. No part of this publication may be reproduced in any
form without the written permission of ROLAND CORPORATION.
Advertisement
Table of Contents

Related Manuals for Edirol UA-5


Summary of Contents for Edirol UA-5
- Page 1 Démarrage Operazioni preliminari Guía de iniciación Thank you for purchasing the UA-5 USB Audio Interface. Before using this unit, carefully read the sections entitled: “USING THE UNIT SAFELY” and “IMPORTANT NOTES” (Getting Started p. 2- p.4). These sections provide important information concerning the proper operation of the unit.
- Page 2 Refer all servicing to your retailer, the nearest Roland Service Center, or an autho- rized Roland distributor, as listed on the “Information” page. • Never use or store the unit in places that are: •...
- Page 3 • Before using the unit in a foreign country, consult with your retailer, the nearest Roland Service Center, or an authorized Roland distributor, as listed on the “Information” page. • DO NOT play a CD-ROM disc on a conventional audio CD player. The resulting sound may be of a level that could cause permanent hearing loss.
-
Page 4: Important Notes
(including padding) that it came in, if possible. Otherwise, you will need to use equivalent packaging materials. • Use a cable from Roland to make the connection. If using some other make of connection cable, please note the following precautions. -
Page 5: Table Of Contents
Troubleshooting... 52 Anschlsse herstellen und Treiber installieren (Windows) ... 66 Anschlüsse herstellen und Treiber installieren (Macintosh) ... 85 Hinweise zum Einsatz des UA-5 ... 93 Fehlerbehebung ... 103 Installation des pilotes et connexions (Windows) ... 117 Installation des pilotes et connexions (Macintosh) ... 136 Guide des applications de l’UA-5 ... -
Page 6: Features Of The Ua-5
Features of the UA-5 24bit/96kHz processing High Quality Sound The UA-5 offers a complete digital recording and playback, ready to use on both desktop and laptop computers, with professional quality audio resolution up to 24- bit/96 kHz. * * 24-bit/96 kHz processing only when using ASIO or WDM driver... -
Page 7: What Is Usb
Any infringement on the rights of a third party you may commit using the UA-5 is solely your own responsibility, and no responsibility shall be born by the manufacturer of the UA-5. -
Page 8: Check The Contents Of The Package
Macintosh–> p. 34 * Please use only the included USB cable. If you require a replacement due to loss or damage, please contact a “EDIROL/Roland Service Center” listed in the “Information” section at the end of this manual. UA-5 Driver CD-ROM fig.03-3... -
Page 9: Attaching The Ferrite Core
Ferrite Core The ferrite core should be attached to the cord of your headphones. Attaching the Ferrite Core Before using headphones, make sure to attach the ferrite core. If you will be using headphones, please follow the instructions below to clamp the supplied ferrite core over the cord. -
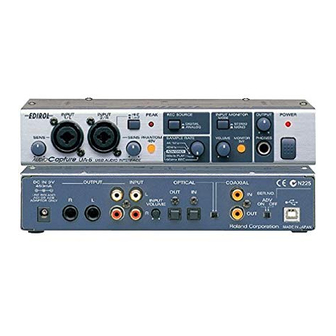
Page 10: Names Of Things And What They Do
Phantom power switch off (dark). Supplying phantom power to a dynamic mic or audio playback device will cause malfunction. For details on your type of mic, refer to the manual that came with your mic. (The phantom power supply of the UA-5 is DC 48V, maximum 10mA.) 2. - Page 11 UA-5's power off, then on again. About the Sampling frequency select switch setting • The UA-5’s Sampling frequency select switch must be set to match the sampling frequency of the application you are using. • 96 kHz REC and 96 kHz PLAY are valid only in Advanced mode (when the Mode select switch is ON).
- Page 12 Names of things and what they do fig.04-1 8. Input monitor stereo/mono select button This button selects whether the input signal from the Input jacks 1 and 2, Input jacks 3 and 4, and the Digital input connector will be monitored in stereo or in MONO.
-
Page 13: Rear Panel
In order for the settings to take effect, you must exit all applications and turn on the power of the UA-5 once again. On (Advanced mode) The driver included with the UA-5 will be used to record/play/edit audio on sequencer software or waveform editing software with high audio quality and stable timing. -
Page 14: Block Diagram
Names of things and what they do fig.04-2 21. Digital output connector (optical) Connect a coaxial cable here when you want to digitally output an audio signal to a digital recorder such an MD or DAT. 22. Input jacks 3 and 4 adjustment volume Adjusts the Input level of Input jacks 3 and 4. -
Page 15: Getting Connected And Installing Drivers (Windows)
Advanced mode The UA-5 will operate in this mode when the rear panel Mode select switch is turned ON. The special driver included on the UA-5 Driver CD-ROM will be used, allowing audio to be recorded/played/edited with high quality and stable timing. -
Page 16: Installing The Special Driver
ADVANCE (mode select) switch. * In order for the setting of the ADVANCE (mode select) switch to take effect, you must exit all sequencer software and other applications that use the UA-5, switch off the UA-5, then turn it back on again. -
Page 17: Installing The Driver
Installing the driver The WDM driver and the MME driver can be installed using the same procedure. With the UA-5 disconnected, start up Windows. Disconnect all USB cables except for a USB keyboard and USB mouse (if used). Log on to Windows as a user with administrative privileges (such as Administrator). - Page 18 Also close any open windows. If you are using virus checking or similar software, be sure to exit it as well. Insert the CD-ROM. Insert the UA-5 Driver CD-ROM into the CD-ROM drive of your computer. fig.05-4e_30 Open the “Run...” dialog box.
- Page 19 Set the UA-5’s mode select switch to the ON position. Turn on the power of the UA-5. Connect the AC adaptor to the UA-5's AC adaptor jack, and insert the AC adaptor's plug into an AC power outlet. Then, turn on the power of the UA-5.
- Page 20 [OK]. fig.05-10e_30 The “Find new hardware wizard” may be displayed. Verify that “EDIROL UA-5 (WDM)” or “EDIROL UA-5 (MME)” is displayed, and click [Finish]. If the “Find new hardware wizard” dialog box is not displayed, proceed to step 18.
- Page 21 If you changed “File signature verification” If you changed the “File signature verification” setting in step 5, restore the original setting after Windows restarts. After Windows restarts, log in to Windows as a user with administrative privileges, (such as Administrator). In the Windows desktop, right-click the My Computer icon, and from the menu that appears, select Properties.
-
Page 22: Windows Me/98 Users
Also, close any open windows. If you are using a virus checker or similar software, be sure to exit this as well. Prepare the CD-ROM. Insert the UA-5 Driver CD-ROM into the CD-ROM drive of your computer. fig.05-12e_30 Open the Run... dialog box. - Page 23 Set the UA-5’s mode select switch to the ON position. Turn on the power of the UA-5. Connect the AC adaptor to the UA-5's AC adaptor jack, and insert the AC adaptor's plug into an AC power outlet. Then, turn on the power of the UA-5.
- Page 24 Getting Connected and Installing Drivers (Windows) fig.05-16e_30 The New Hardware Found dialog box will appear. In the Copy files from field, type the folder name that is shown in the SETUPINF dialog box, and click [OK]. Once the driver has been installed, the New Hardware Found dialog box will close.
- Page 25 Place the UA-5’s mode select switch in the OFF position. Turn on the power of the UA-5. Connect the AC adaptor to the UA-5's AC adaptor jack, and insert the AC adaptor's plug into an AC power outlet. Then, turn on the power of the UA-5.
-
Page 26: Windows Me Users
Place the UA-5’s mode select switch in the OFF position. Turn on the power of UA-5. Connect the AC adaptor to the UA-5's AC adaptor jack, and insert the AC adaptor's plug into an AC power outlet. Then, turn on the power of the UA-5. -
Page 27: Windows 98 Users
Set the UA-5’s mode select switch to the OFF position. Turn on the power of the UA-5. Connect the AC adaptor to the UA-5's AC adaptor jack, and insert the AC adaptor's plug into an AC power outlet. Then, turn on the power of the UA-5. - Page 28 Getting Connected and Installing Drivers (Windows) fig.05-25e_30 USB-compatible devices will be detected automatically, and the “Add New Hardware Wizard” dialog box will appear. Click [Next]. fig.05-26e_30 When “Select the search method.” appears, select “Search for the best driver for your device (Recommended)”, and click [Next].
- Page 29 fig.05-30e_30 When installation of the USB composite device driver is completed, a dialog box like the one shown here will appear. Click [Finish]. fig.05-33e_30 Next, the USB audio device will be detected automatically, and the “Add new hardware wizard” dialog box will appear.
-
Page 30: Settings And Checking
Double-click the Sound and Multimedia (Multimedia in Windows 98) icon. Click the Audio tab. Set the Preferred device for Playback and the Preferred device for Recording as follows, according to the operating mode of the UA-5. Windows Me/2000 users fig.05-38e_30 fig.05-39e_30 Advanced mode... - Page 31 Accessories - Entertainment - Volume Control. Raise or lower the slider to adjust the volume of the UA-5. If you have installed the Standard driver, the UA-5 can use the Windows volume control to adjust the output volume. Items that can be set Controls the volume of “music CDs”...
-
Page 32: Check Whether There Is Sound
Playing back the sample data Here we will use standard Windows functionality to play back the sample data. The sample data is found on the UA-5 Driver CD-ROM. Prepare the CD-ROM. Insert the UA-5 Driver CD-ROM into the CD-ROM drive of your computer. - Page 33 Vocal: Tahirih Walker, Fumiyo Kawazoe Guitar: Katsuhisa Fujimoto, Idecs, Inc. When playing audio CDs from the computer’s internal CD-ROM drive, or using the UA-5 to play game music Windows 2000 users: Open the System Properties dialog box. Select Start | Settings | Control Panel, and in the Control Panel, double-click the System icon.
-
Page 34: Getting Connected And Installing Drivers (Macintosh)
Advanced mode The UA-5 will operate in this mode when the rear panel Mode select switch is turned ON. The special driver included on the UA-5 Driver CD-ROM will be used, allowing audio to be recorded/played/edited with high quality and stable timing. -
Page 35: Installing The Audio Driver
If you want to use the UA-5 in Advanced mode, proceed to Installing the special driver (p. 35). If you want to use Standard driver mode, proceed to Installing the OS-standard driver (p. 38). Switching between Advanced mode and Standard driver mode... -
Page 36: Installing The Asio Driver
Set the UA-5’s ADVANCE (mode select) switch to the ON position. Switch ON the UA-5’s Power switch. Connect the AC adaptor to the UA-5's AC adaptor jack, and insert the AC adaptor's plug into an AC power outlet. Then, turn on the power of the UA-5. - Page 37 Start up your ASIO-compatible software (e.g., Cubase VST, Logic Audio, Digital Performer, Metro). Open the Audio setting dialog box of your ASIO- compatible software, and select [UA-5 ASIO 16bit] as the ASIO Device. Getting Connected and Installing Drivers (Macintosh) Driver to use 24 bit compatible UA-5 ASIO 1.0 16 bit...
-
Page 38: Installing The Os-Standard Driver
Place the UA-5’s ADVANCE (mode select) switch in the OFF position. Switch ON the UA-5’s Power switch. Connect the AC adaptor to the UA-5's AC adaptor jack, and insert the AC adaptor's plug into an AC power outlet. Then, turn on the power of the UA-5. - Page 39 If these are displayed correctly, driver installation has succeeded. In the File menu, click Exit to close “Apple System Profiler”. If they are not displayed correctly, disconnect the UA-5, wait for about ten seconds, and then repeat the procedure from step 2.
- Page 40 Click the Speaker tab or Speaker Settings. xfig.05-46e_30 With the volume turned down on the UA-5 and on your peripheral audio equipment, click Start test. Test signals will be output from the UA-5; left first, then right, as indicated in the screen.
- Page 41 Playing back the sample data Here we will use standard Macintosh functionality to play back the sample data. The sample data is found on the UA-5 Driver CD-ROM. Prepare the CD-ROM. Insert the AUDIO Capture CD-ROM into the CD-ROM drive of your computer.
-
Page 42: Basic Use
UA-5 application guide This chapter explains the various ways the UA-5 can be connected, and introduces some of its applications. * Before connecting to other devices, you must turn down the volume and turn off the power to avoid malfunction or speaker damage. -
Page 43: Recording A Guitar Or Bass
UA-5 application guide Recording a guitar or bass When you play your guitar along with audio data from your computer to record your performance on a sequencer, only the guitar will be recorded on the computer. fig.guitar.e Signal flow Guitar / Bass... -
Page 44: Recording From A Mic
UA-5 application guide Recording from a mic Dynamic Mic fig.mic.e Microphone INPUT Adjust the input level. fig.mic-con.e When using a condenser mic, turn on the Phantom power switch. * If a device that does not require phantom power is connected to the XLR jacks, you must turn off the Phantom power switch to avoid malfunction. -
Page 45: Recording From A Keyboard
UA-5 application guide Recording from a keyboard Here’s how you can send a keyboard performance as audio data to your computer, and record it on sequencer software. fig.keyboard.e Signal flow Keyboard OUTPUT INPUT Adjust the Turn on if you input level. -
Page 46: Ua-5 Application Guide
UA-5 If the UA-5 is connected as shown above to a device that outputs (“thru-s”) the input audio (such as an MD or DAT that is in record mode), turning on the Input monitor switch will cause the sound to loop between the UA-5 and the other device, causing oscillation and producing an unexpectedly high volume. -
Page 47: Digitally Recording From A Cd/Md/Dat
4 to be mixed with the input signals from the Digital input connector and recorded. Built-in sample rate converter The UA-5 is able to convert the sampling frequency of an incoming digital signal in real time. (See the block diagram on p. 14.) < Example >... -
Page 48: Digitally Recording The Output Of The Ua-5 On An Md
* The UA-5 does not support audio formats of professional digital devices. On the UA-5, the input from the input jacks or the input signal from the Digital input connector cannot be output directly to the Digital output connector. The Digital output connector will always output only the audio signal from the computer. -
Page 49: Adjusting The Audio Latency
Adjusting the audio latency When using the UA-5 in Advanced mode, you can change the driver settings to adjust the latency of the audio. To adjust the latency, change the Buffer Size in the driver settings dialog box. * Latency is the time delay from when an application plays back audio data until the sound is actually heard from an audio device such as the UA-5. -
Page 50: Using Asio Direct Monitor
UA-5 application guide Using ASIO Direct Monitor If you are using the UA-5 from an ASIO2.0-compatible application in Advanced mode, the UA-5’s Input monitor switch can be controlled automatically from the application. As described in “Opening the special driver settings dialog box (p. - Page 51 Open the “Control Panel,” and double-click “Sound and Multimedia.” (In the case of Windows 98, double-click “Multimedia.”) Click the “Devices” tab, and double-click “Audio Devices.” Select “EDIROL UA-5 Audio,” and then click the [Properties] button to open Properties. Click the [Settings] button, and the “EDIROL UA-5 Driver Settings” dialog box will appear.
-
Page 52: Troubleshooting
”Find new hardware wizard” ends before the process is completed • It may take about 15 seconds (or more) after the USB cable is connected for the UA-5 to be detected. • Is the USB cable connected correctly? Make sure that the UA-5 and your computer are correctly connected via a USB cable. - Page 53 • The ADVANCE (mode select) switch may have been turned OFF when the Sampling frequency select switch is set to 96 kHz. If you are using the UA-5 at 96 kHz, turn the ADVANCE (mode select) switch ON. • Is USB enabled on your computer? Refer to the operation manual for your computer, and make sure that USB is enabled.
-
Page 54: Driver Is Not Installed Correctly
• The ADVANCE (mode select) switch may have been turned OFF when the Sampling frequency select switch is set to 96 kHz. If you are using the UA-5 at 96 kHz, turn the ADVANCE (mode select) switch ON. As described in Deleting the special driver (p. 63), delete the USB audio device driver that is installed in your computer, and then install the UA-5 driver once again as described in Getting Connected and Installing Drivers (Windows) (p. -
Page 55: The "Insert Disk" Dialog Box Does Not Appear
“?Composite USB Device,” “?USB Device,” “USB Device,” and “USB composite device” that you find. If you find EDIROL UA-5 USB Driver with a yellow “!” or a red “?” displayed beside it, delete this in the same way. -
Page 56: Operating System Becomes Unstable
• Have you specified the audio data output destination for your playback software? For some software such as Cool Edit Pro LE, you must specify the UA-5 as the audio data output destination. For details on this setting, refer to the operation manual for... -
Page 57: Sound From Devices Connected To The Input Jack Is Not Heard In The Headphones
• Was the driver installed correctly? In order for you to play back audio data via the UA-5, the driver must be installed. For installation and settings, refer to Getting Connected and Installing Drivers (Windows, p. -
Page 58: Volume From A Device Connected To The Input Jacks Is Too Low
Noise is heard during audio playback • Is a mic or guitar still connected? If a mic or guitar is connected to the UA-5, disconnect the mic or guitar, and turn the input sensitivity knob all the way to the left. - Page 59 Sound is interrupted during audio playback / recording • Are many applications running on your computer? If you use many applications or start up other applications during playback, playback may be interrupted, depending on your computer system. Please exit unneeded applications, and try again.
- Page 60 In the System Properties dialog box, click [OK]. Restart Windows. • If you are using the special driver, you can solve this problem in the “EDIROL UA-5 Driver Settings” dialog box. For details, refer to the section “Something is wrong with playback;...
-
Page 61: Digitally Recorded Sound Is Distorted, Is At The Wrong Pitch, Or Contains Noise
“Chooser.”) • In the “Memory” Control Panel, set Virtual Memory to “Off.” • Depending on the way in which you connect to the Internet, use the UA-5 with the following settings. If you connect to the Internet via a LAN cable Use while the LAN cable is connected. -
Page 62: Playback Or Recording Halts Midway Through, And Then Becomes Impossible
The UA-5 implements SCMS (p. 7), so when data containing SCMS flags (e.g., data that’s been digitally copied from a commercial music CD to an MD or other medium) is input via the digital input connector, the UA-5 will not permit this to be recorded on the computer. -
Page 63: Deleting The Special Driver
If you were unable to install the special driver according to the procedure given, the UA-5 may not be recognized correctly by the computer. In this case, use the following procedure to delete the special driver, and then follow the procedure in Getting Connected and Installing Drivers (Windows, p. - Page 64 With all USB cables disconnected, start up Windows. (USB keyboard and USB mouse excepted) Turn on the UA-5's ADVANCE (mode select) switch. After connecting the UA-5 to your computer via a USB cable, turn on the power of the UA-5. Exit all applications before deleting the driver.
-
Page 65: Macintosh Users
Macintosh users Turn off the power of the UA-5. Also disconnect the USB cable (by which the UA-5 is connected) from your Macintosh. From the system extensions folder, drag “USB UA-5 Driver” into the trash to delete it. Drag the ASIO driver that you installed in “Installing the ASIO driver” (p. -
Page 66: Anschlsse Herstellen Und Treiber Installieren (Windows)
Erweiterter Modus Das UA-5 befindet sich in diesem Modus, wenn der Modus-Auswahlschalter an der Rückseite auf ON gestellt wird. Der spezielle Treiber, der sich auf der UA-5 Driver CD-ROM befindet, wird verwendet. Dieser Treiber ermöglicht die Aufnahme/Wiedergabe/Bearbeitung von Audio mit hoher Qualität und stabilem Timing. -
Page 67: Installation Des Speziellen Treibers
* Damit die Einstellung des Schalters ADVANCE (Modusauswahl) wirksam wird, müssen Sie die gesamte Sequenzer-Software und andere Anwendungen beenden, von denen das UA-5 verwendet wird, das UA-5 ausschalten und anschließend erneut einschalten. Installation des speziellen Treibers Die Vorgehensweise bei der Installation hängt dabei von Ihrem System ab. -
Page 68: Installation Des Treibers
Installation des Treibers Der WDM-Treiber und der MME-Treiber können mit Hilfe des gleichen Verfahrens installiert werden. Starten Sie Windows, wobei das UA-5 ausgesteckt sind. Stecken Sie alle USB-Kabel außer der USB-Tastatur und der USB-Maus aus (falls vorhanden). Melden Sie sich in Windows als Benutzer mit Administratorrechten an (z.B. - Page 69 Schließen Sie außerdem alle noch geöffneten Programmfenster. Wenn Sie ein Virenschutzprogramm oder ähnliche Software verwenden, müssen Sie diese ebenfalls beenden. Legen Sie die CD-ROM ein. Legen Sie die UA-5 Driver CD-ROM (UA-5 Treiber-CD) in das CD-ROM-Laufwerk Ihres Computers ein. fig.05-4e_30 Öffnen Sie das Dialogfeld "Ausführen...".
- Page 70 Schalten Sie das UA-5 ein. Schließen Sie den Wechselstromadapter des UA-5 an die Wechselstromadapterbuchse an, anschließend verbinden Sie den Stecker mit einer Steckdose. Schalten Sie danach das UA-5 ein. Wenn in Schritt 5 die Einstellung ”Dateisignaturverifizierung” nicht auf ”Ignorieren” gesetzt...
- Page 71 Der Assistent "Neue Hardware gefunden" wird möglicherweise angezeigt. Prüfen Sie, ob "EDIROL UA-5 (WDM)" oder "EDIROL UA-5 (MME)" angezeigt wird und klicken Sie auf [Beenden]. Wenn das Dialogfeld "Neue Hardware gefunden" nicht angezeigt wird, arbeiten Sie mit Schritt 18 weiter. fig.05-11e_30 Starten Sie Windows neu.
- Page 72 Anschlsse herstellen und Treiber installieren (Windows) Wenn Sie ”Dateisignaturverifizierung” geändert haben Wenn Sie die Einstellungen für ”Dateisignaturverifizierung” in Schritt 5 geändert haben, stellen Sie die ursprünglichen Einstellungen nach dem Neustart von Windows wieder her. Nach dem Neustart von Windows melden Sie sich in Windows als Benutzer mit Administrator-Rechten an (wie z.B.
- Page 73 Schließen Sie außerdem alle noch geöffneten Programmfenster. Wenn Sie ein Virenschutzprogramm oder ähnliche Software verwenden, müssen Sie diese ebenfalls beenden. Halten Sie die CD-ROM bereit. Legen Sie die UA-5 Driver CD-ROM (UA-5 Treiber-CD) in das CD-ROM-Laufwerk Ihres Computers ein. fig.05-12e_30 Öffnen Sie Ausführen... (Dialogfeld).
- Page 74 Dialogfeld SETUPINF in den oberen Bereich des Bildschirms zu verlagern. * Klicken Sie noch nicht auf [OK]. Schließen Sie das UA-5 an Ihren Computer mit einem USB-Kabel an, während der Netzstrom ausgeschaltet bleibt. Bringen Sie den Modus-Auswahlschalter des UA-5 in Position ON.
- Page 75 fig.05-16e_30 Daraufhin wird das Dialogfeld Neue Hardware angezeigt. Geben Sie in das Feld für die Kopierquelle der Datei den Namen des Ordners ein, der im Dialogfeld SETUPINF angezeigt wird, und klicken Sie auf [OK]. Nachdem der Treiber installiert wurde, wird das Dialogfeld Neue Hardware gefunden geschlossen.
- Page 76 Schalten Sie das UA-5 ein. Schließen Sie den Wechselstromadapter des UA-5 an die Wechselstromadapterbuchse an, anschließend verbinden Sie den Stecker mit einer Steckdose. Schalten Sie danach das UA-5 ein. Das UA-5 wird vom Computer automatisch erkannt und der Treiber wird installiert.
- Page 77 Position OFF. Schalten Sie das UA-5 ein. Schließen Sie den Wechselstromadapter des UA-5 an die Wechselstromadapterbuchse an, anschließend verbinden Sie den Stecker mit einer Steckdose. Schalten Sie danach das UA-5 ein. fig.05-23e_30 Windows erkennt anschließend das UA-5 und das Dialogfeld ”Hardware-Assistent”...
- Page 78 Wenn Sie ein Virenschutzprogramm oder ähnliche Software verwenden, müssen Sie diese ebenfalls beenden. Legen Sie die Windows-CD-ROM in das CD-ROM- Laufwerk ein. Schließen Sie das UA-5 an Ihren Computer mit einem USB-Kabel an. Bringen Sie den Modus-Auswahlschalter des UA-5 in Position OFF.
- Page 79 fig.05-25e_30 USB-kompatible Geräte werden automatisch erkannt, und das Dialogfeld ”Hardware- Assistent” wird angezeigt. Klicken Sie auf [Weiter]. fig.05-26e_30 Wenn ”Wählen Sie eine Suchmethode” angezeigt wird, wählen Sie ”Den am besten geeigneten Treiber für das aktuell verwendete Gerät suchen (empfohlen)” und klicken auf [Weiter]. fig.05-27e_30 Ein Dialogfeld ähnlich dem Abgebildeten wird...
- Page 80 Anschlsse herstellen und Treiber installieren (Windows) fig.05-30e_30 Sobald die Installation des Treibers USB- Verbundgerät beendet ist, wird folgendes Dialogfeld angezeigt. Klicken Sie auf [Beenden]. fig.05-33e_30 Anschließend wird das USB Audio Device (USB-Audiogerät) automatisch erkannt, und das Dialogfeld ”Hardware-Assistent” wird angezeigt. Klicken Sie auf [Weiter], und setzen Sie die Installation wie in denSchritten 8–11 beschrieben fort (S.
- Page 81 Multimedia (Multimedia in Windows 98). Klicken Sie auf die Registerkarte Audio. Stellen Sie das Bevorzugte Gerät für die Wiedergabe und das Bevorzugte Gerät für die Aufnahme entsprechend dem Betriebsmodus des UA-5 wie folgt ein. Windows Me/2000-Anwender Windows 98-Anwender fig.05-38e_30 fig.05-39e_30...
- Page 82 Sie können den Regler nach oben oder nach unten verschieben, um die Lautstärke des UA-5 anzupassen. Nachdem Sie den Standard-Treiber installiert haben, kann die Ausgabelautstärke des UA-5 mit der Windows- Lautstärkeregelung angepasst werden. Konfigurierbare Optionen Passt die ”CD-Musik”-Lautstärke des internen CD-ROM-Laufwerks Ihres Wiedergabe Computers an.
- Page 83 Abspielen der Beispieldaten Für die Wiedergabe der Beispieldaten wird Standard- Windows-Funktionalität verwendet. Die Beispieldaten befinden sich auf der UA-5 Driver CD-ROM (UA-5 Treiber-CD). Halten Sie die CD-ROM bereit. Legen Sie die UA-5 Driver CD-ROM (UA-5 Treiber-CD) in das CD-ROM-Laufwerk Ihres Computers ein.
- Page 84 Vocal Multi Tahirih Walker, Fumiyo Kawazoe Gitarre: Katsuhisa Fujimoto, Idecs, Inc. Beim Abspielen von Audio-CDs mit dem internen CD-ROM-Laufwerk des Computers oder wenn das UA-5 für die Wiedergabe der Musik von Spielen verwendet wird Windows 2000-Anwender: Öffnen Sie das Dialogfeld Systemeigenschaften.
-
Page 85: Anschlüsse Herstellen Und Treiber Installieren (Macintosh)
Erweiterter Modus Das UA-5 befindet sich in diesem Modus, wenn der Modus-Auswahlschalter an der Rückseite auf ON gestellt wird. Der spezielle Treiber, der sich auf der UA-5 Driver CD-ROM befindet, wird verwendet. Dieser Treiber ermöglicht die Aufnahme/Wiedergabe/Editierung von Audio mit hoher Qualität und stabilem Timing. - Page 86 Anschlüsse herstellen und Treiber installieren (Macintosh) Wenn Sie das UA-5 im erweiterten Modus verwenden möchten, lesen Sie bitte unter Installation des speziellen Treibers (S. 86) weiter. Wenn Sie das UA-5 im Standardtreiber-Modus verwenden möchten, lesen Sie bitte unter Installation des OS-Standard-Treibers (S.
- Page 87 Sequenzer-Software oder Audio-Editier-Software zulässt. Einzelheiten zur Installation und zu den Einstellungen des des ASIO-Treibers erhalten Sie im Dokument English-ASIO- Setting ASIO Driver-E, das sich auf der UA-5 Driver CD- ROM (UA-5 Treiber-CD) befindet. Der ASIO-Treiber des UA-5 unterstützt folgende Audioeingangs-/Ausgangskanäle.
- Page 88 Cubase VST, Logic Audio, Digital Performer, Metro). …ffnen Sie in Ihrer ASIO-kompatiblen Software das Dialogfeld Audioeinstellungen und wählen Sie als ASIO-Gerät [UA-5 ASIO 16bit] aus. Zu verwendende Treiber 24 Bit-kompatibel UA-5 ASIO 1.0 16 Bit UA-5 ASIO 1.0 24 Bit UA-5 ASIO 2.0 16 Bit...
- Page 89 Stecker mit einer Steckdose. Schalten Sie danach das UA-5 ein. Warten Sie ungefähr fünf Sekunden lang. UA-5 benutzt anschließend den Treiber, der im Mac OS enthalten ist. Während Sie noch warten, verändert sich die Bildschirmanzeige nicht, während das UA-5 vom Computer erkannt wird. Arbeiten Sie nicht mit der Maus oder mit der Tastatur.
- Page 90 Treiberinstallation erfolgreich. Klicken Sie im Menü File auf Exit, um den ”Apple System Profiler” zu beenden. Wenn diese Geräte nicht angezeigt werden, trennen Sie das UA-5 vom Anschluss, warten ca. 10 Sekunden und wiederholen anschließend das in Schritt 2 beschriebene Verfahren.
- Page 91 Reduzieren Sie die Lautstärke des UA-5 und Ihrer Audiogeräte-Peripherie und klicken Sie anschließend auf Start test. Testsignale werden aus dem UA-5 ausgegeben; zuerst links, dann rechts, wie im Bildschirm angezeigt. Klicken Sie im Sound-Dialogfeld auf das Register Eingabe. Anschließend wählen Sie in Select sound input source (device)die Option USB Audio.
- Page 92 Abspielen der Beispieldaten Für die Wiedergabe der Beispieldaten wird Standard- Macintosh-Funktionalität eingesetzt. Die Beispieldaten befinden sich auf der UA-5 Driver CD-ROM (UA-5 Treiber-CD). Halten Sie die CD-ROM bereit. Legen Sie die AUDIO Capture CD-ROM in das CD-ROM- Laufwerk Ihres Computers ein.
-
Page 93: Hinweise Zum Einsatz Des Ua-5
Fehlfunktion oder Schäden an den Lautsprechern zu vermeiden. Grundlegende Verwendung Wie im Diagramm gezeigt, können Sie Lautsprecher oder Monitor-Lautsprecher anschließen und den Wiedergabesound Ihrer Anwendung bzw. den Sound von dem Instrument oder Audiogerät, mit dem das UA-5 verbunden ist, überwachen. fig.basic.e Signal flow OUTPUT... -
Page 94: Aufnahme Von Gitarre Oder Bass
Hinweise zum Einsatz des UA-5 Aufnahme von Gitarre oder Bass Wenn Sie Audiodaten von Ihrem Computer mit Gitarre begleiten und eine Aufnahme auf einem Sequenzer erfolgen soll, wird nur das Gitarrenspiel auf dem Computer aufgezeichnet. fig.guitar.e Der Klang des Geräts, das mit Eingangsbuchse 2 verbunden ist, wird nur auf dem rechten Kanal auf Ihrem Computer aufgenommen. - Page 95 Condenser Microphone Record in stereo Record in monaural INPUT Adjust the Turn on if you input level. want to monitor. Hinweise zum Einsatz des UA-5 Signal flow Record in stereo Record in monaural Turn on if you want to monitor.
-
Page 96: Aufnahme Von Einem Keyboard
Hinweise zum Einsatz des UA-5 Aufnahme von einem Keyboard Es folgt eine Beschreibung, wie Sie eine Keyboard-Performance als Audiodaten an Ihren Computer senden und auf Ihrer Sequenzer-Software aufnehmen können. fig.keyboard.e OUTPUT INPUT Adjust the input level. Der Sound, der in die Eingangsbuchse 1 eingegeben wird, wird auf dem linken Kanal aufgenommen, und der Sound, der in Eingangsbuchse 2 eingespeist wird, wird auf dem rechten Kanal aufgenommen. - Page 97 UA-5 Wenn das UA-5, wie in der Abbildung oben gezeigt wird, mit einem Gerät verbunden ist, das Input-Sounds ausgibt (“thru-s”) (wie z.B. ein MD- oder DAT-Gerät im Aufnahmemodus), führt das Einschalten des Input Monitor-Schalters dazu, dass der Sound zwischen dem UA- 5 und dem anderen Gerät in einer schleifenförmigen Verbindung weitergegeben wird und...
- Page 98 Signal flow CD/MD/DAT Da das UA-5 SCMS unterstützt, kann ein Song, der Kopierschutzattribute enthält (z.B. ein Song, der von CD auf MD digitalkopiert wird), und der via Digitaleingabe-Anschluss eingespeist wird, auf Ihrem Computer nicht aufgenommen und aus den Master- Ausgangsbuchsen oder Kopfhörerbuchsen nicht ausgegeben werden.
- Page 99 * Das UA-5 unterstützt keine Audioformate professioneller Digitalgeräte. Die Eingabe aus den Eingangsbuchsen oder das Eingangssignal aus dem Digitaleingabe-Anschluss auf dem UA-5 kann nicht direkt auf dem Digitalausgabe- Anschluss ausgegeben werden. Der Digitalausgabe-Anschluss wird stets nur das Audiosignal vom Computer ausgeben.
-
Page 100: Regelung Der Audio-Latenz
Treibereinstellungen. * Latenz ist die zeitliche Verzögerung zwischen dem Abspielen von Audiodaten durch die Anwendung und der tatsächlichen Wiedergabe aus einem Audiogerät, wie z.B. dem UA-5. Öffnen Sie das Dialogfeld ”Treibereinstellungen” wie in ”Öffnen des Dialogfelds für die Einstellungen des speziellen Treibers (S. 102)”... -
Page 101: Verwendung Des Asio Direct Monitor
Verwendung des ASIO Direct Monitor Wenn Sie das UA-5 von einer ASIO2.0-kompatiblen Anwendung aus im Erweiterten Modus einsetzen, kann der Input Monitor-Schalter des UA-5 automatisch von der Anwendung aus gesteuert werden. Öffnen Sie das Dialogfeld ”Treibereinstellungen” wie in ”Öffnen des Dialogfelds für die Einstellungen des speziellen Treibers (S. - Page 102 Multimedia.” (Unter Windows 98: doppelklicken Sie auf ”Multimedia.”) Klicken Sie auf die Registerkarte ”Geräte” und doppelklicken Sie auf “Audiogeräte.” Wählen Sie ”EDIROL UA-5 Audio,” und klicken Sie anschließend auf die Schaltfläche [Eigenschaften], um die Eigenschaften zu öffnen. Klicken Sie auf die Schaltfläche [Einstellungen] und das Dialogfeld ”EDIROL UA-5 Treibereinstellungen”...
-
Page 103: Fehlerbehebung
Prozess abgeschlossen ist • Nachdem das USB-Kabel angeschlossen wurde, dauert es ca. 15 Sekunden (oder länger), bis das UA-5 erkannt wird. • Ist das USB-Kabel richtig angeschlossen? Prüfen Sie, ob das UA-5 und der Computer vorschriftsmäßig durch das USB-Kabel verbunden sind. - Page 104 Sie den Treiber installiert haben Wenn Ihr Computer oder USB-Hub mit zwei oder mehr USB-Anschlüssen ausgerüstet ist und Sie das UA-5 an einen USB-Anschluss anschließen, an den das UA-5 zuvor niemals angeschlossen wurde, könnte das Dialogfeld ”Unbekanntes Gerät” angezeigt werden, selbst wenn der zugehörige Treiber bereits auf Ihrem Computer installiert ist.
- Page 105 • Der Schalter ADVANCE (Modusauswahl) wurde eventuell auf OFF gestellt, als der Schalter für die Auswahl der Sampling-Frequenz auf 96 kHZ eingestellt wurde. Wenn Sie das UA-5 mit 96 kHz verwenden, stellen Sie den Schalter ADVANCE (Modusauswahl) auf ON. Verwenden Sie das Verfahren, das in Löschen des speziellen Treibers (S. 114) beschrieben wird, um den USB-Audiogeräte-Treiber zu löschen, der auf Ihrem Computer installiert ist, und...
- Page 106 Löschen Sie außerdem alle Einträge mit dem Namen ”?USB-Verbundgerät,” ”?USB-Gerät,” ”USB-Gerät” und ”USB-Verbundgerät”, die Sie finden können. Wenn Sie einen EDIROL UA-5 USB-Treiber mit einem gelben ”!” oder roten ”?” daneben sehen, löschen Sie auch diesen Eintrag. 10. Nachdem Sie die unerwünschten Geräte entgültig gelöscht haben, klicken Sie in den Systemeigenschaften auf [OK].
- Page 107 • Wenn Sie Ihren Computer mit angeschlossenem UA-5 starten, wird der Computer instabil. Bitte starten Sie den Computer mit ausgestecktem UA-5 und schließen Sie das UA-5 erst danach an. Auf einem Computer, mit dem eine USB-Tastatur verwendet wird, kann der Start des Computers mit bereits angeschlossenem UA-5 zu Instabilität führen.
- Page 108 Eingangsbuchsen angeschlossen sind, erklingt verzerrt • Leuchtet die Peak-Anzeige rot? Wenn Sie Sound aus den Eingangsbuchsen 3 und 4 einspeisen, verwenden Sie die UA-5 Eingangsbuchsen-3/4-Regler, um den Eingangspegel zu reduzieren. Wenn Sie Sound aus den Eingangsbuchsen 1/2 einspeisen, verwenden Sie die Input-Sensitivity-Regler , um den Eingangspegel zu reduzieren.
- Page 109 Während der Audiowiedergabe ertönt Rauschen. • Ist noch ein Mikrophon oder eine Gitarre angeschlossen? Wenn ein Mikrophon an das UA-5 angeschlossen ist, stecken Sie das Mikrophon oder die Gitarre aus und drehen Sie den Input-Sensitivity-Regler ganz nach links. Stecken Sie alle Audio-Geräte aus, die Sie nicht verwenden.
- Page 110 Fehlerbehebung Der Sound wird während der Audiowiedergabe unterbrochen • Werden auf Ihrem Computer viele Anwendungen ausgeführt? Wenn Sie während der Wiedergabe mit mehreren Anwendungen arbeiten oder mehrere Anwendungen starten, wird die Wiedergabe auf bestimmten Computersystemen eventuell unterbrochen. Schließen Sie bitte alle nicht benötigten Anwendungen und versuchen Sie es erneut.
- Page 111 (Die Wiedergabe ist nicht einwandfrei; der Sound wird unterbrochen oder Noten fehlen) in der Datei Readme_e, die sich in dem Ordner befindet, in dem Sie die “UA-5 Driver CD-ROM” installiert haben. Fehlerbehebung...
- Page 112 Wählen Sie im Menü Apple die Option Apple System Profiler. Klicken Sie auf die Registerkarte Devices and Volumes. Unterhalb des USB-Abschnitts sehen Sie Audio (UA-5 USB Audio Device). Klicken Sie auf den Pfeil links von diesem Text. Es werden mehrere Zeilen angezeigt, aber die Nummer, die rechts von "Driver...
- Page 113 Die Wiedergabe oder die Aufnahme wird in der Mitte angehalten und kann nicht fortgesetzt werden • Kam es bei der Verwendung des UA-5 zu einer starken Verarbeitungslast wie z.B. Zugriff auf das CD-ROM-Laufwerk oder auf ein Netzwerk? Wenn eine Operation, die zu einer starken Verarbeitungslast führt, während der Verwendung des UA-5 ausgeführt wird, funktioniert das UA-5 eventuell nicht richtig.
- Page 114 Löschen des speziellen Treibers Wenn Sie den speziellen Treiber nicht wie beschrieben installieren konnten, wird das UA-5 eventuell vom Computer nicht richtig erkannt. Gehen Sie in diesem Fall wie nachfolgend beschrieben vor, um den speziellen Treiber zu löschen. Anschließend befolgen Sie die Schritte in Anschlüsse herstellen und Treiber installieren (Windows, S.
- Page 115 Doppelklicken Sie auf[Audio-, Video und Gamecontroller] um eine Liste der Geräte zu erhalten. Klicken Sie in der Liste auf ”EDIROL UA-5”, um diesen Punkt auszuwählen, und klicken Sie auf [Löschen]. Daraufhin wird ein Dialogfeld angezeigt, das Sie dazu auffordert, das Löschen zu bestätigen.
- Page 116 Fehlerbehebung Macintosh-Anwender Schalten Sie das UA-5 aus. Stecken Sie außerdem das USB-Kabel (mit dem das UA-5 angeschlossen ist) aus Ihrem Macintosh aus. Ziehen Sie im Ordner System Extensions den ”USB UA-5 Driver” in den Papierkorb, um ihn zu löschen. Ziehen Sie den ASIO-Treiber, den Sie in ”Installation des ASIO-Treibers” (S.
-
Page 117: Installation Des Pilotes Et Connexions (Windows)
Le pilote standard inclus dans Windows ne prend pas en charge ASIO. Si vous voulez utiliser l’UA-5 en mode Avancé, passez à la section Installation du pilote spécial (p. 118) Si vous voulez utiliser l’UA-5 en mode standard, passez à la section Installation du pilote standard (p. 127). -
Page 118: Installation Du Pilote Spécial
Standard et Avancé en agissant sur le commutateur ADV de l’UA-5 . * Pour que le réglage du commutateur ADV prenne effet, vous devez quitter les logiciels de type séquenceur ou toute autre application utilisant l’UA-5, éteindre ce dernier, puis le rallumer. Installation du pilote spécial La procédure d’installation dépend de votre système d’exploitation. -
Page 119: Installation Du Pilote
(“ Warn ” ou “ Block ”). Choisissez ensuite “ Ignorer ” et cliquez sur [OK]. Installation des pilotes et connexions (Windows) Si l’UA-5 est déjà connecté à votre ordinateur et que le message “ Assistant ajout de nouveau matériel ” est affiché, accédez au dossier du... - Page 120 Quittez tous les logiciels (applications) actifs. Fermez également toutes les fenêtres éventuellement ouvertes. Si vous utilisez un anti-virus, quittez-le également. Insérez le CD-ROM. Insérez le CD-ROM UA-5 Driver dans le lecteur. fig.05-4e_30 Ouvrez la boîte de dialogue “ Exécuter... ”.
- Page 121 * Ne cliquez pas sur [OK] maintenant. L’appareil étant éteint, utilisez un câble USB pour connecter l'UA-5 à votre ordinateur. Placez le commutateur ADV de l’UA-5 sur la position ON. Mettez l’UA-5 sous tension. Branchez d’abord l’adaptateur secteur sur la prise AC de l’UA-5, puis branchez la prise de l’adaptateur secteur sur une...
- Page 122 L’assistant “ Assistant ajout de nouveau matériel ” peut s’afficher. Vérifiez que “ EDIROL UA-5 (WDM) ” ou “ EDIROL UA-5 (MME) ” est affiché, puis cliquez sur [Terminer]. Si la boîte de dialogue “ Assistant ajout de nouveau matériel ”" ne s’affiche pas, passez à l’étape 18.
- Page 123 Si vous avez modifié l’option “ Vérifier la signature des fichiers ” Si vous avez modifié l’option “ Vérifier la signature des fichiers ” à l’ étape 5, restaurez le paramètre d’origine après le redémarrage de Windows. Une fois Windows redémarré, ouvrez une session Windows avec des privilèges d’administration, (par exemple, en ouvrant une session Administrateur).
-
Page 124: Windows Me
Quittez tous les logiciels (applications) actifs. Fermez également toutes les fenêtres éventuellement ouvertes. Si vous utilisez un anti-virus, quittez-le également. Préparez le CD-ROM. Insérez le CD-ROM UA-5 Driver dans le lecteur. fig.05-12e_30 Ouvrez la boîte de dialogue Exécuter... Cliquez sur le bouton Démarrer de Windows. - Page 125 ON. Mettez l’UA-5 sous tension. Branchez d’abord l’adaptateur secteur sur la prise AC de l’UA-5, puis branchez la prise de l’adaptateur secteur sur une prise secteur. Mettez ensuite l’UA-5 sous tension. Si vous utilisez Windows 98, une boîte de dialogue Insérez le disque s’affiche.
- Page 126 Installation des pilotes et connexions (Windows) fig.05-16e_30 La boîte de dialogue Nouveau matériel détecté s'affiche. Dans le champ Copier les fichiers depuis, tapez le nom du dossier indiqué dans la boîte de dialogue SETUPINF, puis cliquez sur [OK]. Une fois le pilote installé, la boîte de dialogue Nouveau matériel détecté...
- Page 127 OFF. Mettez l’UA-5 sous tension. Branchez d’abord l’adaptateur secteur sur la prise AC de l’UA-5, puis branchez la prise de l’adaptateur secteur sur une prise secteur. Mettez ensuite l’UA-5 sous tension. L’UA-5 est détecté automatiquement, le pilote est installé.
- Page 128 Placez le commutateur ADV de l’UA-5 sur la position OFF. Mettez l’UA-5 sous tension. Branchez d’abord l’adaptateur secteur sur la prise AC de l’UA-5, puis branchez la prise de l’adaptateur secteur sur une prise secteur. Mettez ensuite l’UA-5 sous tension. fig.05-23e_30 Windows détecte l’UA-5, puis la boîte de dialogue...
- Page 129 OFF. Mettez l’UA-5 sous tension. Branchez d’abord l’adaptateur secteur sur la prise AC de l’UA-5, puis branchez la prise de l’adaptateur secteur sur une prise secteur. Mettez ensuite l’UA-5 sous tension. Installation des pilotes et connexions (Windows) Selon votre système, la détection de l’appareil peut...
- Page 130 Installation des pilotes et connexions (Windows) fig.05-25e_30 Les appareils compatibles USB sont détectés automatiquement ; la boîte de dialogue “ Assistant ajout de nouveau matériel ” s’affiche. Cliquez sur [Suivant]. fig.05-26e_30 Quand “ Sélectionnez une méthode de recherche. ” s’affiche, sélectionnez “...
- Page 131 fig.05-30e_30 Une fois terminée l’installation du pilote USB composite device, une boîte de dialogue similaire à celle présentée s’affiche. Cliquez sur [Terminer]. fig.05-33e_30 Un USB audio device (Périphérique audio USB) est détecté automatiquement et la boîte de dialogue de l'Assistant ajout de nouveau matériel s’affiche.
-
Page 132: Configuration Et Contrôle
Cliquez deux fois sur l’icône Sons et multimédia (Multimédia sous Windows 98). Cliquez sur l'onglet Audio. Réglez Périphérique par défaut de Lecture et Périphérique par défaut de Enregistrement comme suit, selon le mode de fonctionnement de l’UA-5. Windows Me/2000 fig.05-38e_30 fig.05-39e_30 Mode Avancé... - Page 133 Montez ou baissez le curseur pour régler le volume de l’UA-5. Si vous avez installé le pilote standard, le volume de l’UA-5 peut être réglé à l’aide du contrôle du volume Windows. Options pouvant être cochées Contrôle le volume des CD audio lus par le Lecteur CD lecteur de CD-ROM de l’ordinateur.
-
Page 134: Vérifiez La Présence De Son
Cliquez sur l'onglet [Test], puis cliquez sur le bouton. L’exemple de données a-t-il été lu ? Si c’est le cas, cela signifie que l’ordinateur et l’UA-5 sont correctement connectés et que les pilotes ont été bien installés. Pour pouvoir écouter l'exemple de données, vous... - Page 135 Voix : Tahirih Walker, Fumiyo Kawazoe Guitare Katsuhisa Fujimoto, Idecs, Inc. Lecture de CD audio depuis le lecteur de CD-ROM de l’ordinateur, ou utilisation de l’UA-5 pour l’environnement sonore des jeux Windows 2000 : Ouvrez la boîte de dialogue Propriétés Système .
-
Page 136: Installation Des Pilotes Et Connexions (Macintosh)
24 bits et celles compatibles avec ASIO comme Cubase VST, Logic Audio et SingerSongWriter. En mode Avancé, l’UA-5 ne peut pas lire les données audio (CD audio et sons d’avertissements) à partir du gestionnaire de sons du Macintosh. Mode Standard L’UA-5 fonctionne dans ce mode lorsque le commutateur ADV de la face arrière est... - Page 137 Si vous voulez utiliser l’UA-5 en mode Avancé, passez à la section Installation du pilote spécial (p. 137). Si vous voulez utiliser l’UA-5 en mode Standard, passez à la section Installation du pilote standard (p. 140). Basculement entre mode Avancé et mode Standard Si vous installez à...
-
Page 138: Installation Du Pilote Asio
ON. Placez l’interrupteur d’alimentation de l’UA-5 sur Branchez d’abord l’adaptateur secteur sur la prise AC de l’UA-5, puis branchez la prise de l’adaptateur secteur sur une prise secteur. Mettez ensuite l’UA-5 sous tension. Installation du pilote ASIO Cette section explique comment installer le pilote ASIO pour permettre à... - Page 139 Démarrez votre logiciel compatible ASIO (Cubase VST, Logic Audio, Digital Performer, Metro, etc.). Ouvrez la boîte de dialogue des réglages audio du logiciel compatible ASIO, puis sélectionnez [UA-5 ASIO 16bit] comme pilote ASIO. Installation des pilotes et connexions (Macintosh) Pilote à utiliser Compatibles 24 bits UA-5 ASIO 1.0 16 bits...
- Page 140 L'UA-5 utilise un pilote compris dans le système Macintosh (Mac OS). Pendant que vous patientez, l’affichage ne change pas, mais l’UA-5 est bien en cours de détection. Ne touchez ni à la souris, ni au clavier. Cet appareil est équipé d'un circuit de protection.
- Page 141 Dans le menu Fichier, cliquez sur Quitter pour fermer “ Informations système Apple ”. Si les appareils ne s’affichent pas correctement, débranchez l’UA-5, attendez environ dix secondes, puis répétez la procédure à partir de l’étape 2. Vous devez ensuite procéder à la configuration du pilote.
- Page 142 équipement audio, puis cliquez sur [Lancer test]. Des signaux de test seront transmis par l’UA-5; à gauche d’abord, puis à droite, comme indiqué à l’écran. Dans la boîte de dialogue Son, cliquez sur l’onglet Entréeıı. Dans Sélectionner la source d’entréeıı (périphérique), sélectionnez USB audio.
- Page 143 Cliquez sur le bouton de lecture. L’exemple de données a-t-il été lu ? Si c’est le cas, cela signifie que l’ordinateur et l’UA-5 sont correctement connectés et que les pilotes ont été bien installés. Installation des pilotes et connexions (Macintosh) Pour pouvoir écouter...
-
Page 144: Guide Des Applications De L'ua-5
Guide des applications de l’UA-5 Ce chapitre explique les différents types de connexion possibles avec l’UA-5 et présente certaines de ses applications. * Avant de connecter d’autres appareils, nous vous conseillons de baisser le volume et de couper l’alimentation, afin d'éviter des anomalies de fonctionnement et d'endommager les haut-parleurs. -
Page 145: Enregistrement D'une Guitare Ou D'une Basse
Guide des applications de l’UA-5 Enregistrement d’une guitare ou d’une basse Si vous désirez enregistrer une partie de guitare sur un logiciel séquenceur tout en écoutant des données audio sur votre ordinateur, seule la partie guitare sera enregistrée par l’ordinateur. -
Page 146: Enregistrement Avec Un Micro
Guide des applications de l’UA-5 Enregistrement avec un micro Micro dynamique fig.basic.e Microphone INPUT Adjust the input level. fig.mic-con.e Si vous utilisez un micro à condensateur, appuyez sur le commutateur PHANTOM 48V. * Si un micro ou autre instrument ne nécessitant pas d’alimentation fantôme est connecté... -
Page 147: Enregistrement Avec Un Clavier
Guide des applications de l’UA-5 Enregistrement avec un clavier Cette section explique comment transmettre les sons d’un clavier en tant que données audio vers votre ordinateur, et comment les enregistrer avec votre logiciel séquenceur. fig.keyboard.e Signal flow Keyboard OUTPUT INPUT... - Page 148 UA-5 Si l’UA-5 est connecté, comme sur la figure ci-dessus, à un appareil qui transmet (“ thru- s ”) les données audio (comme un MiniDisc ou un DAT en mode enregistrement), et que vous activez le monitoring (commutateur (INPUT MONITOR) VOLUME, le son va boucler entre l’UA-5 et l’autre appareil, ce qui entraîne une oscillation et un volume...
- Page 149 Le signal numérique est converti et enregistré à la fréquence d’échantillonnage spécifiée par le commutateur SAMPLE RATE. Sans avoir à modifier les réglages de l’UA-5 ou de votre application, cela permet également d’enregistrer avec la meilleure qualité possible les données de sortie d’un tuner numérique BS (Broadcast Satellite), dont la fréquence est modifiée...
- Page 150 * L’UA-5 ne supporte pas les formats audio des appareils numériques professionnels. Sur l’UA-5, les sons entrant par les prises jacks et les signaux entrant par les prises DIGITAL ne peuvent être translis directement par la sortie DIGITAL. La sortie DIGITAL ne peut transmettre que le signal audio provenant de l’ordinateur.
-
Page 151: Réglage De La Latence Audio
* Latence : intervalle de temps entre le moment où une application lit des données audio et le moment où ces données audio sont jouées par un appareil audio comme l’UA-5. Comme expliqué à la section “ Ouverture de la boîte de dialogue des paramètres du pilote spécial (p. -
Page 152: Utilisation D'asio Direct Monitor
Guide des applications de l’UA-5 Utilisation d’ASIO Direct Monitor Si vous utilisez l’UA-5 avec une application compatible ASIO2.0 en mode Avancé , le commutateur de contrôle d’entrée peut être réglé automatiquement depuis l’application. Comme expliqué à la section “ Ouverture de la boîte de dialogue des paramètres du pilote spécial (p. - Page 153 Avec le pilote WDM et Windows 2000 : Ouvrez le “ Panneau de configuration ” et cliquez deux fois sur l'icône “ EDIROL UA-5 ”. La boîte de dialogue “ EDIROL UA-5 Driver Settings ” s’affiche. Avec le pilote MME et Windows 2000 : Ouvrez le “...
-
Page 154: En Cas De Problème
En cas de problème Si un problème inattendu se produit avec l'UA-5, veuillez lire ce chapitre. Il contient de nombreuses solutions aux problèmes les plus courants. Identifiez d’abord les sections qui vous concernent. Ce chapitre est organisé par systèmes d’exploitation. Regardez les icônes à gauche des titres pour trouver les informations dont vous avez besoin. - Page 155 Si votre ordinateur ou répartiteur USB est équipé de deux connecteurs USB (ou plus) et que vous connectez l’UA-5 à un connecteur USB sur lequel l’appareil n’a jamais été connecté, la boîte de dialogue “ Périphérique inconnu ” risque de s'afficher, même si le pilote a déjà...
- Page 156 Utilisez la procédure décrite dans Suppression du pilote (p. 165) pour supprimer le pilote de périphérique audio USB de votre ordinateur, et installez à nouveau les pilotes de l'UA-5 comme décrit dans Installation des pilotes et connexions (Windows) (p. 117). Vérifiez également si “...
- Page 157 ?Composite USB Device ”, “ ?USB Device ”, “ USB Device ” ou “ USB composite device ” éventuellement présentes. Si vous voyez le pilote USB EDIROL UA-5 précédé d’un “ ! ” jaune ou d’un “ ? ” rouge, supprimez-le également.
- Page 158 • L’ordinateur est instable quand il est démarré avec l’UA-5 déjà connecté Démarrez l’ordinateur sans que l’UA-5 ne soit connecté, puis connectez-le. Sur un ordinateur équipé d’un clavier USB, le démarrage avec un UA-5 déjà connecté peut entraîner une instabilité. Dans ce cas, démarrez l'ordinateur avec l'UA-5 non connecté, puis connectez-le.
- Page 159 • Le pilote est-il correctement installé ? Pour pouvoir lire des données audio avec l’UA-5, le pilote doit être installé. Pour plus de détails sur l'installation et les paramètres, reportez-vous à Installation des pilotes et connexions (Windows p.
- Page 160 MIDI du module de sons sont connectées aux entrées ligne jack de l’UA-5, l’ordinateur peut générer du bruit via le module de sons MIDI à partir de l’UA-5, selon l’ordinateur utilisé. Si c’est le cas, vous pouvez soit connecter le module de sons MIDI et l’UA-5 en parallèle à...
- Page 161 Le son s'interrompt pendant la lecture audio • Avez-vous beaucoup d’applications actives sur l’ordinateur ? Si vous utilisez beaucoup d'applications pendant la lecture, ou si vous démarrez d'autres applications, la lecture peut s'interrompre. Quittez toutes les applications qui ne sont pas nécessaires et réessayez.
- Page 162 • Si vous utilisez un pilote spécial, vous pouvez résoudre ce problème à l’aide de la boîte de dialogue “ EDIROL UA-5 Driver Settings ”. Pour plus de détails, reportez- vous à la section “ Something is wrong with playback; sound is interrupted or notes are missing ”...
- Page 163 “ Sélecteur ”.) • Dans le tableau de bord “ Mémoire ”, cochez “ Off ” pour Mémoire virtuelle. • Selon votre type de connexion à Internet, utilisez l’UA-5 avec la configuration suivante. Si vous vous connectez à Internet avec un câble LAN (réseau local) Utilisez l’UA-5 avec le câble LAN connecté.
- Page 164 • Les données contenant des marqueurs SCMS ne peuvent être enregistrées en numérique. L'UA-5 prend en charge SCMS (p. 7) ; si des données SCMS sont entrées via le connecteur numérique (comme des données en provenance d'un MiniDisc copié en numérique à partir d'un CD audio du commerce), l'UA-5 ne pourra pas les enregistrer dans l'ordinateur.
- Page 165 ”. Cliquez ensuite avec le bouton droit de la souris et, dans le menu qui s’affiche, sélectionnez “ Supprimer ”. * Si “ EDIROL UA-5 (WDM) ” ou “ EDIROL UA-5 (MMX) ” ne s’affiche pas dans la liste, reportez-vous à la section “ Impossible d'installer/désinstaller/ utiliser le pilote avec Windows 2000 ”...
- Page 166 Cliquez deux fois sur “ Contrôleurs son, vidéo et jeux ” pour afficher la liste des périphériques. Dans la liste, cliquez sur “ EDIROL UA-5 ” pour le sélectionner, puis cliquez sur [Supprimer]. Une boîte de dialogue vous demande de confirmer la suppression. Vérifiez le contenu, et cliquez sur [OK].
- Page 167 Eteignez l’UA-5. Débranchez aussi le câble USB (avec lequel l’UA-5 est connecté) de votre Macintosh. Du dossier Extensions système, faites glisser le fichier “ USB UA-5 Driver ” dans la corbeille pour le supprimer. Faites également glisser le pilote ASIO installé (“ Installation du pilote ASIO ” - p.
-
Page 168: Collegamenti E Installazione Driver (Windows)
OFF. Verrà utilizzato il driver audio standard USB fornito con Windows. Nel modo Standard, i segnali audio vengono trasferiti tra l’UA-5 e il computer ad una risoluzione di 16 bit e con una frequenza di campionamento di 44.1/48 kHz. -
Page 169: Installazione Del Driver Speciale
ADVANCE dell’UA-5. * Per rendere effettiva l’impostazione dell’interruttore ADVANCE, è necessario chiudere tutti i software sequencer e le altre applicazioni che utilizzano l’UA-5, spegnere l’apparecchio e riaccenderlo. Installazione del driver speciale La procedura d’installazione dipenderà dal sistema utilizzato. -
Page 170: Installazione Del Driver
Installazione del driver I driver WDM e MME possono essere installati seguendo la stessa procedura. Dopo aver scollegato l’UA-5, avviare Windows. Scollegare tutti i cavi USB, ad eccezione della tastiera e del mouse, se utilizzati. Collegarsi a Windows con i privilegi di un amministratore, ad esempio come amministratore. - Page 171 Chiudere tutti i programmi in corso di esecuzione. Chiudere anche le altre finestre aperte. Se si utilizza un programma antivirus o simile, accertarsi che sia anch’esso chiuso. Inserire il CD-ROM. Inserire il CD UA-5 Driver CD-ROM nell’unità CD-ROM del computer. fig.05-4e_30 Aprire la finestra di dialogo “Esegui...”.
- Page 172 SETUPINF nella parte superiore dello schermo. * Non fare clic su [OK] adesso. Con gli apparecchi spenti, collegare un cavo USB tra l’UA-5 e il computer. Impostare l’interruttore di selezione del modo dell’UA-5 in posizione ON. Accendere l’UA-5. Inserire l’adattatore AC nella presa corrispondente sull’apparecchio e inserire la spina dell’adattatore nella presa...
- Page 173 Accertarsi che "EDIROL UA-5 (WDM)" o "EDIROL UA-5 (MME)" sia visualizzato e fare clic su [Fine]. Se la finestra di dialogo "Nuovo componente hardware individuato" non è visualizzata, passare al passo 18. fig.05-11e_30 Riavviare Windows. Viene visualizzata la...
- Page 174 Collegamenti e installazione Driver (Windows) Se è stata modificata l’impostazione “Verifica firma file” Se l’impostazione “Verifica firma file” è stata cambiata al passo 5, ripristinare l’impostazione originale dopo aver avviato Windows. Dopo aver riavviato Windows, collegarsi a Windows come un utente dotato di privilegi di amministrazione, ad esempio come Administrator.
- Page 175 Chiudere anche le altre finestre aperte. Se si utilizza un programma antivirus o simili, accertarsi che sia anch’esso chiuso. Preparare il CD-ROM. Inserire il CD UA-5 Driver CD-ROM nell’unità CD-ROM del computer. fig.05-12e_30 Aprire la finestra di dialogo Esegui...” .
- Page 176 SETUPINF nella parte superiore dello schermo. * Non fare clic su [OK] adesso. Con gli apparecchi spenti, collegare un cavo USB tra l’UA-5 e il computer. Impostare l’interruttore di selezione del modo sull’UA-5 in posizione ON. Accendere l’UA-5. Inserire l’adattatore AC nella presa corrispondente sull’apparecchio e inserire la spina dell’adattatore nella presa...
- Page 177 fig.05-16e_30 Appare la finestra di dialogo Trovato nuovo hardware. Nel campo File copy source, immettere il nome della cartella visualizzato nella finestra di dialogo SETUPINF e fare clic su [OK]. Una volta che il driver è stato installato, la finestra Trovato nuovo hardware si chiude.
- Page 178 Chiudere tutti i programmi in corso di esecuzione. Se si utilizza un programma antivirus o simile, accertarsi che sia anch’esso chiuso. Utilizzare un cavo USB per collegare l’UA-5 al computer. Impostare l’interruttore di selezione del modo sull’UA-5 in posizione OFF.
- Page 179 Chiudere tutti i programmi in corso di esecuzione. Se si utilizza un programma antivirus o simile, accertarsi che sia anch’esso chiuso. Utilizzare un cavo USB per collegare l’UA-5 al computer. Impostare l’interruttore di selezione del modo sull’UA-5 in posizione OFF.
- Page 180 Chiudere tutti i programmi in corso di esecuzione. Se si utilizza un programma antivirus o simile, accertarsi che sia anch’esso chiuso. Inserire il CD-ROM di Windows nell’unità CD-ROM. Utilizzare un cavo USB per collegare l’UA-5 al computer. Impostare l’interruttore di selezione del modo sull’UA-5 in posizione OFF.
- Page 181 fig.05-25e_30 Le periferiche USB compatibili verranno rilevate automaticamente e comparirà la finestra “Installazione guidata nuovo hardware”. Fare clic su [Avanti]. fig.05-26e_30 Quando appare la finestra “Selezionare il metodo di ricerca.”, selezionare “Cerca un driver adatto alla periferica (scelta consigliata)”, e fare clic su [Avanti]. fig.05-27e_30 Verrà...
- Page 182 Collegamenti e installazione Driver (Windows) fig.05-30e_30 Alla fine dell’installazione del driver USB composite device, verrà visualizzata una finestra di dialogo simile a quella sotto illustrata. Fare clic su [Fine]. fig.05-33e_30 Il dispositivo USB Composite Device viene rilevato automaticamente e appare la finestra di dialogo “Installazione guidata nuovo hardware”.
-
Page 183: Configurazione E Verifica
Fare doppio clic sull’icona Suoni e multimedia (Multimedia in Windows 98). Fare clic sulla scheda Audio. Impostare la Periferica preferenziale per la Riproduzione e la Periferica preferenziale per la Registrazione come segue, in base al modo operativo dell’UA-5. Utenti Windows Me/2000 fig.05-38e_30 fig.05-39e_30 Modo Advanced... - Page 184 – Accessori – Svago – Controllo volume. Spostare lo slider verso l’alto o verso il basso per regolare il volume dell’UA-5. Se è stato installato il driver standard, l’UA-5 potrà utilizzare il controllo volume di Windows per regolare il volume di uscita.
-
Page 185: Verificare Se L'audio Viene Riprodotto
Windows per riprodurre i dati esempio. I dati esempio si trovano sul CD-ROM UA-5 Driver . Preparare il CD-ROM. Inserire il CD UA-5 Driver CD-ROM nell’unità CD-ROM del computer. Dalla cartella Sample del CD-ROM, selezionare e trascinare Alright(.wav) sul desktop per copiarlo. - Page 186 Voce: Tahirih Walker, Fumiyo Kawazoe Chitarra Katsuhisa Fujimoto, Idecs, Inc. Quando i CD audio sono riprodotti a partire dal CD-ROM del computer o quando si utilizza l’UA-5 per riprodurre la musica di videogiochi Utenti Windows 2000: Aprire la finestra di dialogo Proprietà del sistema.
-
Page 187: Collegamenti E Installazione Dei Driver (Macintosh)
OFF. Verrà utilizzato il driver audio standard USB fornito con Windows. Nel modo Standard, i segnali audio vengono trasferiti tra l’UA-5 e il computer ad una risoluzione di 16 bit e con una frequenza di campionamento di 44.1/48 kHz. - Page 188 Collegamenti e installazione dei driver (Macintosh) Per utilizzare l’UA-5 in modo Advanced, passare alla sezione Installazione del driver speciale (pag. 188). Per attivare il modo driver Standard, passare alla sezione Installazione del driver standard del sistema operativo (pag. 191). Attivazione dei modi driver Advanced e Standard Se sono stati installati entrambi i driver, quello speciale e quello standard, si potrà...
-
Page 189: Installazione Del Driver Asio
Accendere quindi l’UM-5. Installazione del driver ASIO In questa sezione viene spiegato come installare il driver ASIO per poter utilizzare l’UA-5 con il software sequencer o un software di editing audio. Per maggiori informazioni sull’installazione e le impostazioni del driver ASIO, accertarsi di leggere anche il documento English-ASIO-Setting ASIO Driver-E sul CD-ROM UA-5 Driver CD-ROM. - Page 190 Avviare il software ASIO compatibile, ad esempio Cubase VST, Logic Audio, Digital Performer, Metro. Aprire la finestra di configurazione Audio del programma ASIO compatibile e selezionare [UA-5 ASIO 16bit] come dispositivo ASIO. Driver da utilizzare 24 bit compatibile UA-5 ASIO 1.0 16 bit UA-5 ASIO 1.0 24 bit...
- Page 191 Accendere quindi l’UM-5. Attendere circa cinque secondi. L’UA-5 utilizzerà il driver fornito con MacOS. Durante l’operazione, l’UA-5 verrà rilevato anche se non viene visualizzato alcun messaggio in questo senso. Evitare di toccare il mouse o la tastiera. Collegamenti e installazione dei driver (Macintosh) Questo apparecchio è...
- Page 192 Se sono visualizzati correttamente, l’installazione del driver è riuscita. Nel menu File, fare clic su Exit per chiudere la finestra “Apple System Profiler”. Se non sono visualizzati correttamente, scollegare l’UA-5, aspettare circa dieci secondi, e ripetere la procedura fino al passo 2.
- Page 193 Fare clic sulla scheda Speaker o Speaker Settings. xfig.05-46e_30 Mantenendo il volume al minimo sull’UA-5 e sugli altri apparecchi audio, fare clic su Start test. Come visualizzato sullo schermo, l’UA-5 emetterà dei segnali di controllo prima a sinistra e poi a destra.
- Page 194 Fare clic sul pulsante di riproduzione. I dati esempio sono stati riprodotti? Se i dati sono stati riprodotti correttamente, il computer e l’UA-5 sono collegati correttamente e anche i driver sono stati installati opportunamente. Per poter ascoltare i dati esempio, è necessario disporre di circa 30MB di spazio libero sul disco dove è...
-
Page 195: Guida All'uso Dell'ua-5
è impostato su 96 kHz REC. • Non sarà possibile utilizzare l’applicazione per registrare i suoni provenienti da uno strumento o da un dispositivo audio collegato all’UA-5 se l’interruttore di selezione della frequenza di campionamento è impostato su 96 kHz PLAY. -
Page 196: Registrazione Di Una Chitarra O Di Un Basso
Guida all’uso dell’UA-5 Registrazione di una chitarra o di un basso Quando si suona la chitarra e contemporaneamente si riproducono dati audio sul computer per registrarli su un sequencer, solo la chitarra verrà registrata sul computer. fig.guitar.e L’audio del dispositivo collegato alla Presa d’ingresso 2 verrà registrato solo sul canale destro del computer. -
Page 197: Registrazione Da Un Microfono
Signal flow Condenser Microphone Record in stereo Record in monaural INPUT Adjust the Turn on if you input level. want to monitor. Guida all’uso dell’UA-5 Signal flow Record in stereo Record in monaural Turn on if you want to monitor. - Page 198 Guida all’uso dell’UA-5 Registrazione da una tastiera Di seguito viene spiegato come trasmettere sotto forma di dati audio le note suonate su una tastiera al computer e registrarli quindi con un software sequencer. fig.keyboard.e OUTPUT INPUT Adjust the input level.
- Page 199 (ad esempio un MD o DAT in modo registrazione), l’attivazione dell’interruttore di controllo dell’input provocherà la trasmissione in loop del suono tra l’UA-5 e il dispositivo che a sua volta darà origine a oscillazioni e a un volume improvvisamente alto. Si ricorda che questo tipo di collegamenti potrebbe essere all’origine di malfunzionamenti o di danni ai diffusori.
- Page 200 3 e 4 con i segnali d’ingresso provenienti dal connettore d’ingresso digitale e registrati. Convertitore integrato L’UA-5 è in grado di convertire la frequenza di campionamento di un segnale digitale in entrata in tempo reale. (Vedere lo schema a pagina pag. 14.) < Esempio >...
- Page 201 Signal flow Impostare l’interruttore di selezione della frequenza di campionamento dell’UA-5 in modo che corrisponda alla frequenza di campionamento che può essere registrare sul dispositivo di registrazione, ad esempio un MD. Accertarsi che il parametro della frequenza di campionamento dell’applicazione sia impostato nello stesso modo.
-
Page 202: Regolazione Della Latenza Audio
Guida all’uso dell’UA-5 Regolazione della latenza audio Quando si utilizza l’UA-5 in modo Advanced, è possibile cambiare le impostazioni del driver per regolare la latenza dell’audio. Per regolare la latenza, modificare le dimensioni del buffer nella finestra di dialogo delle impostazioni. -
Page 203: Uso Di Asio Direct Monitor
Uso di ASIO Direct Monitor Se si utilizza l’UA-5 a partire da un’applicazione ASIO2.0 compatibile in modo Advanced, l’interruttore di controllo dell’input dell’UA-5 può essere controllato automaticamente dall’applicazione. Come descritto nella sezione “Apertura della finestra di dialogo delle impostazioni del driver speciale (pag. 204)”, aprire la finestra di dialogo relativa alle impostazioni del driver. - Page 204 Apertura della finestra di dialogo delle impostazioni del driver speciale Se si utilizza il driver WDM in Windows 2000: Nel Pannello di controllo, fare doppio clic su “EDIROL UA-5.” Verrà visualizzata la finestra di dialogo “EDIROL UA-5 Driver Settings”. Se si utilizza il driver MME in Windows 2000: Nel “Pannello di controllo,”...
-
Page 205: Ricerca E Soluzione Dei Problemi
Se si utilizza Windows o Macintosh per la prima volta, e si incontrano dei problemi per capire le spiegazioni, fare riferimento al manuale fornito con il computer o il sistema operativo. Se l’UA-5 non si funziona come dovrebbe, controllare i vari punti illustrati in questo capitolo. Problemi relativi al driver USB Viene visualizzato un messaggio di tipo “Trovato driver... - Page 206 Il messaggio “Periferica sconosciuta” appare anche se il driver è stato installato Se il computer o l’hub USB è provvisto di due o più connettori USB e l’UA-5 è collegato ad un connettore USB al quale non era mai stato collegato prima, potrebbe apparire il messaggio “Periferica sconosciuta”...
- Page 207 ADVANCE. Seguire la procedura descritta nella sezione Cancellazione del driver speciale (pag. 216) per eliminare il driver della periferica audio USB e reinstallare il driver UA-5 secondo quanto descritto nella sezione Collegamenti e installazione Driver (Windows) (pag. 168). Verificare inoltre la presenza del messaggio “Periferica sconosciuta”...
- Page 208 USB,” “Periferica USB,” e “USB composite device” eventualmente visualizzate. Se accanto al driver USB EDIROL UA-5 appare un “!” giallo o un “?” rosso, cancellare la periferica. 10. Dopo aver cancellato tutte le periferiche che presentano dei problemi, fare clic su [OK] nella finestra Proprietà...
- Page 209 Avviare il computer senza che l’UA-5 sia collegato e ricollegare l’UA-5 in un secondo momento. Un computer che utilizza una tastiera USB e cui all’avvio è già stato collegato l’UA-5 potrebbe funzionare in modo instabile. In questo caso collegare l’UA-5 solo dopo aver avviato il computer.
- Page 210 [Modo driver Standard] Per riprodurre un CD audio sull’unità CD-ROM del computer, fare riferimento a Quando i CD audio sono riprodotti a partire dal CD-ROM del computer o quando si utilizza l’UA-5 per riprodurre la musica di videogiochi (pag. 186).
- Page 211 L’audio è disturbato durante la riproduzione • Il microfono o la chitarra sono ancora collegati? Se all’UA-5 è collegato un microfono o una chitarra, scollegarli e ruotare la manopola di sensibilità dell’input completamente a sinistra. Scollegare tutti i dispositivi audio non utilizzati.
- Page 212 Ricerca e soluzione dei problemi L’audio si interrompe durante la riproduzione • Vi sono molte applicazioni in corso di esecuzione sul computer? Se durante la riproduzione sono attive molte applicazioni o se ne avviano altre, la riproduzione potrebbe interrompersi a seconda della configurazione del computer. Chiudere tutte le applicazioni non necessarie e riprovare.
- Page 213 • Se si utilizza il driver speciale, questo problema può essere risolto nella finestra di dialogo “EDIROL UA-5 Driver Settings”. Per maggiori informazioni, fare riferimento alla sezione “Something is wrong with playback; sound is interrupted or notes are missing” nel file Readme_e file nella cartella di installazione del “UA-5 Driver CD-ROM.”...
- Page 214 Sarà quindi necessario cambiarla tramite "Chooser.") • Nel pannello di controllo "Memory" impostare la memoria virtuale su "Off." • A seconda del tipo di connessione a Internet, utilizzare l’UA-5 con le seguenti impostazioni. Se la connessione a Internet avviene tramite un cavo LAN Utilizzare l’UA-5 quando è...
- Page 215 • Impossibile registrare digitalmente dati che contengono il flag SCMS. Dato che l’UA-5 supporta SCMS (pag. 7), i dati che contengono flag SCMS contro la copia, ad esempio dati copiati digitalmente da un CD di musica commerciale su un MD o un altro supporto, e trasmessi tramite il connettore d’ingresso digitale non potranno essere registrati sul computer.
- Page 216 Fare doppio clic su ““Controller audio, video e giochi” per visualizzare un elenco di periferiche. Nell’elenco fare clic su “EDIROL UA-5 (WDM)” o ”EDIROL UA-5 (MMX)” per selezionarlo. Fare clic con il pulsante destro del mouse nel menu visualizzato e selezionare “Elimina.”...
- Page 217 Fare clic sulla scheda Gestione periferiche. Fare doppio clic su “Controller audio, video e giochi” per visualizzare un elenco di periferiche. Nell’elenco fare clic su “EDIROL UA-5” per selezionarlo e fare clic su [Elimina]. Un messaggio chiederà di confermare la cancellazione del driver. Controllare il contenuto della finestra e fare clic su [OK].
- Page 218 Ricerca e soluzione dei problemi Utenti Macintosh Spegnere l’UA-5. Scollegare anche il cavo USB che collega l’UA-5 al Macintosh. Nella cartella system extensions trascinare “USB UA-5 Driver” nel cestino per cancellarlo. Trascinare il driver ASIO che è stato installato nella sezione “Installazione...
-
Page 219: Conexión E Instalación De Los Controladores (Windows)
En el Modo avanzado, las señales de audio se transfieren entre el UA-5 y el PC con una resolución de 24 bits y unas frecuencias de sampling de 44,1/ 48/96 kHz. Seleccione este modo si está utilizando una aplicación que permite grabar, reproducir y editar audio de alta calidad, como una aplicación que da soporte a audio de... - Page 220 • Usuarios de Windows Me/98...(pág. 226) Usuarios de Windows 2000 Controlador WDM y controlador MME El CD-ROM del controlador del UA-5 contiene dos tipos de controladores para Windows 2000. Antes de instalar el controlador, seleccione el controlador apropiado para la aplicación con la que desee utilizarlo.
-
Page 221: Instalación Del Controlador
“Bloquear”). Luego cambie la configuración a “Ignorar” y haga clic en [Aceptar]. Conexión e instalación de los controladores (Windows) Si el UA-5 ya está conectado a su PC y aparece el mensaje "Asistente para agregar nuevo hardware", vaya a la... - Page 222 Cierre también cualquier ventana que esté abierta. Si está utilizando un programa antivirus o software similar, asegúrese de salir también de éste. Inserte el CD-ROM. Inserte el CD-ROM del controlador del UA-5 en la unidad de CD-ROM de su PC. fig.05-4e_30 Abra el cuadro de diálogo "Ejecutar...".
- Page 223 SETUPINF hasta la parte superior de la pantalla. * No haga clic en [Aceptar] todavía. Con el UA-5 desactivado, utilice un cable USB para conectar el UA-5 al PC. Disponga el interruptor de selección de modo del UA-5 en la posición "ON".
- Page 224 Puede que aparezca el "Asistente para encontrar hardware nuevo". Compruebe que aparezca "EDIROL UA-5 (WDM)" o "EDIROL UA- 5 (MME)" y haga clic en [Finalizar]. Si no aparece el cuadro de diálogo "Asistente para encontrar hardware nuevo", prosiga con el paso 18.
- Page 225 Si modificó "Comprobar firma de archivo" Si en el paso 5 modificó la configuración de “Comprobar firma de archivo”, restaure la configuración original después de reiniciar Windows. Después de que Windows se haya iniciado, ábralo como usuario con privilegios administrativos (por ejemplo como administrador). En el escritorio de Windows, haga clic con el botón derecho del ratón en el icono Mi PC y, en el menú...
- Page 226 Cierre también cualquier ventana que esté abierta. Si está utilizando un programa antivirus o software similar, asegúrese de salir también de éste. Prepare el CD-ROM. Inserte el CD-ROM del controlador del UA-5 en la unidad de CD-ROM de su PC. fig.05-12e_30 Abra el cuadro de diálogo Ejecutar...
- Page 227 SETUPINF hasta la parte superior de la pantalla. * No haga clic en [Aceptar] todavía. Con el UA-5 desactivado, utilice un cable USB para conectar el UA-5 al PC. Disponga el interruptor de selección de modo del UA-5 en la posición "ON".
- Page 228 Conexión e instalación de los controladores (Windows) fig.05-16e_30 Aparecerá el cuadro de diálogo Hardware nuevo. En el campo Fuente de copia de archivo, escriba el nombre de la carpeta que aparece en el cuadro de diálogo SETUPINF y haga clic en [Aceptar]. Una vez el controlador se haya instalado, se cerrará...
- Page 229 Si está utilizando un programa antivirus o software similar, asegúrese de salir también de éste. Utilice un cable USB para conectar el UA-5 al PC. Disponga el interruptor (de selección de modo) del UA-5 en la posición "OFF".
- Page 230 Si está utilizando un programa antivirus o software similar, asegúrese de salir también de éste. Utilice un cable USB para conectar el UA-5 al PC. Disponga el interruptor (de selección de modo) del UA-5 en la posición "OFF".
- Page 231 éste. Inserte el CD-ROM de Windows en la unidad de CD-ROM. Utilice un cable USB para conectar el UA-5 al PC. Disponga el interruptor de selección de modo del UA-5 en la posición "OFF". Encienda el UA-5.
- Page 232 Conexión e instalación de los controladores (Windows) fig.05-25e_30 El sistema detectará los dispositivos compatibles con USB automáticamente y aparecerá el cuadro de diálogo "Asistente para agregar nuevo hardware". Haga clic en [Siguiente]. fig.05-26e_30 Cuando aparezca el cuadro de diálogo “Seleccionar el modo de búsqueda”, seleccione “Encontrar el mejor controlador para el dispositivo utilizado...
- Page 233 fig.05-30e_30 Cuando la instalación del controlador USB composite device haya finalizado, aparecerá el siguiente cuadro de diálogo. Haga clic en [Finalizar]. fig.05-33e_30 A continuación, se detectará automáticamente el USB audio device y aparecerá el cuadro de diálogo "Asistente para agregar nuevo hardware".
-
Page 234: Configuración Y Comprobación
Haga clic en la ficha Audio. Establezca el Dispositivo preferido para la Reproducción y el Dispositivo preferido para la Grabación como se indica a continuación, en función del modo operativo del UA-5. Usuarios de Windows Me/2000 Usuarios de Windows 98 fig.05-38e_30 fig.05-39e_30... - Page 235 Haga clic en el botón Inicio de Windows y seleccione Programas - Accesorios - Entretenimiento- Control de volumen. Para ajustar el volumen del UA-5, suba o baje el deslizador. Si ha instalado el controlador estándar, el UA-5 podrá utilizar el Control de volumen de Windows para ajustar el volumen de salida.
- Page 236 Los datos de muestra se encuentran en el CD-ROM del controlador del UA-5. Prepare el CD-ROM. Inserte el CD-ROM del controlador del UA-5 en la unidad de CD-ROM de su PC. De la carpeta "Sample" del CD-ROM, arrastre el archivo Alright(.wav) hasta su escritorio para...
- Page 237 Voces: Tahirih Walker y Fumiyo Kawazoe Guitarra: Katsuhisa Fujimoto, Idecs, Inc. Reproducción de CD de audio en la unidad de CD-ROM interna del PC o utilización del UA-5 para reproducir música de juegos Usuarios de Windows 2000: Abra el cuadro de diálogo Propiedades del sistema.
-
Page 238: Conexión E Instalación De Los Controladores (Macintosh)
24 bits o una aplicación compatible con ASIO como Cubase VST, Logic Audio o SingerSongWriter. En el Modo avanzado, el UA-5 no puede reproducir datos de audio (como un CD de audio o sonidos de aviso) desde el gestor de sonido de Macintosh. - Page 239 ADVANCE del UA-5 (de selección de modo). * Para que la configuración del interruptor ADVANCE (de selección de modo) surta efecto, debe salir de todo software secuenciador y de todas las aplicaciones que utilicen el UA-5, apagar el UA-5 y luego volverlo a encender.
-
Page 240: Instalación Del Controlador Asio
En este apartado se explica cómo instalar el controlador ASIO, con el que su software secuenciador o software de edición de audio podrá utilizar el UA-5 Para obtener más detalles acerca de la instalación y la configuración del controlador ASIO, asegúrese de leer el documento English- ASIO-Setting ASIO Driver-E que hay en el CD-ROM del controlador del UA-5. - Page 241 Cubase VST, Logic Audio, Digital Performer, Metro). Abra el cuadro de diálogo para la configuración de audio de su software compatible con ASIO y seleccione [UA-5 ASIO 16bit] como dispositivo ASIO. Conexión e instalación de los controladores (Macintosh) Controlador que...
- Page 242 Profiler" del menú Apple. Aparecerá el cuadro de diálogo "Apple System Profiler". Haga clic en la ficha "Devices and Volumes". Con el UA-5 desactivado, utilice un cable USB para conectar el UA-5 al Macintosh. Sitúe el interruptor ADVANCE (de selección de modo) del UA-5 en la posición OFF.
- Page 243 El UA-5 utilizará el controlador integrado en el sistema operativo Mac. Mientras espere, el contenido de la pantalla no cambiará, pero el sistema estará detectando el UA-5. No toque ni el ratón ni el teclado. fig.05-37e_30 Para comprobar que el sistema ha detectado el controlador, diríjase...
- Page 244 Haga clic en la ficha "Speaker" o "Speaker Settings". xfig.05-46e_30 Con el volumen bajado en el UA-5 y en su equipo de audio periférico, haga clic en Start test. Las señales de prueba saldrán del UA-5; de la izquierda primero y de la derecha después, tal como se...
- Page 245 Reproducción de los datos de muestra Utilizaremos la funcionalidad estándar de Macintosh para reproducir los datos de muestra. Los datos de muestra se encuentran en el CD-ROM del controlador del UA-5. Prepare el CD-ROM. Inserte el CD-ROM AUDIO Capture en la unidad de CD- ROM de su PC.
-
Page 246: Guía De Aplicaciones Del Ua-5
Guía de aplicaciones del UA-5 Este apartado explica las diversas maneras de conectar el UA-5 y presenta algunas de sus aplicaciones. * Antes de conectarlo a otros dispositivos, debe bajar el volumen y cortar la alimentación para evitar anomalías en el funcionamiento o desperfectos en los altavoces. - Page 247 Guía de aplicaciones del UA-5 Grabación de una guitarra o un bajo Cuando toca la guitarra junto con datos de audio procedentes de su PC para grabar la performance en un secuenciador, únicamente se grabará en el PC la guitarra.
-
Page 248: Grabación Desde Un Micrófono
Guía de aplicaciones del UA-5 Grabación desde un micrófono Micrófono dinámico fig.mic.e Microphone INPUT Adjust the input level. fig.mic-con.e Si utiliza un micrófono electrostático, encienda el interruptor de funcionamiento virtual. * Si un dispositivo no requiere que el funcionamiento virtual se conecte a los jacks XLR, debe apagar el interruptor de funcionamiento virtual para evitar anomalías en el... - Page 249 Guía de aplicaciones del UA-5 Grabación desde un teclado A continuación, se explica cómo enviar una performance de teclado como datos de audio al PC y cómo grabarla en un software secuenciador. fig.keyboard.e Signal flow Keyboard OUTPUT INPUT Adjust the Turn on if you input level.
- Page 250 UA-5 Si el UA-5 está conectado, tal como se muestra arriba, a un dispositivo que envía (función Thru) el audio de entrada (como un MD o un DAT en modo de grabación) y se gira el interruptor INPUT MONITOR, el sonido realizará un loop entre el UA-5 y el otro dispositivo, lo que provocará...
- Page 251 * El UA-5 no es compatible con los formatos de audio de los dispositivos digitales profesionales. Es posible mezclar y grabar las entradas de los jacks de entrada 1 y 2 o de los jacks de entrada 3 y 4 con las señales de entrada del conector de entrada digital.
- Page 252 * El UA-5 no es compatible con los formatos de audio de los dispositivos digitales profesionales. En el UA-5, la entrada que proviene de los jacks de entrada o la señal de entrada del conector de entrada digital no se puede transmitir directamente al conector de salida digital.
- Page 253 Ajuste del tiempo de recuperación de datos Si utiliza el UA-5 en Modo avanzado, puede modificar la configuración del controlador para ajustar el tiempo de recuperación de datos del audio. Para ajustar el tiempo de recuperación de datos, modifique el tamaño del búfer en el cuadro de diálogo de configuración del controlador.
- Page 254 Guía de aplicaciones del UA-5 Utilización de ASIO Direct Monitor (Monitor directo ASIO) Si utiliza el UA-5 desde una aplicación compatible con ASIO2.0 en Modo avanzado, el interruptor INPUT MONITOR del UA-5 se puede controlar automáticamente desde la aplicación. Tal como se describe en “Apertura del cuadro de diálogo de configuración del controlador especial (pág.
- Page 255 Apertura del cuadro de diálogo de configuración del controlador especial Si utiliza un controlador WDM en Windows 2000: Abra el Panel de control y haga doble clic en EDIROL UA-5. Aparecerá el cuadro de diálogo “EDIROL UA-5 Driver Settings”. Si utiliza un controlador MME en Windows 2000: Abra el ""Panel de control"...
-
Page 256: Resolución De Problemas
• Es posible que pasen 15 segundos (o incluso más) entre la conexión del cable USB y la detección del UA-5. • ¿El cable USB está conectado correctamente? Asegúrese de que la unidad UA-5 y el PC están conectados correctamente a través de un cable USB. - Page 257 Si el PC o el concentrador USB tienen dos o más conectores USB y ha conectado el UA- 5 a un conector USB al que no había estado conectado nunca el UA-5, es posible que aparezca un cuadro de diálogo con el mensaje "Dispositivo desconocido", incluso en un sistema en el que ya se haya instalado el controlador.
- Page 258 • Es posible que el interruptor ADVANCE (de selección de modo) esté apagado si el interruptor de selección Sampling Frequency se ha configurado en 96 kHz. Si utiliza el UA-5 a 96 kHz, mueva el interruptor ADVANCE (de modo de selección) hasta la posición ON.
- Page 259 Composite", "?Dispositivo USB", "Dispositivo USB", y "Dispositivo USB composite" que encuentre. Si encuentra el controlador USB EDIROL UA-5 con un "!" amarillo o un "?"rojo al lado, elimínelo del mismo modo. 10. Cuando haya acabado de borrar los dispositivos no deseados, haga clic en [Aceptar] en el cuadro de diálogo Propiedades de Sistema.
- Page 260 (About the Sampling frequency select switch setting (pág. 11) • ¿Es posible que el volumen global del UA-5 esté fijado en 0 (en ese caso, gírelo totalmente en el sentido contrario a las agujas del reloj)? •...
- Page 261 Si está transmitiendo audio de los jacks de entrada 3 y 4, reduzca el nivel de entrada mediante el ajuste de volumen de los jacks de entrada 3/4del UA-5. Si está transmitiendo audio a partir de los jacks de entrada 1/2, utilice los controles de sensibilidad de entrada para reducir el nivel de entrada.
- Page 262 • A veces, se oye ruido en la entrada de línea o en la entrada del micrófono. Si un módulo de sonido MIDI compatible con USB y el UA-5 están conectados mediante USB al mismo PC y las salidas del módulo de sonido MIDI están conectadas a los jacks de entrada de línea de la unidad UA-5, puede oírse ruido procedente del PC a través del módulo de sonido...
- Page 263 El sonido se interrumpe durante la reproducción de audio • ¿Se están ejecutando muchas aplicaciones de manera simultánea en su PC? Si utiliza varias aplicaciones o inicia otras aplicaciones durante la reproducción, ésta puede interrumpirse en función del sistema de su PC. Salga de todas las aplicaciones que no utilice y vuelva a intentarlo.
- Page 264 UA-5 Driver Settings”. Si desea obtener más información, consulte el apartado "Something is wrong with playback; sound is interrupted or notes are missing" que se halla en el archivo Readme_e en la carpeta en la que ha instalado el "CD-ROM de controladores del UA-5".
- Page 265 • En el Panel de control, en "Memory" , fije Virtual Memory en "Off". • En función del tipo de conexión a Internet, utilice el UA-5 con la siguiente configuración. Si se conecta a Internet a través de un cable LAN Utilícelo mientras el cable LAN esté...
- Page 266 La reproducción o la grabación se para a mitad y es imposible proseguir • ¿Se ha procesado una gran carga mientras utilizaba el UA-5, como el acceso a una unidad de CD-ROM o a una red? Si se realiza una operación que implique el procesamiento de una gran carga mientras se utiliza el UA-5, es posible que no funcione correctamente.
- Page 267 “Administrador”. Encienda el interruptor ADVANCE (de modo de selección) del UA-5. Después de conectar el UA-5 al sistema a través de un cable USB, encienda el UA-5. Salga de todas las aplicaciones antes de eliminar el controlador.
- Page 268 USB y el ratón USB) Encienda el interruptor ADVANCE (de modo de selección) del UA-5. Después de conectar el UA-5 al sistema a través de un cable USB, encienda el UA-5. Salga de todas las aplicaciones antes de eliminar el controlador.
- Page 269 Usuarios de Macintosh Corte la alimentación del UA-5. Asimismo, desconecte el cable USB (que conecta el UA-5) del Macintosh. De la carpeta extensiones del sistema, arrastre el “Controlador USB UA-5 ” a la papelera de reciclaje para eliminarlo. Arrastre el controlador ASIO que ha instalado en "Instalación del controlador ASIO ”...
-
Page 270: Main Specifications
Main Specifications UA-5: USB Audio Interface Number of Audio Record/Playback Channels Record: 1 pair of stereo Playback: 1 pair of stereo Full duplex (except for 96 kHz setting) Signal Processing AD/DA Conversion: PC interface: Sampling Frequency Digital output: 44.1/48/96 kHz Digital input: 32/44.1/48/96 kHz *... - Page 271 MEMO...
- Page 272 MEMO...
-
Page 273: Federal Communications Commission Radio Frequency Interference Statement
Compliance Information Statement Model Name : Type of Equipment : Responsible Party : Telephone : NOTICE AVIS UA-5 USB Audio Interface Edirol Corporation North America Address : 425 Sequoia Drive, Suite 114, Bellingham, WA 98226 (360) 594-4276 For EU Countries... - Page 274 Information When you need repair service, call your nearest EDIROL/Roland Service Center or authorized EDIROL/Roland distributor in your country as shown below. HONG KONG AUSTRALIA Tom Lee Music Co., Ltd. EDIROL Australia Pty. Ltd. Service Division 72 Central Avenue Oak Flats NSW 2529...
Need help?
Do you have a question about the UA-5 and is the answer not in the manual?
Questions and answers