Advertisement
Quick Links
Owner's Manual
Bedienungsanleitung
Mode d'emploi
Manuale d'uso
Manual del usuario
Thank you, and congratulations on your choice of the UA-20.
Before using this unit, carefully read the sections entitled:
"USING THE UNIT SAFELY" (P. 3, 4) and "IMPORTANT
NOTES" (P. 5, 6). These sections provide important
information concerning the proper operation of the unit.
Additionally, in order to feel assured that you have gained a
good grasp of every feature provided by your new unit, this
manual should be read in its entirety. The manual should be
saved and kept on hand as a convenient reference.
Copyright © 2002 ROLAND CORPORATION
All rights reserved. No part of this publication may be
reproduced in any form without the written permission of
ROLAND CORPORATION.
Advertisement

Related Manuals for Edirol AudioCapture US-20


Summary of Contents for Edirol AudioCapture US-20
- Page 1 Owner’s Manual Bedienungsanleitung Mode d’emploi Manuale d’uso Manual del usuario Thank you, and congratulations on your choice of the UA-20. Before using this unit, carefully read the sections entitled: “USING THE UNIT SAFELY” (P. 3, 4) and “IMPORTANT NOTES” (P. 5, 6). These sections provide important information concerning the proper operation of the unit.
- Page 2 For the USA DECLARATION OF CONFORMITY Compliance Information Statement Model Name : UA-20 Type of Equipment : USB Audio Interface Responsible Party : Edirol Corporation North America Address : 425 Sequoia Drive, Suite 114, Bellingham, WA 98226 (360) 594-4276 Telephone :...
-
Page 3: Using The Unit Safely
If you EDIROL/Roland Service Center, or an experience any hearing loss or ringing authorized EDIROL/Roland in the ears, you should immediately distributor, as listed on the "Information"... - Page 4 Also, all cords nearest EDIROL/Roland Service and cables should be placed so they Center, or an authorized EDIROL/ are out of the reach of children. Roland distributor, as listed on the ....................
-
Page 5: Important Notes
IMPORTANT NOTES 291a In addition to the items listed under “USING THE UNIT SAFELY” on page 3, please read and observe the following: Power Supply Maintenance 401a • Before connecting this unit to other devices, • For everyday cleaning wipe the unit with a turn off the power to all units. - Page 6 IMPORTANT NOTES Handling CD-ROMs • Avoid touching or scratching the shiny underside (encoded surface) of the disc. Damaged or dirty CD-ROM discs may not be read properly. Keep your discs clean using a commercially available CD cleaner. Copyright • Unauthorized recording, distribution, sale, lending, public performance, broadcasting, or the like, in whole or in part, of a work (musical composition, video, broadcast,...
-
Page 7: Table Of Contents
Contents USING THE UNIT SAFELY................ 3 IMPORTANT NOTES ................. 5 Contents ....................7 Features of the UA-20................10 Awesome, high-quality, 24-bit sound ............... 10 Mic/guitar input....................10 Direct Monitor function..................10 WDM/ASIO 2.0 drivers included..............10 MIDI IN/OUT interface ..................10 Check the contents of the package ............ - Page 8 Contents Deutsch Anschlüsse herstellen und Treiber installieren (Windows)....82 Was ist ein Treiber? ....................82 Erweiterter Modus und Standardtreiber-Modus..........82 Installation des speziellen Treibers..............83 Einstellungen und Überprüfung ................ 99 Anschlüsse herstellen und Treiber installieren (Macintosh).... 105 Was ist ein Treiber? .................... 105 Erweiterter Modus und Standardtreiber-Modus...........
- Page 9 Contents Español Conexión e instalación de los controladores (Windows) ....203 ¿Qué es un controlador? ..................203 Modo avanzado y Modo de controlador estándar ........203 Instalación del controlador especial ..............204 Configuración y comprobación ................ 218 Conexión e instalación de los controladores (Macintosh) ....224 ¿Qué...
-
Page 10: Features Of The Ua-20
Features of the UA-20 Thank you, and congratulations on your choice of the UA-20. The UA-20 is a USB audio interface that can be connected to your computer by a single USB cable, allowing you to record and play back audio data in high-quality digital form. Awesome, high-quality, 24-bit sound You can use your computer to digitally record and play back unbelievably high- quality audio in 24-bit format. - Page 11 Features of the UA-20 What is USB? USB stands for Universal Serial Bus. It is a new interface used to connect various peripheral devices to a computer. USB allows more than one peripheral device to be connected via a single USB cable, and also allows data to be transmitted more rapidly than conventional serial ports.
-
Page 12: Check The Contents Of The Package
16 or Macintosh p. 42). * Please use only the included USB cable. If you require a replacement due to loss or damage, please contact a “EDIROL/Roland Service Center” listed in the “Information” section at the end of this manual. CD-ROM This contains the driver required in order to use the UA-20. -
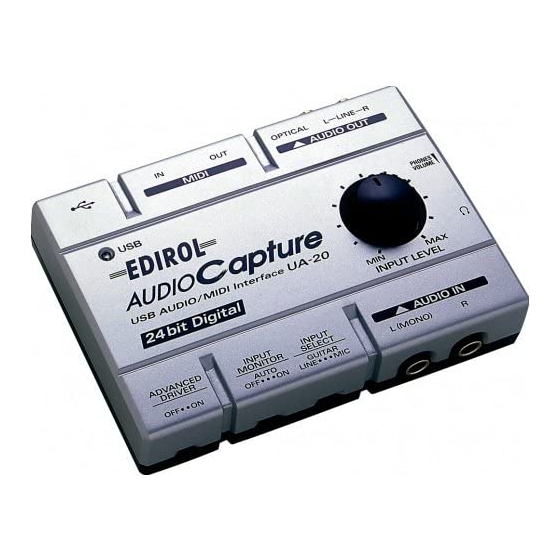
Page 13: Names Of Things And What They Do
Names of things and what they do fig.04-1 1. USB indicator This will light when you use the USB cable to connect the UA-20 to your computer, and the computer has recognized the UA-20. 2. USB connector Audio signals and MIDI signals can be transferred when the UA-20 is connected via a USB cable to your computer. - Page 14 Names of things and what they do 9. ADVANCE (mode select) switch This switches the operating mode. On (Advanced mode) The driver included with the UA-20 will be used to record/play/edit audio on sequencer software or waveform editing software with high audio quality and stable timing.
-
Page 15: Block Diagram
Names of things and what they do Block diagram fig.04-3... -
Page 16: Getting Connected And Installing Drivers (Windows)
Getting Connected and Installing Drivers (Windows) If you are using a Macintosh computer, please proceed to Getting Connected and Installing Drivers (Macintosh) (p. 42). What is a driver? fig.05-1e_50 A “driver” is software that transfers data between the UA-20 and application Application USB port software running on your... -
Page 17: Installing The Special Driver
Getting Connected and Installing Drivers (Windows) Switching between Advanced mode and Standard driver mode If you first install both the special driver and the standard driver, you will be able to switch between Advance and Standard driver modes by operating the UA-20's ADVANCE (mode select) switch. - Page 18 Getting Connected and Installing Drivers (Windows) Windows XP users If you are using Windows XP With the UA-20 disconnected, start up Windows. Professional, you must log on using a user name with an Disconnect all USB cables except for a USB keyboard and USB administrative account type mouse (if used).
- Page 19 Getting Connected and Installing Drivers (Windows) close the System Properties dialog box. Click [OK] to Exit all currently running software (applications). Also close any open windows. If you are using virus checking or similar software, be sure to exit it as well. Prepare the CD-ROM.
- Page 20 Make sure that the screen indicates “EDIROL UA-20 (WDM)”, select “Install from a list or specific In the case of the MME driver, location (Advanced)”, and make sure that “EDIROL click [Next]. UA-20 (MME)” is displayed. fig.2-7 The screen will indicate “Please choose your search and installation options”.
- Page 21 Getting Connected and Installing Drivers (Windows) If the “What action do you want Windows to take?” setting was not set to “Ignore”, a “Hardware Installation” dialog box will appear. If “What action do you want Windows to take?” is set to “Warn,” Click [Continue Anyway].
- Page 22 Continue the installation. fig.2-11_20 The Found New Hardware Wizard will appear. Verify that “EDIROL UA-20 (WDM)” or “EDIROL UA- 20 (MME)” is displayed, and click [Finish]. Wait until “Found New Hardware” appears near the taskbar. When driver installation has been completed, the System Settings Change dialog box will appear.
- Page 23 Getting Connected and Installing Drivers (Windows) If you changed “What action do you want Windows to take?” If you changed the What action do you want Windows to take? setting, restore the original setting after Windows restarts. If you are using Windows XP Professional, log on to Windows using the user name of an administrative account (e.g., Administrator).
- Page 24 Getting Connected and Installing Drivers (Windows) Windows 2000 users If the UA-20 is already connected to your computer With the UA-20 disconnected, start up Windows. and a message of “Add New Disconnect all USB cables except for a USB keyboard and USB Hardware Wizard”...
- Page 25 Getting Connected and Installing Drivers (Windows) Click [OK] to close the System Properties dialog box. Exit all currently running software (applications). Also close any open windows. If you are using virus checking or similar software, be sure to exit it as well. Insert the CD-ROM.
- Page 26 Getting Connected and Installing Drivers (Windows) Use the USB cable to connect the UA-20 to your This unit is equipped with a computer. protection circuit. A brief interval (a few seconds) after connecting a USB connector is required before the unit will If the “File signature verification”...
- Page 27 Click [Yes]. Continue the installation. fig.05-10e_30 The “Find New Hardware Wizard” may be displayed. Verify that “EDIROL UA-20 (WDM)” or “EDIROL UA-20 (MME)” is displayed, and click [Finish]. If the “Find New Hardware Wizard” dialog box is not displayed, proceed to step 18.
- Page 28 Getting Connected and Installing Drivers (Windows) If you changed “File signature verification” If you changed the “File signature verification” setting in step 5, restore the original setting after Windows restarts. After Windows restarts, log in to Windows as a user with administrative privileges, (such as Administrator).
- Page 29 Getting Connected and Installing Drivers (Windows) Windows Me/98 users If the UA-20 is already With the UA-20 disconnected, start up Windows. connected to your computer and a message of “Add New Disconnect all USB cables other than those for a USB Hardware Wizard”...
- Page 30 Getting Connected and Installing Drivers (Windows) Use the USB cable to connect the UA-20 to your This unit is equipped with a computer. protection circuit. A brief interval (a few seconds) after fig.05-15e_30 connecting a USB connector is required before the unit will operate normally.
-
Page 31: Installing The Os-Standard Driver
Getting Connected and Installing Drivers (Windows) Installing the OS-standard driver The procedure for installation and settings will depend on your system. Proceed to the appropriate section as follows. • Windows XP/2000 users ....(p. 31) • Windows Me users ......(p. 32) •... - Page 32 Getting Connected and Installing Drivers (Windows) Windows Me users With the UA-20 disconnected, start up Windows. Disconnect all USB cables except for a USB keyboard and USB mouse (if used). Exit all currently running software (applications). If you are using a virus checker or similar software, be sure to exit it as well.
- Page 33 Getting Connected and Installing Drivers (Windows) Restart Windows. Next, you will need to make the driver settings. Settings and checking (p. 36)) Windows 98 users The USB composite device driver is installed first, then the USB audio device driver is installed. Use the following procedure to install the drivers.
- Page 34 Getting Connected and Installing Drivers (Windows) fig.05-26e_30 When “What do you want Windows to do?” appears, select “Search for the best driver for your device (Recommended)”, and click [Next]. fig.05-27e_30 A dialog box like the one If the display indicates “Can't shown will appear.
- Page 35 Getting Connected and Installing Drivers (Windows) fig.05-33e_30 Next, the USB audio device will be detected automatically, and the “Add New Hardware Wizard” dialog box will appear. Click [Next], and proceed with the installation in the same way as in steps 8–11 (p. 34). fig.05-34e_30 When installation of the USB audio device driver...
-
Page 36: Settings And Checking
Getting Connected and Installing Drivers (Windows) Settings and checking Specifying the audio and MIDI input/output destination Windows XP/2000/Me users Open Control Panel. Click the Windows Start button, and from the menu that appears, select Settings | Control Panel. Windows XP Click the Windows start button, and from the menu that Depending on how your appears, select Control Panel. - Page 37 (p. 16). list that appears. Advanced mode Standard driver mode Sound EDIROL UA-20 OUT EDIROL UA-20 (Windows XP) USB Audio Device (Windows 2000/Me) playback Sound EDIROL UA-20 IN EDIROL UA-20 (Windows XP) recording USB Audio Device (Windows 2000/Me)
- Page 38 Standard Driver [Apply]. mode, refer to Advanced mode and Standard driver mode (p. 16). Advanced mode Standard driver mode Playback EDIROL UA-20 Out USB Audio Device Recording EDIROL UA-20 In USB Audio Device Click the MIDI tab.
- Page 39 (p. 16). appears, and click [Apply]. Advanced mode Standard driver mode MIDI output EDIROL UA-20 MIDI OUT MIDI cannot be handled when using Standard Driver mode. Close the Multimedia Properties dialog box. Click [OK] to complete the settings. This completes MIDI and audio input/output destination settings.
- Page 40 Controls the volume of “audio CDs” on the CD Player setting. internal CD-ROM drive of the computer. (*1) Controls the volume of sound output from the “EDIROL UA-20” audio output device. WAVE Digital output and analog output will change. Controls the volume of the software synthe-...
- Page 41 Getting Connected and Installing Drivers (Windows) When playing audio CDs from the computer’s internal CD-ROM drive, or using the UA-20 to play game music (Standard driver mode only) Windows XP/2000 users: Open the System Properties dialog box. Select Start | Settings | Control Panel, and in the Control Panel, double-click the System icon.
-
Page 42: Getting Connected And Installing Drivers (Macintosh)
Getting Connected and Installing Drivers (Macintosh) If you are using a Windows computer, please proceed to Getting Connected and Installing Drivers (Windows) (p. 16). What is a driver? fig.05-1e_50 A “driver” is software that transfers data between the Application UA-20 and application USB port software running on your USB cable... -
Page 43: Installing The Special Driver
Getting Connected and Installing Drivers (Macintosh) Switching between Advanced mode and Standard driver mode If you first install both the special driver and the standard driver, you will be able to switch between Advance and Standard driver modes by operating the UA-20's ADVANCE (mode select) switch. - Page 44 Getting Connected and Installing Drivers (Macintosh) Installing the UA-20 driver (OMS) Use the following procedure to install the UA-20 driver. OMS can be found in the OMS The included UA-20 OMS driver is an add-on module for Driver folder within the Driver using the UA-20 with OMS.
- Page 45 Getting Connected and Installing Drivers (Macintosh) OMS settings To check the OMS settings, you will first need to connect a MIDI sound module to the UA-20's MIDI OUT connector. For details on connecting a MIDI sound module, refer to the owner's manual for your MIDI sound module.
- Page 46 Getting Connected and Installing Drivers (Macintosh) fig.03-omsusb2.e The Create a New We recommend that you turn off AppleTalk, by selecting Studio Setup dialog Chooser from the Apple box will appear. menu. Click [Cancel]. If you accidentally clicked OK, click [Cancel] in the next screen.
- Page 47 Getting Connected and Installing Drivers (Macintosh) fig.03-omsusb07 Verify that MIDI transmission and reception can be performed correctly. From the Studio menu, choose Test Studio. fig.54 When you move the mouse cursor near the sound generator icon, the If the UA-20 does not produce cursor will change to a sound, refer to No sound shape.
- Page 48 Getting Connected and Installing Drivers (Macintosh) Installing the UA-20 driver (FreeMIDI) Use the following procedure to install the UA-20 driver. The included UA-20 FreeMIDI driver is an add-on module for using the UA-20 with FreeMIDI. In order to use it, FreeMIDI must be installed on the hard disk from which you started * Disconnect the UA-20 from the Macintosh before beginning the installation.
- Page 49 Getting Connected and Installing Drivers (Macintosh) FreeMIDI settings To check the FreeMIDI settings, you will first need to connect a MIDI sound module to the UA-20's MIDI OUT connector. For details on connecting a MIDI sound module, refer to the owner's manual for your MIDI sound module.
- Page 50 Getting Connected and Installing Drivers (Macintosh) Select UA-20 USB from the Settings folder you copied in step 3, and click [Open]. Verify that MIDI transmission and reception occur correctly. From the MIDI menu, choose Check Connections. fig.fm2 The mouse cursor will change to the shape of a keyboard.
-
Page 51: Installing The Asio Driver
Getting Connected and Installing Drivers (Macintosh) Installing the ASIO driver You must install the MIDI driver even if you will be using only audio on the UA-20. Be sure to install the MIDI driver before you install the ASIO driver. This section explains how to install the ASIO driver that allows the UA-20 to be used by your sequencer software or audio editing software. - Page 52 Getting Connected and Installing Drivers (Macintosh) ig.05-21e_30 From the Driver E– ASIO Driver folder of the CD-ROM, copy [UA-20 ASIO1.0 16bit] to the [ASIO Drivers] folder within the ASIO Drivers folder of the ASIO-compatible software you are using (e.g., Cubase VST, Logic Audio, Digital Performer, Metro, or SPARK LE).
-
Page 53: Installing The Os-Standard Driver
Getting Connected and Installing Drivers (Macintosh) Installing the OS-standard driver With the UA-20 disconnected, start up Mac OS. Exit all currently running software (applications). If you are using a virus checker or similar software, be sure to exit it as well. fig.05-35e_30 After starting up Mac OS, select Apple System Profiler from the... - Page 54 Getting Connected and Installing Drivers (Macintosh) fig.05-37e_30 In order to check that detection has been completed, once again go to “Apple System Profiler”, and select “Update all information” from the Commands menu. In the USB area, three audio devices will be displayed. If these are displayed correctly, driver installation has succeeded.
- Page 55 Getting Connected and Installing Drivers (Macintosh) xfig.05-46e_30 With the volume turned down The output volume of the UA- 20 cannot be adjusted with the on the UA-20 and on your Mac OS sound dialog box. peripheral audio equipment, Make volume adjustments click [Start Test].
-
Page 56: Ua-20 Application Guide
UA-20 application guide This chapter explains the various ways the UA-20 can be connected, and introduces some of its applications. * To prevent malfunction and/or damage to speakers or other devices, always turn down the volume, and turn off the power on all devices before making any connections. Basic use As shown in the diagram, you can connect headphones or monitor speakers, and monitor the playback sound from your application or the sound from the instrument or... -
Page 57: Recording A Guitar Or Bass
UA-20 application guide Recording a guitar or bass When you play your guitar along with audio data from your computer to record your performance on a sequencer, only the guitar will be recorded on the computer. fig.guitar.e Signal flow Adjust the input level. -
Page 58: Recording From A Mic
UA-20 application guide Recording from a mic fig.mic.e Signal flow Adjust the input level. Turn on if you want to monitor. Microphone Set this to MIC. fig.mic-con.e Use the Input volume to adjust the input level. Check the input level on the application that you are using. If you turn the input monitor switch to ON, the sound will be output from the headphone jack and the master output jacks. -
Page 59: Recording From A Keyboard
UA-20 application guide Recording from a keyboard Here’s how you can send a keyboard performance as audio data to your computer, and record it on sequencer software. fig.keyboard.e Signal flow Adjust the input level. Turn on if you want to monitor. Set this to LINE. -
Page 60: Recording An Analog Signal From An Audio Device
UA-20 application guide Recording an analog signal from an audio device fig.aux.e Signal flow Adjust the input level. Turn on if you want to monitor. Set this to LINE. LINE OUT Stereo Set The sound that is input to Input jack L(MONO) will be recorded on the left channel, and the sound that is input to R jack will be recorded on the right channel. -
Page 61: Recording A Midi Device
UA-20 application guide Recording a MIDI device fig.digital.e MIDI cable MIDI IN MIDI OUT MIDI Sound Module MIDI Keyboard USB cable port Signal flow Computer The MIDI messages from a MIDI keyboard connected to the MIDI IN connector can be sent via the UA-20 to sequencer software on your computer. -
Page 62: Digitally Recording The Output Of The Ua-20 On An Md
UA-20 application guide Digitally recording the output of the UA-20 on an MD Make connections as shown in the diagram. fig.MD.e Optical digital cable DIGITAL INPUT Signal flow * The UA-20 does not support audio formats of professional digital devices. On the UA-20, the input from the input jacks cannot be output directly to the Digital output connector. -
Page 63: Adjusting The Audio Latency
UA-20 application guide Adjusting the audio latency When using the UA-20 in Advanced mode, you can change the driver settings to adjust the latency of the audio. To adjust the latency, change the Buffer Size in the driver settings dialog box. * Latency is the time delay from when an application plays back audio data until the sound is actually heard from an audio device such as the UA-20. -
Page 64: Using Asio Direct Monitor
UA-20 application guide Using ASIO Direct Monitor If you are using the UA-20 from an ASIO2.0-compatible application in Advanced mode, the UA-20’s Input monitor switch can be controlled automatically from the application. As described in “Opening the special driver settings dialog box (p. 65)”, open the “Driver Settings”... - Page 65 The “EDIROL UA-20 Driver Settings” dialog box will appear. * In Windows XP, click “Switch to classic view” to switch the display to the classic view. EDIROL UA-20 will not be displayed unless the classic view is selected. If using the MME driver on Windows XP/2000: Open the “Control Panel”, and double-click “System”.
-
Page 66: Troubleshooting
Troubleshooting Troubleshooting If an unexpected problem occurs while using the UA-20, read this chapter first. It contains numerous tips for resolving problems. If you are using Windows or Macintosh for the first time, and as a result find it difficult to follow the procedural explanations, please refer to the manuals that came with your computer or operating system. - Page 67 Troubleshooting • Does your computer meet the USB specifications? If you are using a computer that does not fulfill the electrical requirements of the USB specifications, operation may be unstable. In this case, you may be able to solve the problem by connecting a USB hub.
- Page 68 Troubleshooting Can’t install/delete/use the driver in Windows XP/2000 • Did you log on to Windows as a user with administrative privileges? In order to install/delete/re-install the driver in Windows XP/2000, you must be logged into Windows as a user with administrative privileges, such as Administrator. For details, please contact the system administrator for your computer system.
- Page 69 “?Composite USB Device”, “?USB Device”, “USB Device”, and “USB composite device” that you find. If you find EDIROL UA-20 with a yellow “!” or a red “?” displayed beside it, delete this in the same way. When you have finished deleting the unwanted devices, click [OK] in the System Properties dialog box.
-
Page 70: Problems When Using The Ua-20
Troubleshooting Problems when using the UA-20 Operating system becomes unstable • Operation becomes unstable when the computer is started up with the UA-20 already connected Please start up your computer with the UA-20 disconnected, and then connect the UA-20. On a computer that uses a USB keyboard, starting up the computer with the UA-20 already connected may cause operation to become unstable. - Page 71 In order to record/play MIDI tracks using the UA-20, you must correctly install the UA-20 driver (Getting Connected and Installing Drivers (Windows) (p. 16)). Also make sure that the input port and output port are set as follows in your software. INPUT port OUTPUT port EDIROL UA-20 MIDI IN EDIROL UA-20 MIDI OUT...
- Page 72 Troubleshooting • Has the MIDI device you are using been selected correctly? Select [UA-20 MIDI IN/OUT] as the MIDI output device. • Are the track outputs set correctly? MIDI tracks to which no MIDI playback device is assigned will not be heard. If you want to play back a MIDI track, you must make sure that the MIDI device you want to use is displayed in your software as the MIDI output port.
- Page 73 Troubleshooting Distortion occurs in the sound from devices connected to the input jacks If you are inputting audio from Input jacks, use the UA-20 Input volume to reduce the input level. Sound from devices connected to the input jack is not heard in the headphones •...
- Page 74 Troubleshooting Noise is heard during audio playback • Is a mic or guitar still connected? If a mic or guitar is connected to the UA-20, disconnect the mic or guitar, and turn the input sensitivity knob all the way to the left. Disconnect any audio devices you are not using.
- Page 75 Troubleshooting • Are you using a USB device other than the UA-20? Try turning off the power of all USB audio devices other than the UA-20. • In some cases, you may also be able to solve this problem by grounding the chassis of your computer, or the grounding connector of the AC power supply plug of your computer.
- Page 76 Troubleshooting • Try using the following procedure to change your disk drive settings. The following setting item may not exist on some computers. In the Windows Control Panel, double-click System. Click the Device Manager tab. Double-click Disk Drives to see the list of devices. From the list, select GENERIC IDE DISK TYPE??, and click Properties to access the GENERIC IDE DISK TYPE?? Properties dialog box.
- Page 77 Restart Windows. • If you are using the special driver, you can solve this problem in the “EDIROL UA-20 Driver Settings” dialog box. For details, refer to the section “Something is wrong with playback; sound is interrupted or notes are missing” within the Readme_e file located in the folder in which you installed the CD-ROM.
- Page 78 Troubleshooting • Try increasing the Buffer Size in the ASIO Driver control panel. The name of the settings dialog box will differ depending on your software. * If you change the buffer size, you must exit the software and then restart it. * Roland can make no guarantee of, nor provide support regarding the operation of sequencer software and audio editing software made by another manufacturer.
-
Page 79: Deleting The Special Driver
Open the Control Panel, and double-click System. * In Windows XP, click “Switch to classic view” to switch the display to the classic view. EDIROL UA-20 will not be displayed unless the classic view is selected. Click the Hardware tab, and in the “Device Manager” area, click [Device Manager]. - Page 80 Click the Device Manager tab. Double-click “Sound, video, and game controllers” to see a list of devices. From the list, click “EDIROL UA-20” to select it, and click [Remove]. A dialog box will appear, asking you to confirm that you want to delete the driver.
- Page 81 Troubleshooting Macintosh users Disconnect the USB cable (by which the UA-20 is connected) from your Macintosh. From the system extensions folder, drag “USB UA-20 Driver” into the trash to delete it. Delete UA-20 from the OMS Folder inside the System folder, or drag UA-20 Driver from the FreeMIDI Folder to the trash.
-
Page 82: Anschlüsse Herstellen Und Treiber Installieren (Windows)
Anschlüsse herstellen und Treiber installieren (Windows) Wenn Sie einen Macintosh-Computer verwenden, lesen Sie bitte unter Anschlüsse herstellen und Treiber installieren (Macintosh) (S. 105) weiter. Was ist ein Treiber? fig.05-1e_50 Ein ”Treiber” ist Software, die Daten zwischen dem UA-20 und Application USB port Anwendungssoftware auf Ihrem Computer... -
Page 83: Installation Des Speziellen Treibers
Anschlüsse herstellen und Treiber installieren (Windows) Wählen Sie diesen Modus, wenn Sie eine Anwendung nutzen, die die Windows- eigenen Funktionen einsetzt, wie z.B. eine Anwendung, die das CD-ROM- Laufwerk des Computers verwendet, um CD-Audio wiederzugeben oder eine Anwendung, die den Software-Synthesizer nutzt, der in Windows enthalten ist. Der Standardtreiber, der mit Windows ausgeliefert wird, unterstützt ASIO nicht. - Page 84 Anschlüsse herstellen und Treiber installieren (Windows) MME-Treiber Dieser Treiber ermöglicht es Ihnen, 24-Bit-Audio auch von Anwendungen aus zu verwenden, die über keinen WDM-Treiber-Modus verfügen, wie z.B. Cool Edit. Es ist nicht möglich, den MME-Treiber mit dem WDM-Treibermodus einer Anwendung, wie z.B. SONAR, zu verwenden. * Es ist nicht möglich, beide Treiber, den WDM- und den MME-Treiber, zu installieren.
- Page 85 Anschlüsse herstellen und Treiber installieren (Windows) fig.2-1 Klicken Sie auf die Registerkarte Hardware und klicken Sie anschließend auf [Treibersignierung]. Öffnen Sie das Dialogfeld Treibersignaturoptionen. fig.2-2 Prüfen Sie, ob “Wie soll Windows vorgehen?” Wenn Sie “Wie soll Windows auf “Ignorieren” vorgehen?” in Schritt 4 eingestellt ist.
- Page 86 Anschlüsse herstellen und Treiber installieren (Windows) Klicken Sie auf die Windows-Schaltfläche Start. Wählen Sie im daraufhin angezeigten Menü die Option “Ausführen...”. Öffnen Sie das Dialogfeld Ausführen..fig.2-3_30 Geben Sie im angezeigten Dialogfeld Folgendes in das Feld Wenn Sie den MME-Treiber “Öffnen”...
- Page 87 Quelle Bei Verwendung des MME- installieren (für fortgeschrittene Benutzer)” und klicken Treibers sollten Sie Sie auf [Weiter]. sicherstellen, dass fig.2-7 "EDIROL UA-20 (MME)" angezeigt wird. Im Bildschirm wird folgende Meldung angezeigt: “Wählen Sie die Such- und Installationsoptionen”. Wählen Sie “Nicht suchen, sondern den zu installierenden Treiber selbst wählen”, und klicken Sie auf...
- Page 88 Anschlüsse herstellen und Treiber installieren (Windows) Wenn die Einstellung für “Wie soll Windows vorgehen?” nicht “Ignorieren” lautet, wird das Dialogfeld “Hardware-Installation” angezeigt. Wenn für Wie soll Windows vorgehen? “Warnen” aktiviert wurde, klicken Sie auf [Trotzdem fortsetzen]. Setzen Sie die Installation fort. Wenn für “Wie soll Windows vorgehen?”...
- Page 89 Der Assistent für das Suchen neuer Hardware erscheint. Prüfen Sie, ob “EDIROL UA-20 (WDM)” oder “EDIROL UA-20 (MME)” angezeigt wird und klicken Sie auf [Beenden]. Warten Sie, bis die Meldung “Neue Hardware gefunden” in der Nähe der Task-Leiste angezeigt wird.
- Page 90 Anschlüsse herstellen und Treiber installieren (Windows) Nachdem der Treiber installiert wurde, wird das Dialogfeld Geänderte Systemeinstellungen angezeigt. Klicken Sie auf [Ja]. Windows startet anschließend automatisch neu. Wenn Sie “Wie soll Windows vorgehen?” geändert haben Wenn Sie die Einstellung “Wie soll Windows vorgehen?” geändert haben, müssen Sie die ursprüngliche Einstellung nach dem Neustart von Windows wiederherstellen.
- Page 91 Anschlüsse herstellen und Treiber installieren (Windows) Windows 2000-Anwender Wenn das UA-20 bereits mit Ihrem Computer verbunden Starten Sie Windows, wobei das UA-20 ausgesteckt ist und der Assistent “Neue ist. Hardware hinzufügen” angezeigt wird, wechseln Sie Stecken Sie alle USB-Kabel außer der USB-Tastatur und der in den CD-ROM-Ordner mit USB-Maus aus (falls vorhanden).
- Page 92 Anschlüsse herstellen und Treiber installieren (Windows) Wenn “Ignorieren” eingestellt ist, klicken Sie einfach auf [OK]. Wenn “Ignorieren” nicht eingestellt ist, notieren Sie sich die Wenn Sie die Einstellung "Dateisignaturverifizierung" aktuelle Einstellung ("Warnen" oder "Sperren"). in Schritt 5 geändert haben, Anschließend ändern Sie die Einstellung auf “Ignorieren” müssen Sie die früheren und klicken auf [OK].
- Page 93 Anschlüsse herstellen und Treiber installieren (Windows) * Der Laufwerknamen "D:" kann auf Ihrem System anders lauten. Geben Sie statt dessen den Laufwerknamen Ihres CD-ROM- Laufwerks an. fig.05-6e_30 Das Dialogfeld SetupInf wird angezeigt. Jetzt kann der Treiber installiert werden. Bringen Sie den Schalter ADVANCE (Modusauswahl) Dieses Gerät ist mit einem des UA-20 in die Position ON.
- Page 94 Anschlüsse herstellen und Treiber installieren (Windows) Wenn in für "Dateisignaturverifizierung" nicht "Ignorieren" aktiviert wurde, erscheint die Meldung "Digitalsignatur nicht gefunden". Wenn für "Dateisignaturverifizierung" "Warnen" aktiviert ist, klicken Sie auf [Ja]. Setzen Sie die Installation fort. Wenn für "Dateisignaturverifizierung" "Sperren" aktiviert ist, klicken Sie auf [OK].
- Page 95 Das Dialogfeld "Neue Hardware gefunden" wird eventuell angezeigt. Prüfen Sie, ob "EDIROL UA-20 (WDM)" oder "EDIROL UA-20 (MME)" angezeigt wird und klicken Sie auf [Beenden]. Wenn der Assistent für das Suchen neuer Hardware nicht angezeigt wird, arbeiten Sie mit Schritt 18 weiter.
- Page 96 Anschlüsse herstellen und Treiber installieren (Windows) fig.05-11e_30 Möglicherweise wird das Dialogfeld Geänderte Systemeinstellungen angezeigt. Klicken Sie auf [Ja]. Windows startet anschließend automatisch neu. Wenn das Dialogfeld Geänderte Systemeinstellungen nicht erscheint, starten Sie Windows über das Start-Menü neu. Wenn Sie “Dateisignaturverifizierung” geändert haben Wenn Sie die Einstellungen für “Dateisignaturverifizierung”...
- Page 97 Anschlüsse herstellen und Treiber installieren (Windows) Windows Me/98-Anwender Wenn das UA-20 bereits mit Starten Sie Windows, wobei das UA-20 ausgesteckt ist. Ihrem Computer verbunden Stecken Sie alle USB-Kabel außer der USB-Tastatur und der ist und der Assistent “Neue Hardware hinzufügen” USB-Maus aus (falls vorhanden).
- Page 98 Anschlüsse herstellen und Treiber installieren (Windows) Bringen Sie den Schalter ADVANCE (Modusauswahl) des UA-20 in die Position ON. Dieses Gerät ist mit einem Schutzschaltkreis ausgestattet. Verwenden Sie das USB-Kabel, um das UA-20 an Nach dem Anschluss eines Ihren Computer anzuschließen. USB-Steckers benötigt das Gerät eine kurze Zeitspanne fig.05-15e_30...
-
Page 99: Einstellungen Und Überprüfung
Anschlüsse herstellen und Treiber installieren (Windows) Einstellungen und Überprüfung Angabe des Audio- und MIDI-Eingabe/ Ausgabeziels Windows XP/2000/Me-Anwender Öffnen Sie die Systemsteuerung. Klicken Sie in Windows auf Start und wählen Sie im daraufhin angezeigten Menü Einstellungen - Systemsteuerung. Windows XP Klicken Sie in Windows auf Start und wählen Sie im Abhängig von der daraufhin angezeigten Menü... - Page 100 Gerät] und wählen Sie Modus (S. 82). folgende Option aus der angezeigten Liste aus. Erweiterter Modus Standardtreiber-Modus Audio- EDIROL UA-20 OUT EDIROL UA-20 (Windows XP) USB-Audiogerät (Windows 2000/Me) Wiedergabe Audio- EDIROL UA-20 IN EDIROL UA-20 (Windows XP) aufnahme USB-Audiogerät (Windows 2000/Me)
- Page 101 Aufnahme folgende Optionen erhalten Sie unter Erweiterter und klicken Sie auf Modus und Standardtreiber- Modus (S. 82). [Übernehmen]. Standardtreiber- Erweiterter Modus Modus Wiedergabe EDIROL UA-20 OUT USB Audiogerät Aufnahme EDIROL UA-20 In USB Audiogerät Klicken Sie auf das Register MIDI.
- Page 102 Liste und Modus und Standardtreiber- klicken Sie auf [Anwenden]. Modus (S. 82). Erweiterter Modus Standardtreiber-Modus MIDI- EDIROL UA-20 MIDI OUT MIDI kann nicht verarbeitet werden, wenn der Ausgabe Standardtreiber-Modus verwendet wird. Schließen Sie das Dialogfeld Eigenschaften für Multimedia.
- Page 103 Wiedergabe Computers an. (*1) verwenden, wenn Sie die Passt die Lautstärke an, die vom Audio- Lautstärkeregelung in die Ausgabegerät "EDIROL UA-20" ausgegeben maximale Position bringen. WAVE wird. Die Digitalausgabe und die analoge Ausgabe werden hiermit geändert. Passt die Lautstärke des Software- SW Synth Synthesizer an, der in Windows integriert ist.
- Page 104 Anschlüsse herstellen und Treiber installieren (Windows) Beim Abspielen von Audio-CDs mit dem internen CD-ROM-Laufwerk des Computers oder wenn das UA-20 für die Wiedergabe der Musik von Spielen verwendet wird (nur Standardtreiber-Modus) Windows XP/2000-Anwender: Öffnen Sie das Dialogfeld Systemeigenschaften. Wählen Sie Start | Einstellungen | Systemsteuerung und doppelklicken Sie in der Systemsteuerung auf das Symbol System.
-
Page 105: Anschlüsse Herstellen Und Treiber Installieren (Macintosh)
Anschlüsse herstellen und Treiber installieren (Macintosh) Wenn Sie einen Windows-Computer verwenden, lesen Sie bitte Anschlüsse herstellen und Treiber installieren (Windows) (S. 82). Was ist ein Treiber? fig.05-1e_50 Ein "Treiber" ist Software, die Daten zwischen dem Application UA-20 und USB port Anwendungssoftware auf USB cable driver... - Page 106 Anschlüsse herstellen und Treiber installieren (Macintosh) Standardtreiber-Modus Das UA-20 befindet sich in diesem Modus, wenn der Schalter ADVANCE (Modusauswahl) an der Rückseite auf OFF gestellt wird. Es wird der Standard- USB-Audiotreiber verwendet, der in MacOS enthalten ist. Im Standardtreiber- Modus werden Audiosignale zwischen dem UA-20 und dem Computer mit einer Auflösung von 16 Bit und mit Sampling-Frequenzen von 44,1 kHz übertragen.
-
Page 107: Installation Des Speziellen Treibers
Anschlüsse herstellen und Treiber installieren (Macintosh) Installation des speziellen Treibers Sie müssen den MIDI-Treiber auch dann installieren, wenn Sie auf dem UA-20 nur Audio verwenden. Installieren Sie unbedingt den MIDI-Treiber. Verwenden Sie entweder OMS oder FreeMIDI als MIDI-Treiber. Wenn Sie OMS verwenden ......... (S. 107) Wenn Sie FreeMIDI verwenden ......... - Page 108 Anschlüsse herstellen und Treiber installieren (Macintosh) Beenden Sie alle aktuell ausgeführten Programme (Anwendungen). Wenn Sie ein Virenschutzprogramm oder ähnliche Software verwenden, müssen Sie diese ebenfalls beenden. Halten Sie die CD-ROM bereit. Legen Sie die CD-ROM in das CD-ROM-Laufwerk ein. Doppelklicken Sie auf das Symbol UA-20 OMS Driver-E Installer (das sich im Ordner Driver E-OMS Driver auf der CD-ROM befindet), um das Installationsprogramm zu starten.
- Page 109 Anschlüsse herstellen und Treiber installieren (Macintosh) OMS-Einstellungen Bevor Sie die OMS-Einstellungen prüfen können, müssen Sie ein MIDI-Soundmodul mit dem MIDI OUT-Anschluss des UA-20 verbinden. Weitere Informationen zum Anschluss eines MIDI- Soundmoduls erhalten Sie im Benutzerhandbuch für Ihr MIDI-Soundmodul. Bringen Sie den Schalter ADVANCE (Modusauswahl) des UA-20 in die Position ON.
- Page 110 Anschlüsse herstellen und Treiber installieren (Macintosh) fig.03-omsusb1a.e Wenn ein Dialogfeld ähnlich dem abgebildeten Dialogfeld angezeigt wird, klicken Sie auf [Turn It Off]. Anschließend wird ein Dialogfeld für die Bestätigung angezeigt. Klicken Sie hier auf [OK]. fig.03-omsusb2.e Wir empfehlen Ihnen, AppleTalk zu deaktivieren, Das Dialogfeld Create indem Sie im Apfelmenü...
- Page 111 Anschlüsse herstellen und Treiber installieren (Macintosh) fig.51e Wählen Sie im Menü Edit die Option OMS MIDI Setup. Aktivieren Sie im daraufhin angezeigten Dialogfeld OMS MIDI Setup die Option Run MIDI in background und klicken Sie auf [OK]. fig.52E Wählen Sie im Menü File die Option Make Current.
- Page 112 Anschlüsse herstellen und Treiber installieren (Macintosh) Beenden Sie OMS Setup. Wählen Sie im Menü File die Option [Quit]. Klicken Sie im Dialogfeld AppleTalk Confirmation auf [OK], um das Dialogfeld zu schließen. Damit wurden die Anschlüsse des UA-20 und des Macintosh sowie die Installation des MIDI-Treibers fertiggestellt.
- Page 113 Anschlüsse herstellen und Treiber installieren (Macintosh) Prüfen Sie den Installationsort und klicken Sie auf [Install] fig.3-2_40 Falls eine Nachricht wie abgebildet angezeigt wird, klicken Sie auf [Continue]. Alle anderen aktuell ausgeführten Anwendungen werden anschließend beendet und die Installation wird fortgesetzt. Ein Dialogfeld zeigt Folgendes an: Installation completed.
- Page 114 Anschlüsse herstellen und Treiber installieren (Macintosh) Einstellungen für FreeMIDI Bevor Sie die FreeMIDI-Einstellungen prüfen können, müssen Sie ein MIDI-Soundmodul mit dem MIDI OUT- Anschluss des UA-20 verbinden. Weitere Informationen zum Anschluss eines MIDI- Soundmoduls erhalten Sie im Benutzerhandbuch für Ihr MIDI-Soundmodul.
- Page 115 Anschlüsse herstellen und Treiber installieren (Macintosh) Wenn das Dialogfeld About Quick Setup angezeigt wird, klicken Sie auf [Cancel]. Wählen Sie im Menü File die Option Open. Wählen Sie UA-20 USB im Ordner Settings, den Sie in Schritt 3 kopiert haben, und klicken Sie auf Open. Prüfen Sie, ob die MIDI-Übertragung und der MIDI- Empfang fehlerfrei erfolgen.
-
Page 116: Installation Des Asio-Treibers
Anschlüsse herstellen und Treiber installieren (Macintosh) Installation des ASIO-Treibers Sie müssen den MIDI-Treiber auch dann installieren, wenn Sie auf dem UA-20 nur Audio verwenden. Installieren Sie unbedingt den MIDI-Treiber, bevor Sie den ASIO-Treiber installieren. In diesem Abschnitt wird erläutert, wie der ASIO-Treiber installiert wird, der die Verwendung des UA-20 durch Ihre Sequenzer-Software oder Audio-Bearbeitungssoftware ermöglicht. - Page 117 Anschlüsse herstellen und Treiber installieren (Macintosh) fig.05-21e_30 Kopieren Sie vom Ordner Driver E–ASIO Driver auf der CD-ROM [UA-20 ASIO1.0 16bit] in den Ordner [ASIO Drivers] innerhalb des Ordners ASIO Drivers der ASIO-kompatiblen Software, die Sie verwenden (z.B., Cubase VST, Logic Audio, Digital Performer, Metro oder SPARK LE).
-
Page 118: Ua-20 Application Guide
UA-20 application guide Regelung der Audio-Latenz Bei Verwendung des UA-20 im Erweiterten Modus können Sie die Treibereinstellungen anpassen, um die Latenz des Sounds anzupassen. Um die Latenz anzupassen, ändern Sie die Puffergröße im Dialogfeld für die Treibereinstellungen. * Latenz ist die zeitliche Verzögerung zwischen dem Abspielen von Audiodaten durch die Anwendung und der tatsächlichen Wiedergabe aus einem Audiogerät, wie z.B. -
Page 119: Verwendung Des Asio Direct Monitor
UA-20 application guide Verwendung des ASIO Direct Monitor Wenn Sie das UA-20 von einer ASIO 2.0-kompatiblen Anwendung aus im Erweiterten Modus einsetzen, kann der Input Monitor-Schalter des UA-20 automatisch von der Anwendung aus gesteuert werden. Öffnen Sie das Dialogfeld “Treibereinstellungen”, wie in “Öffnen des Dialogfelds für die Einstellungen des speziellen Treibers (S. - Page 120 Multimedia”. (Unter Windows 98: doppelklicken Sie auf “Multimedia”.) Klicken Sie auf die Registerkarte "Geräte" und doppelklicken Sie auf “Audio- Geräte”. Wählen Sie “EDIROL UA-20 Audio” und klicken Sie anschließend auf die Schaltfläche [Eigenschaften], um die Eigenschaften zu öffnen. Klicken Sie auf die Schaltfläche [Einstellungen] und das Dialogfeld “EDIROL-UA-20 Treibereinstellungen”...
-
Page 121: Fehlerbehebung
Fehlerbehebung Fehlerbehebung Wenn während der Verwendung des UA-20 unerwartete Probleme auftreten, lesen Sie bitte zunächst dieses Kapitel. Hier finden Sie eine Vielzahl von Tipps für die Lösung von Problemen. Wenn Sie mit Windows oder mit dem Macintosh zum ersten Mal arbeiten und daher Schwierigkeiten haben, die Erklärungen zu verstehen, lesen Sie bitte im Benutzerhandbuch Ihres Computers oder Ihres Betriebssystems nach. - Page 122 Fehlerbehebung • In manchen Fällen kann es vorkommen, dass bei Auslieferung Ihres PCs eventuell nicht alle Windows 98-Dateien installiert sind, die für die Unterstützung von Audio über USB erforderlich sind. Bitte wenden Sie sich diesbezüglich an den Hersteller Ihres Computers. •...
- Page 123 Fehlerbehebung Der Treiber kann unter Windows XP/2000 nicht installiert/gelöscht/verwendet werden • Haben Sie sich in Windows als Benutzer mit Administratorrechten angemeldet? Um den Treiber unter Windows XP/2000 zu installieren/zu löschen/neu zu installieren, müssen Sie in Windows als Benutzer mit Administratorrechten angemeldet sein, wie z.B.
- Page 124 “?USB-Verbundgerät”, “?USB-Gerät”, “USB-Gerät” und “USB- Verbundgerät”, die Sie finden können. Wenn Sie einen EDIROL UA-20 USB-Treiber mit einem gelben “!” oder roten “?” daneben sehen, löschen Sie auch diesen Eintrag. Nachdem Sie die unerwünschten Geräte endgültig entfernt haben, klicken Sie in den Systemeigenschaften auf [OK].
-
Page 125: Installation Des Pilotes Et Connexions (Windows)
Installation des pilotes et connexions (Windows) Si vous utilisez un Macintosh, reportez-vous à la section Installation des pilotes et connexions (Macintosh) (p. 146). Qu'est-ce qu'un pilote ? fig.05-1e_50 Un “pilote” est un logiciel qui sert à transférer les données entre l'UA-20 et Application USB port le logiciel tournant sur... -
Page 126: Installation Du Pilote Spécial
Installation des pilotes et connexions (Windows) Basculement entre mode Avancé et mode Standard Si vous installez à la fois le pilote spécial et le pilote standard, vous aurez la possibilité de basculer entre les modes Standard et Avancé en agissant sur le commutateur ADVANCED DRIVER de l’UA-20. - Page 127 Installation des pilotes et connexions (Windows) Windows XP Si vous utilisez Windows XP L’UA-20 étant débranché, démarrez Windows. Professional, vous devez ouvrir une session avec un Débranchez tous les câbles USB, à l’exception de ceux du nom d’utilisateur disposant clavier et de la souris (le cas échéant). des droits d’administrateur.
- Page 128 Installation des pilotes et connexions (Windows) [OK] fermer la boîte de dialogue Cliquez sur pour Propriétés système. Quittez tous les logiciels (applications) actifs. Fermez également toutes les fenêtres éventuellement ouvertes. Si vous utilisez un anti-virus, quittez-le également. Munissez-vous du CD-ROM. Introduisez-le dans le lecteur de CD de votre ordinateur.
- Page 129 Vérifiez que l’écran indique “EDIROL UA-20” sélectionnez “Installer à partir d’une liste ou d’un Dans le cas du pilote MME, emplacement spécifique vérifiez que “EDIROL UA-20 (Avancé)” puis cliquez sur [Suivant]. (MME)” s'affiche. fig.2-7 L’écran indiquera “Veuillez choisir vos options de recherche et d’installation”.
- Page 130 “EDIROL SD-20” puis cliquez sur [Suivant]. Dans le cas du pilote MME, L’installation du pilote vérifiez que “EDIROL UA-20 commence. (MME)” s'affiche. Si le paramètre “Que voulez-vous faire?” n'est pas défini sur “Ignorer”, la boîte de dialogue “Installation du matériel” s'affiche.
- Page 131 Poursuivez l’installation. fig.2-11_20 La boîte de dialogue Assistant ajout de nouveau matériel s'affiche. Vérifiez que “EDIROL UA-20 (WDM)” ou “EDIROL UA-20 (MME)” est affiché, puis cliquez sur [Terminer]. Attendez que “Nouveau matériel détecté” s’affiche près de la barre des tâches.
- Page 132 Installation des pilotes et connexions (Windows) Une fois l’installation du pilote terminée, la boîte de dialogue Modification des paramètres système s’affiche. Cliquez sur [Oui]. Windows redémarre automatiquement. Si vous avez modifié “Que voulez-vous faire ?” Si vous avez modifié “Que voulez-vous faire ?” restaurez le paramètre d’origine après le redémarrage de Windows.
- Page 133 Installation des pilotes et connexions (Windows) Windows 2000 Si l'UA-20 est déjà connecté à votre ordinateur et que le L’UA-20 étant débranché, démarrez Windows. message "Assistant ajout de Débranchez tous les câbles USB, à l’exception de ceux du nouveau matériel" s'affiche, accédez au dossier du clavier et de la souris (le cas échéant).
- Page 134 Installation des pilotes et connexions (Windows) Si vous avez modifié "Vérifier Cliquez sur [OK] pour fermer la boîte de dialogue la signature des fichiers" à Propriétés système. l’étape 5, vous devez restaurer le réglage précédent après installation du pilote. (–> Si Quittez tous les logiciels (applications) actifs.
- Page 135 Installation des pilotes et connexions (Windows) Utilisez le câble USB pour connecter l'UA-20 à Cet appareil est équipé d'un l’ordinateur. circuit de protection. Lors de la connexion au port USB, attendez quelques secondes avant d'utiliser l'appareil. Si l’option “Vérification de la signature des pilotes” n’a pas été...
- Page 136 La boîte de dialogue “Assistant Nouveau matériel détecté” peut s'afficher. Vérifiez que “EDIROL UA-20 (WDM)” ou “EDIROL UA-20 (MME)” est affiché, puis cliquez sur [Terminer]. Si la boîte de dialogue “Assistant ajout de nouveau matériel” ne s’affiche pas, passez à l’étape 18.
- Page 137 Installation des pilotes et connexions (Windows) fig.05-11e_30 La boîte de dialogue Modification des paramètres système peut s'afficher. Cliquez sur [Oui]. Windows redémarre automatiquement. Si la boîte de dialogue Modifier les paramètres système ne s’affiche pas, redémarrez Windows vous-même (menu Démarrer). Si vous avez modifié...
- Page 138 Installation des pilotes et connexions (Windows) Windows Me/98 Si l'UA-20 est déjà connecté à L’UA-20 étant débranché, démarrez Windows. votre ordinateur et que le message "Assistant ajout de Débranchez tous les câbles USB, à l’exception de ceux du nouveau matériel" s'affiche, clavier et de la souris.
- Page 139 Installation des pilotes et connexions (Windows) Utilisez le câble USB pour connecter l'UA-20 à Cet appareil est équipé d'un l’ordinateur. circuit de protection. Lors de la connexion au port USB, fig.05-15e_30 attendez quelques secondes avant d'utiliser l'appareil. Si vous utilisez Windows 98, une boîte de dialogue...
-
Page 140: Configuration Et Contrôle
Installation des pilotes et connexions (Windows) Configuration et contrôle Spécification de la destination d'entrée/ sortie audio et MIDI Windows XP/2000/Me : Ouvrez le Panneau de configuration. Cliquez sur le bouton Démarrer de Windows, puis dans le menu qui s’affiche, choisissez Paramètres | Panneau de configuration. - Page 141 Standard (p. 125). dans la liste qui s’affiche. Mode Avancé Mode Standard EDIROL UA-20 OUT EDIROL UA-20 (Windows XP) Lecture USB Audio Device (Windows 2000/Me) EDIROL UA-20 IN EDIROL UA-20 (Windows XP) Enregistrement USB Audio Device (Windows 2000/Me) EDIROL UA-20 MIDI OUT Les fonctions MIDI ne peuvent être...
- Page 142 Avancé et le mode Standard, reportez-vous à la [Appliquer]. section Mode Avancé et mode Standard (p. 125). Mode Avancé Mode Standard EDIROL UA-20 Out Périphérique audio Lecture Enregistre- EDIROL UA-20 In Périphérique audio ment Cliquez sur l'onglet MIDI.
- Page 143 Standard (p. 125). [Appliquer]. Mode Avancé Mode Standard Sortie MIDI EDIROL UA-20 MIDI OUT Les fonctions MIDI ne peuvent être utilisées en mode standard. Fermez la boîte de dialogue Propriétés de Multimédia. Cliquez sur [OK] pour confirmer.
- Page 144 à son Lecteur de CD lecteur de CD-ROM de l’ordinateur. (*1) maximum. Règle le volume de sortie du périphérique audio de sortie "EDIROL UA-20". Les sorties WAVE numériques et analogiques sont affectées. Règle le volume du synthétiseur logiciel SW Synth intégré...
- Page 145 Installation des pilotes et connexions (Windows) Lecture de CD audio depuis le lecteur de CD-ROM de l’ordinateur, ou utilisation de l’UA-20 pour l’environnement sonore des jeux (mode Standard seulement) Windows XP/2000/XP : Ouvrez la boîte de dialogue Propriétés Système. Sélectionnez Démarrer | Paramètres | Panneau de configuration et, dans le Panneau de configuration, cliquez deux fois sur l’icône Système.
-
Page 146: Installation Des Pilotes Et Connexions (Macintosh)
Installation des pilotes et connexions (Macintosh) Si vous utilisez Windows, reportez-vous à la section Installation des pilotes et connexions (Windows) (p. 125). Qu'est-ce qu'un pilote ? fig.05-1e_50 Un “ pilote" est un logiciel qui sert à transférer les Application données entre l'UA-20 et le USB port logiciel tournant sur votre USB cable... -
Page 147: Installation Du Pilote Spécial
Installation des pilotes et connexions (Macintosh) Basculement entre mode Avancé et mode Standard Si vous installez à la fois le pilote spécial et le pilote standard, vous aurez la possibilité de basculer entre les modes Standard et Avancé en agissant sur le commutateur ADVANCED DRIVER de l’UA-20. - Page 148 Installation des pilotes et connexions (Macintosh) Installation du pilote UA-20 (OMS) Procédez comme suit pour installer le pilote UA-20. OMS se trouve dans le dossier Le pilote OMS UA-20 est un module supplémentaire fourni OMS Driver du dossier pour pouvoir faire fonctionner l'UA-20 avec OMS. Pour Driver E sur le CD-ROM.
- Page 149 Installation des pilotes et connexions (Macintosh) Une boîte de dialogue s’affiche : Installation completed. Cliquez sur [Redémarrer] pour redémarrer le Macintosh. Paramètres OMS Pour vérifier les paramètres OMS, vous devez d'abord connecter un module de sons MIDI à la prise MIDI OUT de l'UA-20.
- Page 150 Installation des pilotes et connexions (Macintosh) fig.03-omsusb1a.e Si une boîte de dialogue similaire à celle présentée ici s'affiche, cliquez sur [Turn It Off]. Une boîte de confirmation s'affiche, cliquez sur [OK]. fig.03-omsusb2.e Nous vous recommandons de désactiver AppleTalk, en La boîte de dialogue ouvrant le Sélecteur dans le menu Apple.
- Page 151 Installation des pilotes et connexions (Macintosh) fig.52E Dans le menu File, sélectionnez Make Current (Rendre actif). Si vous ne pouvez pas sélectionner Make Current, cela signifie qu'il est déjà activé et que vous pouvez passer à l'étape suivante. fig.03-omsusb07 Vérifiez que l'envoi et la réception MIDI fonctionnent correctement.
- Page 152 Installation des pilotes et connexions (Macintosh) Installation du pilote UA-20 (FreeMIDI) Procédez comme suit pour installer le pilote UA-20. Le pilote UA-20 FreeMIDI est un module supplémentaire fourni pour pouvoir faire fonctionner l'UA-20 avec FreeMIDI. Pour pouvoir l'utiliser, FreeMIDI doit déjà être installé sur le disque de démarrage.
- Page 153 Installation des pilotes et connexions (Macintosh) Paramètres FreeMIDI Pour vérifier les paramètres FreeMIDI, vous devez d'abord connecter un module de sons MIDI à la prise MIDI OUT de l'UA-20. Pour plus d'informations sur la connexion d'un module de sons MIDI, reportez-vous à la documentation de votre module de sons MIDI.
- Page 154 Installation des pilotes et connexions (Macintosh) Quand la boîte de dialogue About Quick Setup s'affiche, cliquez sur [Cancel]. Dans le menu File, sélectionnez Open. Sélectionnez UA-20 USB dans le dossier Settings que vous avez copié à l'étape 3, puis cliquez sur [Open]. Vérifiez que l'envoi et la réception MIDI fonctionnent correctement.
-
Page 155: Installation Du Pilote Asio
Installation des pilotes et connexions (Macintosh) Installation du pilote ASIO Vous devez installer le pilote MIDI même si vous ne travaillez qu'avec de l'audio. N'oubliez pas d'installer le pilote MIDI. avant d'installer le pilote ASIO. Cette section explique comment installer le pilote ASIO pour permettre à... - Page 156 Installation des pilotes et connexions (Macintosh) fig.05-21e_30 A partir du dossier Driver E–ASIO Driver du CD-ROM, copiez [UA-20 ASIO1.0 16bit] dans le dossier [ASIO Drivers] du dossier ASIO Drivers du logiciel ASIO que vous utilisez (Cubase VST, Logic Audio, Digital Performer, Metro, SPARK LE, etc.).
-
Page 157: Ua-20 Application Guide
UA-20 application guide Réglage de la latence audio Si vous utilisez l’UA-20 en mode Avancé, vous pouvez modifier les réglages du pilote pour contrôler la latence de l’audio. Pour agir sur cette latence, modifiez la valeur de Buffer Size dans la boîte de dialogue de configuration du pilote. * Latence : intervalle de temps entre le moment où... -
Page 158: Utilisation D'asio Direct Monitor
UA-20 application guide Utilisation d’ASIO Direct Monitor Si vous utilisez l’UA-20 avec une application compatible ASIO2.0 en mode Avancé , le commutateur de contrôle d’entrée peut être réglé automatiquement depuis l’application. Comme expliqué à la section Ouverture de la boîte de dialogue des “... - Page 159 La boîte de dialogue “EDIROL UA-20 Driver Settings” s’affiche. * Avec Windows XP, cliquez sur “Switch to classic view” pour passer en mode Vue classique. EDIROL UA-20 ne s'affichera pas si la vue classique n'est pas activée. Avec le pilote MME et Windows XP/2000 : Ouvrez le Panneau de configuration et cliquez deux fois sur l'icône Système.
-
Page 160: En Cas De Problème
En cas de problème En cas de problème Si un problème inattendu se produit avec l'UA-20, veuillez lire ce chapitre. Il contient de nombreuses solutions aux problèmes les plus courants. Si vous utilisez Windows ou le Macintosh pour la première fois et que vous avez du mal à... - Page 161 En cas de problème • Votre ordinateur répond-il aux normes USB ? Si vous utilisez un ordinateur qui ne satisfait pas aux besoins électriques des spécifications USB, son fonctionnement peut être instable. Dans de tels cas, vous pouvez résoudre le problème en connectant un répartiteur USB (hub). •...
- Page 162 En cas de problème Impossible d’installer/désinstaller/utiliser le pilote avec Windows XP/2000 • Avez-vous ouvert une session Windows en tant qu’utilisateur doté de privilèges d’administration ? Pour pouvoir installer, supprimer ou réinstaller le pilote sous Windows XP/2000, vous devez avoir ouvert une session en tant qu’utilisateur doté de privilèges administratifs, comme Administrateur.
- Page 163 “?Périphérique USB composite”, “?Périphérique USB”, “Périphérique USB” ou “Périphérique USB composite” éventuellement présentes. Si vous voyez le pilote USB EDIROL UA-20 précédé d’un “!” jaune ou d’un “?” rouge, supprimez-le également. Lorsque vous avez fini de supprimer les périphériques indésirables, cliquez sur [OK] dans la boîte de dialogue Propriétés Système.
-
Page 164: Collegamenti E Installazione Dei Driver (Windows)
Collegamenti e installazione dei driver (Windows) Per gli utenti Macintosh, fare riferimento alla sezione Collegamenti e installazione dei driver (Macintosh) (pag. 185). Definizione di un driver fig.05-1e_50 Un “driver” è un programma che trasferisce i dati tra l’UA-20 e il Application USB port programma utilizzato sul... -
Page 165: Installazione Del Driver Speciale
Collegamenti e installazione dei driver (Windows) Il driver standard fornito con Windows non supporta ASIO. Installing the OS-standard driver (pag. 31)) * Per utilizzare la funzionalità MIDI, attivare il modo Advanced. Attivazione dei modi driver Advanced e Standard Se sono stati installati entrambi i driver, quello speciale e quello standard, si potrà passare dall’uno all’altro modo azionando l’interruttore di selezione ADVANCE dell’UA-20. - Page 166 Collegamenti e installazione dei driver (Windows) Utenti Windows XP Se si utilizza Windows XP Dopo aver scollegato l’UA-20, avviare Windows. Professional, è necessario collegarsi come un nome Scollegare tutti i cavi USB, ad eccezione della tastiera e del utente dotato di privilegi mouse USB, se utilizzati.
- Page 167 Collegamenti e installazione dei driver (Windows) [OK] chiudere la finestra di dialogo Fare clic su Proprietà del sistema. Chiudere tutti i programmi in corso di esecuzione. Chiudere anche le altre finestre aperte. Se si utilizza un programma antivirus o simile, accertarsi che sia anch’esso chiuso.
- Page 168 “EDIROL UA-20 (WDM)”, selezionare “Installa da un Se si tratta del driver MME, elenco o percorso accertarsi che “EDIROL UA-20 specifico (per utenti esperti)” e fare clic su [Avanti]. (MME)” sia visualizzato. fig.2-7 La finestra visualizzerà il seguente messaggio “Selezionare le opzioni...
- Page 169 (WDM)” e fare clic su [Avanti]. La procedura Se si tratta del driver MME, di installazione del accertarsi che “EDIROL UA-20 driver verrà avviata. (MME)” sia visualizzato. Se l’impostazione “Scegliere una delle seguenti opzioni” non è stata impostata su “Ignora”, comparirà il messaggio “Installazione guidata hardware”.
- Page 170 Verrà visualizzata la finestra di dialogo Installazione guidata nuovo hardware. Accertarsi che “EDIROL UA-20 (WDM)” o “EDIROL UA-20 (MME)” sia visualizzato e fare clic su [Fine]. Attendere fino a quando nella barra delle applicazioni non appare il messaggio “Trovato nuovo hardware”.
- Page 171 Collegamenti e installazione dei driver (Windows) Se è stato modificato il parametro “Scegliere una delle seguenti opzioni” Se l’impostazione Scegliere una delle seguenti opzioni è stata modificata, ripristinare il parametro d’origine dopo aver riavviato Windows. Se si utilizza Windows XP Professional, collegarsi con un nome utente dotato di privilegi di tipo amministrativo (ad esempio Administrator).
- Page 172 Collegamenti e installazione dei driver (Windows) Utenti Windows 2000 Se l’UA-20 è già collegato al computer e appare il Dopo aver scollegato l’UA-20, avviare Windows. messaggio “Installazione Scollegare tutti i cavi USB, ad eccezione della tastiera e del guidata nuovo hardware”, aprire sul CD-ROM la cartella mouse USB, se utilizzati.
- Page 173 Collegamenti e installazione dei driver (Windows) Fare clic su [OK] per chiudere la finestra di dialogo Proprietà del sistema. Chiudere tutti i programmi in corso di esecuzione. Chiudere anche le altre finestre aperte. Se si utilizza un programma antivirus o simile, accertarsi che sia anch’esso chiuso.
- Page 174 Collegamenti e installazione dei driver (Windows) Utilizzare il cavo USB per collegare l’UA-20 al Questo apparecchio è computer. provvisto di un circuito di protezione. È necessario aspettare qualche secondo dopo aver inserito un Se l’impostazione “Verifica firma file” non è stata connettore USB prima che impostata su “Ignora”, verrà...
- Page 175 “Installazione guidata nuovo hardware”. Accertarsi che “EDIROL UA-20 (WDM)” o “EDIROL UA-20 (MME)” sia visualizzato e fare clic su [Fine]. Se la finestra di dialogo “Nuovo componente hardware individuato” non è visualizzata, passare al passo 18.
- Page 176 Collegamenti e installazione dei driver (Windows) fig.05-11e_30 Viene visualizzata la finestra di dialogo Modifica impostazioni di sistema. Fare clic su [Sì]. Windows verrà riavviato automaticamente. Se la finestra di dialogo Modifica impostazioni di sistema non appare, riavviare Windows dal menu Start. Se è...
- Page 177 Collegamenti e installazione dei driver (Windows) Utenti Windows Me/98 Se l’UA-20 è già collegato al Dopo aver scollegato l’UA-20, avviare Windows. computer e appare il messaggio “Installazione Scollegare tutti i cavi USB ad eccezione della tastiera e del guidata nuovo hardware” , mouse.
- Page 178 Collegamenti e installazione dei driver (Windows) Impostare l’interruttore ADVANCE (selezione del modo) dell’UA-20 in posizione ON. Questo apparecchio è provvisto di un circuito di Utilizzare il cavo USB per collegare l’UA-20 al protezione. È necessario computer. aspettare qualche secondo dopo aver inserito un fig.05-15e_30 connettore USB prima che l’apparecchio funzioni...
-
Page 179: Configurazione E Verifica
Collegamenti e installazione dei driver (Windows) Configurazione e verifica Indicazione della destinazione audio e MIDI d’ingresso/uscita Utenti Windows XP/2000/Me Aprire il Pannello di controllo. In Windows, fare clic sul pulsante Start e nel menu selezionare Impostazioni | Pannello di controllo. Windows XP In Windows, fare clic sul pulsante Start e nel menu A seconda di come il sistema... - Page 180 Modo driver selezionare quanto segue Advanced e Standard (pag. 164). nell’elenco visualizzato. Modo Advanced Modo driver Standard EDIROL UA-20 OUT EDIROL UA-20 (Windows XP) Riproduzione suoni Periferica audio USB (Windows 2000/Me) Registrazione EDIROL UA-20 IN EDIROL UA-20 (Windows XP)
- Page 181 Modo driver opzioni sotto indicate e fare clic Advanced e Standard su [Applica]. (pag. 164). Modo Advanced Modo driver Standard Riproduzione EDIROL UA-20 Out Periferica audio USB EDIROL UA-20 In Periferica audio USB Registrazione Fare clic sulla scheda MIDI.
- Page 182 Advanced e Standard (pag. 164). Modo Advanced Modo driver Standard Uscita MIDI EDIROL UA-20 MIDI OUT Il modo driver Standard non permette la gestione dei dati MIDI. Chiudere la finestra di dialogo Proprietà multimediali. Fare clic su [OK] per completare le impostazioni.
- Page 183 CD-ROM interna del computer. (*1) Controlla il volume dell’output audio proveniente dalla periferica di uscita audio WAVE “EDIROL UA-20”. L’uscita digitale e quella analogica cambiano. Se è selezionata la casella Regola il volume del sintetizzatore software Disattiva o lo slider è al SW Synth incorporato in Windows.
- Page 184 Collegamenti e installazione dei driver (Windows) Riproduzione dei CD audio a partire dal CD-ROM del computer o quando si utilizza l’UA-20 per riprodurre la musica di videogiochi (solo modo driver Standard) Utenti Windows XP/2000: Aprire la finestra di dialogo Proprietà del sistema. Selezionare Start | Impostazioni | Pannello di controllo e nel Pannello di controllo, fare doppio clic sull’icona Sistema.
-
Page 185: Collegamenti E Installazione Dei Driver (Macintosh)
Collegamenti e installazione dei driver (Macintosh) Per gli utenti Windows, fare riferimento alla sezione Collegamenti e installazione dei driver (Windows) (pag. 164). Definizione di un driver fig.05-1e_50 Un “driver” è un programma che trasferisce i Application dati tra l’UA-20 e il USB port programma utilizzato sul USB cable... -
Page 186: Installazione Del Driver Speciale
Collegamenti e installazione dei driver (Macintosh) Attivazione dei modi driver Advanced e Standard Se sono stati installati entrambi i driver, quello speciale e quello standard, si potrà passare dall’uno all’altro modo azionando l’interruttore di selezione ADVANCE dell’UA-20. * Per rendere effettiva l’impostazione dell’interruttore ADVANCE, è necessario chiudere tutti i software sequencer e le altre applicazioni che utilizzano l’UA-20 e ricollegare l’apparecchio. - Page 187 Collegamenti e installazione dei driver (Macintosh) Installazione del driver UA-20 (OMS) Seguire la procedura sotto indicata per installare il driver L’applicazione OMS si trova UA-20. nella cartella OMS Driver Il driver UA-20 OMS è un modulo aggiuntivo che permette di all’interno della cartella utilizzare l’UA-20 con OMS.
- Page 188 Collegamenti e installazione dei driver (Macintosh) Verrà visualizzata una finestra di dialogo indicante Installation completed. Fare clic su [Restart] per riavviare il Macintosh. Impostazioni OMS Per controllare le impostazioni OMS sarà necessario innanzitutto collegare un modulo sonoro MIDI al connettore MIDI OUT dell’UA-20.
- Page 189 Collegamenti e installazione dei driver (Macintosh) fig.03-omsusb1a.e Se compare una finestra di dialogo come quella illustrata, fare clic su [Turn It Off]. Verrà visualizzata una finestra di dialogo di conferma; fare clic su [OK]. fig.03-omsusb2.e Si consiglia di disattivare AppleTalk selezionando Verrà...
- Page 190 Collegamenti e installazione dei driver (Macintosh) fig.52E Nel menu File selezionare Make Current. Se non è possibile selezionare Make Current, vuol dire che è stata già attivata e si può quindi passare all’operazione successiva. fig.03-omsusb07 Accertarsi che la trasmissione e la ricezione MIDI siano corrette.
- Page 191 Collegamenti e installazione dei driver (Macintosh) Installazione del driver UA-20 (FreeMIDI) Seguire la procedura sotto indicata per installare il driver UA-20. Il driver UA-20 FreeMIDI in dotazione è un modulo aggiuntivo che permette di utilizzare l’UA-20 con FreeMIDI. Per poterlo utilizzare, FreeMIDI deve essere già stato installato sul disco fisso di avvio.
- Page 192 Collegamenti e installazione dei driver (Macintosh) Impostazioni FreeMIDI Per controllare le impostazioni FreeMIDI sarà necessario innanzitutto collegare un modulo sonoro MIDI al connettore MIDI OUT dell’UA-20. Per maggiori informazioni sul collegamento del modulo sonoro MIDI, fare riferimento al manuale utente del modulo sonoro MIDI.
- Page 193 Collegamenti e installazione dei driver (Macintosh) Selezionare UA-20 USB nella cartella Settings copiata al passo 3 e fare clic su [Open]. Controllare che l’invio e la ricezione MIDI siano corrette. Nel menu MIDI selezionare Check Connections. fig.fm2 Il cursore del mouse assumerà...
-
Page 194: Installazione Del Driver Asio
Collegamenti e installazione dei driver (Macintosh) Installazione del driver ASIO È necessario installare il driver MIDI anche se si utilizzerà solo l’audio dell’UA-20. Non dimenticare di installare il driver MIDI prima di installare il driver ASIO. In questa sezione viene spiegato come installare il driver ASIO per poter utilizzare l’UA-20 con il software sequencer o un software di editing audio. - Page 195 Collegamenti e installazione dei driver (Macintosh) ig.05-21e_30 Dalla cartella Driver E–ASIO Driver sul CD-ROM, copiare [UA-20 ASIO1.0 16bit] nella cartella [ASIO Drivers] a sua volta all’interno della cartella ASIO Drivers del software ASIO compatibile utilizzato, ad esempio Cubase VST, Logic Audio, Digital Performer, Metro o SPARK LE. Avviare il software ASIO compatibile, ad esempio Cubase VST, Logic Audio, Digital Performer, Metro o Il titolo della finestra di...
-
Page 196: Ua-20 Application Guide
UA-20 application guide Regolazione della latenza audio Quando si utilizza l’UA-20 in modo Advanced, è possibile cambiare le impostazioni del driver per regolare la latenza dell’audio. Per regolare la latenza, modificare le dimensioni del buffer nella finestra di dialogo delle impostazioni. * La latenza è... -
Page 197: Uso Di Asio Direct Monitor
UA-20 application guide Uso di ASIO Direct Monitor Se si utilizza l’UA-20 a partire da un’applicazione ASIO2.0 compatibile in modo Advanced, l’interruttore di controllo dell’input dell’UA-20 può essere controllato automaticamente dall’applicazione. Come descritto nella sezione “Apertura della finestra di dialogo delle impostazioni del driver speciale (pag. - Page 198 Verrà visualizzata la finestra di dialogo “EDIROL UA-20 Driver Settings”. * In Windows XP, fare clic su “Passa alla visualizzazione classica” per attivare la visualizzazione classica. EDIROL UA-20 verrà visualizzato solo dopo aver attivato la visualizzazione classica. Se si utilizza il driver MME in Windows XP/2000: Nel “Pannello di controllo”...
-
Page 199: Ricerca E Soluzione Dei Problemi
Ricerca e soluzione dei problemi Ricerca e soluzione dei problemi Se nell’usare l’UA-20 si dovessero incontrare dei problemi, leggere questo capitolo. Contiene vari consigli per la risoluzione dei problemi. Se si utilizza Windows o Macintosh per la prima volta, e si incontrano dei problemi per capire le spiegazioni, fare riferimento al manuale fornito con il computer o il sistema operativo. - Page 200 Ricerca e soluzione dei problemi • Il computer soddisfa le specifiche tecniche USB? Se si utilizza un computer che non soddisfa le specifiche elettriche previste per poter utilizzare l’USB, la macchina potrebbe diventare instabile. In questo caso il problema potrebbe essere risolto collegando un hub USB. •...
- Page 201 Ricerca e soluzione dei problemi Impossibile installare/cancellare/usare il driver sotto Windows XP/2000 • Ci si è collegati a Windows come utenti dotati di privilegi di amministratore? Per poter installare, cancellare o reinstallare il driver sotto Windows XP/2000, è necessario essere collegati a Windows con i privilegi di un amministratore. Per maggiori informazioni, contattare l’amministratore del sistema del computer.
- Page 202 “?Periferica USB composita”, “?Periferica USB”, “Periferica USB” e “Periferica USB composita” eventualmente visualizzate. Se accanto al driver USB EDIROL UA-20 appare un “!” giallo o un “?” rosso, cancellare la periferica. Dopo aver cancellato tutte le periferiche che presentano dei problemi, fare clic su [OK] nella finestra Proprietà...
-
Page 203: Conexión E Instalación De Los Controladores (Windows)
Conexión e instalación de los controladores (Windows) Si es usuario de Macintosh, consulte el apartado Conexión e instalación de los controladores (Macintosh) (pág. 224). ¿Qué es un controlador? fig.05-1e_50 Un “controlador” es software que transfiere datos entre el UA-20 y el Application USB port software de aplicación que... -
Page 204: Instalación Del Controlador Especial
Conexión e instalación de los controladores (Windows) El controlador estándar integrado en Windows no da soporte a ASIO. Installing the OS-standard driver (pág. 31)) * Si desea utilizar MIDI, establezca el Modo avanzado. Pasar del Modo avanzado al Modo de controlador estándar y viceversa Si primero instala tanto el controlador especial como el controlador estándar, podrá... - Page 205 Conexión e instalación de los controladores (Windows) Usuarios de Windows XP Si es usuario de Windows XP Con el UA-20 desconectado, inicie Windows. Professional, debe iniciar la sesión con un nombre de Desconecte todos los cables USB excepto el del teclado USB y usuario con algún tipo de el ratón USB (si se utilizan).
- Page 206 Conexión e instalación de los controladores (Windows) [Aceptar] cerrar el cuadro de diálogo Haga clic en para Propiedades del sistema. Salga de todo el software que se esté ejecutando (aplicaciones). Cierre cualquier ventana que esté abierta. Si utiliza un programa antivirus o software similar, también debe cerrarlo. Prepare el CD-ROM.
- Page 207 “Instalar desde una lista o una ubicación específica En caso de que utilice el (Avanzada)” y haga clic en controlador MME, asegúrese [Siguiente]. de que aparezca “EDIROL fig.2-7 UA-20 (MME)”. La pantalla indicará “Elija sus opciones de búsqueda e instalación”.
- Page 208 Conexión e instalación de los controladores (Windows) Si no se ha establecido el valor de “¿Qué acción desea que realice Windows?” en “Ignorar”, aparecerá el cuadro de diálogo “Instalación de hardware”. Si “¿Qué acción desea que realice Windows?” está establecido en “Advertir”: Haga clic en [Continuar de todos modos].
- Page 209 Aparecerá el Asistente para hardware nuevo encontrado. Compruebe que aparezca “EDIROL UA-20 (WDM)” o “EDIROL UA-20 (MME)” y haga clic en [Finalizar]. Espere hasta que aparezca “Hardware nuevo encontrado” cerca de la barra de tareas. Una vez finalizada la instalación del controlador, aparecerá...
- Page 210 Conexión e instalación de los controladores (Windows) Si ha modificado “¿Qué acción desea que realice Windows?” Si ha modificado el valor para ¿Qué acción desea que realice Windows?, restablezca la configuración original después de reiniciar Windows. Si es usuario de Windows XP Professional, debe iniciar la sesión de Windows utilizando un nombre de usuario con algún tipo de cuenta administrativa (Administrador, por ejemplo).
- Page 211 Conexión e instalación de los controladores (Windows) Usuarios de Windows 2000 Si el UA-20 ya está conectado a su PC y aparece un mensaje de Con el UA-20 desconectado, inicie Windows. “Asistente para agregar Desconecte todos los cables USB excepto el del teclado USB y nuevo hardware”, vaya a la carpeta del CD-ROM el ratón USB (si se utilizan).
- Page 212 Conexión e instalación de los controladores (Windows) Haga clic en [Aceptar] para cerrar el cuadro de diálogo Propiedades del sistema. Salga de todo el software que se esté ejecutando (aplicaciones). Cierre cualquier ventana que esté abierta. Si utiliza un programa antivirus o software similar, también debe cerrarlo. Inserte el CD-ROM.
- Page 213 Conexión e instalación de los controladores (Windows) Utilice el cable USB para conectar el UA-20 al sistema. Esta unidad viene equipada con un circuito de protección. Es necesario dejar pasar un pequeño intervalo (de unos Si la configuración de “Verificación de la firma del segundos) después de archivo”...
- Page 214 Es posible que aparezca el “Asistente para encontrar nuevo hardware”. Compruebe que indique “EDIROL UA-20 (WDM)” o “EDIROL UA-20 (MME)” y haga clic en [Finalizar]. Si no aparece el cuadro de diálogo “Asistente para encontrar nuevo hardware”, prosiga con el paso 18.
- Page 215 Conexión e instalación de los controladores (Windows) fig.05-11e_30 Puede que aparezca el cuadro de diálogo Cambio de configuración del sistema. Haga clic en [Sí]. Windows se reiniciará automáticamente. Si no aparece el cuadro de diálogo Cambio de configuración del sistema, reinicie Windows desde el menú Inicio. Si ha modificado “Verificación de la firma del archivo”...
- Page 216 Conexión e instalación de los controladores (Windows) Usuarios de Windows Me/98 Si el UA-20 ya está conectado a Con el UA-20 desconectado, inicie Windows. su PC y aparece el mensaje “Asistente para agregar Desconecte todos los cables USB excepto el del teclado USB y nuevo hardware”, vaya a la el ratón USB.
- Page 217 Conexión e instalación de los controladores (Windows) Sitúe el Interruptor de selección de modo ADVANCE del UA-20 en la posición ON. Esta unidad viene equipada con un circuito de protección. Utilice el cable USB para conectar el UA-20 al sistema. Es necesario dejar pasar un pequeño intervalo (de unos fig.05-15e_30...
-
Page 218: Configuración Y Comprobación
Conexión e instalación de los controladores (Windows) Configuración y comprobación Especificación del destino de entrada/ salida de audio y MIDI Usuarios de Windows XP/2000/Me Abra el Panel de control. Haga clic en el botón Inicio y, en el menú que aparece, seleccione Configuración | Panel de control. - Page 219 (pág. 203). Modo avanzado Modo de controlador estándar Reproducción EDIROL UA-20 OUT EDIROL UA-20 (Windows XP) Dispositivo de audio USB de sonido (Windows 2000/Me) Grabación EDIROL UA-20 IN EDIROL UA-20 (Windows XP) de sonido...
- Page 220 [Aplicar]. (pág. 203). Modo avanzado Modo de controlador estándar Reproducción EDIROL UA-20 Out Dispositivo de audio USB Grabación EDIROL UA-20 In Dispositivo de audio USB Haga clic en la ficha MIDI.
- Page 221 Modo de [Aplicar]. controlador estándar (pág. 203). Modo avanzado Modo de controlador estándar EDIROL UA-20 MIDI OUT No puede utilizarse MIDI en el Salida de MIDI Modo de controlador estándar. Cierre el cuadro de diálogo Propiedades de multimedia.
- Page 222 CD-ROM de CD interna del PC. (*1) Controla el volumen de salida de sonido del dispositivo de salida de audio “EDIROL WAVE UA-20”. La salida digital y la salida analógica Si se encuentra seleccionada la variarán.
- Page 223 Conexión e instalación de los controladores (Windows) Reproducción de CD de audio en la unidad de CD-ROM interna del PC o utilización del UA-20 para reproducir música de juegos (sólo en Modo de controlador estándar) Usuarios de Windows XP o 2000: Abra el cuadro de diálogo Propiedades del sistema.
-
Page 224: Conexión E Instalación De Los Controladores (Macintosh)
Conexión e instalación de los controladores (Macintosh) Si es usuario de Windows, consulte el apartado Conexión e instalación de los controladores (Windows) (pág. 203). ¿Qué es un controlador? fig.05-1e_50 Un “controlador” es software que transfiere Application datos entre el UA-20 y el USB port software de aplicación que USB cable... -
Page 225: Instalación Del Controlador Especial
Conexión e instalación de los controladores (Macintosh) Seleccione este modo si está utilizando una aplicación que se sirve de los recursos propios del sistema operativo Mac, como una aplicación que utiliza la unidad de CD-ROM del PC para reproducir audio de CD o una aplicación que utiliza el sintetizador de software integrado en el sistema operativo Mac. - Page 226 Conexión e instalación de los controladores (Macintosh) Instalación del controlador del UA-20 (OMS) Lleve a cabo el siguiente procedimiento para instalar el OMS se encuentra en la controlador del UA-20. carpeta OMS Driver dentro El controlador OMS del UA-20 que se incluye es un módulo de la carpeta Driver E del añadido para utilizar el UA-20 con OMS.
- Page 227 Conexión e instalación de los controladores (Macintosh) Aparecerá un cuadro de diálogo que indica Installation completed. Haga clic en [Restart] para reiniciar el Macintosh. Configuración de OMS Para comprobar la configuración de OMS, primero debe conectar un módulo de sonido MIDI al conector MIDI OUT del UA-20.
- Page 228 Conexión e instalación de los controladores (Macintosh) fig.03-omsusb1a.e Si aparece un cuadro de diálogo como éste, haga clic en [Turn It Off]. Aparecerá un cuadro de diálogo de confirmación; haga clic en [OK]. fig.03-omsusb2.e Es conveniente desactivar AppleTalk, seleccionando Aparecerá el cuadro de Chooser en el menú...
- Page 229 Conexión e instalación de los controladores (Macintosh) fig.52E En el menú File, elija Make Current. Si no puede seleccionar Make Current, significa que ya se ha aplicado y puede continuar con el siguiente paso. fig.03-omsusb07 Compruebe que la transmisión y la recepción MIDI se realicen correctamente.
- Page 230 Conexión e instalación de los controladores (Macintosh) Instalación del controlador del UA-20 (FreeMIDI) Lleve a cabo el siguiente procedimiento para instalar el controlador del UA-20. El controlador FreeMIDI del UA-20 que se incluye es un módulo añadido para utilizar el UA-20 con FreeMIDI.
- Page 231 Conexión e instalación de los controladores (Macintosh) Configuración de FreeMIDI Para comprobar la configuración de FreeMIDI, primero debe conectar un módulo de sonido MIDI al conector MIDI OUT del UA-20. Para obtener información sobre cómo conectar un módulo de sonido MIDI, consulte el manual del usuario de su módulo de sonido MIDI.
- Page 232 Conexión e instalación de los controladores (Macintosh) Seleccione UA-20 USB en la carpeta Settings que ha copiado en el paso 3 y haga clic en [Open]. Compruebe que la transmisión y la recepción MIDI se realizan correctamente. En el menú MIDI, seleccione Check Connections. fig.fm2 El cursor del ratón se convertirá...
-
Page 233: Instalación Del Controlador Asio
Conexión e instalación de los controladores (Macintosh) Instalación del controlador ASIO Debe instalar el controlador MIDI aunque sólo pretenda utilizar audio en el UA-20. Asegúrese de instalar el controlador MIDI antes de instalar el controlador ASIO. En este apartado se explica cómo instalar el controlador ASIO, con el que su software secuenciador o software de edición de audio podrá... - Page 234 Conexión e instalación de los controladores (Macintosh) fig.05-21e_30 De la carpeta Driver E-ASIO Driver del CD-ROM, copie [UA-20 ASIO1.0 16bit] en la carpeta [ASIO Drivers] dentro de la carpeta ASIO Drivers del software compatible con ASIO que esté utilizando (por ejemplo Cubase VST, Logic Audio, Digital Performer, Metro o SPARK LE).
-
Page 235: Ua-20 Application Guide
UA-20 application guide Ajuste del tiempo de recuperación de datos Si utiliza el UA-20 en Modo avanzado, puede modificar la configuración del controlador para ajustar el tiempo de recuperación de datos del audio. Para ajustar el tiempo de recuperación de datos, modifique el tamaño del búfer en el cuadro de diálogo de configuración del controlador. -
Page 236: Utilización De Asio Direct Monitor (Monitor Directo Asio)
UA-20 application guide Utilización de ASIO Direct Monitor (Monitor directo ASIO) Si utiliza el UA-20 desde una aplicación compatible con ASIO2.0 en Modo avanzado, el interruptor INPUT MONITOR del UA-20 se puede controlar automáticamente desde la aplicación. Tal como se describe en “Apertura del cuadro de diálogo de configuración del controlador especial (pág. - Page 237 Aparecerá el cuadro de diálogo “EDIROL UA-20 Driver Settings”. * En Windows XP, haga clic en “Cambiar a vista clásica” para establecer la pantalla en modo de vista clásica. EDIROL UA-20 no aparecerá si no selecciona la vista clásica. Si utiliza un controlador MME en Windows XP/2000: Abra el “Panel de control”...
-
Page 238: Resolución De Problemas
Resolución de problemas Resolución de problemas Si sucede un problema inesperado mientras utiliza el UA-20, antes de nada lea este capítulo. Contiene múltiples consejos para solucionar problemas. Si utiliza Windows o Macintosh por primera vez y, como consecuencia de ello, encuentra dificultades para seguir las explicaciones de procedimiento, consulte los manuales de su PC o sistema operativo. - Page 239 Resolución de problemas • ¿Puede utilizar el cable USB en su PC? Consulte el manual de funcionamiento del PC y asegúrese de que puede utilizar el cable USB. • Se ha detectado que, en determinados casos, no todos los archivos de Windows 98 necesarios para dar soporte a audio a través de USB están instalados cuando el PC sale de fábrica.
- Page 240 Resolución de problemas El controlador no se ha instalado correctamente Tal como se describe en Deleting the special driver (pág. 79), elimine el controlador del dispositivo de audio USB instalado en el sistema y vuelva a instalar el controlador UA-20, tal como se describe en Conexión e instalación de los controladores (Windows) (pág.
- Page 241 [Aceptar]. Del mismo modo, si aparecen indicaciones de “?Dispositivo USB Composite”, “?Dispositivo USB”, “Dispositivo USB” o “Dispositivo USB Composite”, elimínelas. Si ve EDIROL UA-20 con un “!” amarillo o un “?”rojo al lado, elimínelo del mismo modo. Cuando haya terminado de eliminar los dispositivos no deseados, haga clic en [Aceptar] en el cuadro de diálogo Propiedades del sistema.
-
Page 242: Main Specifications
Main Specifications UA-20: USB Audio/MIDI Interface Number of Audio Record/Playback Interface Channels Record: 1 pair of stereo Digital output Playback: 1 pair of stereo Optical Type Full duplex (conforms to S/P DIF) Signal Processing Connectors PC interface: 24 bit Input Jack (1/4 inch phone type) x 2 Sampling Rate Digital Out Connector Digital output:... - Page 244 Information When you need repair service, call your nearest EDIROL/Roland Service Center or authorized EDIROL/Roland distributor in your country as shown below. HONG KONG BRAZIL HUNGARY AUSTRALIA MIDDLE EAST Tom Lee Music Co., Ltd. Intermusica Ltd Roland Brasil Ltda EDIROL Australia Pty. Ltd.
Need help?
Do you have a question about the AudioCapture US-20 and is the answer not in the manual?
Questions and answers