Edirol UA-3 Getting Started
Usb audio interface
Hide thumbs
Also See for UA-3:
- Owner's manual (121 pages) ,
- Getting started (72 pages) ,
- Getting started manual (48 pages)
Table of Contents
Advertisement
Quick Links
Getting Started
201a
Before using this unit, carefully read the sections entitled:
"USING THE UNIT SAFELY" and "IMPORTANT NOTES" (p. 2, p.
4). These sections provide important information concerning the
proper operation of the unit. Additionally, in order to feel assured
that you have gained a good grasp of every feature provided by
your new unit, Getting Started manual should be read in its
entirety. The manual should be saved and kept on hand as a
convenient reference.
Copyright © 2001 ROLAND CORPORATION
All rights reserved. No part of this publication may be reproduced in any form
without the written permission of ROLAND CORPORATION.
Advertisement
Table of Contents

Related Manuals for Edirol UA-3


Summary of Contents for Edirol UA-3
- Page 1 The manual should be saved and kept on hand as a convenient reference. Copyright © 2001 ROLAND CORPORATION All rights reserved. No part of this publication may be reproduced in any form without the written permission of ROLAND CORPORATION.
- Page 2 (except when this manual provides specific instructions directing you to do so). Refer all servicing to your retailer, the nearest Roland Service Center, or an authorized Roland distributor, as listed on the "Information" page. • Never use or store the unit in places that are: •...
- Page 3 • Protect the unit from strong impact. (Do not drop it!) • DO NOT play a CD-ROM disc on a conven- tional audio CD player. The resulting sound may be of a level that could cause permanent hearing loss. Damage to speakers or other system components may result.
-
Page 4: Important Notes
(including padding) that it came in, if possible. Otherwise, you will need to use equivalent packaging materials. • Use a cable from Roland to make the connection. If using some other make of connection cable, please note the following precautions. -
Page 5: Table Of Contents
You must read this before you use digital recording... 6 Introduction ... 7 Check the contents of the package ... 7 Parts of the UA-3 and their function ... 8 Connections and driver installation (Windows)... 10 What is a driver? ... 10 Making connections and installing the driver ... -
Page 6: You Must Read This Before You Use Digital Recording
If input from the UA-3’s analog inputs (line input jacks): •Recording can occur normally Do not use this unit for purposes that could infringe on a copyright held by a third party. Roland assumes no responsibility whatsoever with regard to any infringements of third-party copyrights arising through your use of this unit. -
Page 7: Introduction
UA-3. UA-3 USB cable Use this to connect the UA-3 to the USB connector of your computer. For details on connections, refer to Connections and driver installation (Windows p. 10, Macintosh p. 24). AUDIO Capture CD-ROM This contains software that you will need in order to use the UA-3. -
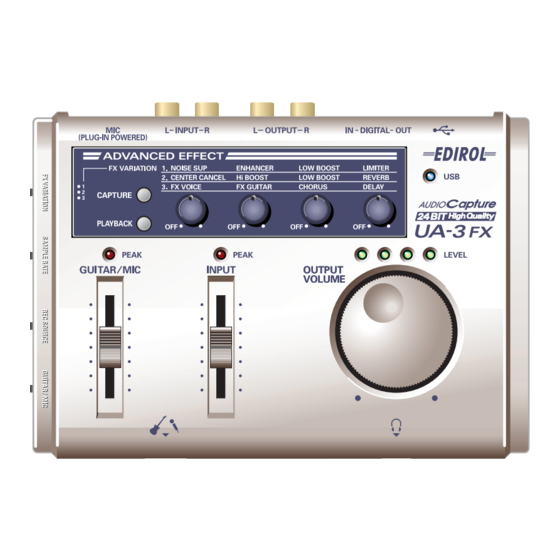
Page 8: Parts Of The Ua-3 And Their Function
This selects the input that will be used for recording. • Digital input connectors • Mic input jack USB indicator This will light when the UA-3 is connected and recognized to the computer. “DYNAMIC” “DIGITAL” / Line input jacks / Guitar input jack “INPUT + GUITAR/MIC”... - Page 9 Output level indicator The number of LED’s that light changes according to the output level from the Headphone jack and the Line output jacks use the Line output volume Line output volume This adjusts the volume that is output from the Headphone jack Line output jacks Guitar/Mic input peak indicator If the input level from the Guitar input jack...
-
Page 10: Connections And Driver Installation (Windows)
A driver is software that allows an application program running on your computer to transfer data to and from the UA-3 when it is connected to your computer via a USB cable. The driver passes data from the application to the UA-3, and passes data from the UA-3 to the application. -
Page 11: Making Connections And Installing The Driver
Always make sure to have the volume level turned down before connecting the UA-3. Even with the volume all the way down, you may still hear some sound when the power is switched on, but this is normal, and does not indicate a malfunction. - Page 12 1. Turn on the power of your computer and start up Windows. 2. Use a USB cable to connect the UA-3 to your computer. The UA-3 is recognized to the computer and the driver is installed all automatically. 3. After installing the driver, restart Windows.
- Page 13 1. Turn on the power of your computer and start up Windows. Insert the Microsoft Windows CD-ROM into your CD-ROM drive, and use a USB cable to connect the UA-3 to your computer (p. 11). Since some computers are sold with the contents of the Microsoft Windows CD-ROM already in the hard disk, a Microsoft Windows CD-ROM may not have been included.
- Page 14 Connections and driver installation (Windows) 3. The following dialog box will appear. Check CD-ROM drive, and click [Next]. fig.02-07.e 4. The following dialog box will appear. Click [Next]. fig.02-08.e * Depending on your system, the Location of driver may differ from the above illustration, but this is not a problem.
- Page 15 6. When installation of the USB Composite Device driver is finished, the following dialog box will appear. Click [Finish]. fig.02-10.e 7. Then, the USB Human Interface Device will automatically be detected, and the Add New Hardware Wizard dialog box will appear. Click [Next], and continue the installation using the very same procedure as steps 2--5 (p.
- Page 16 Connections and driver installation (Windows) 9. Next, a USB Audio Device will be detected automatically, and the Add New Hardware Wizard dialog box will appear. Click [Next], and continue the installation using the very same procedure as in steps 2 -- 5 (p.13 -- 14). fig.02-13.e 10.
- Page 17 Specifying the audio input/output device 1. Click the Windows [Start] button, and select [Settings] - [Control Panel]. Win 98 / Win 98SE In Control Panel, double-click the [Multimedia] icon to open the Multimedia Properties dialog box. Win 2000 / Me In Control Panel, double-click the [Sounds and Multimedia] icon to open the Sounds and Multimedia Properties dialog box.
- Page 18 1. Click the Windows [Start] button, and select [Programs] - [Accessories] - [Entertainment] - [Volume Control] to start it up. Windows Me fig.02-17.e 2. You can raise or lower the slider to adjust the volume of the UA-3. The following items can be set. USB Audio (Speaker) WAVE...
-
Page 19: Checking For Sound Output
When using your computer’s CD-ROM drive to play an audio CD, or when playing background music for games with the UA-3 If using Windows Me: Select [Start]-[Settings]-[Control Panel]. In the [Control Panel], double- click the [System] icon to access the System Properties dialog box. Click the [Device Manager] tab, and double-click the [CDROM] icon. - Page 20 Did you hear the sample data? If the sample data played correctly, your computer and the UA-3 are connected correctly, and the drivers have been installed correctly. If the data did not play correctly, refer to Troubleshooting (p. 36). Troubleshooting contains material to help you find and correct such problems.
-
Page 21: Deleting The Usb Audio Device Driver
Use the following procedure to delete the driver that is already installed. 1. Use a USB cable to connect the UA-3 to your computer. 2. Click the Windows [Start] button, and select [Settings] - [Control Panel]. 3. In [Control Panel], double-click [System] to open the System Properties dialog. -
Page 22: Basic Operation Of The D-Out Smoother
When audio is played back to a digital device such as MD or DAT connected to the digital output of the UA-3, a certain amount of time is required for the audio output to be locked immediately after audio playback, so that there may be no sound for one or two seconds, or the pitch or tempo may become incorrect. - Page 23 Using the D-Out Smoother The D-Out Smoother has an “ON/OFF” switch and a “TEST” button. “ON/OFF” switch Normally, you will leave this “ON” when using the digital output of the UA-3. Turn this “OFF” when connecting or disconnecting the UA-3. “TEST” button Click the [TEST] button.
-
Page 24: Connections And Driver Installation (Macintosh)
Connections and driver installation (Macintosh) * If you are a Windows user, refer to p. 10. In order to use the UA-3, you must first install a driver. UA-3 uses a driver included with Mac OS. Making connections and installing the driver... - Page 25 3. Click the [Devices and Volumes] tab control. 4. Use a USB cable to connect the UA-3 to your computer. 5. To make sure it is successfully recognized, select [Update all information] from the [Commands] menu. You should see the following three audio devices in the USB section, as shown below: fig.03-04.e...
- Page 26 Connections and driver installation (Macintosh) 8. Turn down the volume on the UA-3, and on your audio equipment, then click [Start Test]. fig.03-06.e 9. Test sounds are output from left to right, along with what appears on the screen; adjust the volume using the [Main Volume] bar. When you are finished, click [Stop Test].
-
Page 27: Known Issues: Ua-3
Expression Mode to Response Priority. • The standard driver that comes with Mac OS is not ASIO compatible. • When you start up your computer with the UA-3 connected, the computer may become unstable. If this occurs, start up your computer before connecting the UA-3, and connect the UA-3 after start-up. -
Page 28: Checking For Sound Output
The sample data will begin playing. Did you hear the sample data? If the sample data played correctly, your computer and the UA-3 are connected correctly, and the drivers have been installed correctly. If the data did not play correctly, refer to Troubleshooting (p. 36). Troubleshooting contains material to help you find and correct such problems. -
Page 29: Appendices
LINE IN Set to "INPUT+GUITAR/MIC" * The sampling rate of the UA-3’s digital output is 44.1kHz. Audio data of a sampling rate other than 44.1kHz will be automatically converted within a computer to 44.1kHz, and will be output from the digital output connectors of the UA-3. - Page 30 Line input jacks, Mic input jack or Guitar input jack, refer to p.31 -- 34. On Stereo Headphones the UA-3, it is not possible to mix the signal from these inputs with the signal from the digital input connector and record them together.
- Page 31 LINE IN Audio cable USB cable LINE port UA-3 In order to record at the best possible audio quality, do not connect a guitar or mic to the "GUITAR" jack or "MIC" jack. Lower the "GUITAR/MIC" slider to the lowest position.
- Page 32 USB cable audio data on the computer LINE port Stereo Headphones UA-3 The guitar input and audio data on the compute Guitar will be mixed and output. Signal flow of audio data on the computer GUITAR signal flow...
- Page 33 Stereo Headphones UA-3 The MIC will be output. MIC input signal flow Appendices CONDENSER MIC The UA-3 supports small port multimedia microphones used for adding narration, and is compatible with plug-in powered monaural microphones. Howling could be produced depending on...
- Page 34 The GUITAR and LINE IN will be mixed and output. LINE LINE port UA-3 Guitar LINE input signal flow GUITAR input signal flow you use the slider to adjust the level so it is as high It is not possible to...
-
Page 35: Block Diagram
UA-3 Block Diagram fig.UA3Block.e UA-3 Block Diagram [Recording input select switch is set to INPUT + GUITAR/MIC] USB Connector USB indicator Digital input connector (Optical) Line input peak indicator Line input jacks Guitar input jack Guitar/Mic input peak indicator Mic input jack... -
Page 36: Troubleshooting
The power conservation mode of your computer may limit the power that is supplied to USB. Check the settings of your computer. In some cases, the UA-3 cannot be used with a bus-powered hub (a hub that does not contain a power supply). Please use a self-powered hub (a hub that contains a power supply). - Page 37 If your computer or USB hub has two or more USB connectors, connecting the UA-3 to a USB connector to which the UA-3 has never before been connected may cause the Add New Hardware Wizard dialog box will appear even though the drivers have already been installed.
- Page 38 Depending on your application, playing audio with a digital device such as an MD connected to the digital output of the UA-3 may cause a certain amount of time to be required for the digital audio output to be locked immediately after playback, so that there will be no sound for one or two seconds. If this occurs, you can use the D-Out Smoother software from the included CD-ROM to make audio play smoothly.
-
Page 39: Sound Is Distorted
Also, the number of LED’s in the output level indicator will change according to the output level of the UA-3. If the red LED lights, use the line output volume to lower the volume. -
Page 40: Sound Is Interrupted During Audio Playback
Troubleshooting Sound is interrupted during audio playback • Try increasing the memory You can increase the processing power of your computer by adding more memory. For details on adding memory, refer to the owner’s manual for your computer. • Does your computer fulfill the USB specifications? The audio may be interrupted if you are using a computer that does not electrically meet the USB specifications. - Page 41 • Data that contains the SCMS flag cannot be recorded digitally. The UA-3 supports SCMS (p. 6), so that if SCMS-flagged data (such as data from an MD that was digitally copied from a commercial music CD) is input to the digital connector, the UA-3 will not be able to record this on the computer.
- Page 42 Does the game use an audio CD for background music? If an audio CD is used to provide background music for the game, refer to When using your computer’s CD-ROM drive to play an audio CD, or when playing background music for games with the UA-3 (p. 19).
-
Page 43: Problems Common To Software In General
[Tools] - [Audio options] - [Settings] - [Default sampling rate] An Application hangs up When using digital music software for digital recording with the UA-3’s recording input switch set to DIGITAL, be absolutely sure that a digital device is connected. - Page 44 Troubleshooting A shortcut error appears when starting up Windows If you uninstall the D-Out Smoother with the Register to STARTUP checked (p. 23), the following error message will appear when you start up Windows. In this case, click [NO] to close the message. fig.06-01.e Use the following procedure to delete this message.
-
Page 45: Specifications
32 kHz/44.1 kHz/48 kHz * When you record audio digitally from a digital device, UA-3 does not support the switching function of the sampling rate of the digital device. If you want to switch the sampling rate, you have to reconnect the digital cable. -
Page 46: System Requirements
UA-3, Roland cannot guarantee that a given computer can be used satisfactorily with the UA-3 based solely on the fact that it meets the above requirements. This is because there are too many other variables that may influence the processing environment, including differences in motherboard design and the particular combination of other devices involved. - Page 47 This product complies with the requirements of European Directive 89/336/EEC. FEDERAL COMMUNICATIONS COMMISSION RADIO FREQUENCY INTERFERENCE STATEMENT This equipment has been tested and found to comply with the limits for a Class B digital device, pursuant to Part 15 of the FCC Rules.
- Page 48 Information When you need repair service, call your nearest Roland/EDIROL Service Center or authorized Roland/EDIROL distributor in your country as shown below. INDIA AUSTRALIA Rivera Digitec (India) Pvt. Ltd. EDIROL Australia Pty. Ltd. 409, Nirman Kendra Mahalaxmi 72 Central Avenue Flats Compound Off.
Need help?
Do you have a question about the UA-3 and is the answer not in the manual?
Questions and answers