Table of Contents
Advertisement
Getting Started
Thank you for purchasing the UA-5 USB Audio Interface.
Before using this unit, carefully read the sections entitled: "USING
THE UNIT SAFELY" and "IMPORTANT NOTES" (Getting
Started p. 2- p.4). These sections provide important information
concerning the proper operation of the unit. Additionally, in order
to feel assured that you have gained a good grasp of every feature
provided by your new unit, Getting Started should be read in its
entirety. The manual should be saved and kept on hand as a
convenient reference.
Copyright © 2001 ROLAND CORPORATION
All rights reserved. No part of this publication may be reproduced in any
form without the written permission of ROLAND CORPORATION.
Advertisement
Table of Contents

Related Manuals for Edirol Edirol Audio Capture UA-5


Summary of Contents for Edirol Edirol Audio Capture UA-5
-
Page 1: Getting Started
The manual should be saved and kept on hand as a convenient reference. Copyright © 2001 ROLAND CORPORATION All rights reserved. No part of this publication may be reproduced in any form without the written permission of ROLAND CORPORATION. -
Page 2: Using The Unit Safely
Refer all ....................servicing to your retailer, the nearest • This unit, either alone or in combi- Roland Service Center, or an autho- nation with an amplifier and rized Roland distributor, as listed on headphones or speakers, may be the "Information"... - Page 3 AC adaptor from the be located so their location or position outlet, and request servicing by your does not interfere with their proper retailer, the nearest Roland Service Center, or ventilation. an authorized Roland distributor, as listed on ....................
-
Page 4: Important Notes
• Use a cable from Roland to make the connection. If using some other make of • This device may interfere with radio and connection cable, please note the following television reception. -
Page 5: Table Of Contents
CONTENTS USING THE UNIT SAFELY ..............2 IMPORTANT NOTES................4 Features of the UA-5 ................6 Check the contents of the package ............8 Names of things and what they do ............. 10 Front panel......................... 10 Rear panel ........................13 Block diagram...................... -
Page 6: Features Of The Ua-5
Mac), application allowing high performance with music software such as SONAR(TM), Cubase(TM), Logic(TM). * Roland will provide no guarantee or support regarding operation with sequencer software or audio editing software made by another manufacturer. Please contact the manufacturer of the... - Page 7 Features of the UA-5 What is USB? USB stands for Universal Serial Bus. It is a new interface used to connect various peripheral devices to a computer. USB allows more than one peripheral device to be connected via a single USB cable, and also allows data to be transmitted more rapidly than conventional serial ports.
-
Page 8: Check The Contents Of The Package
Macintosh–> p. 34. * Please use only the included USB cable. If you require a replacement due to loss or damage, please contact a “EDIROL/Roland Service Center” listed in the “Information” section at the end of this manual. UA-5 Driver CD-ROM fig.03-3... - Page 9 6. TERMINATION OF THE LICENSE Roland reserves the right to terminate this license if you fail to comply with any of the terms and conditions contained herein. You hereby agree that upon such a termination, you will not use give away, loan, lease or re-sell the SOFTWARE.
-
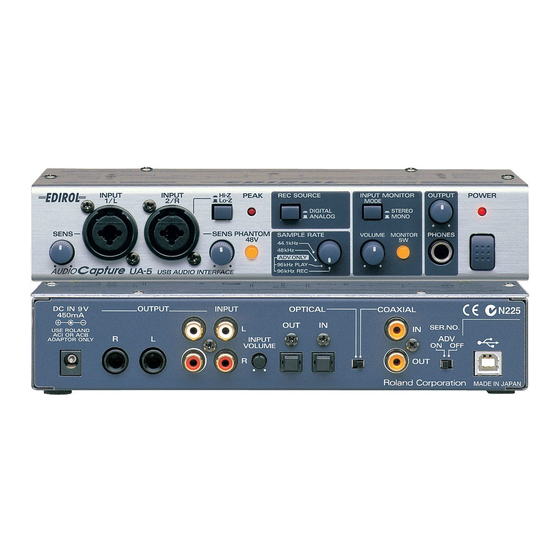
Page 10: Names Of Things And What They Do
Names of things and what they do Front panel fig.04-1 9 10 1. Input jacks 1, 2 fig.04-1ae These are input jacks for analog audio signals. These are combination XLR and phone jacks, allowing you to XLR type connect either type of plug. Both balanced and unbalanced devices can be connected. - Page 11 Names of things and what they do 3. Input impedance select switch Depending on the device connected to Input jack 2, use this switch to select either high impedance (Hi-Z) or low impedance (Lo-Z). If you are connecting a guitar or bass to Input jack 2, set this switch to the high impedance setting (Hi-Z).
- Page 12 Names of things and what they do fig.04-1 9 10 8. Input monitor stereo/mono select button This button selects whether the input signal from the Input jacks 1 and 2, Input jacks 3 and 4, and the Digital input connector will be monitored in stereo or in MONO.
-
Page 13: Rear Panel
Names of things and what they do Rear panel fig.04-2 15. USB connector Connect your computer here via a USB cable. Do not connect or disconnect the USB cable while an audio playback application is recording or playing. Doing so may cause the application to hang up. -
Page 14: Block Diagram
Names of things and what they do fig.04-2 21. Digital output connector (optical) Connect a coaxial cable here when you want to digitally output an audio signal to a digital recorder such an MD or DAT. 22. Input jacks 3 and 4 adjustment volume Adjusts the Input level of Input jacks 3 and 4. -
Page 15: Getting Connected And Installing Drivers (Windows)
Getting Connected and Installing Drivers (Windows) If you are using a Macintosh computer, please proceed to "Getting Connected and Installing Drivers (Macintosh) (p. 34). What is a driver? fig.05-1e_50 A “driver” is software that transfers data between the UA-5 and application Application USB port software running on your... -
Page 16: Installing The Special Driver
Getting Connected and Installing Drivers (Windows) Switching between Advanced mode and Standard driver mode If you first install both the special driver and the standard driver, you will be able to switch between Advance and Standard driver modes by operating the UA-5's ADVANCE (mode select) switch. -
Page 17: Installing The Driver
Getting Connected and Installing Drivers (Windows) Installing the driver The WDM driver and the Legacy driver can be installed using the same procedure. If the UA-5 is already connected to your computer and a message of "Add NewHardware Wizard" is With the UA-5 disconnected, start up Windows. - Page 18 Getting Connected and Installing Drivers (Windows) Open the System Properties dialog box. Click [OK]. Exit all currently running software (applications). Also close any open windows. If you are using virus checking or similar software, be sure to exit it as well. Insert the CD-ROM.
- Page 19 Getting Connected and Installing Drivers (Windows) fig.05-6e_30 The SETUPINF dialog box will appear. If a message of “The driver is You are now ready to install already installed” appears, the driver. you can connect the UA-5 to Drag the title bar to move the your computer and use it.
- Page 20 Getting Connected and Installing Drivers (Windows) fig.05-8e_30 The Insert disk dialog If the Insert disk dialog box does not appear, please read box will appear. The “Insert Disk” dialog box Click [OK]. does not appear (p. 55) fig.05-9e_30 The File is needed dialog box will appear.
- Page 21 Getting Connected and Installing Drivers (Windows) If you changed “Check file signature” If you changed the “Check file signature” setting in step 5, restore the original setting after Windows restarts. After Windows restarts, log in to Windows as a user with administrative privileges, (such as Administrator).
- Page 22 Getting Connected and Installing Drivers (Windows) Windows Me/98 users Installing the driver If the UA-5 is already connected to your computer and a message of "Add With the UA-5 disconnected, start up Windows. NewHardware Wizard" is displayed, go to the UA-5 Disconnect all USB cables other than those for a USB Driver CD-ROM folder keyboard or USB mouse.
- Page 23 Getting Connected and Installing Drivers (Windows) fig.05-14e_30 Open the SETUPINF dialog box. If a message of “The driver is You are now ready to install already installed” appears, the driver. you can connect the UA-5 to Drag the title bar to move the your computer and use it.
- Page 24 Getting Connected and Installing Drivers (Windows) fig.05-16e_30 The New Hardware dialog box will appear. In the File copy source field, type the folder name that is shown in the SETUPINF dialog box, If the New Hardware dialog and click [OK]. box does not appear, re-install the driver using the same procedure as described in "The...
-
Page 25: Installing The Os-Standard Driver
Getting Connected and Installing Drivers (Windows) Installing the OS-standard driver The procedure for installation and settings will depend on your system. Proceed to the appropriate section as follows. • Windows 2000 users........(p. 25) • Windows Me users ........(p. 26) • Windows 98 users........(p. 27) Windows 2000 users Start up Windows. -
Page 26: Windows Me Users
Getting Connected and Installing Drivers (Windows) Windows Me users Start up Windows. Exit all currently running software (applications). If you are using a virus checker or similar software, be sure to exit it as well. Use a USB cable to connect the UA-5 to your computer. -
Page 27: Windows 98 Users
Getting Connected and Installing Drivers (Windows) Restart Windows. Depending on your system, a Next, you will need to make the driver settings. certain amount of time may be (–> Settings and checking (p. 30)) required for the device to be detected after the driver has been installed. - Page 28 Getting Connected and Installing Drivers (Windows) fig.05-25e_30 USB-compatible devices will be detected If this dialog box does not appear, refer to ”Find new automatically, and the hardware wizard” does not “Add new hardware execute automatically (p. 52) wizard” dialog box will appear.
- Page 29 Getting Connected and Installing Drivers (Windows) fig.05-30e_30 When installation of the USB composite device driver is completed, a dialog box like the one shown here will appear. Click [Finish]. fig.05-33e_30 Next, the USB audio device will be detected automatically, and the “Add new hardware wizard”...
-
Page 30: Settings And Checking
Getting Connected and Installing Drivers (Windows) Settings and checking Specifying the audio input/output destination Open Control Panel. Click the Windows Start button, and select Settings - Control Panel. Double-click the Sound and Multimedia If the Sound and Multimedia (Multimedia in Windows 98) icon. icon does not appear, click Display all control panel options in the frame at the left... - Page 31 Getting Connected and Installing Drivers (Windows) This completes audio input/output destination settings. If you installed the special driver, proceed to Check whether If the Volume Control is not there is sound (p. 32) installed on your computer, If you installed the standard Windows driver, set the use the Control Panel icon Windows volume control.
-
Page 32: Check Whether There Is Sound
Getting Connected and Installing Drivers (Windows) Check whether there is sound Now we will play back the sample data to check whether In order to hear the sample connections are correct. data, you will need Playing back the sample data approximately 30 MB of free Here we will use standard Windows functionality to play space on the hard disk in... - Page 33 Getting Connected and Installing Drivers (Windows) About the included song data It’s gonna be alright Composed & Programmed by Mitsuru) Sakaue Vocal: Tahirih Walker, Fumiyo Kawazoe Guitar: Katsuhisa Fujimoto, Idecs, Inc. When playing audio CDs from the computer’s internal CD-ROM drive, or using the UA-5 to play game music Windows 2000 users: Open the System Properties dialog box.
-
Page 34: Getting Connected And Installing Drivers (Macintosh)
Getting Connected and Installing Drivers (Macintosh) If you are using a Windows computer, please proceed to Getting Connected and Installing Drivers (Windows) (p. 15). What is a driver? fig.05-1e_50 A “driver” is software that transfers data between the UA-5 and application software running on your computer, when your Application... -
Page 35: Installing The Special Driver
Getting Connected and Installing Drivers (Macintosh) If you want to use the UA-5 in Advanced mode, proceed to Installing the special driver (p. 35). If you want to use Standard driver mode, proceed to Installing the OS-standard driver (p. 38). Switching between Advanced mode and Standard driver mode If you first install both the special driver and the standard driver, you will be able to switch between Advance and Standard driver modes by operating the UA-5's... -
Page 36: Installing The Asio Driver
Getting Connected and Installing Drivers (Macintosh) fig.05-20e_30 If a message like the following is displayed, click [Continue]. The other currently running applications will exit, and installation will continue. A dialog box will indicate Installation completed. This unit is equipped with a protection circuit. - Page 37 Getting Connected and Installing Drivers (Macintosh) Here we will explain how to install the ASIO 1.0 16 bit- compatible driver. If your ASIO-compatible software supports ASIO 2.0 or recording/ playback of 24 bit audio data, using the following drivers will provide a higher quality environment.
-
Page 38: Installing The Os-Standard Driver
Getting Connected and Installing Drivers (Macintosh) Installing the OS-standard driver With the UA-5 disconnected, start up Mac OS. Exit all currently running software (applications). If you are using a virus checker or similar software, be sure to exit it as well. fig.05-35e_30 After starting up Mac OS, select Apple System Profiler from the... - Page 39 Getting Connected and Installing Drivers (Macintosh) fig.05-37e_30 In order to check that detection has been completed, once again go to “Apple System Profiler,” and select “Update all information” from the Command menu. In the USB area, three audio devices will be displayed. If these are displayed correctly, driver installation has succeeded.
- Page 40 Getting Connected and Installing Drivers (Macintosh) fig.05-45e_30 Click the Speaker tab or Speaker Settings. Audio data from the computer cannot be played back if the Recording source select switch is set to DIGITAL. Set the switch to ANALOG. xfig.05-46e_30 With the volume turned down on the UA-5 and on your If USB audio is not displayed, peripheral audio equipment,...
- Page 41 Getting Connected and Installing Drivers (Macintosh) Check whether there is sound Now we will play back the sample data to check whether In order to hear the sample connections are correct. data, you will need Playing back the sample data approximately 30 MB of free Here we will use standard Macintosh functionality to play space on the hard disk that...
-
Page 42: Ua-5 Application Guide
UA-5 application guide This chapter explains the various ways the UA-5 can be connected, and introduces some of its applications. * Before connecting to other devices, you must turn down the volume and turn off the power to avoid malfunction or speaker damage. Basic use As shown in the diagram, you can connect headphones or monitor speakers, and monitor the playback sound from your application or the sound from the... -
Page 43: Recording A Guitar Or Bass
UA-5 application guide Recording a guitar or bass When you play your guitar along with audio data from your computer to record your performance on a sequencer, only the guitar will be recorded on the computer. fig.guitar.e Signal flow Guitar / Bass INPUT Turn on if you Adjust the... -
Page 44: Recording From A Mic
UA-5 application guide Recording from a mic Dynamic Mic Condenser Mic fig.mic.e Signal flow Signal flow Microphone Condenser Microphone Record in stereo Record in stereo Record in monaural Record in monaural INPUT INPUT Adjust the Adjust the Turn on if you Turn on if you input level. -
Page 45: Recording From A Keyboard
UA-5 application guide Recording from a keyboard Here’s how you can send a keyboard performance as audio data to your computer, and record it on sequencer software. fig.keyboard.e Signal flow Keyboard OUTPUT INPUT Adjust the Turn on if you input level. want to monitor. -
Page 46: Recording From The Aux Input
UA-5 application guide Recording from the AUX input fig.aux.e Signal flow Turn on if you want to monitor. INPUT OUTPUT MIDI Sound Module Stereo Set Use the Input jacks 3 and 4 adjustment volume to adjust the input level. For optimum recording quality, use the AUX input adjustment volume to raise the level so it is as high as you can get it before causing the Peak indicator to light. -
Page 47: Digitally Recording From A Cd/Md/Dat
UA-5 application guide Digitally recording from a CD/MD/DAT Make connections as shown in the diagram. fig.digital.e Signal flow Set this to match the sampling frequency of the application that you are using. Turn on if you want to monitor. OPTICAL COAXIAL Optical digital cable... -
Page 48: Digitally Recording The Output Of The Ua-5 On An Md
UA-5 application guide Digitally recording the output of the UA-5 on an MD Make connections as shown in the diagram. fig.MD.e Signal flow Set to the appropriate sampling frequency, so it matches the audio data to be played back, or the application you intend to use. -
Page 49: Adjusting The Audio Latency
UA-5 application guide Adjusting the audio latency When using the UA-5 in Advanced mode, you can change the driver settings to adjust the latency of the audio. To adjust the latency, change the Buffer Size in the driver settings dialog box. * Latency is the time delay from when an application plays back audio data until the sound is actually heard from an audio device such as the UA-5. -
Page 50: Using Asio Direct Monitor
UA-5 application guide Using ASIO Direct Monitor If you are using the UA-5 from an ASIO2.0-compatible application in Advanced mode, the UA-5’s Input monitor switch can be controlled automatically from the application. As described in “Opening the special driver settings dialog box (p. 51)”, open the driver settings dialog box. - Page 51 UA-5 application guide Opening the special driver settings dialog box If using the WDM driver on Windows 2000: Open the “Control Panel” and double-click “EDIROL UA-5.” The “EDIROL UA-5 Driver Settings” dialog box will appear. If using the MME driver on Windows 2000: Open the “Control Panel,”...
-
Page 52: Troubleshooting
Troubleshooting If an unexpected problem occurs while using the UA-5, read this chapter first. It contains numerous tips for resolving problems. First see whether Troubleshooting explains how to solve your problem. Troubleshooting is organized according to different operating systems. Refer to the icon(s) at the left of the title to find the items you need. - Page 53 Troubleshooting • The ADVANCE (mode select) switch may have been turned OFF when the Sampling frequency select switch is set to 96 kHz. If you are using the UA-5 at 96 kHz, turn the ADVANCE (mode select) switch ON. • Is USB enabled on your computer? Refer to the operation manual for your computer, and make sure that USB is enabled.
-
Page 54: Driver Is Not Installed Correctly
Troubleshooting Driver is not installed correctly • The Power indicator may be blinking. • The ADVANCE (mode select) switch may have been turned OFF when the Sampling frequency select switch is set to 96 kHz. If you are using the UA-5 at 96 kHz, turn the ADVANCE (mode select) switch ON. As described in Deleting the special driver (p. - Page 55 Troubleshooting Device Manager shows “?”, “!”, or “USB Composite Device” The “Insert Disk” dialog box does not appear Use the following procedure to re-install the driver. Turn off the power of your computer, and start up Windows with all USB cables disconnected (except for keyboard and mouse).
-
Page 56: Problems When Using The Ua-5
Troubleshooting Problems when using the UA-5 Operating system becomes unstable • Operation becomes unstable when the computer is started up with the UA-5 already connected Please start up your computer with the UA-5 disconnected, and then connect the UA-5. On a computer that uses a USB keyboard, starting up the computer with the UA-5 already connected may cause operation to become unstable. - Page 57 Troubleshooting • Are you trying to play back an audio CD played by your computer’s CD Player? [Standard driver mode] If you want to use the CD-ROM drive of your computer to play an audio CD, refer to When playing audio CDs from the computer’s internal CD-ROM drive, or using the UA-5 to play game music (p.
-
Page 58: Noise Is Heard During Audio Playback
• Are you using a cable that has a built-in resistor? Use a cable without a built-in resistor (e.g., Roland PCS series). • Are the Input sensitivity knobs raised appropriately? Turn the knobs clockwise to adjust the volume. (p. 10) Guitar sound is too weak •... -
Page 59: Sound Is Interrupted During Audio Playback
Troubleshooting Sound is interrupted during audio playback • Are many applications running on your computer? If you use many applications or start up other applications during playback, playback may be interrupted, depending on your computer system. Please exit unneeded applications, and try again. If this does not resolve the problem, try restarting your computer. - Page 60 Troubleshooting • Try installing more memory. Installing more memory will increase the performance of your computer. For details on how to install more memory, refer to the operation manual for your computer. • Does your computer satisfy the requirements of the USB standard? If you are using a computer (such as a computer that you yourself assembled) that does not satisfy the electrical requirements of the USB specifications, you may experience interruptions in the audio.
- Page 61 Troubleshooting Depending on the virtual memory setting or network-related settings, noise may occur. Please make the following settings before use. • In Chooser of the Apple menu, set AppleTalk to "Inactive." (This setting is not changed as a result of turning off AppleTalk, as requested by OMS when sequencer software is started up.
-
Page 62: Game Background Music Does Not Play
Troubleshooting Playback or recording halts midway through, and then becomes impossible • Was a heavy processing load experienced while using the UA-5, such as accessing the CD-ROM drive or a network? If an operation involving a heavy processing load is performed while the UA-5 is in use, it may not operate correctly. -
Page 63: Deleting The Special Driver
Troubleshooting Deleting the special driver If you were unable to install the special driver according to the procedure given, the UA-5 may not be recognized correctly by the computer. In this case, use the following procedure to delete the special driver, and then follow the procedure in Getting Connected and Installing Drivers (Windows, p. - Page 64 Troubleshooting Windows Me/98 users With all USB cables disconnected, start up Windows. (USB keyboard and USB mouse excepted) Turn on the UA-5's ADVANCE (mode select) switch. After connecting the UA-5 to your computer via a USB cable, turn on the power of the UA-5.
-
Page 65: Macintosh Users
Troubleshooting Macintosh users Turn off the power of the UA-5. Also disconnect the USB cable (by which the UA-5 is connected) from your Macintosh. From the system extensions folder, drag “USB UA-5 Driver” into the trash to delete it. Drag the ASIO driver that you installed in “Installing the ASIO driver” (p. 36) into the trash to delete it. -
Page 66: Main Specifications
Main Specifications UA-5: USB Audio Interface Number of Audio Record/Playback Interface Channels Record: 1 pair of stereo Digital input/output Playback: 1 pair of stereo Coaxial type Full duplex (except for 96 kHz setting) Optical type (conforms to S/P DIF) Signal Processing AD/DA Conversion: 24 bit linear Connectors... - Page 67 For EU Countries This product complies with the requirements of European Directive 89/336/EEC. For the USA FEDERAL COMMUNICATIONS COMMISSION RADIO FREQUENCY INTERFERENCE STATEMENT This equipment has been tested and found to comply with the limits for a Class B digital device, pursuant to Part 15 of the FCC Rules.
- Page 68 Information When you need repair service, call your nearest EDIROL/Roland Service Center or authorized EDIROL/Roland distributor in your country as shown below. IRELAND HONG KONG BARBADOS PERU CYPRUS Roland Ireland Parsons Music Ltd. A&B Music Supplies LTD Audionet Radex Sound Equipment Ltd.
Need help?
Do you have a question about the Edirol Audio Capture UA-5 and is the answer not in the manual?
Questions and answers