Lantronix xPico 110 Quick Start Manual
Hide thumbs
Also See for xPico 110:
- Quick start manual (3 pages) ,
- User manual (17 pages) ,
- Integration manual (34 pages)
Advertisement
Quick Links
xPico
WHAT'S
PRODUCT
IN THE
REG FORM
BOX
Product
Registration Form
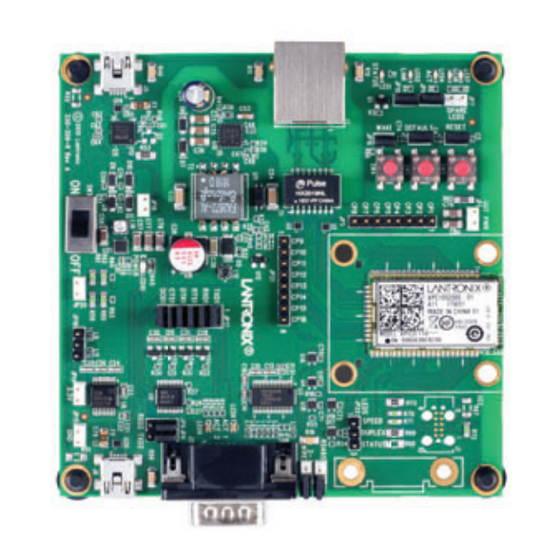
1. HARDWARE OVERVIEW
Power Input (USB)
Power On/Off Switch
Serial 2 Header
2. HARDWARE INSTALLATION
1. Connect the PC to the numbered device ports (Serial 1/Serial 2) on the xPico 110 evaluation board
using appropriate cables and adapters.
2. Connect the evaluation board to the network via an Ethernet cable using the Ethernet (RJ45) port.
3. Supply power to the evaluation board by using the included power adapter and move the power
switch to ON.
4. Via the computer connected on the same network, you can follow the path to device discovery and
initial network configuration as outlined below.
3. IP ADDRESSING
The Ethernet port on xPico 110 defaults to DHCP assigned IP
address. If your network does not support DHCP, then xPico 110
will fall back to using an automatically generated IP address (Auto
IP) within the 169.254.0.0 subnet.
If you want to assign a different IP address, it must be within a
valid range, unique to your network, and within the same subnet as
your workstation.
110 Evaluation Kit Quick Start Guide
®
5 VDC
Serial 1
xPico 110
Evaluation Board
To configure the xPico 110, you will need the following:
IP address (if not assigned):
Subnet mask (if not assigned): _____ . _____ . _____ . _____
Gateway IP address:
DNS Server address:
Power Supply
With
Regional Adapters
10/100 Ethernet Port
LEDs
SYSTEM Pins
(RESET/DEFAULTS)
CP Headers
xPico 110 Module
_____ . _____ . _____ . _____
_____ . _____ . _____ . _____
_____ . _____ . _____ . _____
Advertisement

Related Manuals for Lantronix xPico 110


Summary of Contents for Lantronix xPico 110
- Page 1 Serial 1 2. HARDWARE INSTALLATION 1. Connect the PC to the numbered device ports (Serial 1/Serial 2) on the xPico 110 evaluation board using appropriate cables and adapters. 2. Connect the evaluation board to the network via an Ethernet cable using the Ethernet (RJ45) port.
- Page 2 For the latest firmware downloads, visit http://www.lantronix.com/support/downloads ©2023 Lantronix, Inc. All rights reserved. Lantronix, xPico and TruPort are registered trademarks of Lantronix, Inc. All other trademarks are the property of their respective owners. Specifi cation are subject to change without notice. 900-789-R Rev C...
Need help?
Do you have a question about the xPico 110 and is the answer not in the manual?
Questions and answers