Advertisement
xPico
250 Evaluation Kit Quick Start Guide
®
WHAT'S
IN THE
BOX
xPico 250
Evaluation Board
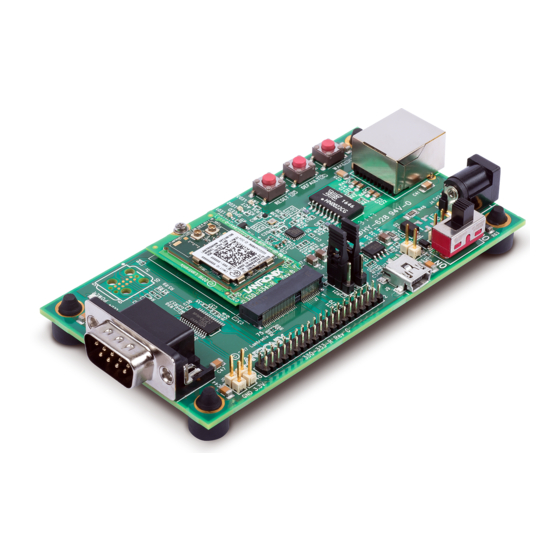
1. HARDWARE OVERVIEW
DB9 RS232
Serial Port
2. HARDWARE INSTALLATION
2a. Attach the antenna(s) to the evaluation board.
2b. Supply power to the evaluation board by plugging in the included power adapter to the 5V
DC Power Input (shown above).
2c. Move the ON/OFF power switch to ON.
2d. Proceed to the next page for instructions on how to configure the xPico 250 using the web
manager UI.
u.fl to RP-SMA Adapter
Cables and Antennas
xPico 250
Power LED
Module
Peripheral I/O
Header
3.3V
Header
5V Power Supply with
Regional Adapters
LED 2
Ethernet Speed
LED 3 Ethernet
Activity
LED1
Reset
Defaults
Status
USB Port
Host/Device
Firmware &
License Agreement
Wake
10/100
Ethernet
RJ 45
5V DC
Power Input
Power
On/Off
Advertisement
Table of Contents

Related Manuals for Lantronix xPico 250


Summary of Contents for Lantronix xPico 250
- Page 1 2b. Supply power to the evaluation board by plugging in the included power adapter to the 5V DC Power Input (shown above). 2c. Move the ON/OFF power switch to ON. 2d. Proceed to the next page for instructions on how to configure the xPico 250 using the web manager UI.
- Page 2 6:00 a.m. – 5:00 p.m., Pacific Time, excluding holidays. ©2018 Lantronix, Inc. All rights reserved. Lantronix and xPico are registered trademarks of Lantronix, Inc. All other trademarks are the property of their respective owners. Specification are subject to change without notice. 900-803-R Rev A...
Need help?
Do you have a question about the xPico 250 and is the answer not in the manual?
Questions and answers