Advertisement
- 1 RECOMMENDATIONS
- 2 TECHNICAL FEATURES AND ACCESSORIES
- 3 PRODUCT DESCRIPTION
- 4 MAIN FUNCTIONS
- 5 FEATURES
- 6 CONTROL PANEL FEATURES
- 7 BEFORE FIRST USE
- 8 ESPRESSO SIDE
- 9 COFFEE
- 10 SAFETY AND VISUAL WARNINGS
- 11 Documents / Resources
RECOMMENDATIONS
To obtain an espresso which is rich in aromas and creamy to suit, the quality of the water, the temperature, the variety of coffee, the roasting process, the fineness of the ground coffee, the dosage and the extraction pressure are all determining elements.
Water
Always use clean fresh water and change the water every day. Water with a low mineral content is preferred.
Temperature
For the first espresso or if multiple espressos are made during the day or if the machine is turned off between each "Espresso moment", it is recommended that you dispense the equivalent of 1 cup of hot water as if you were making a espresso but without using ground espresso. In this way, the dispensing unit, the filter holder, the filter and the cup get hotter, allowing the espresso to maintain the ideal temperature for longer once in the cup.
Coffee roasting
It is possible to choose any type of coffee variety; the main thing is that it is fresh.
Coffee grinding
If the coffee is ground too finely, it will cause too much resistance to the hot water flow causing this to overheat and "burn" the coffee, thus lending it a distinct bitterness. The coffee will be dispensed drop by drop and the foam will not form in the cup. If the coffee is ground too coarsely it will provide no resistance to the water flow. The infusion time is therefore too short. The coffee is not very creamy and does not release enough aromas.

Do not pour an espresso into a cup at room temperature. This will cause the temperature of the espresso to cool too quickly. It is recommended that you turn on your machine 10 to 15 minutes before making the espresso and rest the cups on the cup warming plate. It heats up quickly and reaches a temperature that is sufficiently high enough to heat the cups quickly and efficiently.
TECHNICAL FEATURES AND ACCESSORIES
- Power: 1250 W
- Voltage: 120 V ~ 60 Hz
- Pump pressure: 19 bars
- Dimensions: L 15 x H 12.8 x P 11.4 inches
- Steel surface n Pre-brewing of the ground coffee
- Electronic detection of water level
- Memory storage for 2 coffee sizes
- Automatic standby (after 30 mins)
- Reduction in brightness of TEMPERATURE light after 1 hour
- Product accessories:
- 1 spoon
- One 1 cup filter
- One 2 cup filter
- One cleaning needle
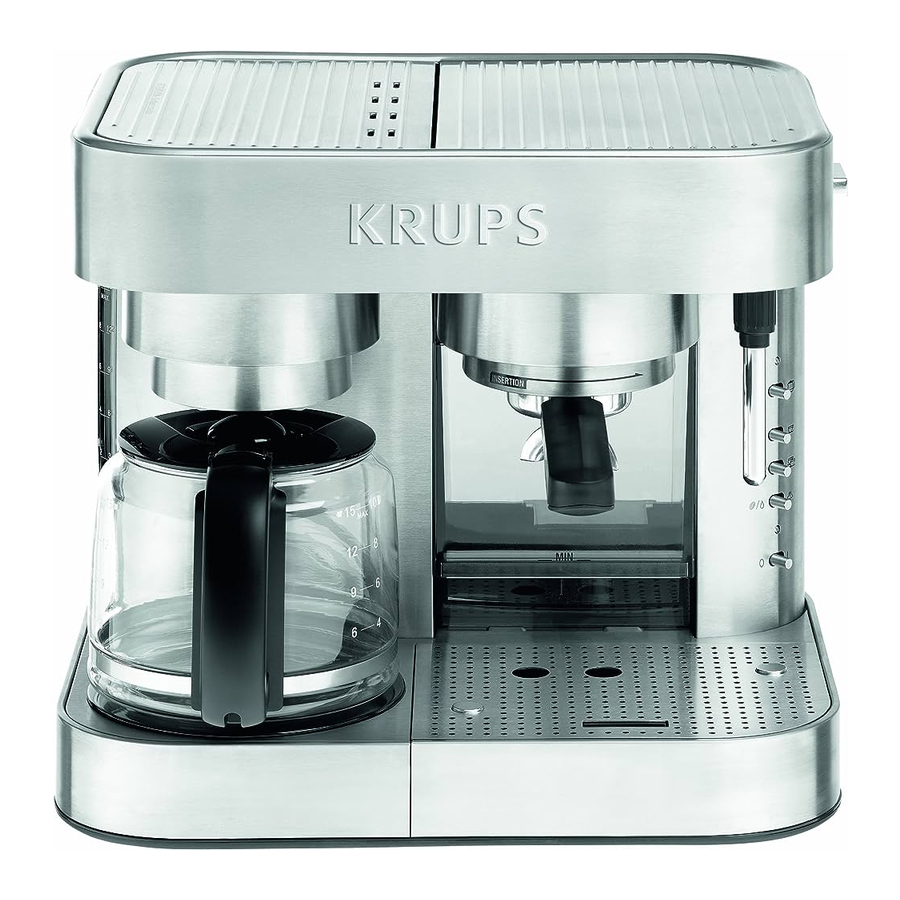
PRODUCT DESCRIPTION

ESPRESSO SIDE
- Stainless steel cup warming plate
- Group head
- Stainless steel body
- Rotating control button
d1: PENDING setting:![]()
d2: HOT WATER function![]()
d3: STEAM function![]()
- Adjustable HOT WATER/STEAM nozzle
- Spout nozzle
- Frothing nozzle
- Control panel
h1: FILTER COFFEE light
h2: FILTER COFFEE button![]()
h3: Preprogrammed 1 cup espresso button![]()
h4: Preprogrammed 2 cup espresso button![]()
h5: TEMPERATURE SELECTION button


- Expresso
![]()
- Hot water
![]()
- Steam
![]()

- Removable water drip tray
- Stainless steel tray cover
- Stainless steel cup rest grill with adjustable height
- Tray water level indicator
- Buttons for adjusting the grill height
- Removable water tank
- Filter holder
- Filter holder dispensing spout
- 1 cup espresso filter
![]()
- 2 cup espresso filter
![]()
- Espresso dosing spoon
- Ground tamper
- Cleaning needle


COFFEE SIDE
- Warming plate
- Glass coffee pot
- Anti-drip device
- Removable filter holder for coffee grounds
- Water tank
- Water tank Max fill line
- Lid
- Coffee dosing spoon
MAIN FUNCTIONS
Expresso
- An excellent espresso:
- 19 bar high pressure pump
- Pre-brewing of the ground coffee
- Filters with pressurization chamber for increased crema
- Ideal water:
- Thermo block heating unit for an ideal constant temperature
- Complete freedom of use:
- Compatible with ground coffee and all paper pods, both soft and compact
- Smart Cup rest grill with adjustable height:
- For special small espresso cups
- For mugs, large cups, dessert glasses...
- Ease of use:
- 2 sizes of espresso that are easy to program
- Water tank that can be accessed from the front.
- Sophisticated design:
- 100% solid stainless steel cover
- Filter holder with professional dispensing spout
- Safety and comfort:
- EMPTY TANK detection with automatic pump stop
- Automatic standby when device is not used for more than 30 minutes
Filter coffee
- Performance:
- Capacity for up to 10 cups
- Glass coffee pot with water level markings/Removable lid
- Compatible with standard paper filters
- Ease of use:
- 1.5 liter tank with water level indicator
- Filter support with anti-drip system
- Keeps coffee warm for up to 2 hours.
- Safety:
- Heating stops automatically after 2 hours
FEATURES
The letters refer to the product description.
- Stainless steel cup warming plate
Warms cups quickly and effciently, maintaining the ideal temperature longer. - Group head
The group head enables the locking of the filter holder. - Stainless steel body
The body of your espresso machine is stainless steel for better quality and longevity. - Rotating control button
The rotating button activates the HOT WATER or STEAM function. - Adjustable HOT WATER/STEAM spout
The adjustable spout allows distribution of the hot water or steam. - Spout nozzle
The spout nozzle enables the handling of the HOT WATER/STEAM spout without getting burnt. - Frothing nozzle
The frothing nozzle generates a smooth milk froth. - Removable drip tray
The drip tray collects the overflow from the ESPRESSO maker. It is easily removable and should be checked and emptied regularly.
- Stainless steel cup rest grill
The perforated cup rest grill has markings for positioning cups. - Tray water level indicator
When a red signage is displayed on the indicator, the tank needs emptying. - Buttons for adjusting the grill height
The adjustment buttons allow you to adjust the cup rest grill based on the cups used:- Low setting for large cups, dessert glasses and mugs
- High setting specifically designed for special espresso cups
- Removable water tank
The tank can be removed from the machine for filling from the front of the machine. (See section "Filling the tank").
Comments:- Make sure the water never exceeds the maximum level for the tank.
- Make sure the water in the tank never passes below the minimum water level. Readjust the water level regularly.
- Filter holder
The filter holder has an ergonomic handle. To make your espresso, place one of the filters in the filter holder and then add the ground coffee or pods. Position the filter holder on the group head to the far left then turn it to the right to lock it into place.
- 1 cup espresso filter
The cup size is identified on the bottom of the filter by the marking![]() . This filter allows you to prepare 1 cup of espresso using ground coffee, a compact paper pod or a soft paper pod.
. This filter allows you to prepare 1 cup of espresso using ground coffee, a compact paper pod or a soft paper pod. - 2 cup espresso filter
The cup size is identified on the bottom of the filter by the marking![]() . This filter allows you to prepare 2 cups of espresso using ground coffee.
. This filter allows you to prepare 2 cups of espresso using ground coffee.
Please note: it cannot be used with 2 pods at the same time. - Espresso dosing spoon
Well-leveled, it allows you to measure the quantity of coffee required for a good espresso. - Ground tamper
The ground tamper allows you to carefully tamp the coffee in the filter.
 . This filter allows you to prepare 1 cup of espresso using ground coffee, a compact paper pod or a soft paper pod.
 . This filter allows you to prepare 2 cups of espresso using ground coffee.
- Warming plate
It allows you to maintain the temperature of your coffee for up to 2 hours. - Glass coffee pot
It can contain the equivalent of 15 small cups of coffee or 10 large ones.
![]()
never place the coffee pot on a hotplate, in an oven or microwave. - Anti-drip device
If the coffee pot is removed before the coffee is done brewing, the anti-drip device prevents any more coffee from being dispensed.
- Removable filter holder for coffee grounds
To make your coffee, place a Krups #4 filter in the filter holder and position it in its compartment using the 2 handles. - Water tank
After opening the lid on the filter compartment, simply fill the tank with the quantity of water required.
![]()
never exceed the "MAX" marking located close to the overflow. - Coffee tank overflow
If the water in the tank reaches the overflow opening, it will spill onto the counter. This situation must be avoided, be careful not to overflowing the tank.
![]()
never exceed the "MAX" marking located close to the overflow. - Lid
The lid is opened by simply pressing on both sides. The lid allows easy access to the tank and the coffee filter holder. - Dosing spoon for filter coffee
It allows you to measure the quantity of coffee grounds required for a good filter coffee.
![]()
The filter coffee and espresso functions cannot be operated at the same time.
CONTROL PANEL FEATURES
The letters refer to the product description.
h1. FILTER COFFEE light
This light comes on while the coffee is being dispensed and while the coffee is being kept warm (2 hours).
h2. FILTER COFFEE button I /
This button allows you to brew coffee depending on the quantity of water poured into the tank. Shortly after brewing, the machine automatically switches to the keep warm function.
h3. PRE-PROGRAMMED 1 cup espresso button:
This button allows you to program a quantity of coffee corresponding to 1 cup (approximately 50 ml in a pre-set dose, approximately 150 ml as a maximum dose) depending on the quantity pre-programmed. Coffee production is stopped automatically, after the pre-programmed amount has been dispensed.
h4. PRE-PROGRAMMED 2 cup espresso button:
This button allows you to program a quantity of coffee corresponding to 2 cups (approximately 100 ml in a pre-set dose, approximately 250 ml as a maximum dose) depending on the quantity pre-programmed. Coffee production is stopped automatically, after the pre-programmed amount has been dispensed.
h5. TEMPERATURE SELECTION button: 
For the water to remain at an ideal temperature for making your beverages, the TEMPERATURE SELECTION button must be positioned to the left for espressos or hot water  and to the right for steam
  .
.
h6. TEMPERATURE light:
This light indicates:
- When your machine is ready to produce espresso, hot water or steam:
- Light flashes = the espresso, hot water or steam mode is in progress
- Light is solid = the espresso, hot water or steam mode is ready to dispense
- That the tank is empty (flashes quickly)
- That the rotating control button should be set to PENDING (
![]() ) during heating of your appliance (flashes quickly)
) during heating of your appliance (flashes quickly)
h7. START/STOP button
Turn the button to the right (I) to turn the machine on – (the TEMPERATURE light (h6) comes on straight away) and to the left ( ) to switch off.
BEFORE FIRST USE
- Open the machine and remove all the plastic bags, boxes and papers protecting the different parts. Never leave the plastic bags in the reach of children.
- Also remove any self-adhesive labels that may be on the product cover or any other information leaflets.
- Remove detachable parts and clean in warm soapy water. Do the same with the other accessories.
- Wipe the appliance body and staineless steel tray cover using a soft wet cloth.
Any action performed on the machine must be done with the power cord disconnected. Never place parts or accessories in the dishwasher. Only the glass coffee pot is compatible with the dishwasher. Never immerse the appliance, power cord or plug in any liquid.
- Ensure that all parts are completely dry before re-assembling.
- Place the cup rest grill on the water drip tray and slide it into the housing.
- Reposition the water tank by pushing it backwards toward the edge of the machine.
- Return the filter holder into its compartment.
- Position the coffee pot on the warming plate.
Filling the espresso water tank
To fill the tank:
- Remove the water tank by pulling it forwards using the central handle (Fig.1).
![]()
- Fill the tank with fresh water without exceeding the maximum water level.
- Return the tank into its housing by sliding it along the cup rest grill (Fig.2).
![]()
- Ensure that you have pushed it right to the end.


Draining and priming of the water circuit
Before using for the first time it is imperative that you allow the water to circulate through all of the appliance's circuits to remove any possible air and for the pump to be activated.
- ESPRESSO SIDE
With the water tank full:
- Connect the power cord.
- Check that the rotating control button is set to PENDING (
![]() ) and that the TEMPERATURE SELECTION button (h5) is at ESPRESSO/HOT WATER
) and that the TEMPERATURE SELECTION button (h5) is at ESPRESSO/HOT WATER ![]() .
. - Check the FILTER COFFEE light (h1) is off and the FILTER COFFEE (h2) button
![]() is set on(
is set on(![]() )setting.
)setting. - Switch the machine on by turning the START/STOP (h7) button to the right to the (I) setting.
- The TEMPERATURE light (h6) flashes slowly to indicate that the Thermo block is heating up. (Approximately 1 minute).
![]()
While the TEMPERATURE light (h6) flashes, none of the ESPRESSO functions can be used. - Place a large container under the HOT WATER/STEAM spout.
- When the TEMPERATURE light (h6) stops flashing, turn the rotating control button to the HOT WATER function
![]() (Fig.3).
(Fig.3).
![]()
- The pump starts working at a steady rate and the hot water flows through the spout. Let it flow for approximately 10 seconds.
- Stop the flow of water by simply returning the control button to PENDING(
![]() ) (Fig.4).
) (Fig.4).
![]()
- If there is no water flow, see the section "Safety and visual warnings".
- Place a sufficiently large enough container under the dispensing unit without using the filter holder.
- When the TEMPERATURE light (h6) stops flashing, briefly turn the Pre-programmed 2 cup espresso button
![]() to the right and let the water flow (the machine's pump stops automatically when the pre-programmed amount has been dispensed). If this does not work, see the paragraph "Safety and visual warnings" and perform this action again.
to the right and let the water flow (the machine's pump stops automatically when the pre-programmed amount has been dispensed). If this does not work, see the paragraph "Safety and visual warnings" and perform this action again.
 .
. is set on(
 (Fig.3).

 to the right and let the water flow (the machine's pump stops automatically when the pre-programmed amount has been dispensed). If this does not work, see the paragraph "Safety and visual warnings" and perform this action again.
It is possible that some steam may be released from the water tank. This is completely normal.
The water circuit has now been drained and your machine is ready for use.
- COFFEE FUNCTION
- Check that the power cord is connected.
- Open the lid by pressing on both sides and open the lid to 90° without forcing (Fig.5 and 6).

- Fill the tank without exceeding the MAX marking at the overflow opening (Fig.7 and 8).

- Ensure that the filter holder is correctly positioned (i.e. fully inserted into its opening).
- Place a paper filter in the filter holder and fill it with ground coffee using the measuring spoon, with one spoon per cup of coffee.
- Close the lid until you hear the click indicating that it is firmly locked (Fig.11).
![]()
- Position the coffee pot on the warming plate.
![]()
- Check that the rotating control button is set to PENDING (
![]() ) (fig.4) and the START/STOP (h7) button is set to(
) (fig.4) and the START/STOP (h7) button is set to(![]() ).
). - Push the FILTER COFFEE button
![]() to the right; the COFFEE FILTER light (h1) comes on and the coffee is dispensed after a few seconds.
to the right; the COFFEE FILTER light (h1) comes on and the coffee is dispensed after a few seconds. - After all the water has been dispensed, turn off the appliance and let it cool.


- Remove the coffee pot from the warming plate and pour away the water.
ESPRESSO SIDE
ESPRESSO PREPARATION
Espresso coffee is obtained by passing pressurized hot water through coffee grounds. The quality of the taste depends on several factors: the type of coffee, the fineness of the ground coffee, the quantity of ground coffee in the filter and the quality of the water...
The XP6040 espresso machine allows you to prepare a delicious espresso from ground coffee or a paper coffee pod.
It is recommended that you turn the machine on 10 to 15 minutes before making your espresso and pre-heat the cups on the cup warming plate. Your coffee will then stay at the ideal temperature longer in a cup that has been preheated.
- Espresso made from ground coffee
- Choose the 1 cup filter
![]() or the 2 cup filter
or the 2 cup filter ![]() depending on the quantity of coffee required and place in the filter holder. (fig.5).
depending on the quantity of coffee required and place in the filter holder. (fig.5). - Fill the dosing spoon taking car to level it:
- 1-cup filter = 1 spoon of ground coffee (approximately 7 g)
- 2-cup filter = 2 spoons of ground coffee (approximately 14 g)
- Empty the contents of the spoon into the filter then gently shake to distribute the ground coffee uniformly.
- Press down the ground coffee using the ground tamper. If the coffee seems too light, press the coffee more.
- If necessary, wipe the edge of the filter to remove any ground coffee that may be stuck and thus help the filter holder lock into the dispensing unit.
 or the 2 cup filter
  depending on the quantity of coffee required and place in the filter holder. (fig.5).
- Espresso made from paper pods
![]()
There are 2 types of paper pods:- The "compact" pod = special espresso coffee packaged in a rigid pod (approx. 45 mm in diameter) composed of 7 g of compacted ground coffee.
- "Soft" pod = pod measuring 55 to 60 mm in diameter. Since this type of pod is not specifically designed for espresso machines, you will obtain a weaker coffee than with a "compact" pod.
- Use the 1 cup filter
![]() and insert either a compact or a soft pod.
and insert either a compact or a soft pod.
![]()
Do not use the 2 cup filter with paper pods. - Since the shape of the paper pods can differ from one brand to another, take care to center the pod in the filter and push gently so that the sides fit.
If necessary, fold the sides of the paper pod inside the filter to prevent it from overhanging. This will ensure that coffee will not leak outside the filter holder and prevent any damage.
- Espresso function
Preparing the machine
- Check the water level in the tank and fill if necessary.
- Check that the rotating control button is set to PENDING(
![]() ) and that the TEMPERATURE SELECTION button (h5) is at ESPRESSO/HOT WATER
) and that the TEMPERATURE SELECTION button (h5) is at ESPRESSO/HOT WATER ![]() .
. - Switch the machine on by turning the START/STOP button (h7) to the (I) setting.
- The TEMPERATURE light (h6) flashes.
 .
.
While the TEMPERATURE light (h6) flashes, none of the ESPRESSO functions can be used.
- Insert the filter holder into the group head by aligning the handle with the marking "INSERTION" and lock by moving the filter holder from left to right (Fig.15).
![]()

Adjusting the cup rest grill
The height of the cup rest grill can be adjusted.
- When using large cups, dessert glasses and mugs, leave the grill on the bottom level.
- When using espresso cups, raise the cup rest grill by pressing on the 2 height adjustment buttons at the same time (Fig.13).
![]()

To return the cup rest grill to the lower level, press the 2 adjustment buttons at the same time.
- Place 1 or 2 cups (as necessary) on the cup rest grill and check that it/they are correctly positioned under the dispensing spout of the filter holder, using the cup positioning marks (fig.14).
![]()

Coffee preparation
- Wait until the TEMPERATURE light (h6) stops flashing, therefore indicating that the appliance has reached the optimum temperature for making an espresso coffee. Your appliance is now ready for use.
- Turn the espresso button
![]() or
or![]() to the right to activate the ESPRESSO function. The pump operates briefly to pre-wet the ground coffee and then stops for a few seconds and starts again to dispense the coffee.
to the right to activate the ESPRESSO function. The pump operates briefly to pre-wet the ground coffee and then stops for a few seconds and starts again to dispense the coffee.
 to the right to activate the ESPRESSO function. The pump operates briefly to pre-wet the ground coffee and then stops for a few seconds and starts again to dispense the coffee.
This pre-brewing process ensures even greater release of the coffee aroma.
- When the volume of coffee has been reached, the appliance stops automatically.
By default, the volume of coffee for "1 cup" is 50 ml; for "2 cups" it is 100 ml.
- Wait a few seconds until the surplus water in the thermo block has been drained (until the "suction noise" has stopped).
 NOTE
NOTE
A little steam may be released from the water tank. This is completely normal.
- Remove the cup(s) then unlock the filter holder by turning it from right to left until it can be released from the group head.
Be careful as some steam may be released from the dispensing unit.
Cleaning the filter and filter holder
- Empty the filter using a small spoon or carefully tapping it against a surface so that any coffee grounds can be collected.
- Remove the filter.
The metal parts on the filter holder and filter are very hot.
- Rinse the filter and filter holder under hot water and dry.
- Pre-programmed settings
The stainless steel XP6040 automatic espresso machine allows you to pre-program 2 volumes of espresso coffee very simply.
![]()
Two volumes of coffee can be programmed by default into your machine:- Pre-program 1 (1 cup): 50 ml approximately
- Pre-program 2 (2 cups): 100 ml approximately
Programming 1 espresso cup
To pre-program the preparation of 1 espresso cup to your taste, follow the steps for preparing an espresso (See section "Espresso function").
- Place the cup on the cup rest grill.
- When the TEMPERATURE light (h6) stops flashing, briefly press the Pre-programmed 1 espresso button
![]() to the right and hold in this position. The espresso begins to dispense.
to the right and hold in this position. The espresso begins to dispense. - When the desired volume of espresso is reached, release the button. The dispensing of coffee is stopped immediately and the personalized setting is stored in the memory.
Programming 2 cups of espresso
The steps are identical to those for programming 1 cup. Simply place 2 cups on the cup rest grill and activate the Pre-programmed 2 cup espresso button  rather than the Pre-programmed 1 cup button.
The maximum volume that can be programmed for 1 cup is 150 ml; for 2 cups it is 250 ml approximately.
- The programmed settings can be changed at any time by following the same procedure.
You can serve yourself from the espresso machine manually by interrupting the dispensing of coffee at any time. To do so, briefly activate the espresso button  or or the previously activated button.
HOT WATER FUNCTION
The production of hot water is ideal for preparing tea, infusions or pre-heating a container.
- Check the water level in the tank.
- Make sure that the frothing nozzle is securely fitted to the adjustable spout.
- Check that the rotating control button is set to PENDING (
![]() ) Fig.4) and that the TEMPERATURE SELECTION button (h5) is at ESPRESSO/HOT WATER
) Fig.4) and that the TEMPERATURE SELECTION button (h5) is at ESPRESSO/HOT WATER ![]() .
.
 .
.- Switch the machine on by turning the START/STOP (h7) button to the right to the (I) setting.
- The TEMPERATURE light (h6) flashes.
- Wait until the TEMPERATURE light (h6) stops flashing.
- Place a cup or bowl under the adjustable spout and make sure it is correctly positioned.
- Turn the control button to HOT WATER
![]() . The hot water flows through the spout.
. The hot water flows through the spout. - When the required quantity of water is reached, turn the rotating control button to PENDING (
![]() ) to stop the flow of hot water (Fig.4).
) to stop the flow of hot water (Fig.4). - The pump stops immediately and the spout circuit is closed.
 . The hot water flows through the spout.
It is possible that some steam may be released from the water tank. This is completely normal.
- You can now use the water collected to prepare your hot drink.
STEAM FUNCTION
Steam production is ideal for making the milk froth used in milk drinks (cappuccino, latte machiatto, hot chocolate, etc.).
- Check the water level in the tank.
- Make sure that the frothing nozzle is securely fitted to the adjustable spout.
- Check that the rotating control button is set to PENDING (
![]() ).
). - Switch the machine on by turning the START/STOP (h7) button to the right to the (I) setting.
- The TEMPERATURE light (h6) flashes.
If the rotating control button (d) is not at PENDING ( ), the TEMPERATURE light (h6) flashes quickly and heating does not occur.
- Turn the TEMPERATURE SELECTION button (h5) to STEAM
![]() .
. - Wait until the TEMPERATURE light (h6) stops flashing.
- Place a container or empty cup under the spout.
- Open the spout circuit by turning the control button to STEAM
![]() release any remaining water that may be in the circuit.
release any remaining water that may be in the circuit. - Turn the control button back to the left to PENDING (
![]() ).
). - Pour the milk into a container and plunge the frothing spout into the container without touching the bottom to pevent blocking the steam flow.
Advice
For a better result, use refrigerated milk, a cold stainless steel container and measure approximately 20 to 30 ml of milk per drink. - Wait until the TEMPERATURE light (h6) stops flashing.
- Turn the control button back to STEAM
![]() .
.
 .
. release any remaining water that may be in the circuit.
You will then hear an intermittent noise which is the pump jump starting. This is completely normal and necessary for the steam production. A little steam may be released from the water tank. This is completely normal.
To prevent blocking the flow of steam, the spout should not touch the bottom of the container.
- As soon as the milk begins to move, slowly return the frothing spout back to the surface with a circular motion. Plunge the spout into the container again this time with an increasing circular movement.
- Do this several times until the milk turns into a thick and creamy froth.
- When the required quantity of milk is reached, close the spout circuit by turning the control button to PENDING (
![]() ).
). - You can now remove the container from the spout.
- Following the production of steam, the spout and its frothing nozzle are extremely hot. Be careful of the risk of accidental burns.
- It is strongly recommended that the spout and its frothing nozzle is cleaned every time milky froth is made (See section "Cleaning and maintenance"). This operation prevents any risk of spreading micro bacteria.
To change to the ESPRESSO function after the production of steam, it is imperative that hot water is passesd through the spout (See "Hot water function") to force the temperature of the thermo block to fall. The ESPRESSO function will remain blocked if this operation is not performed first.
DESCALING
Reminder: The guarantee does not cover faulty appliances on which descaling was not performed regularly.
If you use your machine on almost a daily basis, regular descaling of the different water circuits is recommended on average every 2 months
Descaling of the ESPRESSO circuit
This operation is performed with the filter holder removed.
- Empty the water tank completely.
- Pour 500 ml of water into the tank with a sachet of "Special espresso" anti-scale agent available in stores or 250 ml of white vinegar mixed with 250 ml of water.
- Place a large container under the dispensing unit.
- Turn the appliance on and check that the rotating control button is set to PENDING (
![]() ) (Fig.4) and that the TEMPERATURE SELECTION button (h5) is at ESPRESSO/HOT WATER
) (Fig.4) and that the TEMPERATURE SELECTION button (h5) is at ESPRESSO/HOT WATER ![]() . Wait until the TEMPERATURE light (h6) stops flashing.
. Wait until the TEMPERATURE light (h6) stops flashing.
 . Wait until the TEMPERATURE light (h6) stops flashing.
- Activate the pump using the Pre-programmed 1 cup espresso button or the Pre-programmed 2 cup button
![]() to dispense approximately 50 ml in the container then stop the pump by releasing the button used.
to dispense approximately 50 ml in the container then stop the pump by releasing the button used.
 to dispense approximately 50 ml in the container then stop the pump by releasing the button used.
By doing this, the personal setting for the volume of espresso linked to the button used is changed.
Remember to reset this when you next make a espresso.
- Immediately turn the START/STOP (h7) button to "
![]() " to switch off the machine (this must be done before the suction noise for draining is triggered).
" to switch off the machine (this must be done before the suction noise for draining is triggered). - Let the solution rest for approximately 10 minutes in the case of the anti-scale agent (and 20 minutes for the vinegar mixture) to let the liquid act in the heating unit and at the entrance to the dispensing unit.
- Repeat steps a) to c) twice.
Descaling of the SPOUT circuit
The descaling of the SPOUT circuit is very similar to that of the ESPRESSO circuit.
- Place the container under the adjustable spout and position correctly.
- Turn the appliance on and check that the rotating control button is set to PENDING (
![]() ) and that the TEMPERATURE SELECTION button (h5) is at EXPRESSO/HOT WATER
) and that the TEMPERATURE SELECTION button (h5) is at EXPRESSO/HOT WATER ![]() .
. - Wait until the TEMPERATURE light (h6) stops flashing.
- Turn the rotating control button to the right to select the HOT WATER function "
![]() .
. - Let the antiscale agent flow through the spout for a maximum of 20 seconds.
- Stop the flow by turning the rotating control button to PENDING (
![]() ).
). - Immediately switch off the machine by turning the START/STOP (h7) button to
![]() .
. - Let the solution rest for the same length of time as for the ESPRESSO circuit.
- During this time, remove the remainder of the anti-scale agent contained in the tank and rinse thoroughly with fresh water.
 .
.Rinsing of circuits
- Fill the tank with fresh water up to the maximum water level.
- Turn the machine on and wait until the TEMPERATURE light (h6) stops flashing.
- Get a large container to collect the water.
- Start rinsing by circulating a full tank of fresh water as follows:
- 3/4 of the tank through the ESPRESSO circuit
- 1/4 of the tank through the SPOUT circuit
Once you have let the equivalent of a tank of fresh water circulate through the 2 circuits you can be sure that there is no anti-scale agent left in the tank nor any residue taste resulting from its use.
CLEANING AND MAINTENANCE
To ensure that your Dual Espresso-Filter Coffee Machine works for many years, we advise that you perform regular maintenance.
- Before any cleaning, disconnect the machine's power cord and ensure that the machine is cold.
- None of the machine's parts can be put in the dishwasher.
Regular cleaning of filters and filter holder
- After each use, clean the filter and the filter holder opening under warm water.
- Regularly check that the sieves at the bottom of the filters are not blocked. If necessary, use a fine needle (not supplied) to unblock the holes. You can also wipe the upper surface of the sieves using a synthetic brush and run the filters under warm water to remove any dirt.
Clean the filters thoroughly
If you notice a problem dispensing coffee, it may be that the filter is blocked. In this case, clean thoroughly
- Using a cross recess unscrew the central screw.
- Remove the stainless steel sieve.
- Clean all the parts in warm water.
- Hold to the light to check that there is no residue blocking the holes. If so, clean more thoroughly taking care to remove any particles using a synthetic brush or a fine needle.
Ensure that the different parts are dry before assembling: place the sieve in the filter and tighten the screw.
Cleaning the dispensing unit
- The base of the dispensing unit must be cleaned regularly using a non-abrasive cloth soaked in water. This is to remove all remaining coffee grounds from the sieve and in the filter holder housing system.
- Residual coffee grounds can also get blocked in the dispensing unit's peripheral cylinder. In this case, this can be removed using a small fine object which is not pointed or a toothpick.
You are advised to operate your machine regularly with the filter holder in place but without coffee, to remove any coffee remains.
Cleaning the adjustable spout and frothing nozzle
It is highy recommended that you clean the spout and its frothing nozzle after each production of milk froth
Ensure that the spout and its nozzle have cooled down before performing any maintenance.
- Remove the frothing nozzle from the spout by turning fully then pull the part to release (Fig.17).
![]()
- Dip the frothing nozzle in very hot water and ensure that any milk residue is completely removed.

If any of the milk froth has dried up around the frothing nozzle, dip this in a container of water overnight to soften the residue
- Clean the outside of the plastic tube of the nozzle with hot water.
- If necessary, unblock the internal steam duct by inserting the needle supplied (u) into the nozzle hole and running some hot water or steam through the plastic tube (See sections "Hot water function" or "Steam function" ).
- Ensure that all parts are completely dry.
- We also recommend that you use this needle to unblock the holes in the filters and the small hole at the top of the detachable metal steam foam nozzle (fig 18).
![]()
- Carefully fit the special cappuccino nozzle by positioning the pins in the holes and rotating them anticlockwise until they lock into place (Fig.19).
![]()


These operations are essential to prevent any risk of spreading micro bacteria.
Cleaning the water tank
- Remove and clean the water tank every day. Rinse with clear water and re-position correctly ensuring that it is correctly lodged in its housing.
- If a layer of limescale should form on the tank walls, descale using a mixture of water and white vinegar. Let the mixture rest for 1 hour.
- Wipe with a non-abrasive sponge and rinse thoroughly.
Cleaning the cup rest grill
- Remove the cup rest grill by moving it upwards.
- Wash with warm soapy water.
- Rinse and dry carefully. Cleaning the water drip tray
- Remove the water drip tray by sliding it forwards (fig.20).
![]()
- Dismantle the water drip tray:
- Press the 2 height adjustment buttons at the same time.
- Remove the cup rest grill (Fig.21).
![]()
- To release the tray hold the 2 plastic rods serving as a support at the front and rear center of the tray. Clean under warm water and dry thoroughly.


The water level indicator can be removed and re-attached using the clips.
- Clean the stainless steel cover using a non-abrasive slightly damp cloth. Dry. Do not allow water to get into the adjustment buttons' mechanisms.
- Re-assemble the tray by simply applying pressure on the plastic clips in the positions specified for this purpose.
- Reposition the cup rest grill.
- Place the tray in the lower position by fully pressing down the 2 adjustment buttons at the same time.
Cleaning the appliance body, the cup warming plate
These parts of the appliance are cleaned using a non-abrasive and slightly wet cloth.
Take care not to allow water on the control panel. Any other servicing should be performed by an authorized service representative.
COFFEE
COFFEE PREPARATION
- Open the COFFEE lid by pressing both sides and open the lid to 90° without forcing (Fig.5 and 6).
- Pour the quantity of water required into the tank depending on the number of cups required, never exceeding the MAX marking located at the overflow opening (Fig.7 and 8).
![]()
- For a better taste, use only fresh water.
- Measure between 100 and 150 ml per cup of coffee.
- Ensure that the filter holder is correctly positioned (i.e. fully inserted into its opening) (Fig.9).
![]()
- Place a #4 paper filter in the filter holder (Fig.10).
![]()
- Using a dosing spoon, fill the paper filter with ground coffee depending on the numer of cups required.


We recommend 1 level dosing spoon of ground coffee for a 100 ml cup. You can adjust the dosage to your taste and the brand of coffee used.
- Close the coffee lid until you hear the click indicating that it is firmly locked. Apply pressure on the front and back of the lid to close firmly.
- Position the coffee pot on the warming plate.
Ensure that the coffee pot is well positioned to de-activate the anti-drip device. Otherwise the coffee cannot be dispensed.
- Check that the rotating control button is set to PENDING (
![]() ).
). - Check that the START/STOP button (h7)
![]() is to the (
is to the (![]() ) setting and the TEMPERATURE light (h6) is off.
) setting and the TEMPERATURE light (h6) is off. - Press the FILTER COFFEE button (h2)
![]() to the (l) setting. The FILTER COFFEE light (h1) comes on and the coffee is dispensed after a few seconds.
to the (l) setting. The FILTER COFFEE light (h1) comes on and the coffee is dispensed after a few seconds. - Once all of the coffee has been dispensed you can remove the coffee pot and serve.
- If you do not return the FILTER COFFEE button I / I ((h2) to the (
![]() ) setting, the FILTER COFFEE light (h1) remains on and the keep warm function for the coffee pot remains active.
) setting, the FILTER COFFEE light (h1) remains on and the keep warm function for the coffee pot remains active.
 is to the (
Thanks to the anti-drip device, you can remove the coffee pot at any time to serve coffee during dispensing, then return quickly to the plate to continue percolation.
Two hours after the coffee has been dispensed, the keep warm function automatically stops and the FILTER COFFEE (h1) light goes out.
- If the keep warm function is deactivated manually, do not reactivate if the tank is empty.
- Never place the coffee pot on a hotplate, in an oven or microwave.
To prevent the risk of burns:
- Never open the lid while coffee is being dispensed.
- Never place your face or any part of the body near the vapor release holes located along the edge of the lid.
- Only handle the coffee pot using its handle and never touch the warming plate.
- Allow the appliance to cool before re-using for a second time.
- Once the appliance has cooled, open the lid by pressing the left side.
- Remove the filter holder using the handles.
- Remove the filter paper and throw away.
- Rinse the filter holder under warm water and dry before re-positioning.
DESCALING
Reminder: the guarantee does not cover faulty appliances on which descaling was not performed regularly.
If you use your machine on almost a daily basis, regular descaling of the different water circuits is recommended on average every 2 months.
- Pour 500 ml of water into the tank with a sachet of "Special coffee machine" anti-scale agent available in the store or 250 ml of white vinegar mixed with 250 ml of water.
- Position the coffee pot on the warming plate.
- Turn the appliance on and check that the rotating control button is set to PENDING (
![]() ).
). - Activate the FILTER COFFEE button and dispense half of the preparation.
- Switch off the machine by turning the START/STOP (h7) button to "
![]() ".
". - Allow the solution to rest for approximately 1 hour to allow the liquid to act.
- Turn the machine on again and press the FILTER COFFEE button again
![]() until all of the solution has been dispensed.
until all of the solution has been dispensed. - Fill the tank with fresh water until the maximum water level and rinse the FILTER COFFEE circuit allowing all of the water to be dispensed into the coffee pot.
CLEANING AND MAINTENANCE
To ensure that your Dual Espresso-Filter Coffee Machine works for many years, we advise that you perform regular maintenance.
- Before any cleaning, disconnect the machine's power cord and ensure that the machine is cold.
- None of the machine's parts can be put in the dishwasher, except for the glass coffee pot.
Regular cleaning of the coffee pot, filter support and anti-drip device
- Clean all the parts in warm water. Only the glass coffee pot is compatible with the dishwasher.
Cleaning the dispensing unit
- The base of the dispensing unit must be cleaned regularly using a non-abrasive cloth soaked in water. This is to remove any coffee residue on the sieve and in the filter holder housing system.
- Residual coffee grounds can also get blocked in the dispensing unit's peripheral cylinder. In this case, this can be removed using a small fine object which is not pointed or a toothpick.
You are advised to operate your machine regularly with the filter holder in place but without coffee, to remove any coffee remains.
Cleaning the water tank
- Remove and clean the water tank every day. Rinse with clear water and re-position correctly ensuring that it is correctly lodged in its housing.
- If a layer of limescale should form on the tank walls, descale using a mixture of water and white vinegar. Allow it to sit for 1 hour.
- Wipe with a non-abrasive sponge and rinse thoroughly.
Cleaning the appliance body, the cup warming plate, the warming plate and the lid
These parts of the appliance are cleaned using a non-abrasive and slightly wet cloth.
If you notice any traces of coffee on the warming plate, clean using a sponge and a little dish washing liquid.
Take care not to allow water on the control panel. Any other servicing should be performed by an authorized service representative.
SAFETY AND VISUAL WARNINGS
The EXPRESSO/HOT WATER/STEAM buttons on the XP6040 include a general safety device that prevents confirmation of any operation if the correct temperature has not been reached:
- While the TEMPERATURE light (h4) flashes, none of the buttons (except START/STOP and FILTER COFFEE) can be used.
The machine is also equipped with visual warnings informing of any misuse of the machine.
Scenario 1: detection of a fault in the ESPRESSO water tank
In EXPRESSO or HOT WATER mode, when the TEMPERATURE light (h6) flashes quickly and the pump stops, your machine has detected that the water in the tank is at the minimum level and warns you as if the tank was empty.
In this case:
- Turn the rotating control button – if this is not the case – to the PENDING position (
![]() ).
). - Switch the machine off by turning the START/STOP button (h7) to the (
![]() ) setting.
) setting. - Empty the rest of the water in the tank and re-fill then re-position correctly.
- Switch the machine on by turning the START/STOP button (h7) to the (I) setting.
- Wait until the TEMPERATURE light (h6) stops flashing.
- Let the water run through the HOT WATER/STEAM spout (fig.3) for approximately 20 seconds (See section "Hot water function").
Note: If the pump has not started completely, the TEMPERATURE light (h6) flashes again (quickly or normally).
In this case, switch the machine off again. Wait a few seconds then turn on again and restart. It may be that you have to repeat these operations 2 or 3 times for the pump to be completely operational again.
Scenario 2: rotating selector incorrectly positioned
If the TEMPERATURE light (h6) flashes quickly when you turn your machine on, this means that the rotating control button (d) is not set to PENDING () and that the thermo block cannot be heated. In this case, turn the control button to PENDING ().

Documents / ResourcesDownload manual
Here you can download full pdf version of manual, it may contain additional safety instructions, warranty information, FCC rules, etc.
Advertisement


Need help?
Do you have a question about the XP6040 and is the answer not in the manual?
Questions and answers