KRUPS XP1500/1530 - Espresso Coffee Maker Manual
- Instructions for use manual (43 pages) ,
- Owner's manual (17 pages)
Advertisement
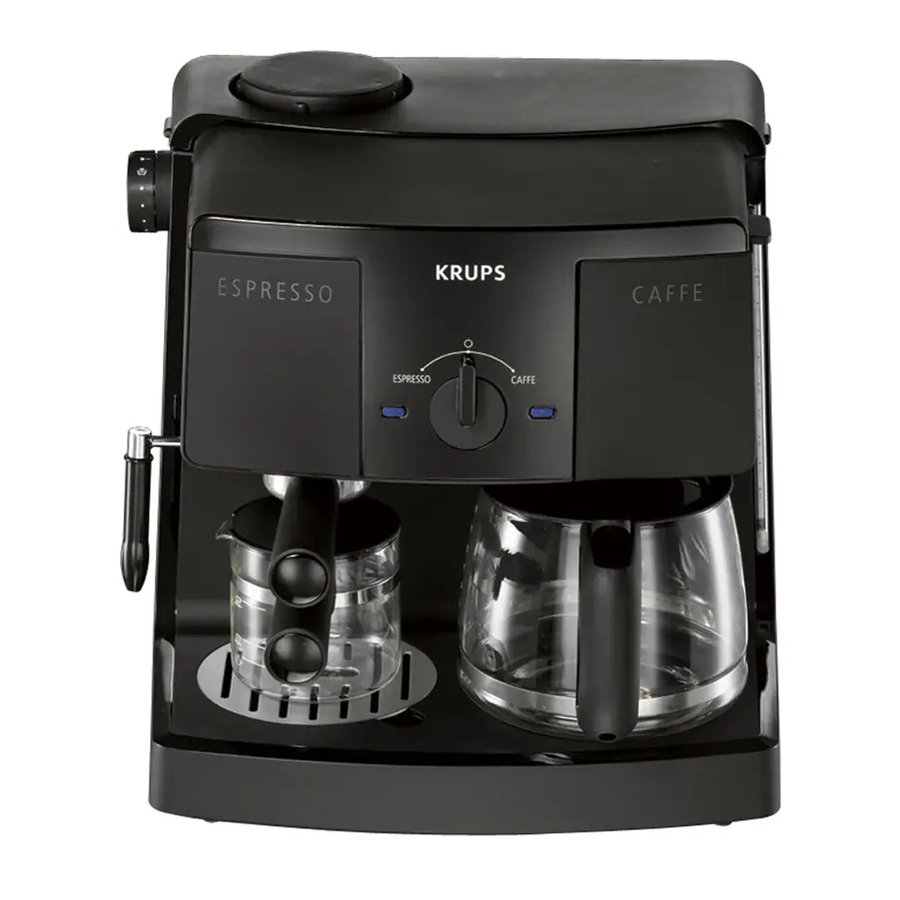
Description

Espresso: e
e1- Boiler security cap
e2- Steam side knob
e3- Steam nozzle
e4- Cappuccino nozzle
e5- Espresso jug lid
e6- Espresso carafe
e7- Drip grid
e8- 2-4-cup sieve
e9- Sieve holder
e10- Measuring spoon
S- Selector knob
C- Display
Coffee: c
c1- Optional accessory: Duo-Filter – Ref: F15A04 (sold separatly)
c2- Watertank drip coffee
c3- Filter basket
c4- Swing-out filter holder
c5- Waterlevel indicator
c6- Pause and Serve device
c7- Drip carafe hinged lid
c8- Drip carafe
c9- Non-stick coated keepwarming plate
Before First Use
Please familiarize yourself with all parts of your Krups espresso machine prior to use. Insert the filter basket into the filter holder, fit the filter holder into the filter rings, remove and replace the boiler cap. Check the different positions of the switch. To remove any residuals of production which may rest in the appliance, run the machine through one or two cycles with water only. Wash all loose parts in warm soapy water, rinse thoroughly and dry.
Read all instructions, cautions, notes and attentions before actually using the machine.

PRESSURE
Never open boiler cap (e1) or remove filter holder (e9) while your appliance is turned «on» or as long as there is pressure in the boiler container.
Never move or remove the filter holder while the appliance is in operation and under pressure.
Please follow the instructions listed below to see if the machine is still under pressure. Follow these safety precautions while your machine is in use and ten to fifteen minutes after last use.
- Turn the selector knob (S) to the OFF position.
- Carefully open the steam release knob (e2) by turning it counter clockwise. If steam comes out of the nozzle, then the boiler chamber is still under pressure. Close steam knob and proceed with instructions listed below.
- Take a pitcher filled with cold water and hold it underneath the steam nozzle with nozzle inserted into the pitcher. Then open the steam release knob (e2) by turning it counter clockwise. Leave steam release knob open until no more steam comes out of nozzle. When finished turn steam knob clockwise to close.
- Now you can remove the boiler cap and the filter holder.
Genuine Espresso
Espresso is a far richer and stronger brew than regular coffee. It should be deep, dark, and delicious. Most people find that they enjoy it in small quantities because of its richness, and for that reason, espresso is usually served in small (2-2 1/2 oz) demi-cups.
Your appliance when properly used, will produce espresso that is deep, dark and delicious. Just follow the instructions and use fresh, well-roasted, pre-ground espresso.
Preparing espresso or cappuccino is different from brewing regular drip coffee. One main difference is that the water will come to a boil and will then be forced through the ground coffee. This means that an espresso machine works under pressure and needs special attention.
HOT
Do not touch boiler cap (e1) during operation. Before removing boiler cap turn off machine, let it cool down for at least 2 or 3 minutes. Relieve pressure. See CAUTION-PRESSURE.
Making the Perfect Cup of Coffee
Making the perfect cup of coffee is something different for everyone. It is an art and a science, that is not only effected by the coffee that is used, but also the equipment. The water, the water temperature, the time the water is in contact with the coffee, the grind, the type of filter, all play an important role in determining the flavor. Fine tuning these aspects is the art of making the ultimate cup of coffee.
The four main principles:
- The Water
It is important to use fresh water. Since coffee is 98% water, any residual flavors will come through in the coffee. The Duo Filter (not delivered with this appliance, yet available as an accessory) System can remove chlorine taste, but the better the water you start with the better the flavor of the coffee. - The Coffee
Choose premium fresh whole beans suited to your taste. There are two principale species of coffee: Arabica and Robusta. Arabica beans are the choice beans with more flavor and less caffeine. Robusta beans have more caffeine and are more « robust » and are usually used in blends. The origin of the beans and the roast will determine the flavor. Roasts vary from light to very dark. Light roasts have a smooth, delicate aromatic taste, medium to medium dark roasts are slightly stronger, with a full-bodied balanced taste, and dark roasts are bold with smoky undertones. - The Grind
Use the proper grind finesse and grind just prior to brewing. The variation in the grind depends on the type of filter you use. We prefer paper filters because they allow you to use a finer grind, thus allowing a full extraction and more contact time with the water. Permanent filters require a slightly coarser grind therefore the extraction rate is reduced. A general rule of thumb for grinding is the longer the brew process the coarser the grind. - The Proportion
We recommend that you use 1 rounded Tbsp. of ground coffee per cup and modify the quantity to suit your taste.
COFFEE
Special features
The following features are available only on the XP 1530.
Programming Clock and coffee strengh
Your XP 1530 Krups appliance is equipped with electronic controls providing comfort and range of setting with 3 push buttons (1).

- clock setting mode for day time and coffeecycle automatic start (C1)
- hours and automatic start mode selection(C2)
- minutes and coffee strength selection (C3)
- display for feedback to user (C4)
- clock setting for day time is adjustable oncethe appliance is plugged with display blinking.
Press the (C1) button to enter clock setting mode. Then press (C2) to adjust hours and validate with (C1) button. Press (C3) to adjust minutes and validate with (C1) buttons.
Setting can be done either with impulse or continuous actuation of hours and minutes buttons.
Once day time is set, you are invited to set the automatic start time, with display blinking and clock icon in display.
You can either choose to set automatic start time immediately by repeating above operations, or choose to do the setting later by pushing the clock mode button (C1) twice.
To activate the automatic coffee start at preset time, simply activate the automatic mode button (C2). To shut off appliance that started in automatic mode, press the button (C2).
Coffee Strength
Your XP1530 KRUPS appliance is equipped with Coffee strength mode button.
You can choose to brew an extra strong cup of coffee by activating the strong coffee mode (C3). A coffee cup icon is displayed on top left of the display (10).

To come back to regular coffee just press again the strong coffee mode button (C3).
This is normally used only with a small quantity of water (max 4 cups).
Automatic stop
Your XP1530 KRUPS appliance is equipped with automatic shut off.
2 hours after switching ON drip coffee function, the appliance will switch OFF automatically. In that case you need to turn the selector knob (S) in OFF middle position before making a new coffee cycle.
You can also turn the selector off as soon as the coffee is ready.
Preparing Coffee
We recommend rinsing the coffee machine by running one or two cycles with water only, without ground coffee in the filter basket.
Be sure that the water chamber is empty.
Remove any literature, etc if found in the water chamber.
- The lid of the glass carafe must be properly positioned during the brewing process.
- To open the lid press the flap on top of handle.
- Make sure that the swivel filter is closed properly during the brewing process. Push in firmly until the handle touches the side of the coffee maker and filter «clicks» into place.
![]()
If the swivel filter is not closed in properly the «Pause and Serve» can not function. This may cause hot water or hot coffee to overflow.- The «Pause and Serve» mechanism is opened as long as the glass carafe is inserted into the machine and sits properly on the warming plate and the swivel filter is closed properly. When brewing coffee make sure the glass carafe is in place (see «Pause and Serve» section).
Place your appliance near an electrical outlet and release enough cord so that you can plug in the machine (2).

Putting in the ground coffee
- Swing out the filter holder (3) and insert a paper filter in the filter basket. We recommend using KRUPS size 4. When inserting a paper filter make sure the seam is pointing toward the base of the filter holder (4).
![]()
![]()
Use your hands to conform the filter to the contours of the filter basket. This will enable you to achieve better results. - Put ground coffee into the filter basket (5). We suggest using one level KRUPS measuring spoon of ground coffee for each cup of robust brewed coffee. You can adjust the quantity to suit your own taste.
![]()
We do not recommend using coffee that is ground to a powder-like consistency, as this will prevent water from passing through the filter. - Close the filter and make sure that it is completely closed (6).
![]()


ATTENTION:
Make sure that the filter paper does not fold over when closing the swivel filter, otherwise the water might run between the filter paper and the filter holder producing a very weak cup of coffee.
Filling the Water Chamber
- Open the hinged lid (7). Pour in the desired quantity of water (8) and close the lid. The amount of freshly brewed coffee delivered after the brewing process will always be slightly less than the amount put into the water chamber. This is due to the minimal absorption of the water by the ground coffee. The water levels on drip carafe and appliance do take this absorption in account for more convenience.
![]()
![]()
- Place the glass carafe with lid in position on the warming plate.
- Turn « ON » your appliance in drip coffee mode using the selector knob (S). The indicator light will illuminate indicating that the brewing process has begun (9).
![]()
- As long as the blue indicator light is illuminated the coffee will be kept warm.


Pause and Serve Feature
The Pause and Serve feature automatically stops the flow of brewed coffee through the filter cone if the glass carafe is removed from the warming plate during the brewing cycle. You have about 20 seconds between the removal of the carafe and it being reinserted back onto the warming plate.
The Pause and Serve device closes off the filter cone so effectively that there is virtually no coffee dripping onto the warming plate. Once the carafe is replaced, the brewing process and the flow of coffee into the carafe will resume.
If significant amounts of coffee drip onto the warming plate afer the carafe has been removed, please check the seal in the filter holder to ensure it is placed properly. If a requirement seal is needed, please contact one of our main service centers or our main parts center.
If the filter is overfilled with coffee grounds, it could cause the water that jets into the filter cone to overflow between the filter and the sides of the filter cone. Be sure to use the proper amount of ground coffee.
If this blockage and subsequent dripping does occur, put the glass carafe immediately back onto the warming plate, and allow the full brewing cycle to run its course. Do not swing out the swivel filter until the brewing process is completed.
Cleaning the coffeemaker
- Always unplug this appliance before cleaning. Clean the filter basket, carafe, and lid in a solution of warm water and mild liquid soap. These parts can also be placed in the upper level of your dishwasher away from the heating and drying element for safe effective cleaning.
- Never use scouring agents.
- Never immerse the appliance itself in water. To clean, simply wipe off with a soft, damp cloth.
- Never use a cloth to clean inside of the water chamber, as this might leave residual deposits in the chamber. Just rinse with cold water periodically.
Decalcifying the coffeemaker
The warranty does not cover faulty or broken machines that are not properly descaled.
The coffeemaker must be decalcified regularly. The frequency depends on the hardness of your water and how often you use the coffeemaker.
Recognizable indications that descaling is necessary are:
- increase noise during boiling,
- longer preparation time.
If usage is frequent, descaling should be carried out as follows:
- with soft water once a year,
- with medium hard water every quarter year,
- with hard water once a month.
In doubt regarding the water hardness in your area, you may call your local water department.
As descaling agent we recommend the use of reference solution N°F054 from Satisfusion 1 Service at 888-344-0727.
Dissolve a packet of Krups descaling solution in 1/2 quart water and pour into the water container. Run this through 2 or 3 times as if making coffee, but using no ground coffee. The hot descaling solution must be allowed to cool down before being poured into the water container. Finally do the same twice using clear water.
ESPRESSO
Making espresso
- Place your appliance near an electrical outlet and release enough cord so that you can plug in the machine (2).
- Place the filter basket (e8) into the filter holder (e9) and rotate basket inside filter holder to secure it (11).
![]()
- Fill with ground espresso. The filter basket is marked on the inside for 2 and 4 cups. Pack the coffee lightly and clear any excess coffee from the rim of the filter holder. This will assure proper fit to the brewing head (12).
![]()


ATTENTION!
Do not pack coffee too tightly.
Do not fill more coffee than indicated by the four-cup marking into the filter basket. This might cause clogging or overflow.
- To insert the filter holder, place the filter handle's to the left, raise the filter holder up into brewing head and turn the filter holder to the right, until it can go no further.
If the filter holder's handle does not point toward you in lock position, do not operate the machine. Rather, remove the filter holder and reinsert it as described above (13).
![]()
By following this procedure this will prevent the filter holder from being dislodged as pressure builds up during the brewing process. - Open the hinged lid and unscrew the boiler cap by turning it counterclockwise (14+15).
![]()
![]()
- Fill the boiler container with cold water using the marking indicated on the glass carafe (16).
![]()


Never fill the boiler while your appliance is switched on.
Never fill more than 20 oz of water into the boiler.
The glass carafe has markings for 2 and 4 cups.
To froth milk for Cappuccino preparation, add the quantity of water corresponding to the steam level marking on the carafe.
Maximum capacity to the bottom of the metal band around the glass carafe = 4 cups of espresso, plus steam for frothing milk for cappuccino.
Never fill the carafe above the bottom of the metal band!
NOTE
It is very important to fill only the amount of water you need into the boiler. Your appliance will always need to process all the water until the boiler is empty.
- Close the boiler cap securely by turning it clockwise (17).
![]()
- Place carafe under the filter holder and make sure the slot on carafe lid is right below the filter holder output (18).
![]()


ATTENTION:
Make sure the overflow grid (e7) is in place.
- Make sure the side knob (e2) is set on cup Espresso position. Then turn the selector knob (S) to the left in Espresso ON position. The left indicator will light ON blue (19).
![]()
It will take approximately 2 minutes for the water to be heated. The water will then be forced through the ground coffee into the glass carafe. - Wait until all the water in the boiler hasbeen used. Switch off the machine by turning the selector knob (S) in middle position.
- Do not unscrew the boiler cap while the machine is in operation. Wait until brewing cycle is completed and all water and steam have been used (see CAUTION-PRESSURE).

Use caution when removing the filter holder, as the metal parts may still be hot. After switching off the appliance it is recommended to wait about 2 minutes before removing the filter holder. To remove the filter holder, turn the filter to the left, until the holder dislodges from the machine.
Cappuccino
Cappuccino reportedly takes its name from the chocolate hues of the robes worn by the Capuchin monks who favored this delicious dessert coffee. Cappuccino is traditionnally made up of 1/3 espresso, 1/3 steamed milk and 1/3 froth and can be tailored to one's own taste with cinnamon, sugar, chocolate flakes or even liquor. Its versatility makes cappuccino a world wide gourmet choice.
Making Cappuccino
If the Cappuccino nozzle is not attached, attach it now (20).

- Pour 4 to 6 oz of fresh, cold milk into a small pitcher. Do not use a pitcher cleaned with hot water and still warm. The pitcher should fit underneath the cappuccino nozzle. We recommend using 2% or skim for a stiff, dense froth. Use regular whole milk if you prefer a creamy froth.
- Follow the directions from step 1 to 12 in section « Making Espresso ».
- As soon as the first few drops of coffee are forced through the filter holder you can start frothing the milk.
Place the tip of the steam nozzle half way into the pitcher of milk. -
- Turn the steam release knob (e2) counterclockwise to release steam(21).
![]()
- Keep pitcher slightly tilted so that youcan always see the position of the nozzle as you froth the milk.
Always ensure some clearance between the cappuccino nozzle end and bottom wall of the pitcher, to allow steam exhaust.
In just a few seconds, your milk will begin to froth. As the froth rises, keep lowering the pitcher so that the tip of the steam nozzle is always just slightly beneath the surface of the rising froth.
Note : Do not bring milk to a boil (this will happen if large bubbles start to form on the surface of the milk). - When you have finished frothing milk, close the steam release knob by turning it clockwise while the nozzle is still immersed in the milk. This willavoid splattering of the hot milk and froth.
- If you prefer «stiff» froth, let the frothedmilk stand for a minute.
- Turn the steam release knob (e2) counterclockwise to release steam(21).

ATTENTION:
Clogged steam nozzle
Milk residuals will build up in the tip of the steam nozzle after frothing milk. To avoid clogging, remove the plastic housing of the cappuccino nozzle (22) once appliance is cold, for easy cleaning. Then follow «cleaning the steam nozzle» as described in the section «Cleaning the cappuccino nozzle».

- Don't forget to replace the tip of the nozzle and screw on tightly (23).
![]()

Make sure your appliance is cool and all pressure has been released (see CAUTION-PRESSURE).
- Fill the boiler container with cold water.
![]()
For steam only, do not fill the glass carafe above the 2-cups marking. This amount will always provide enough steam for frothing. - Have your pitcher with milk ready to heat.
- Place glass carafe, with lid under filter holder (18). Make sure the side knob (e2) is set on cup Espresso position. Then turn the selector knob (S) to the left in Espresso ON position. The left indicator will light ON blue (19).
- Open the steam release knob immediately after turning the machine on. Stand by with your frothing pitcher.
![]()
Do not leave the machine unattended at this time.
It will take approximately 30 to 60 seconds after turning the machine on for the steam to come out of the steam nozzle. Proceed with steps 4.a) and 4.b) in the section « Making Cappuccino ». - When all steam is released, close the steam release knob and turn off the machine.
![]()
If you do not need all the water for steaming, proceed as follows:- turn off the machine.
- release the remaining steam pressure into another container.
Do not close the steam release knob before all steam is released or machine has been turned «off»! (See section – CAUTION - PRESSURE)
ATTENTION!
The plastic housing of the cappuccino nozzle (e4) has 2 fine holes on sides which draw air into the milk.
If those holes get clogged, the milk will not be frothed properly. Therefore, do not dip the cappuccino nozzle in milk or froth up to those holes.
Cleaning the espresso and cappuccino side
Before cleaning, turn «off» the machine, unplug it, and allow it to cool down.
The filter holder, filter basket, carafe, carafe lid and overflow lid must not be cleaned in dish washer. Only use hot water and gentle soap. Never use abrasive materials.
The machine can be wiped clean by using a damp cloth. Never immerse the body of your «appliance» in water or any other liquid. Clean the brewing head with a damp cloth and remove ground coffee. If there is water left in the boiler chamber, let the machine cool down, remove all those parts and empty through the top opening by turning upside down.
Cleaning the Cappuccino nozzle
Clean the steam nozzle each time after you have immersed it in the milk, otherwise the inside of the nozzle becomes clogged and the milk deposits on the outside harden and become difficult to remove.
- If clogging does occur, remove the plastic housing of the cappuccino nozzle (22) once appliance is cold and then unscrew the tip of the steam nozzle (23).
Remove all milk particles using a sewing needle and rinse under the faucet. Replace nozzle tip making sure to screw it on tightly. Wipe off the outside of the nozzle with a wet cloth. Hold the wet cloth very close to the tip of the nozzle and open the steam valve. Let the steam escape into the wet cloth for one or two seconds, then close the valve. Any milk residue will then be flushed out. The plastic housing of the cappuccino nozzle should be rinsed in warm water. If the small suction openings are clogged up, it can be opened with a small needle.
Cleaning the drip tray
- The overflow grid and the cavity under he grid can be cleaned by removing the grid (24).
![]()

Do not try to open or disassemble the main body of the machine.
Decalcifying the espresso side
The warranty does not cover faulty or broken espresso machine due to not being descaled.
- Due to the acid substance, we recommend protecting your worktop and sink unit during the descaling process, especially if it is made of marble or stone. Isolate your espresso with a tea towel, a tablecloth or a tray.
The espresso machine must be decalcified regularly. The frequency depends on the hardness of your water and how often you use the espresso machine.
Before descaling, the brewing sieve on the brewing head must first be screwed off.
- Remove all lime and coffee residues from the brewing sieve and the brewing head.
- Remove the plastic housing of the cappuccino nozzle (22).
As descaling agent we recommend the use of reference solution N°F054 from Satisfusion 1 Service at 888-344-0727. - Dissolve a packet of Krups descaling solution in 10 oz / 300 ml of lukewarm water and pour into the boiler container. Put one receptacle under the brewing head and another under the steam nozzle.
(Note : Do not use the filter holder during decalcification.) - Open the steam valve and turn on the appliance. Allow the descaling solution to run out of the espresso outlet and the steam nozzle.
- After each brewing cycle, switch off the appliance and allow the appliance to cool down.
- Repeat this operation once again.
Following this, allow 2 boiler container of clear water to run through the system. Switch off the appliance. Allow the appliance to cool down. Insert the brewing sieve into the brewing head again and push the plastic housing of the cappuccino nozzle onto the steam nozzle.
Troubleshooting
(Always check if the appliance is plugged in and is in the proper (on) position).
Espresso leaking from filter holder
Cause:
- Filter holder not properly inserted.
- Filter holder not pushed in far enough.
- Internal gasket is dirty and needs to be cleaned.
- Gasket without elasticity, replace it with a new one.
- Coffee powder not cleaned off the edge of the filter holder.
Espresso does not come out
Cause:
- No water in boiler container.
- No coffee in filter holder.
- Filter clogged because coffee ground is too fine and or pressed down too hard
Steam does not come out of steam nozzle
Cause:
- No water or not enough water in the boiler chamber.
- Steam nozzle is clogged (see «Cleaning the cappuccino nozzle » section).
Not enough froth when frothing the milk
Cause:
- Steam nozzle touches the bottom of the pitcher.
- Steam nozzle is clogged: tiny holes on top of plastic housing of the cappuccino nozzle are clogged (see «cleaning the cappuccino nozzle»)
- Milk is not fat enough or too warm (more than 8°C).
For best results
Always use fresh, cold water (warm water might be stale and have mineral deposits which would impair the flavor of the coffee)
We recommend that you grind your own beans. Freshly ground beans deliver more aroma and flavor. Use one KRUPS measuring scoop of beans per cup.
Serve coffee immediately after brewing.
Never reheat coffee.
Accessory
Optional accessory, sold separatly: Duo Filter ref F15A04.
Anti chlorine and anti-scale filter optimizes coffee taste and reduces the frequency of descaling and maintenance.

Documents / ResourcesDownload manual
Here you can download full pdf version of manual, it may contain additional safety instructions, warranty information, FCC rules, etc.
Advertisement


Need help?
Do you have a question about the XP1500 and is the answer not in the manual?
Questions and answers