KRUPS KM730 - 12 Cup Programmable Coffee Maker Manual
- Instructions manual (34 pages) ,
- Manual (33 pages)
Advertisement
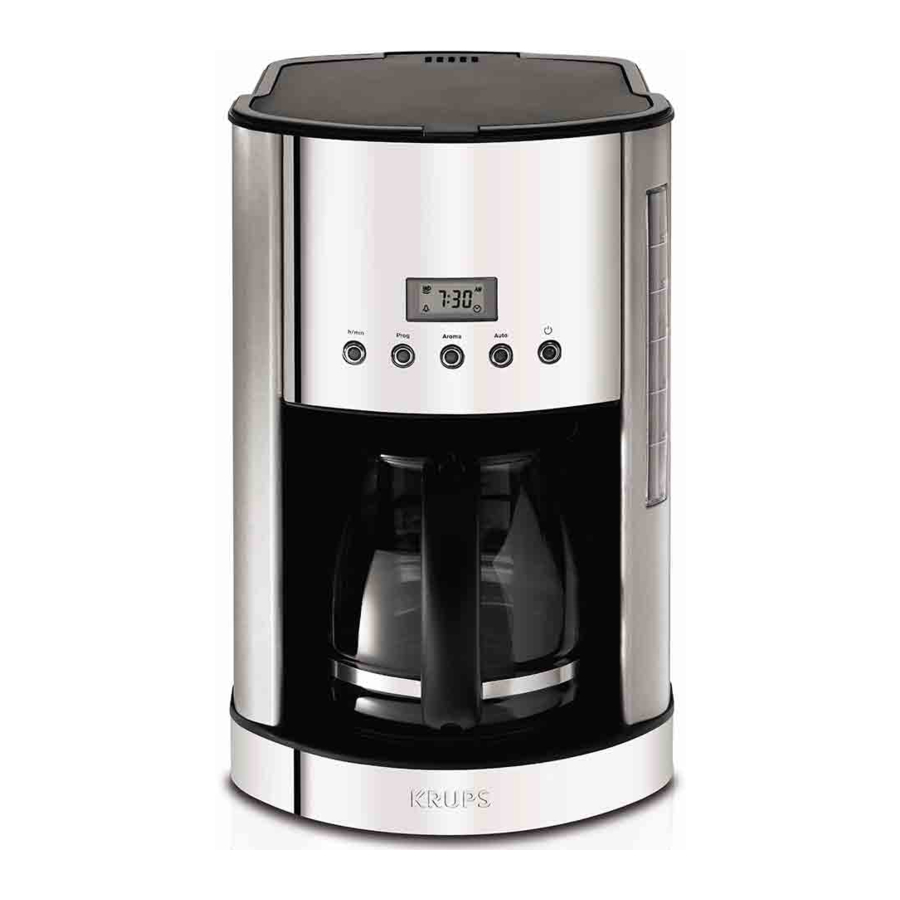
DESCRIPTION

- Main body
- Top lid
- Water tank
- Water level indicator
- Carafe lid
- Carafe handle
- Carafe
- Heating plate
- Filter holder
- Permanent filter
- On/Off button with blue LED
- Auto On brewing selection button with blue LED
- Aroma coffee selection button with blue LED
- Programming button with blue LED
- h/min button with blue LED
- Display
- Spoon
PRIOR TO USE
- Operate your coffee maker for the first time without coffee using 1 liter of water to rinse the circuit.

Use only cold water. The automatic brewing system has been designed to work only with cold water.
SETTING THE CLOCK
There are two ways to set the clock on your coffee maker.
- When you initially plug in the coffee maker, the unit will beep and "12:00" will flash on the LC D displayfor a few seconds. Press immediately the h/min button (o) to set the current hour. If "12:00" starts to flash, press the PRO G button (n) for a few seconds until the "12:00" flashes again. Then press the h/min button (o) to set the current hour. There are AM and PM indicators on the top right side of the LC D screen. To set the current minutes, press the PRO G button (n) and then press the h/min button (o) until the correct minutes appear on the LC D display. After 5 seconds, the unit will beep and the time will stop flashing.
- At any other time, you can set the clock or change the set time by pressing and holding the h/min button(o). The unit will beep and "12:00" will flash on the LC D display. Use the h/min button (o) to set the current hour. There are AM and PM indicators on the top right side of the LC D screen.
To set the current minutes, press the PRO G button (n) and then press the h/min button (o) until the correct minutes appear on the LC D display. After 5 seconds, the unit will beep and the time will stop flashing.
Notes: Your clock has now been set and will continue to keep the correct time, even after the coffee maker has been shut off.
Unplugging the coffee maker or a power failure will reset the clock to 12:00 AM. Repeat the instructions above to reset the clock.
MAKING COFFEE
- Open the coffee maker lid (b).
- Place the coffee maker on a hard, flat surface. With the coffeemaker turned off, plug into a 120V outlet.
- Fill the carafe with fresh, cold water (preferably bottled or filtered water). Open the hinged cover andpour the water into the water tank Fig. 1 and 2. The number of cups is shown by the water level indicator Fig. 3. Do not exceed the 12 cup level.

Notes:

- Use only cold water. The automatic brewing system has been designed to work only with cold water.
- There are overflowing holes on the back of the water tank to prevent exceeding the capacity of the coffeemaker. If you add too much water, it will leak out from the back of the unit.
- The amount of brewed coffee will be less than the water poured in the watertank since about 10% isabsorbed by the coffee grounds and the filter.
- Place the carafe with its lid on to the heating plate (h) making sure it is fully seated on the heating plate to activate the pouring mechanism.
![]()
To avoid filter basket overflow, the carafe must fit securely into the coffeemaker with the lid on. If not properly positioned on the heating plate, it could cause hot water or hot coffee to overflow. - Open the coffee maker lid (b), insert the filter holder (i). Make sure it is securely pushed down and locked. Then insert a standard # 4 cone paper filter or the permanent filter (j) into the filter holder (i). Use a fresh paper filter or clean the permanent filter for each carafe of coffee Fig. 4 and 5.

- Add about 2 ounces of ground coffee for 12 cups. Do not exceed the 12 cup level Fig. 6.
![]()
- Close the top lid making sure it is securely closed Fig. 7.
![]()
- Press the On/Off button (k). The button will illuminate, indicating that your coffee maker has begun the brewing cycle.
![]()
The coffee maker becomes very hot during the brew cycle. Please handle with care.
Note: at any time during the brewing cycle, you can turn the coffee maker off by simply pressing the On/Off button (k). No buttons will be illuminated, indicating that the coffee maker is off. -
- When the brewing cycle is completed, the coffee maker will beep and the On/Off button(k) will blink. This indicates that the keep warm cycle has started.
Notes: When the brewing cycle is finished, there will still be hot liquid in the filter basket. Wait a few minutes for the rest of the liquid to drip through into the carafe before removing the basket.- The keep warm function will operate up to two hours. During the keep warm cycle, the On/Off button (k) will keep flashing and the LC D display will count up the time since brewing completed. At any time you can stop the keep warm cycle just by pressing the On/Off button (k). When the keep warm cycle is done the LED will switch off and the LC D will display the clock again.
- When the brewing cycle is completed, the coffee maker will beep and the On/Off button(k) will blink. This indicates that the keep warm cycle has started.
- Open the top lid and carefully remove the filter holder by grasping the tab on each side of the filter holder, and lifting straight up from the filter holder. Discard the used coffee filter (if using a paper filter) and grounds Fig. 8 and 9.

Note:- If two or more pots of coffee are to be made it is recommended to let the coffee maker cool down for 10 minutes between each brewed pot.


Auto Shut-Off
As a convenience, your coffee maker has been designed with an Auto S hut-Off feature. When the brewing cycle is completed, the coffee maker will shut off automatically after 2 hours.
AROMA SELECTION
- To ensure optimum flavor, the Aroma coffee selection button (m) allows you to prepare a stronger coffee.
- Follow the directions for MAKING C O FFEE until step 6.
- Press Aroma coffee selection button (m) to select a stronger strength of brew. The button will illuminate and a black cup icon appears on the left top corner. Fig. 10.
![]()
Note: This function will slow down the brewing cycle.
- Press Aroma coffee selection button (m) to select a stronger strength of brew. The button will illuminate and a black cup icon appears on the left top corner. Fig. 10.

PROGRAMMING YOUR COFFEE MAKER
Auto on setting
- Check to ensure digital clock is set to correct time. If the time is incorrect, follow the instructions in the "Setting the Clock" section.
- Follow steps 1 through 6 in the "Making Coffee" section.
- Press the PROG button (n). A bell icon appears on the left bottom corner of the LCD.
- Use the h/min button (o) to set the desired start brewing time in hours. Refer to the AM and PM indicators on the top right side of the LCD display.
- Press the PROG button (n) and then use the h/min button (o) to set the desired start brewing time in minutes.
- After 5 seconds, the coffee maker will beep and the LC D display will show the current time.
Note: You can press the ARO MA button (m) if you want to prepare a stronger coffee (refers to 5- AROMA SELECTION) - Press the AUTO button (l). Its led will illuminate to indicate that the coffee maker is programmed. A clock icon appears on the right bottom corner of the LC D. The digital clock will continue to show the current time.
- Once the preset brew time is reached, the coffee maker will automatically initiate the brew cycle. TheOn/Off button (k) will illuminate, indicating that your coffee maker has begun the brewing cycle. The AUTO button (l) switches off.
Note: At any time during the brewing cycle, you can turn the coffee maker off or cancel a brewing cycle, by simply pressing the On/Off button (k). No button will be illuminated, indicating that the coffee maker is off.
To cancel a preset brewing cycle, press the AUTO button (l) - the preset brew cycle is cancelled when the AUTO button (l) is no longer illuminated.
For your convenience, your coffee maker will remember your preset brewing time. S imply press the AUTO button (l) to activate the preset brewing cycle. To change the preset brewing time, follow steps 3 through 7 above.
Pause & serve
- This feature allows you to interrupt the brewing cycle and pour a cup of coffee before the end of the brewing cycle.

While this will temporarily stop the coffee from dripping into the carafe, it does not stop the brewing cycle. After serving, the carafe should be immediately returned to the heating plate to prevent the filter basket from overflowing.
Make sure the carafe is positioned firmly against the back of the coffee maker. Do not remove the carafe for longer than 30 seconds.
NOTE: While the pause and serve is a convenient way to pour a cup of coffee mid-cycle, we recommend you wait until the completion of the brew cycle as the strength and flavor of coffee poured mid-cycle will vary from the finished brew.
CLEANING
- To remove the used coffee grounds, remove the filter holder from the coffeemaker. Fig 8.
- Unplug the appliance.
- Do not clean the appliance when it is still hot.
- Carafe, carafe lid and removable filter holder can go on the top shelf of the diswasher.
NOTE: Do not place any other part of the coffee maker in the dishwasher.
- Clean with a soft cloth or a damp sponge. Never use harsh detergents or abrasive cleaners on any part of the coffee maker.
- To clean the stainless steel parts of your coffee maker, rinse a soft cloth or sponge in warm water and squeeze out excess water. Wipe the surface of the stainless steel in the direction of the brush marks. Dry thoroughly and polish with a soft dry cloth.
- For hard to remove stains, use a plastic mesh pad or cloth damped in vinegar.
- Do not immerse the appliance in water or place it under running water.
DESCALING
- Calcium build-up frequently occurs in drip coffeemakers. This build-up is normal and is caused by minerals commonly found in drinking water. Periodically, your coffeemaker will need cleaning to remove calcium or mineral deposits that may form. You will know when your unit will need descaling when you notice an obvious slow down in brewing time.
- We recommend descaling your unit with a solution of white vinegar and cold water or a suitable descaling agent. A solution of two tablespoons of white vinegar to one carafe of cold water works best. Pour this solution into the water tank, and follow your normal operating instructions, without a filter in the filter basket.
- When the brew cycle is finished, empty the carafe and rinse with water. Refill the water reservoir with cold water only and repeat the brew cycle with water only, twice more. This will rinse out any remaining vinegar solution.
- We strongly recommend decalcifying your coffee maker any time the brewing time slows down or when you begin to notice excessive steaming. The frequency of decalcifying will depend on the hardness of your water. We suggest decalcifying approximately every 80 brew cycles if you have soft water or every 40 brew cycles if you have hard water.
TROUBLESHOOTING
| PROBLEM | SOLUTION |
| The coffee does not brew or the machine does not switch on. |
|
Appliance appears to be leaking |
|
It takes a long time to brew. |
|
| The brew basket (j) overflows or the coffee drips too slowly. |
|
The coffee has a bad taste |
|
Coffee dispensing does not work (no coffee flow) |
|
The timer is not accurate (delayed) |
|
If your appliance still does not work properly, please call your respective country's Consumer Service.

Documents / ResourcesDownload manual
Here you can download full pdf version of manual, it may contain additional safety instructions, warranty information, FCC rules, etc.
Download KRUPS KM730 - 12 Cup Programmable Coffee Maker Manual
Advertisement


Need help?
Do you have a question about the KM730 and is the answer not in the manual?
Questions and answers