
Related Manuals for Raymarine RayChart 630


Summary of Contents for Raymarine RayChart 630
- Page 1 Distributed by Any reference to Raytheon or RTN in this manual should be interpreted as Raymarine. The names Raytheon and RTN are owned by the Raytheon Company.
- Page 2 RayChart 620 and 630 Owner’s Handbook Document number: 81155_2 Date: 11th May1999...
-
Page 4: Safety Notices
RayChart 620 and 630 Electronic Charting Systems Owner’s Handbook SAFETY NOTICES 1. HIGH VOLTAGE. The display unit contains high voltages. Adjustments require specialised service procedures and tools only available to qualified service technicians – there are no user serviceable parts or adjustments. The operator should never remove the display unit cover or attempt to service the equipment. - Page 5 Raytheon Marine Company 676 Island Pond Road Manchester, NH 03109-5420 Telephone: (603) 647-7530 1-800 539-5539 Fax: (603) 634-4756 Raytheon Marine Limited Anchorage Park Portsmouth Hampshire PO3 5TD England Telephone: (+44) 1705 693611 Fax: (+44) 1705 694642 RayChart 620 and 630...
-
Page 6: How This Handbook Is Organized
This handbook covers the following electronic charting systems from Raytheon Marine Company: • RayChart 620 monochrome chartplotter • RayChart 630 color chartplotter It contains very important information on the installation and operation of your new equipment. In order to obtain the best results in operation and performance, please read this handbook thoroughly. -
Page 7: How To Use This Handbook
Their design and manufacture conforms to the appropriate Electromagnetic Compatibility (EMC) standards, but correct installation is required to ensure that performance is not compromised. RayChart 620 and 630 symbol in the margin. -
Page 8: Table Of Contents
Contents Contents Chapter 1: Introduction ... 1 1.1 Overview ... 1 Features ... 1 Functions ... 2 Navigational Displays ... 2 1.2 The Chart Display ... 3 1.3 Operating Controls ... 5 The Trackpad and Cursor ... 5 Dedicated Keys ... 6 The Soft Keys ... - Page 9 Viewing the Waypoint List ...50 Waypoint List Operations ...51 Finding a Waypoint in the List ...51 Editing a Waypoint or Adding a New Waypoint ...52 5.3 The Current Route ...53 Viewing the Current Route ...53 Current Route Operations ...54 RayChart 620 and 630...
- Page 10 Contents 5.4 The Route List ...55 Viewing the Route List ...55 Route List Operations ...56 Route Details ...57 Editing a Route or Building a New Route ...57 5.5 Finding and Displaying a Waypoint ...59 5.6 Displaying and Printing the Log ...59 5.7 Printing the screen ...60 Chapter 6: Customizing the Chartplotter ...
- Page 11 NMEA Connection ...93 Printer Connection ...94 GPS Sensor Port ...94 SeaTalk Connection ... 94 7.6 System Check and Initial Setup ...95 System Check ...95 Switch On and Initial Setup ...95 EMC Checks Before Going to Sea ...96 RayChart 620 and 630...
- Page 12 Contents Chapter 8: Maintenance and Problem Solving ... 97 8.1 Routine Maintenance ... 97 Cabling and Connections ...97 EMC Servicing and Safety Guidelines ...97 Disposal ... 97 8.2 Problem Solving ...98 Common Problems and Their Solutions ...98 How to Contact Raytheon (US) ...99 For Marine Product and Services Information ...99 For Accessories and Parts ...
- Page 13 RayChart 620 and 630...
-
Page 14: Chapter 1: Introduction
Chapter 1: Introduction Chapter 1: Introduction 1.1 Overview The chartplotter is a sophisticated electronic charting system, which uses GPS or dGPS data to make navigation as simple and accurate as possible. The chartplotter displays chart information from the C-MAP NT electronic chart cards (C-Cards), and position information from satellites. -
Page 15: Functions
SeaTalk or NMEA 0183. Data from this connected equipment, including position, waypoints and routes, is displayed on the chartplotter and is used in calculations. Details of connecting other equipment are given in Chapter 7. RayChart 620 and 630 ® and NMEA 0183 standards. -
Page 16: The Chart Display
Chapter 1: Introduction 1.2 The Chart Display The chartplotter includes a small-scale world map, detailed navigation information is displayed when a chart card is installed. The chartplotter screen includes a cursor data box which normally provides the following information: • The cursor position, in either latitude and longitude or TDs, depending on your setup •... - Page 17 Track history Mark Event GO TO RULER Objects: 1 Tr Racon F1.W.10s27m16M Horn(2).30s Customizable Window, showing navigation data and CDI RayChart 620 and 630 CENTER SPEED DEPTH 24.0 HEADING ° M APP WIND APP WIND ° P ON COURSE WPT 001 001WPT 0.00$...
-
Page 18: Operating Controls
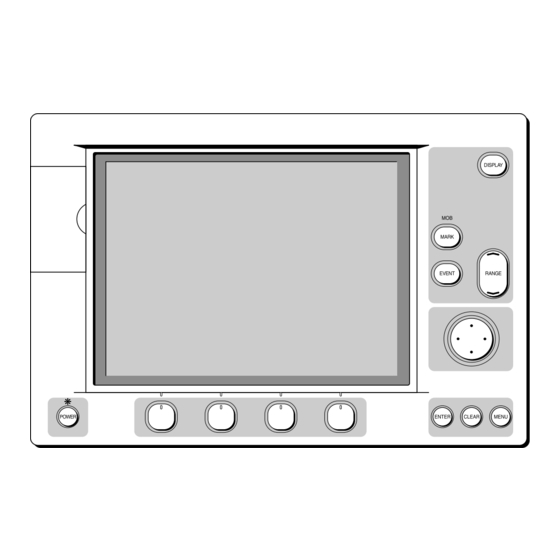
Chapter 1: Introduction 1.3 Operating Controls To control the chartplotter, the keys on the display unit are used with on-screen facilities such as pop-up menus. These include: • A trackpad providing up, down, left, right and diagonal control of an on- screen cursor. -
Page 19: Dedicated Keys
If desired, you can turn the sound off as part of your set up procedure (see Chapter 6). The dedicated keys are defined in the illustration on page 9. RayChart 620 and 630... -
Page 20: The Soft Keys
Chapter 1: Introduction The Soft Keys The four keys below the screen are called soft keys because their functions change according to the operation. The soft keys are grouped into related sets and subsets providing access to the various functions. The soft key labels are displayed on the screen just above the keys. -
Page 21: Other Soft Key Functions
When a list is on-screen, associated soft keys are also displayed; you use the trackpad to select an item from the list, then use the appropriate soft key to perform the required action. For example, you can delete a waypoint or a route. RayChart 620 and 630... - Page 22 RayChart 620 and 630 DISPLAY FOR MAIN SCREEN SELECTION CHART TRACKS SCREEN START CARTOGRAPHY EDIT ORIENTATION DELETE WINDOWS COLOURS ROUTE GOTO Soft keys POWER Press to select the indicated function, or scroll round a menu list. Press to turn on the display.
- Page 23 RayChart 620 and 630...
-
Page 24: Chapter 2: Getting Started And Controlling The Chart Display
Chapter 2: Getting Started and Controlling the Chart Display Chapter 2: Getting Started and Controlling the Chart Display 2.1 Introduction This chapter provides information, instructions and simple exercises to get you started using the chartplotter. It will help you to become familiar with the chart display and the functions of the controls before you start using the chartplotter for routine navigation. - Page 25 The soft keys INITIALIZE and BEACON can be used to initialize the GPS and to manually set up a differential beacon. These functions are described in Chapter 6. 02/24/97 ACQUIRING 10:09:14 U HDOP: 1.Ø SOG: Ø.ØKts BEACON INITIALIZE RayChart 620 and 630 CHART D3838-2...
-
Page 26: Adjusting The Lighting And Contrast
You can change the level of screen backlighting and monochrome screen contrast. • A 630 Chartplotter with color display has six brightness levels and a day/ night view setting. • A 620 Chartplotter with a monochrome display has six brightness levels and 40 contrast levels. -
Page 27: Using Chart Cards
2. Open the card cover, at the top left of the chartplotter front panel, by pushing the latch to the left and then opening the cover as shown in the illustration on the following page. RayChart 620 and 630... -
Page 28: Removing A Chart Card
Chapter 2: Getting Started and Controlling the Chart Display 3. Hold the card with the metal contacts facing left and the text “front insertion” towards the card slot. The C-MAP label will be facing right, as shown in the illustration. 4. -
Page 29: Displaying Information About Objects
If there is more than one page of information for the object, you can page through it using the PAGE DN soft key, and go back to the beginning using the BACK soft key. Press CLEAR to return to the expanded list, and select another object if required. RayChart 620 and 630... - Page 30 Chapter 2: Getting Started and Controlling the Chart Display Press CLEAR to clear the expanded information display, and return to the EXPAND and ALLINFO soft key display. CURSOR 50°36.68 N 009°47.60 E 208°M 1.4$ DEPTH IN FEET 100$ To Cursor 218°M 415.2$ 4.
-
Page 31: Port Area
4. Use the trackpad to highlight the required facility then press ENTER. The details for that facility are displayed. 5. Press CLEAR three times to return to the initial soft key display. RayChart 620 and 630 . The port facility symbols are D4211_1... -
Page 32: Tide Data
Chapter 2: Getting Started and Controlling the Chart Display Tide Data The symbol indicates tide height data is available for that position on the chart. The Raychart displays a graph of real time predictions of the maximum and minimum tide heights for the selected day. A digital readout provides sunrise and sunset as well as tide details for the selected day. -
Page 33: Controlling The Chart
• Use the CENTER soft key to center the chart on one of a choice of positions: the vessel’s position, the cursor position or a specified position . • Automatically re-center the chart using the HOME option. RayChart 620 and 630... -
Page 34: Changing The Chart Scale
Chapter 2: Getting Started and Controlling the Chart Display Note: If you have selected a chart display with one or two data windows, the chartplotter will treat the start of the data window as the edge of the chart. Changing the Chart Scale The RANGE key allows you to change the cartography scale so that you can see a smaller or larger area on the screen. -
Page 35: Changing The Chart Center
Home Mode (see below) 3. If you pressed REMOTE CENTER, the input box displays the current cursor position, as latitude and longitude or TDs depending on your system. RayChart 620 and 630 CENTER CURSOR REMOTE CENTER HOME... - Page 36 Chapter 2: Getting Started and Controlling the Chart Display REMOTE CENTER 39°21.11 N LAT: 009°52.55 E LON: SELECT SCROLL DIGITS Change the values to the screen centre, as follows: a. Move the cursor to the first digit you wish to change, using the left or right trackpad controls.
-
Page 37: Displaying Navigation Data
The CHART soft keys let you select either a Full Screen chart or a chart with data window(s). When you press the DISPLAY key to select the CHART option, the last used configuration is displayed. FULL D3839-1 WINDOW WINDOW SET UP D4203_1 RayChart 620 and 630... -
Page 38: Changing Between Full Screen And Windows
Chapter 2: Getting Started and Controlling the Chart Display Ten navigational data windows are available for display; six are pre-defined and supplied with the chartplotter, in addition four can be customized as part of your set up procedure, described in Section 6.3. You can display one or two data windows and select the window position. -
Page 39: Navigation
When you press the DISPLAY key to select the NAV option, the indicator you last used (CDI or BDI) is shown. DISPLAY FOR MAIN SCREEN SELECTION CHART SELECT LEFT WINDOW DEF. WINDOW 01 RayChart 620 and 630 D3833-1... - Page 40 Chapter 2: Getting Started and Controlling the Chart Display The soft keys disappear after 7 seconds if you do not make a selection. The CDI or BDI data is presented in a window at the bottom right of the screen, with steering data, as shown in the examples below: CDI (Course Deviation Indicator) STEER LEFT...
- Page 41 RayChart 620 and 630...
-
Page 42: Chapter 3: Using The Initial Soft Keys
Chapter 3: Using the Initial Soft Keys Chapter 3: Using the Initial Soft Keys 3.1 Introduction This chapter explains how to perform some basic chart operations using the trackpad, and the soft keys. The initial soft key display is shown below. ROUTE Note: If you have set up your system so that the soft keys are not displayed all the time (Help Level 0), press any soft key to display the labels. -
Page 43: Setting Up And Using On-Screen Routes
FOLLOW when a route is already active. REVERSE Used to reverse the tracking order of the waypoints in the route. NEXT LEG Used to proceed to the next leg of the route. SELECT ROUTE 01 D3826-1 RayChart 620 and 630... -
Page 44: Making A New On-Screen Route
Chapter 3: Using the Initial Soft Keys Making a New On-Screen Route To making a new route using the ROUTE soft key : 1. Move the cursor to the area in which you wish to make the route, and select a suitable chart scale. -
Page 45: Editing An Existing Route On-Screen
You can now add, delete or insert waypoints, although you cannot delete a waypoint if you are tracking towards it. 003WPT 50°43.06 N 000°59.39 W ADD WPT DELETE WPT RayChart 620 and 630 EDIT D3827-2... -
Page 46: Editing Route Information
Chapter 3: Using the Initial Soft Keys Note: You can also use this option to delete waypoints that are not part of the current route, if you have selected the waypoint display option when you set up your chartplotter (see Chapter 6). To delete a waypoint: Note: You cannot delete a waypoint if it is used in another route. - Page 47 WPT NAME SYM SOURCE 43°58.95 N 010°06.64 E 004WPT CURSOR 43°59.62 N 010°05.51 E 003WPT CURSOR 44°00.40 N 010°03.93 E 002WPT CURSOR CLEAR ENTER SELECT SCROLL CANCEL ACCEPT DIGITS SELECTION SAVE & FOLLOW SAVE AND EXIT RayChart 620 and 630 D3828-2...
-
Page 48: Using A Route
Chapter 3: Using the Initial Soft Keys 4. Repeat steps 2 and 3 until the required information is displayed. 5. When you have finished editing the data, you can either: Press the SAVE & EXIT soft key to save the changes and return to •... -
Page 49: Advancing To The Next Leg Of The Route
3. Use the trackpad or ROUTE soft key to highlight the ERASE option, and press ENTER. 4. Press ENTER to confirm the deletion. The route disappears from the screen, and the route soft keys are cleared. RayChart 620 and 630... -
Page 50: Using The Go To Key
Chapter 3: Using the Initial Soft Keys 3.3 Using the GO TO Key The GO TO initial soft key provides a quick method of navigating to a target point. You can select any target point (which is then stored as a new waypoint) or an existing waypoint. -
Page 51: Clearing Or Changing A Go To
MENU . If you turned off the waypoint display when you set up your chartplotter, the waypoint disappears since only the active waypoint and the current route waypoints are displayed (see Chapter 6). ENTER CLEAR CANCEL ACCEPT SELECTION D3825-1 D3824-1 RayChart 620 and 630... -
Page 52: Measuring Distances Using The Ruler Key
Chapter 3: Using the Initial Soft Keys 3.4 Measuring Distances Using the RULER Key You can obtain an accurate measurement of the distance between two points by using the RULER soft key, as follows: 1. From the initial soft key display, press the RULER soft key. The soft key labels change, as shown in the example below. - Page 53 RayChart 620 and 630...
-
Page 54: Chapter 4: Additional Basic Functions
Chapter 4: AdditionalBasic Functions Chapter 4: Additional Basic Functions 4.1 Introduction This chapter explains how to use some further basic functions available on the chartplotter, using the dedicated keys and the menus. To get the most out of your chartplotter, you should set up the basic data and customize the display, as described in Chapter 6. -
Page 55: Placing And Deleting A Mark
3. Press the DELETE MARK soft key to delete the mark. 4. Press EXIT or CLEAR to return to the initial soft key display. MARK SYMBOLS ENTER CLEAR SELECT CANCEL ACCEPT SYMBOL SELECTION EXIT SELECT SYMBOL DELETE MARK RayChart 620 and 630 D3829-1... -
Page 56: Placing And Deleting An Event
Chapter 4: AdditionalBasic Functions Placing and Deleting an Event The procedure for placing an event is the same as for placing a mark, except that you use the EVENT key and the event is always placed at the vessel’s position. The event is marked with an event name in addition to the event symbol. -
Page 57: Starting And Stopping A Track
The EDIT option on the Tracks menu allows you to edit the controls for the current track and also any other tracks stored in memory. You can: SCREEN EDIT WAYPOINT LIST CARTOGRAPHY SYSTEM CURRENT ROUTE ORIENTATION NAVIGATE WINDOWS ROUTE LIST PLOTTER FIND COLOURS ALARMS/TIMERS FIX STATUS MEMORY C-CARD RayChart 620 and 630 D3360-2... - Page 58 Chapter 4: AdditionalBasic Functions • Select one or more track histories for display. • Change the track file for the current track history data. If you do this after the track history has started, the chartplotter stops storing track data to the original track file and starts storing it in the new file.
-
Page 59: Man Overboard (Mob)
To MOB 000°M 415.2$ ELAPSE: 00:01:12 Note: The MOB procedure can also be initiated or cancelled remotely if the appropriate SeaTalk message is received by the chartplotter. 50°36.71 N 001°05.99 W WPT 999 RayChart 620 and 630 5.948 °M D3835-2... -
Page 60: Alarms And Timers
Chapter 4: AdditionalBasic Functions To cancel the MOB procedure, press and hold the MARK key for two seconds again. 4.6 Alarms and Timers The chartplotter reports the following alarms: Alarm Indicates: Arrival Your vessel has arrived at the active waypoint; it has either: entered the arrival circle (the radius of which is set in Set Up) or, has passed the perpendicular to the route leg through the waypoint. - Page 61 RayChart 620 and 630...
-
Page 62: Chapter 5: Using Stored Lists (Edit)
Chapter 5: Using Stored Lists (EDIT) Chapter 5: Using Stored Lists (EDIT) 5.1 Introduction The chartplotter allows you to perform a number of tasks using the information you have stored. This information includes waypoints, routes, events, track histories and the log. This chapter explains how to view, edit, use and print the stored information using the EDIT menu. -
Page 63: The Waypoint List
The list shows the waypoint symbol, number (assigned by the chartplotter) and name for each waypoint. The waypoints are listed in alphanumeric order by waypoint name. The box below the list gives the following details for the highlighted waypoint: RayChart 620 and 630 WAYPOINT LIST 001WPT 002WPT 003WPT... -
Page 64: Waypoint List Operations
Chapter 5: Using Stored Lists (EDIT) • Position, in either latitude and longitude or TDs, depending on your setup • Bearing and range from your vessel’s current position • Source of position data (cursor, edit, GPS etc) • Depth and temperature when the event waypoint was created, if available •... -
Page 65: Editing A Waypoint Or Adding A New Waypoint
6. When you have finished your edits, press ENTER to save the information and return to the Waypoint List, or CLEAR to abandon your changes. Note: The entry is rejected if the edited position is the same as another waypoint. RayChart 620 and 630 WAYPOINT LIST EDIT WAYPOINT ØØ1WPT... -
Page 66: The Current Route
Chapter 5: Using Stored Lists (EDIT) 5.3 The Current Route The Current Route option allows you to view the currently selected route, with progress details, and to specify a planned Speed Over the Ground (SOG) to obtain an estimated time of arrival (ETA). You can also advance to the next leg of the route from this screen. -
Page 67: Current Route Operations
This soft key is only available if you have already selected the PLANNED SOG option, and displays the Planned SOG window. Use the trackpad to adjust the value, and press ENTER to accept the new value. RayChart 620 and 630... -
Page 68: The Route List
Chapter 5: Using Stored Lists (EDIT) 5.4 The Route List Whenever you create a route, its details are added to the Route List. You can store data for up to 20 routes in the chartplotter’s memory. The Route List option allows you to perform the following tasks: •... -
Page 69: Route List Operations
This has the same effect as the FOLLOW option from the ROUTE initial soft key menu. This soft key is displayed instead of SELECT or FOLLOW if the highlighted route has been selected and is active. It turns off the selected route. RayChart 620 and 630... -
Page 70: Route Details
Chapter 5: Using Stored Lists (EDIT) Route Details To display the details of the currently highlighted route: 1. Press the ROUTE DETAILS soft key. The Route Details screen is displayed. CURSOR 50°36.68 N 009°47.60 E 208°M 1.4$ DEPTH IN FEET 100$ To Cursor 218°M 415.2$... - Page 71 The new waypoint is now highlighted in the route list. e. Control stays in the Waypoint List window, so you can continue to select waypoints and add them to the route. RayChart 620 and 630 D4210_1...
-
Page 72: Finding And Displaying A Waypoint
Chapter 5: Using Stored Lists (EDIT) f. Press the right trackpad edge to return control to the Route Details window. If you made a mistake, you can use the DELETE soft key to remove the waypoint(s) from the route. 5. Press the EDIT RTE NAME key to edit the route name. Use the trackpad to change the letters and numbers, and press ENTER when you have finished. -
Page 73: Printing The Screen
In the System Set Up menu, serial port is set to printer and the baud rate is correct. 2. Press and hold the DISPLAY key for 5 seconds. At the end of this time, the chartplotter beeps 3 times, the cursor disappears, and the display information is sent to the printer. RayChart 620 and 630... -
Page 74: Chapter 6: Customizing The Chartplotter
Chapter 6: Customizing the Chartplotter Chapter 6: Customizing the Chartplotter 6.1 Introduction When you have installed your chartplotter and are familiar with its basic operation, you may need to set it up so that it obtains the correct information from the equipment that you have connected it to, operates according to your requirements, and displays information according to your preferences. -
Page 75: Setting Up The Data
For sub-menus, a further menu of parameters is displayed. Repeat steps 3 and 4 to select a parameter. A window is displayed, listing the settings available, with the current setting highlighted. Alternatively, for numerical parameters, a single value (or OFF) is displayed, that can be adjusted. RayChart 620 and 630... -
Page 76: Setting Up The System
Chapter 6: Customizing the Chartplotter SYSTEM SET UP MAIN MENU LANGUAGE UNITS MENU DATE & TIME MENU SIMULATOR MENU HELP KEYPRESS SOUND CURSOR ECHO GPS INPUT SERIAL OUTPUT PRINTER BAUD RATE CLEAR SCROLL CANCEL LIST 5. Use the up and down trackpad controls to move the highlight bar through the options or to increase/decrease the parameter value. - Page 77 24 hour 12 hour Local (offset value) MM-DD-YY MM-DD-YY DD-MM-YY Value 10.0 kts Value 000°T (Position) Level 0 Level 1 Level 1 NMEA NAVAID NAVAID NMEA NMEA PRINTER 300, 600, 1200, 9600 2400, 4800, 9600 RayChart 620 and 630 Default...
-
Page 78: Language
Chapter 6: Customizing the Chartplotter Language Select the language in which you wish information to be displayed. The selected language will be used for screen text, labels, menus and options, but will not affect the chart information. Units Choose your preferred units for distance, speed, depth and temperature. The units you set will be used to display all data, including information received from other instruments on the system. -
Page 79: Keypress Sound
RayChart 620 and 630 Keypress Sound This option controls whether or not the chartplotter beeps when you press a key or when an alarm is activated. Cursor Echo Cursor Echo ON allows the cursor position to be displayed on a radar display. - Page 80 Chapter 6: Customizing the Chartplotter Parameter/Menu Heading Magnetic Variation Position resolution TD Settings Menu Map Datum Fix Datum Position correction Head Up Response Options Factory Default Magnetic Magnetic True AUTOMATIC AUTOMATIC Value, + or - in 0.1° steps (value) .000 9970 Slave 1 Slave 2...
-
Page 81: Heading
Canadian East Coast 5970 Commando Lion (Korea) (Obselete) 5990 Canadian West Coast 7170 Saudi Arabia South (Obselete) 7930 Labrador Sea (Obselete) 7960 Gulf of Alaska 7970 Norwegian Sea (Obselete) 7980 Southeast US 7990 Mediterranean Sea 8970 Great Lakes RayChart 620 and 630... -
Page 82: Map Datum And Fix Datum
Chapter 6: Customizing the Chartplotter 8990 Saudi Arabia North (Obselete) 9940 US West Coast 9960 Northeast US 9970 North West Pacific (Obselete) 9980 Icelandic (Obselete) 9990 North Pacific Note: Obselete chains do not transmit, but allow old TD positions to be entered. -
Page 83: Setting Up The Chartplotter
Each parameter is described in the following subsections. Parameter Waypoint Name Waypoint Display Course Vector Heading Vector Options Factory Default 3 characters 6 characters 6 characters 16 characters None SHORT SHORT LONG INFINITE SHORT SHORT LONG INFINITE RayChart 620 and 630 D4201_1 Default... -
Page 84: Waypoint Name
Chapter 6: Customizing the Chartplotter Wind Vector Tide Vector Dead Reckoning Cursor Data Box Waypoint Name This option controls the number of characters of each waypoint name that are displayed on the chart. Reducing or removing the waypoint name can sometimes improve the readability of the chart (all the characters are still shown in other displays). -
Page 85: Tide Vector
Parameter Arrival Radius Alarm Off Course Alarm Anchor Alarm Danger Zone Alarm Countdown Timer Elapsed Timer Clock Alarm Options Factory Default Arrival radius value Value Value Value ON (and value) RESET RESET ON (and value) RayChart 620 and 630 Default... -
Page 86: Alarms
Chapter 6: Customizing the Chartplotter Alarms All the alarms default to OFF, that is, disabled. You can switch an alarm on and adjust its setting to any value, in steps of 0.01. When an alarm is set, it will be triggered when the alarm condition is met (see Chapter 4). -
Page 87: Fix Status
3. Alternatively, press the RESET soft key to reset the GPS. 4. Press CLEAR or ENTER to return to the Fix Status screen, and CHART to return to the chart. 02/24/97 ACQUIRING 10:09:14 U HDOP: 1.Ø SOG: Ø.ØKts BEACON INITIALIZE RayChart 620 and 630 CHART D3838-2... -
Page 88: Setting Up A Differential Beacon
Chapter 6: Customizing the Chartplotter Setting Up a Differential Beacon Normally, your differential beacon receiver (if fitted) automatically picks up the transmitted differential signal. If there are two differential beacons competing in a region, you may wish to set up the beacon manually. The Beacon Set Up menu also indicates Beacon status and can be used to return to auto mode after having set up the beacon manually. -
Page 89: Memory C-Card
MARKS TRACK ROUTES ENTER MENU CHANGE C-CARD CHANGE SLOT SAVE FILE ERASE FILE FORMAT C-CARD RayChart 620 and 630 CLEAR EXIT D3840-1... - Page 90 Chapter 6: Customizing the Chartplotter 7. Press ENTER to accept the new name. The system saves all the data of the selected type into the named file on the C-Card, and updates the display with the filename. If you have inserted a new (unformatted) C-card, the chartplotter automatically formats it before saving the file.
-
Page 91: Customizing The Screen Display
5. Use the trackpad to highlight the required setting, and press ENTER. 6. When you have reset all the required values, press CLEAR to return to the Chart Configuration menu, and CLEAR again to return to the default display. RayChart 620 and 630... -
Page 92: Chart Orientation
Chapter 6: Customizing the Chartplotter The following table lists the map configuration options and their default settings, and provides a space for you to make a note of your new default setting. Items can be set either OFF or ON, unless indicated. Menu/Parameters Land Settings Menu Natural Features Rivers &... -
Page 93: Setting Up Windows
The default windows are selected using the DISPLAY key options, as described in Chapter 2. These options allow you to select the data set to be displayed in either one or two windows, with a choice of window positions. RayChart 620 and 630 COURSE UP HEAD UP... - Page 94 Chapter 6: Customizing the Chartplotter To set up a customized window: 1. Press MENU to display the main menus. 2. Use the trackpad or the SCREEN soft key to highlight the WINDOWS option from the SCREEN menu, and press ENTER. The Customize On Screen Data Windows screen is displayed, showing the last-used window selection.
-
Page 95: Changing Color Settings
To change the color settings: 1. Press MENU to display the main menus. 2. Use the trackpad or the SCREEN soft key to highlight the COLORS option from the SCREEN menu, and press ENTER. The following window is displayed: RayChart 620 and 630 D4209_1... - Page 96 Chapter 6: Customizing the Chartplotter 3. Use the up and down trackpad controls to select an item from the menu. Where necessary, press the apropriate soft key to select the specific item (TRACK, ROUTE, SYMBOL, VECTOR) to change. 4. Press ENTER to accept your selection. The available colors are displayed, use the up and down trackpad controls to select a color then press ENTER to accept the color (or CLEAR to cancel the selection).
- Page 97 RayChart 620 and 630...
-
Page 98: Chapter 7: Installation
Chapter 7: Installation Chapter 7: Installation 7.1 Introduction This chapter explains how to install the chartplotter. Installation should only be undertaken by a competent installer. The chartplotter can be trunnion (yoke) or panel mounted. It must be connected to a power supply and to a source of position data (for example, a GPS), and can also be connected to other units via the SeaTalk, Navaid or NMEA connections. -
Page 99: Emc Installation Guidelines
• If a suppression ferrite is attached to a cable, this ferrite should not be removed. If the ferrite has to be removed during installation it must be reassembled in the same position. RayChart 620 and 630... -
Page 100: Packing List
Chapter 7: Installation The following illustration shows the range of suppression ferrites fitted to Raytheon equipment. If your Raytheon equipment is going to be connected to other equipment using a cable not supplied by Raytheon, a suppression ferrite MUST always be fitted to the cable close to the Raytheon unit. -
Page 101: Planning The Installation
• Attached to a bulkhead, using the trunnion bracket already fitted to the display • On a panel (tabletop or console), using the mounting kit provided 332mm (13.1in) 169mm (6.65in) 180mm (7in) 265mm (10.4in) RayChart 620 and 630 98mm (3.9in) D3345-1... -
Page 102: Connection Options
Chapter 7: Installation Although the chartplotter is designed to meet the CFR46 waterproofing standard, it is advisable to mount it, whenever possible, so that it is not exposed to the direct effects of salt spray or direct sunlight. The monochrome chartplotter is provided with a sun cover. It is designed for above or below deck installation. -
Page 103: Cabling
4. Drill a 12.7mm (½ in) pilot hole in each corner of the cut-out area. 5. Using a suitable saw, cut along the outside edge of the cut-out line. 6. Remove the trunnion (yoke) knobs and bracket from the chartplotter. Make sure that the unit fits in the cut-out area. RayChart 620 and 630... - Page 104 Chapter 7: Installation 7. Drill four 5mm ( 8. Complete the installation of the power data cabling, GPS input, and any other accessory cables to the console (see Section 7.5). 1 Gasket 2 Thumb nuts (4 off) 3 Thumb studs (4 off) 9.
-
Page 105: Chartplotter Connections
Use the cable supplied to connect the following at the rear POWER connector, as shown above: • Power • NMEA In • NMEA Out • Printer The pin functions are listed in the table below. SeaTalk POWER GPS SENSOR RayChart 620 and 630 Power NMEA/ Printer D3355-2... -
Page 106: Dc Power
Chapter 7: Installation Pin No. Pin No. Function Function Pin No. Pin No. Pin No. Function Function Function Battery negative Battery positive (12 - 32 VDC) NMEA data input (+ve) NMEA input (-ve) - common Printer ready NMEA data out OR printer out Data output common Not connected DC Power Connection... -
Page 107: Printer Connection
Note: The SeaTalk connector cannot be used to power the chartplotter. Power is not supplied to other SeaTalk equipment. GPS Function GPS Function GPS Function GPS Function GPS Function +12V DC 0V DC Ground I/O Data in from GPS Data out to GPS Not used (differential) RayChart 620 and 630... -
Page 108: System Check And Initial Setup
Chapter 7: Installation 7.6 System Check and Initial Setup Once you have installed your chartplotter and made all the connections, you need to check and test your installation before using the system for navigation. You may wish to read Chapters 2 to 6, and familiarize yourself with the operation of the chartplotter, before performing the initial setup. -
Page 109: Emc Checks Before Going To Sea
RayChart 620 and 630 EMC Checks Before Going to Sea Always check the installation before going to sea to make sure that it is not affected by radio transmissions, engine starting etc. In some installations, it may not be possible to prevent the equipment from being affected by external influences. -
Page 110: Chapter 8: Maintenance And Problem Solving
Chapter 8:Maintenance and Problem Solving Chapter 8: Maintenance and Problem Solving This chapter provides information on routine maintenance and on possible causes of problems you may experience with your chartplotter. 8.1 Routine Maintenance The chartplotter is a sealed unit. Maintenance procedures are therefore limited to cleaning and periodical checks. -
Page 111: Problem Solving
Check your estimated latitude and longitude. Check the time and date, and correct if necessary. Check the source of the position input. Check the SeaTalk connector and the SeaTalk network. Check the NMEA connector and the NMEA equipment. RayChart 620 and 630... -
Page 112: How To Contact Raytheon (Us)
For Marine Product and Services Information Visit the Raytheon World Wide Web site for the latest information on the newest Raytheon Marine electronic equipment and systems at: www.raymarine.com For Accessories and Parts Many Raytheon accessory items and parts can be obtained directly from your authorized Raytheon dealer. -
Page 113: How To Contact Raytheon (Europe)
Raytheon part number ready when speaking with your dealer. Worldwide Support Please contact the authorised distributor in the country. A list of worldwide distributors is supplied with your system. RayChart 620 and 630... -
Page 114: Appendix A: Specification
Appendix A: Specification Appendix A: Specification This appendix provides the physical and electrical specification for the chartplotter. Size Weight Environmental Mounting Power Controls Display type Display size Interfaces Position data Cartography Software update Memory conforms to 89/336/EEC(EMC), EN60945:1997 226 mm x 332 mm x 84 mm (8.9 in x 13.1 in x 3.3 in), excluding trunnion 1.8 kg (64 oz) Waterproofing To CFR46;... - Page 115 RayChart 620 and 630...
-
Page 116: Appendix B: Nmea Data Received And Transmitted
Appendix B Appendix B: NMEA Data Received and Transmitted The following table defines the data received/transmitted on the NMEA port. Data Heading Locked Heading Position (LAT/LON) Speed Over Ground Course Over Ground Time (UTC) Date Sats and HDOP Satellite Data Current Waypoint Identifier Bearing to Waypoint Distance to Waypoint... - Page 117 RayChart 620 and 630...
-
Page 118: Glossary
Glossary Glossary This glossary explains the terms and abbreviations that may be unfamiliar to the reader. G.1 Terms Active Bearing Course Current Dedicated key Heading Home Mode Latitude Longitude Orientation Panning Plotter Mode Relative Motion Route A waypoint that has been confirmed as the destination or interim destination. - Page 119 Any location that has been stored in memory with Lat/ Long or TD as the coordinates, which is to be used as a destination or a turning point on the route to the destination. A boxed area inset on the main screen, containing information. RayChart 620 and 630...
-
Page 120: Abbreviations
Glossary G.2 Abbreviations Bearing Deviation Indicator Bearing To Waypoint Course Deviation Indicator Course Made Good Course Over Ground. The actual direction of your vessel’s movement over the ground. dGPS Differential Global Positioning System Distance Made Good Distance To Go Electro-Magnetic Compatibility Estimated Time of Arrival Global Positioning System HDOP... - Page 121 RayChart 620 and 630...
-
Page 122: Index
Index Index Active - definition 105 Adding Waypoint - External Capture 32 Waypoint On-Screen 31, 32 Waypoint to the List 49, 52 Alarms Anchor 47, 72, 73 Arrival 36, 47, 72, 73 Clock 47 Controlling 41 Danger Zone 47, 72, 73 Fix Status 47 Handling 47 Off Course 47, 72, 73... - Page 123 Route On-Screen 30, 32 Track Controls 44 Waypoint Details 49, 51, 52 Waypoint Details (GO TO) 37 Elapsed Timer 72, 73 RayChart 620 and 630 Checks Before Going to Sea 96 Conformance iv Installation Guidelines 86 Servicing Guidelines 97 Erasing...
- Page 124 Index Keypress Sound 64, 66 Keys Dedicated 5, 6 Soft 5, 7 Language 64, 65 Lat/Long Grid 79 Latitude - definition 105 Lighting Control 13 Color Display 13 List Route 49, 55 Waypoint 49, 50 Lists of Stored Data 49–60 Location 88 Displaying 59 Printing 59...
- Page 125 RULER Soft Key 7, 29, 39 Safety i, 29, 97 Scale 3, 14 Changing 20, 21 Screen Customisation 78 SeaTalk 2, 66 Connection 94 RayChart 620 and 630 Data 80, 81, 89 definition 106 Ports 89 Selecting Route 31, 56 Waypoint 49...
- Page 126 Index TD Settings 67, 68 Tide Data 19 Tide Vector 71, 72 Time Out - definition 106 Timers 47 Clock Alarm 72, 73 Controlling 41 Countdown 47, 72, 73 Elapsed 72, 73 Set Up 72 Trackpad 5 Tracks 43 Color 82 Controls 44 Deleting 44 Displaying 41...
- Page 127 RayChart 620 and 630...
-
Page 128: Warranty Limitations
Limited Warranty Certificate Raytheon Marine Company warrants each new Light Marine/Dealer Distributor Product to be of good materials and workmanship, and will repair or exchange any parts proven to be defective in material and workmanship under normal use for a period of 2 years/24 months from date of sale to end user, except as provided below. Defects will be corrected by Raytheon Marine Company or an authorized Raytheon dealer. - Page 129 United States of America Raytheon Marine Company Recreational Products 676 Island Pond Road Manchester, NH 03109-5420 U.S.A. UK, Europe, Middle East, Far East Raytheon Marine Company Recreational Products Anchorage Park, Portsmouth PO3 5TD, England Purchased from Dealer Address Installed by Commissioned by Owner’s name Mailing address...