PATPET p-collar 920 - Remote Training Collar Manual
- User manual (20 pages)
Advertisement
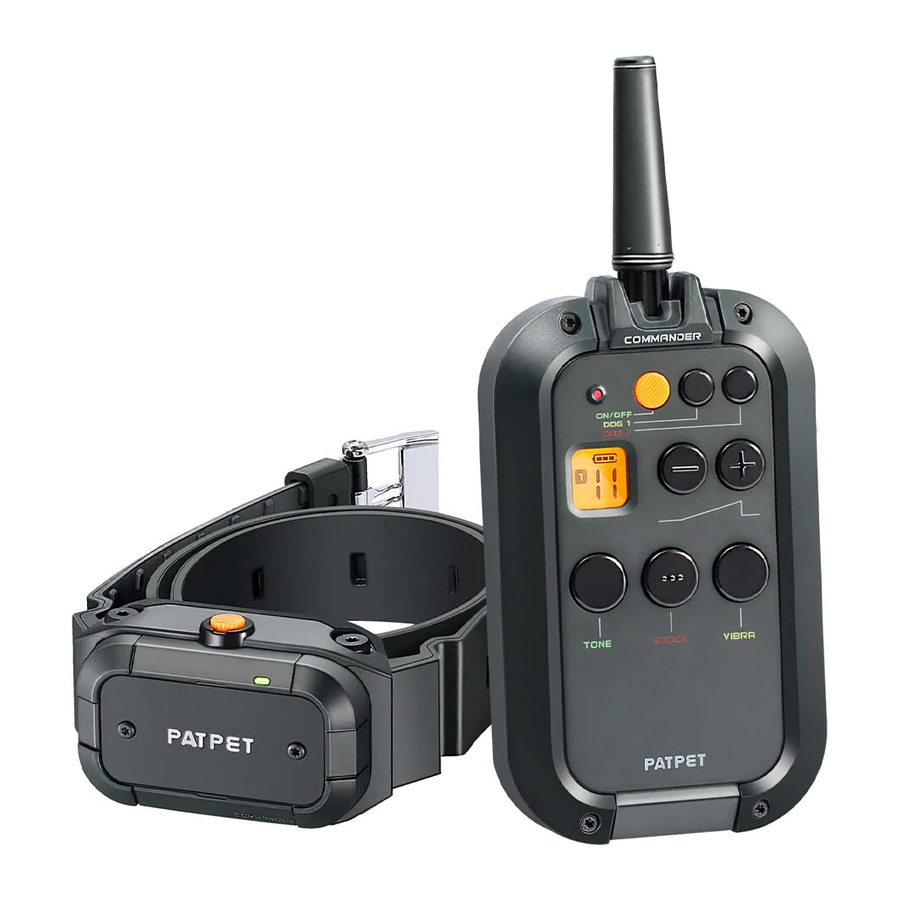
Overview
Remote

- ON/OFF
- Dog 2
- Dog 1
- Increase shock level
- Decrease shock level
- Tone button
- Vibration button
- Shock button
- Charge port
- Shock Level Display
- Channel Display
- Battery Display
- Indicator light
Receiver Collar


- Contact Points
- Charging Port (with cover)
- On/Off Button
- LED Indicator
- Contact spring sheet
Product Setup
Before you use the dog training collar, you must set up the product as outlined by the below steps:
- Charge the remote and the receiver collar.
- Prepare the remote and turn it on.
- Prepare the receiver collar and turn it on.
- Test the function of the buttons before putting it on a dog.
- Familiarize yourself with how to use the test lamp, the shock function, and screwdrivers
- Pair the remote and the receiver collar, You may need to pair twice if you lose the product code or have a second collar.
Charge the Remote and the Receiver Collar
- Plug in and charge the remote and the receiver collar fully.
The initial charge will take up to 4 hours.
Subsequent charges will take 2-3 hours. - When fully charged, the red LED on the receiver collar will become green. The battery display on the remote will stop cycling and display full.
- Please press back the rubber cover when the receiver collar is fully charged.
Tips:
- Excessive charging will shorten the life of your battery. Only charge the device when the batteries are low.
- When you're not using the collar, please turn it off to maintain battery life.
Note: Please use an Output: DC 5V 500-800mA charger to charge the product. Do not use chargers that do not match the necessary specifications.
Prepare the Remote
Turning the Remote OFF and ON
- Press and Hold ON/OFF button to turn the remote ON.
- The LCD will light up and show the information about the current channel and battery level. If not, please charge the remote.
- Press and Hold ON/OFF button to turn the remote OFF.
Prepare the Receiver
Please use the test tool to install the contact points

Selecting The Contact Points and The Contact spring sheet. For the best results, select the correct contact points based on your dog's coat. You can use the contact points on their own, or use the contact points and springs at the same time, which make the contact more effective and more comfortable.

Turn on the Receiver Collar
- Press the ON/OFF button until the green LED light comes on.
- In normal mode, the green LED will flash every 4 seconds, indicating that the receiver collar is on and ready to receive a signal from the remote.
Turn off the Receiver Collar
- Press and hold the ON/OFF button until the red LED light shuts off.
- This takes approximately 3 seconds. Release the On/Off Button.
NOTE
To extend battery life, pleade turn the receiver collar off when it is not use.
Function Test
We recommend you experience how the different shock levels feel on yourself before using this with a pet. Always begin at the lowest level and increase the level up to that with which you are comfortable.
- Place one finger over both contact points on the training collar.
- Hold your remote approximately 2 ft. from the training collar.
Press and hold the vibration button for 1 to 2 seconds.
You should feel continuous vibration. - Press the "-" button to decrease levels. Starting at level 1, press the shock button.
- Increase the level until the sensation begins to feel uncomfortable.
NOTE
- Vibration/Shock will not transmit for more than 10 continuous seconds. To reactivate, release and re-press the button.
- lt is not recommended to press and hold the vibration/shock button too long, as this could cause physical or psychological pain to the dog.
How to Use the Test Lamp
Shock Function Test

- Turn on the receiver collar.
- Hold the test lamp's contacts against the contact points.
- Press the shock button and the test lamp will light up. The brightness corresponds to the shock level increasing.
Pair the Remote and the Receiver Collar
- Press the Dog 1 button of the remote.
- Make sure the receiver collar is turned off, Press and hold the ON/OFF button on the collar for 4-5 seconds.
- The receiver red & green LEDs will blink for about 15 seconds, which indicates that it is ready for adding and then release the button.
- Press the remote tone and vibration buttons at the same time and hold for 2-3 seconds. The LED on the receiver collar will blink for 5 times, which indicates successful pairing.
Pair the Second Collar with the Remote
If the remote only is dog 1 mode, you need to unlock the dog 2 mode:
Press "DOG 2" and "-" key at same time and hold 5 second.(Repeat this operation to lock DOG 2 again)
Press the Dog 2 button of the Remote to select Dog 2. Then follow the above pairing steps from 2-4.
Collar Fitting

Please fit the collar properly, ensuring that the contact points press firmly against the dog's skin. When properly fitted, you should be able to put a finger in between the receiver collar and dog's neck.
Too Loose:
The receiver collar will move around the dog's neck and the contact points maybe can't contact the dog's skin.
Too Tight:
It may cause shortness of breath for the dog and may hurt the dog's skin.

- Do not shave the hair on pet's neck as this may increase the risk of skin irritation.
- The collar should not be worn for more than 12hours per day as it may cause skin irritation when worn too long.
Find the Best Shock Level for Your Pet
The unit comes with Up and Down buttons to control the level of shock, with Level 1 being the lowest and Level 16 being the highest. The level of shock best suited for your dog depends on your dog's temperament and threshold for being shocked. Always start at the lowest level and work your way up. You have reached the appropriate level when the dog responds to the shock with a mild reaction, such as a flick of the ear, a lick of the lips, a tensing of the neck muscles, etc. The shock level may vary depending on the training situation. When highly distracted, dog's will require a higher level of shock.
Device Information
Product Specification
| Battery Type | Rechargeable, lithium polymer battery |
| Battery Life(typical use) | Remote: 27 days /Receiver: 11 days |
| Remote Waterproof Rating | IEC 60529 IPX5, waterproof |
| Receiver Waterproof Rating | IEC 60529 IPX7, waterproof |
| Operating temperature range | -20~40 0 C (-4~104 oF) |
| Charging temperature range | 0~40 0 C (32~104 oF) |
| Remote wireless power | 20dBm(100mW) |
| Wireless Range | 900m (2950 feet) |
The unit needs to be charged in any of the following situations:
- The indicator light on the receiver collar is emitting a red color every 4 seconds or is flashing rapidly.
- The 3 bar battery indicator on the remote's LCD shows just 1 bar.
- The transmitting indicator light on the remote and receiver collar does not turn on.
- The indicator light on the remote or receiver collar comes on momentarily when any of the mode buttons are pressed.
Frequently Asked Questions
Is the vibration/shock safe for my pet?
While the vibration/shock is unpleasant, it is harmless to your pet. Electronic training devices require interaction and training from the owner to achieve the desired results.
How old does my pet have to be before using the remote training collar?
Your pet should be able to recognize basic obedience commands such as "Sit" or "Stay".Pets should be at least 6 months old before using the training collar.
Once my pet is trained and has been obeying my commands, will he have to continue to wear the receiver collar?
Probably not. You may need to reinforce your training with the receiver collar from time to time.
Are the remote and the receiver collar waterproof?
YES.
Will I get exactly 2950 feet of range with the remote training collar?
The range of the remote training collar will vary according to terrain, weather, and vegetation in your area, as well as possible interference from other radio devices. Refer to your maximize the distance" for tips on maximizing your range.
How long can I continuously deliver Vibration/Shock to my pet?
The maximum amount of time you can press the Vibration/Shock Button and deliver Vibration/Shock to your pet continuously is 10 seconds. After this, there's a time-out an Vibration/Shock cannot be delivered for 5 seconds. After the 5 second time-out period, the button can be pressed and vibration/shock can be delivered again.
Troubleshooting Guide
My pet does not respond when I press a button.
- Make sure the receiver collar has been turned on.
- Make sure the remote channel(1 or 2) is correct with the receiver collar.
- If not, please pair the Remote and the Receiver Collar again.
- Check the battery may be low in either the remote or the receiver collar.
- Make sure the receiver collar's contact points are placed snugly against your pet's skin. Refer to "Collar Fitting" for more information
- Terrain, weather, vegetation, transmission from other radio devices, and many other factors can impact the amount of range you have with the unit.
The receiver collar unworkable.
- Make sure the receiver collar has been charged. For the initial charge, be sure to charge it for 4 hours. Subsequent charges only take 2-3 hours.
For cooperation: Inquiry@patpet.com
For help: Support@patpet.com

Documents / ResourcesDownload manual
Here you can download full pdf version of manual, it may contain additional safety instructions, warranty information, FCC rules, etc.
Download PATPET p-collar 920 - Remote Training Collar Manual
Advertisement


Need help?
Do you have a question about the p-collar 920 and is the answer not in the manual?
Questions and answers