Advertisement
Introduction
Thanks for purchasing!
The dog training collar is designed to let dogs live safely, happily and get along with people more harmoniously.

Do not use with aggressive dogs.
Aggressive dogs can cause severe injury and even death to their owner and others. If you are unsure whether this product is appropriate for your dog, please consult your veterinarian or certified trainer.

Safety during on-leash training.
It is vitally important that you and your dog remain safe while learning during on-leash training. Your dog should be on a strong leash, long enough for him to attempt to chase an object, but short enough for him not to reach a road or other unsafe area. You must also be physically strong enough to restrain your dog when he tries to chase.
Risk of skin damage.
Please read and follow the instructions in this manual. Proper fit of the collar is important. A collar worn for too long or made too tight on the pet's neck may cause skin damage ranging from redness to pressure ulcers. This condition is commonly known as bed sores.
- Avoid leaving the collar on the dog for more than 12 hours per day. When possible reposition the collar on the pet's neck every 1 to 2 hours.
- Never connect a lead to the electronic collar; it will cause excessive pressure on the contacts.
- If a rash or sore is found, discontinue use of the collar until the skin has healed.
- If the condition persists beyond 48 hours, see your veterinarian.
- This product is not a toy, please keep away from children.
- This product is only for use with healthy dogs.
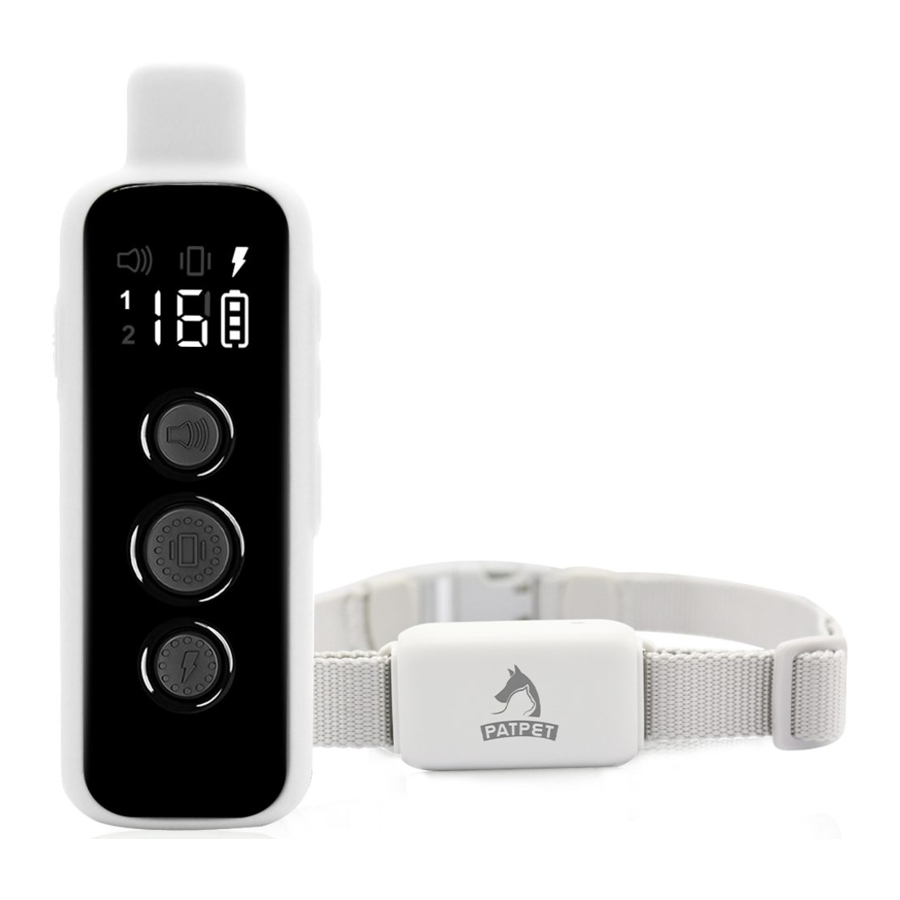
Overview
Remote

- Mode indication
- Battery Display
- Shock Level +
- Shock Level -
- On/Off Button
- Channel Display
- Channel Conversion Switch
- Shock Level Display
- Tone Button
- Vibration Button
- Shock Button
- Charging Port
Receiver Collar

- Contact Points
- Charging Port (with cover)
- On/Off Button
- LED Indicator
- Contact spring sheet
Setting Up the Product
Before you can use the Dog Training Collar, you must set up the product as below steps:
- Charging the Remote and the Receiver Collar.
- Prepare the Remote and turn it on.
- Prepare the Receiver Collar and turn it on.
- Function test, test function of buttons before wearing it on dog.
- How to use the Test Lamp, test Shock function or use as a screw driver.
- Pair the Remote and the Receiver Collar, pair them when the product lose its code or pair for a second collar.
Charging the Remote and the Receiver Collar
- Plug in and fully charge the Remote and the Receiver collar. For the initial charge, be sure to charge it for 4 hours. Subsequent charges only take 2-3 hours.
- When full charged, the red LED on the Receiver Collar will become green. The Battery Display of the Remote will stop cycling and appear full.
- Please replace the rubber cover when the Receiver Collar is full charged.
Tips:
- Excessive charging will shorten battery life. Only charge them when batteries are low.
- When you're not using the collar, please turn it off to increase the battery life.

Note:
Please use the Output: DC 5V 500-800mA charger to charge the product.
Don't use a charger that does not meet the specifications to charge the product.
Prepare the Remote
Turn ON/OFF the Remote
- Long press the ON/OFF button to turn the remote ON.
- LCD will be lighted, and show the information of current channel, battery power and levels. If not, please charge the remote.
- Long press the ON/OFF button to turn the remote OFF.
Prepare the Receiver
Please use our distribution test tool to install the contact points.

You can also choose to use contact spring sheet, which make the contact more effective and more comfortable.

Turn on the Receiver Collar
- Press the On/Off Button the Green LED light comes on.
- In normal mode, the Green LED will flash every 4 seconds, indicating the Receiver Collar is on and ready to receive a signal from the Remote.
Turn off the Receiver Collar
- Press and hold the On/Off Button until the Red LED light shuts off (This takes approximately 3 seconds).
- Release the On/Off Button.
NOTE:
To extend the life of the batteries, please turn the Receiver Collar off when it is not in use.
Function Test
We recommend you experience firsthand how the different levels feel on yourself and always begin at the lowest level, and increase the levels up to your personal comfort levels.
- Place one finger over both Contact Points of the training collar.
- Hold your remote approximately 2 ft. from the training collar.
Press the Vibration Button continuously for 1 to 2 seconds.
You should feel continuous vibration. - Press
![]() to decrease levels. Starting at level 1,press the Shock Button.
to decrease levels. Starting at level 1,press the Shock Button. - Increase the level until the sensation begins to feel uncomfortable.
NOTE: Continuous stimulation will transmit for no more the 10 continuous seconds. To reactivate, release and repress the button.
 | Tone: sends a tone with non-adjustable level to the Receiver Collar. |
 | Vibration: sends a vibration with non-adjustable level to the Receiver Collar. |
 | Shock: sends 1-16 adjustable levels of static stimulation to the Receiver Collar. |
 | Slide up, control dog 1, slide down, control dog 2. |
 | Long press to turn on, long press to turn off. |
 | Press to increase the Shock Level. |
 | Press to decrease the Shock Level. |
Note:
- The Shock Level can be adjusted from 1 to 16 levels, please adjust it properly as per your dog's reaction.
- It is not recommended to press and hold the Vibration/Shock Button too long to avoid physical or psychological hurt to the dog.
How to Use the Test Lamp
Shock Function Test
- Turn on the Receiver Collar.
- Hold the Test Lamp contacts against the Contact Points (or Conductive Silicone).
- Press the Shock Button and the Test Lamp will be lighted. It will be lighter accordingly with the Shock Level increasing.

As a Screw Driver
Use the Test Lamp to tighten or loosen the Contact Points when prepare the Receiver Collar.
Pair the Remote and the Receiver Collar
- Use the
![]() switch on the Remote to select Dog 1.
switch on the Remote to select Dog 1. - With the Remote turned on and the Receiver Collar turned off, press and hold the ON/OFF Button on the Receiver Collar for 4-5 seconds.
- The Red & Green LED will blink for about 10 seconds indicating that it is ready for pairing.
- Press and hold Tone Button and Vibration Button at the same time for 2-3 seconds, the Green Led on the Receiver Collar will blink for 5 times indicating successful pairing.
Pairing a Second Collar with the Remote
- Use the
![]() Button on the Remote to select Dog 2. Then follow the above pairing steps from 2-4.
Button on the Remote to select Dog 2. Then follow the above pairing steps from 2-4.
Dog Training
Selecting The Contact Points and The Contact spring sheet
For the best results, select the correct Contact Points based on your dog's coat.
You can use the Contact point separately, or use the Contact point and spring at the same time.
Collar Fitting
Please fit the collar properly so that the Contact Points press firmly against the dog's skin. When properly fitted, you should be able to put a finger in between the Receiver Collar and dog's neck.
Too loose: the Receiver Collar will move around the dog's neck, the Contact Points may hurt the dog's skin.
Too tight: it may cause dog's to breathe hard.

- do not shave the pet's neck as this may increase the risk of skin irritation.
- the collar should not be worn for more than 12 hours per day. Or it may cause skin irritation.
Find the Best Shock Level for Your Pet
The unit comes with Up and Down buttons to control the Shock Level, with Level 1 being the lowest level and Level 16 being the highest. The level of Shock best suited for your dog depends on your dog's temperament and threshold for Shock. Always start at the lowest level and work your way up. The appropriate level can be found when the dog responds to the Shock with a mild reaction, such as a flick of the ear, a lick of the lips, a tensing of the neck muscles etc. The Shock Level may vary depending on the training situation. When highly distracted, dog's will require a higher level of Shock.
Device Information
Product Specification
| Battery Type | Rechargeable, lithium polymer battery |
| Battery Life(typical use) | Remote: 27 days Receiver: 11 days |
| Remote Waterproof Rating | Non-Waterproof(Keep away from water) |
| Receiver Waterproof Rating | IEC 60529 IPX7, waterproof |
| Operating temperature range | From 0-40℃(from 32-104℉) |
| Wireless Power | 20dBm(100mW) |
| Wireless Range | 300m(984 feet) |
The unit need to be charged under any of below situations
- The indicator light on the Receiver Collar is emitting a red color every 4 seconds or flashes rapidly.
- The 3 bar indicator on the Remote LCD shows just 1 bar.
- The indicator light on the Remote or Receiver Collar will not come on.
- The indicator light on the Remote or Receiver Collar comes on momentarily when any of the Mode Buttons is pressed.
Frequently Asked Questions
| Is the Vibration/Shock safe for my pet? | While the Vibration/Shock is unpleasant, it is harmless to your pet. Electronic training devices require interaction and training from the owner to achieve desired results. |
| How old does my pet have to be before using the Remote Training Collar? | Your pet should be able to recognize basic obedience commands such as "Sit" or "Stay".Pets should be at least 6 months old before using the Training Collar. |
| Once my pet is trained and has been obeying my commands, will he have to continue to wear the Receiver Collar? | Probably not. You may need to reinforce training with the Receiver Collar from time to time. |
| Is the Receiver Collar waterproof? | Yes. |
| Will I get exactly 984 feet of range with the Remote Training Collar? | The range of the Remote Training will vary according to terrain, weather, vegetation, as well as transmission from other radio devices. Refer to "To maximize the distance" for tips on maximizing your range. |
| How long can I continuously deliver Vibration/Shock to my pet? | The maximum amount of time you can press the Vibration/Shock Button and deliver Vibration/Shock to your pet continuously is 10 seconds. After this, there's a time-out an Vibration/Shock cannot be delivered for 5 seconds. After the 5 second time-out period, Button can be pressed and Vibration/Shock can be delivered again. |
Troubleshooting Guide
My pet does not respond when I press a button | |||
| |||
The Receiver Collar will not turn on |
| ||
The Receiver Collar is not responding to the Remote |
|

VideosPatpet p-collar 650 - Dog Training Collar Review Video by Patpet Collar
Documents / ResourcesDownload manual
Here you can download full pdf version of manual, it may contain additional safety instructions, warranty information, FCC rules, etc.
Advertisement


Need help?
Do you have a question about the p-collar 650 and is the answer not in the manual?
Questions and answers