
Related Manuals for Patpet P-COLLAR 920


Summary of Contents for Patpet P-COLLAR 920
- Page 1 P-COLLAR 920 User Guide For cooperation:Inquiry@patpet.com For help:Support@patpet.com Follow us for more training tricks , Facebook @PatpetTech 0.3.0.02.920XXX-PT-00...
- Page 2 Please read the User Guide manual before using this product...
- Page 3 Thanks for purchasing! The dog training collar is designed to let dogs enjoy safer and happier lives as well as improve their ability to live in harmony with people. WARNING Do NOT use with aggressive dogs Aggressive dogs may cause serious injury or even death for owners or bystanders.
- Page 4 CAUTION Risk of Damage to Dog’s Skin Never leave the collar on for more than 12 hours per day. Reposition the collar on your dog’s neck every 1 to 2 hours. Never connect a leash to the electronic collar as this will cause excessive pressure on the contacts.
-
Page 5: Table Of Contents
Table of Contents Overview .......................06 Product Setup ..................07 Charge the Remote and the Receiver Collar ..........07 Prepare the Remote ..................08 Prepare the Receiver ..................08 Turn on the Receiver Collar ................09 Turn off the Receiver Collar ................09 Function Test .....................09 How to Use the Test Lamp ................10 Pair the Remote and the Receiver Collar ..........11... -
Page 6: Overview
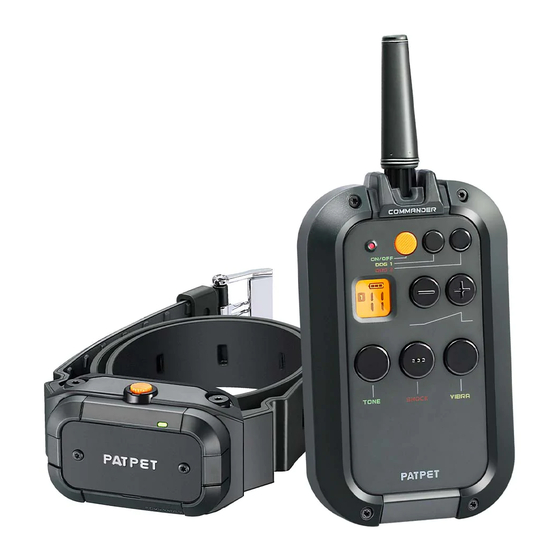
Overview Remote A. ON/OFF B. Dog 2 C. Dog 1 D. Increase shock level E. Decrease shock level F. Tone button G. Vibration button H. Shock button I. Charge port J. Shock Level Display K. Channel Display L. Battery Display M. -
Page 7: Product Setup
Product Setup Before you use the dog training collar, you must set up the product as outlined by the below steps: 1. Charge the remote and the receiver collar. 2. Prepare the remote and turn it on. 3. Prepare the receiver collar and turn it on. 4. -
Page 8: Prepare The Remote
Prepare the Remote Turning the Remote OFF and ON 1. Press and Hold ON/OFF button to turn the remote ON. 2. The LCD will light up and show the information about the current channel and battery level. If not, please charge the remote. 3. -
Page 9: Turn On The Receiver Collar
Turn on the Receiver Collar - Press the ON/OFF button until the green LED light comes on. - In normal mode, the green LED will flash every 4 seconds, indicating that the receiver collar is on and ready to receive a signal from the remote. -
Page 10: How To Use The Test Lamp
NOTE 1. Vibration/Shock will not transmit for more than 10 continuous seconds. To reactivate, release and re-press the button. 2. lt is not recommended to press and hold the vibration/shock button too long, as this could cause physical or psychological pain to the dog. -
Page 11: Pair The Remote And The Receiver Collar
Pair the Remote and the Receiver Collar 1. Press the Dog 1 button of the remote . 2. Make sure the receiver collar is turned off, Press and hold the ON/OFF button on the collar for 4-5 seconds. 3. The receiver red & green LEDs will blink for about 15 seconds, which indicates that it is ready for adding and then release the button. -
Page 12: Find The Best Shock Level For Your Pet
Too Loose: The receiver collar will move around the dog's neck and the contact points maybe can't contact the dog's skin. Too Tight: It may cause shortness of breath for the dog and may hurt the dog's skin. Caution: 1. Do not shave the hair on pet's neck as this may increase the risk of skin irritation. - Page 13 Device Information Product Specification Battery Type Rechargeable, lithium polymer battery Battery Life(typical use) Remote: 27 days /Receiver: 11 days Remote Waterproof Rating IEC 60529 IPX5, waterproof Receiver Waterproof Rating IEC 60529 IPX7, waterproof Operating temperature range -20~40 C (-4~104 Charging temperature range 0~40 C (32~104 Remote wireless power...
- Page 14 Others Frequently Asked Questions Is the vibration/shock safe for my pet? While the vibration/shock is unpleasant, it is harmless to your pet. Electronic training devices require interaction and training from the owner to achieve the desired results. How old does my pet have to be before using the remote training collar? Your pet should be able to recognize basic obedience commands such as "Sit"...
- Page 15 How long can I continuously deliver Vibration/Shock to my pet? The maximum amount of time you can press the Vibration/Shock Button and deliver Vibration/Shock to your pet continuously is 10 seconds. After this, there's a time-out an Vibration/Shock cannot be delivered for 5 seconds. After the 5 second time-out period, the button can be pressed and vibration/shock can be delivered again.
- Page 16 Warranty and repair information 1-Year Warranty The original purchaser for this unit is provided with a 1-YEAR WARRANTY. The warranty begins on the date of purchase, For the first year, coverage is provided for both parts and labor on warranty repair services. After the first year, the Limited Lifetime Warranty covers parts only, and does not cover labor fees and Accessories, Accessories such as straps and batteries are covered for the first year only.
- Page 17 Procedure for Repair Work If the unit is malfunctioning, please refer to the 'Troubleshooting Guide" in the manual before sending it back for service. A copy of the sales receipt showing the purchase date may be required before warranty work is initiated. Please include a brief explanation outlining the problem, and include your name, address,city/state/zip code, daytime phone number, evening phone number, and email address.
- Page 18 Compliance FCC - USA This device complies with part 15 of the FCC Rules. Operation is subject to the following two conditions: (1) This device may not cause harmful interference. (2) This device must accept any interference received, including interference that may cause undesired operation.
- Page 19 - Reorient or relocate the receiving antenna. - Increase the separation between the equipment and receiver. - Connect the equipment into an outlet on a circuit different from that to which the receiver is connected. - Consult the dealer or an experienced radio/TV technician for help...
- Page 20 Shenzhen Patpet Technology Co.,Ltd https://patpet.com/ Become a dealer: inquiry@patpet.com After-service: support@patpet.com @PatpetDogCollar Youtube Video Guide Shenzhen Patpet Technology Co., Ltd Add: No. 1 Qinhui Road, Gushu Community, Xixiang Street, Baoan District, Shenzhen,China MADE IN CHINA Ro H S...
Need help?
Do you have a question about the P-COLLAR 920 and is the answer not in the manual?
Questions and answers