Advertisement
Quick Links
Prestige Trimax 60-110
Ignition Kit - Installation Instructions
1.1.
Applicability
Prestige boilers with "PT"-prefixed serial number, as
indicated on data plate.
Kit Part Number
PTRKIT301
Table 1 - PT Ignition Kit Numbers
1.2.
Purpose
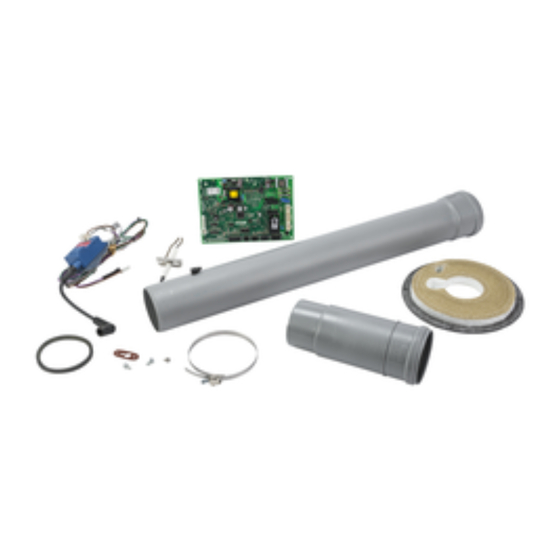
This kit (see Fig. 3 for details) replaces the existing TriMax
control module, the igniter and wiring, the internal
venting tube and the heat exchanger insulation.
1.3.
Initial tasks
Confirm the replacement kit is appropriate for the boiler
to be worked on (see Table 1).
Write down all the appliance settings, including the
cascade settings (if the boiler is in a cascade) for reference
before bringing any change to the appliance. A reference
table is provided on the last page of this document.
1.4.
Boiler preparation
1.4.1 Required Tools and Material
•
Screwdriver, flat head
•
Screwdriver, cross head
•
10 mm socket/wrench
•
Wrench, Torx 20
•
Flue gas analyzer
1.4.2 Preparation Procedure
1. Turn the boiler off by pressing the on/off power
switch.
2. Allow boiler to cool down.
3. Disconnect electrical power at the external electric box
DANGER
•
Avoid electrical shock by disconnecting the
electrical supply prior to performing any operation
on the internal parts of the boiler.
Revision Date: 1/28/2020
Model
PT 60-110
DANGER
•
Before any operation on the internal components
of the appliance, allow the appliance to cool
down to room temperature. Some components
can be very hot.
•
Failure to comply will result in substantial property
damage, serious injury, or death.
4. Shut off the gas supply to the boiler at the main manual
shut off valve.
5. Remove boiler front panel as follows:
•
Remove the thumb screw along the upper
edge of the unit.
•
Lift the panel up and tilt back slightly to remove
the front panel.
6. Slide left and right tabs of control panel inward and
lower control panel. See Fig. 1.
Œ
Fig. 1 - Opening and Lowering the Control Panel
Fig. 2 - Opening the Retaining Tabs
2020-31 Prestige Trimax 60-110 Ignition Kit
Œ
Retaining tabs
1
Advertisement

Related Manuals for TriangleTube PTRKIT301


Summary of Contents for TriangleTube PTRKIT301
- Page 1 Kit Part Number Model down to room temperature. Some components can be very hot. PTRKIT301 PT 60-110 • Failure to comply will result in substantial property Table 1 - PT Ignition Kit Numbers damage, serious injury, or death.
- Page 2 PRESTIGE IGNITION KIT - INSTALLATION INSTRUCTIONS Black Brown Violet White Green W Bk For PT60-110 Fig. 3 - Prestige Solo & Excellence - Ignition Kit Item Description Igniter Screws, igniter Gasket, igniter Bracket, spark generator (not illustrated) Spark generator Wiring, spark generator Control Module, TriMax Vent pipe, telescopic, for PT60 and 110 Clamp, vent pipe...
-
Page 3: Best Practice
PRESTIGE IGNITION KIT - INSTALLATION INSTRUCTIONS pipe port. Retain for later reinstallation. NOTICE 3. Cut the pipe (4) into two where practical. Remove Before disconnecting any wire connections, mark and discard both pieces and lower gasket accord- and label all connections and location of the ing to applicable local regulations. - Page 4 PRESTIGE IGNITION KIT - INSTALLATION INSTRUCTIONS 2. Open top access panels by remove all screws secur- 1.5.5 Removing the Burner and Insulation ing the rear top jacket panel (1) from the side panels 1. Remove heat exchanger bracket located at the back and remove rear top panel.
-
Page 5: Control Module Replacement
PRESTIGE IGNITION KIT - INSTALLATION INSTRUCTIONS 3. Install new TriMax control module with 2 retained screws. 4. Reinstall the rear cover of the control module. 1.5.10 Wiring Connection (See Fig. 13) 1. Reconnect all disconnected plugs to blower, gas valve and sensors, as required. 2. - Page 6 PRESTIGE IGNITION KIT - INSTALLATION INSTRUCTIONS Fig. 9 - Accessing the Combustion Adjustment Interface 1.5.12 Checking the Combustion Settings • If the CO 2 level during high fire (100%) differs by 1. Turn boiler on. more than 0.4% from the recommended combus- 2.
- Page 7 PRESTIGE IGNITION KIT - INSTALLATION INSTRUCTIONS • Counter-clockwise adjustment of the offset screw at 9. Reinstall the boiler front panel. Low Fire : O2 increases, CO2 decreases 10. On the rating plate of the appliance, install the sticker provided with the kit. This will indicate that •...
- Page 8 Bk. Black Br. Brown Violet W. White Gr. Green To left side casing W Bk grounding tabs Connect to uncon- nected Molex connector in exist- ing boiler wiring DO NOT reconnect original boiler wiring Molex connector here Fig. 13 - Prestige Solo & Excellence - PCB Wiring - POSTMOD...
- Page 9 PRESTIGE TriMax Control and/or Display Module Replacement 1.6. Default Values and Adjustments Table 1: TriMax Settings HEATING SETTING FACTORY DEFAULT MINIMUM SETTING MAXIMUM SETTING EXISTING SETTING Heating Operation Enabled Switch & Demand Outdoor Reset Absolute Max CH Setpoint 188°F [87°C] 68°F [20°C] 188°F [87°C] CH1 Maximum Setpoint...
Need help?
Do you have a question about the PTRKIT301 and is the answer not in the manual?
Questions and answers