Table of Contents
Advertisement
CONTENTS
Unpacking Instructions ........... 2
Package Contents .................. 2
Product Registration ............... 2
Features & Benefits: Sensor ...... 2
Features & Benefits: Display ..... 3
Setup .................................... 6
Sensor Setup ......................... 6
Display Setup ........................ 7
Set the Time, Date & Units ...... 8
Backlight Settings ................... 8
Questions?
877-221-1252 or visit www.AcuRite.com.
SAVE THIS MANUAL FOR FUTURE REFERENCE.
Placement Guidelines ............. 9
Using the Weather Station .....10
Programmable Alarms. .......... 11
Troubleshooting ....................12
Care & Maintenance .............13
Calibration ...........................13
Specifications ........................14
FCC Information ...................14
Customer Support .................15
Warranty..............................15
Contact Customer Support at
Instruction Manual
Weather Station
model 01121
Advertisement
Table of Contents

Related Manuals for ACU-RITE 01121


Summary of Contents for ACU-RITE 01121
-
Page 1: Table Of Contents
Instruction Manual Weather Station model 01121 CONTENTS Unpacking Instructions ... 2 Placement Guidelines ..... 9 Package Contents ....2 Using the Weather Station ..10 Product Registration ....2 Programmable Alarms... 11 Features & Benefits: Sensor ..2 Troubleshooting ....12 Features &... -
Page 2: Unpacking Instructions
Congratulations on your new AcuRite product. To ensure the best possible product performance, please read this manual in its entirety and retain it for future reference. Unpacking Instructions Remove the protective film that is applied to the LCD screen prior to using this product. -
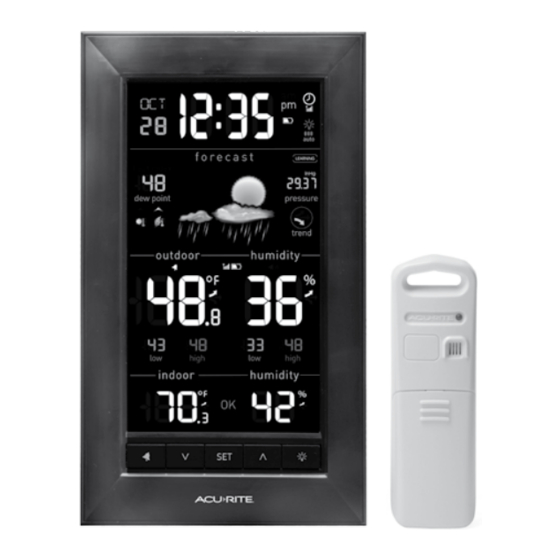
Page 3: Features & Benefits: Display
Features & Benefits BACK OF DISPLAY 6. A-B-C Switch 1. Integrated Hang Hole For easy wall mounting. ID code that must match sensor’s A-B-C switch to ensure units 2. Plug-in for Power Adapter synchronize. 3. Backup Battery Compartment 7. Power Adapter 4. - Page 4 Features & Benefits Display...
- Page 5 Features & Benefits FRONT OF DISPLAY 1. Date 14. Outdoor High and Low Humidity 2. Heat Index/Dew Point Records Heat Index calculation displays Highest and Lowest humidity recorded when temperature is 80°F (27°C) since midnight. or above. Dew Point calculation displays 15.
-
Page 6: Setup
SETUP Sensor Setup Set the A-B-C Switch conditions. Cold temperatures can cause alkaline batteries The A-B-C switch is located inside to function improperly. Use the battery compartment. It can lithium batteries in the sensor for be set to A, B or C. However, temperatures below -4ºF / -20ºC . -
Page 7: Display Setup
Display Setup Set the A-B-C Switch 2. Insert 3 x AAA alkaline batteries into the battery Locate the A-B-C switch inside compartment, as shown. Follow the battery compartment. Set the polarity (+/–) diagram in the A-B-C switch to A, B or C. the battery compartment. -
Page 8: Set The Time, Date & Units
Atomic Clock AcuRite atomic clocks use a radio-controlled signal (RCC) to synchronize to the correct time broadcast by the National Institute of Standards and Technology (NIST) Radio Station WWVB, located near Fort Collins, Colorado. WWVB broadcasts the current time and date with split-second accuracy. The atomic clock and calendar will maintain the correct time and date, and automatically update for daylight saving time to provide the most accurate timekeeping standard possible. -
Page 9: Placement Guidelines
Placement for Maximum Accuracy AcuRite sensors are sensitive to surrounding environmental conditions. Proper placement of both the display and the outdoor sensor are critical to the accuracy and performance of this product. Display Placement Place the display in a dry area free of dirt and dust. Display stands upright for tabletop use or is wall-mountable. -
Page 10: Using The Weather Station
OPERATION Using the Weather Station Learning Mode Self-calibrating forecasting uses a unique algorithm to analyze changes in pressure over a time period (called Learning Mode) to determine your altitude. After 14 days, the learning mode icon disappears from the display screen. At this point, the self-calibrated pressure is tuned in to your location and the unit is ready for superior weather prediction. -
Page 11: Programmable Alarms
Programmable Alarms This display features programmable alarms that sound an alert to notify you when a value (for temperature or humidity) has been reached or exceeded. When an alarm is triggered, the display emits an audible beep and flashes data in the affected category. -
Page 12: Troubleshooting
Troubleshooting Problem Possible Solution If the wireless signal indicator shows no bars: • Relocate the display and/or the outdoor sensor. The units must be within 330 ft (100 m) of each other. • Make sure both units are placed at least 3 feet (.9 m) No outdoor sensor away from electronics that may interfere with the wireless reception... -
Page 13: Care & Maintenance
Care and Maintenance Display Care Clean with a soft, damp cloth. Do not use caustic cleaners or abrasives. Keep away from dust, dirt and moisture. Clean ventilation ports regularly with a gentle puff of air. Outdoor Sensor Care Clean with a soft damp cloth. Do not use caustic cleaners or abrasives. Calibration The indoor/outdoor temperature and humidity readings, and barometric pressure can be calibrated on the display unit to improve accuracy. -
Page 14: Specifications
Specifications Outdoor: -40ºF to 158ºF; -40ºC to 70ºC TEMPERATURE RANGE Indoor: 32ºF to 122ºF; 0ºC to 50ºC Outdoor: 1% to 99% RH HUMIDITY RANGE Indoor: 1% to 99% RH 330 ft/100 m depending on home construction materials WIRELESS RANGE 433 MHz OPERATING FREQUENCY Display: 5V, 250mA power adapter POWER... -
Page 15: Customer Support
Customer Support AcuRite customer support is committed to providing you with best-in- class service. For assistance, please have the model number of this product available and contact us in any of the following ways: (877) 221-1252 AcuRite Visit us at www. .com Installation Videos Register your Product... - Page 16 ©Chaney Instrument Co. All rights reserved. AcuRite is a registered trademark of the Chaney Instrument Co., Lake Geneva, WI 53147. All other trademarks and copy- rights are the property of their respective owners. AcuRite uses patented technology. Printed in China 01121 INST 090617 Visit www.AcuRite.com/patents for details.
Need help?
Do you have a question about the 01121 and is the answer not in the manual?
Questions and answers
where is the A B C switch for outdoor on base
The A-B-C switch for the ACU-RITE 01121 outdoor sensor is located inside the battery compartment.
This answer is automatically generated
Wrench icon meaning?