Table of Contents
Advertisement
Quick Links
Package Contents
1. AcuRite Iris Weather Sensor
2. Mounting Hardware
3. Sensor Mounting Bracket
4. Instruction Manual
IMPORTANT
Register online to receive 1-year warranty protection
www.acurite.com/product-registration
Questions? Visit www.acurite.com/support
AcuRite Iris
PRODUCT MUST BE REGISTERED
TO RECEIVE WARRANTY SERVICE
PRODUCT REGISTRATION
Instruction Manual
™
Weather Sensor
(Dual Solar Panel)
(5-in-1)
model 06014
Advertisement
Table of Contents

Related Manuals for ACU-RITE 06014


Summary of Contents for ACU-RITE 06014
- Page 1 Instruction Manual AcuRite Iris (5-in-1) ™ Weather Sensor (Dual Solar Panel) model 06014 Package Contents 1. AcuRite Iris Weather Sensor 2. Mounting Hardware 3. Sensor Mounting Bracket 4. Instruction Manual PRODUCT MUST BE REGISTERED IMPORTANT TO RECEIVE WARRANTY SERVICE PRODUCT REGISTRATION Register online to receive 1-year warranty protection www.acurite.com/product-registration...
-
Page 2: Features And Benefits
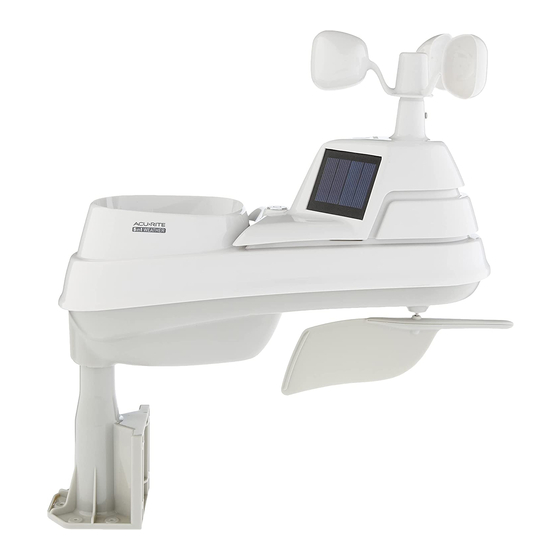
Features & Benefits AcuRite Iris SENSOR 5. Temperature & Humidity Sensors 1. Rainfall Collector Funnel (internal) 2. Solar Cell Panel 6. Mounting Point Converts sunlight into power to run Wind Speed Anemometer internal aspirating fan. Internal Aspirating Fan 8. Wind Direction Vane (not shown) 9. - Page 3 SETUP AcuRite Iris Sensor Setup Set the A-B-C Switch The AcuRite Iris sensor requires lithium batteries in low temperature conditions. Locate the A-B-C switch inside the Cold temperatures can cause alkaline battery compartment. Set the A-B-C batteries to function improperly. Use switch to A, B or C.
- Page 4 Placement for Maximum Accuracy AcuRite sensors are sensitive to surrounding environmental conditions. Proper placement of both the display and the sensor are critical to the accuracy and performance of this product. AcuRite Iris Sensor Placement The AcuRite Iris sensor is designed to remain outdoors all year long. Choose an open location with no obstructions above or around the sensor for the most accurate measurements.
- Page 5 AcuRite Iris Sensor Installation Guidelines INSTALLATION HEIGHT Mount the sensor at a minimum height of 5 feet (1.5 meters) off the ground, in an open area. Higher is better for wind measurements - the National Weather Service recommends 33 feet (10 meters) high! MOUNTING OPTIONS The included mounting bracket is designed to screw directly onto wooden posts or surfaces that are 2”x 4”...
-
Page 6: Calibrate The Rain Gauge
Calibrate the Rain Gauge The rain gauge on the AcuRite Iris sensor can be calibrated to improve accuracy. Items Needed: AcuRite Iris sensor, companion unit, plastic cup, pin, screw driver 1. First, ensure AcuRite Iris sensor is perfectly level using built-in bubble level. 2. -
Page 7: Limited 1-Year Warranty
Customer Support AcuRite customer support is committed to providing you with best-in-class service. For assistance, please have the model number of this product available and contact us in any of the following ways: Chat with our support team at www.acurite.com/support Email us at support@chaney-inst.com ►... - Page 8 © Chaney Instrument Co. All rights reserved. AcuRite is a registered trademark of the Chaney Instrument Co., Lake Geneva, WI 53147. All other trademarks and copyrights are the property of their respective owners. AcuRite uses patented Printed in China technology. Visit www.acurite.com/patents for details. 06014 INST 050521...
Need help?
Do you have a question about the 06014 and is the answer not in the manual?
Questions and answers
How do I change the rainfall settings from week and month to day and month