
Related Manuals for Hanna Instruments HI88713-01


Summary of Contents for Hanna Instruments HI88713-01
- Page 1 Instruction Manual HI88713 ISO Turbidity Meter w w w . h a n n a i n s t . c o m...
-
Page 2: Table Of Contents
Dear Customer, Thank you for choosing a Hanna Instruments product. This manual will provide you with the necessary information for correct use of the instrument. Please read this instruction manual carefully before using the instrument. If you need additional technical information, do not hesitate to e‑mail us at tech@hannainst.com or see the back side of this manual for our worldwide sales and technical service contacts. -
Page 3: Preliminary Examination
GENERAL DESCRIPTION GENERAL DESCRIPTION The HI88713 Turbidity bench meter is a high accuracy, meter that benefits from Hanna Instruments’ years of experience as manufacturer of analytical instruments. The HI88713 Turbidity bench meter meets and exceeds the requirements of ISO 7027 standard. -
Page 4: Abbreviations
The HI88713 Turbidity bench meter features G.L.P. (Good Laboratory Practice) functions that allow traceability of the calibration conditions. The last calibration points as well as time and date The HI88713 Turbidity bench meter has a user‑friendly interface with an easy to understand, graphical LCD. - Page 5 For the ratio turbidity mode, the microprocessor of the instrument calculates the NTU value, from the signals that reaches the two detectors, by using an effective algorithm. The optical system and measuring technique compensate the color interference and also the LED intensity fluctuations, minimizing the need of frequent calibration.
-
Page 6: Functional Description
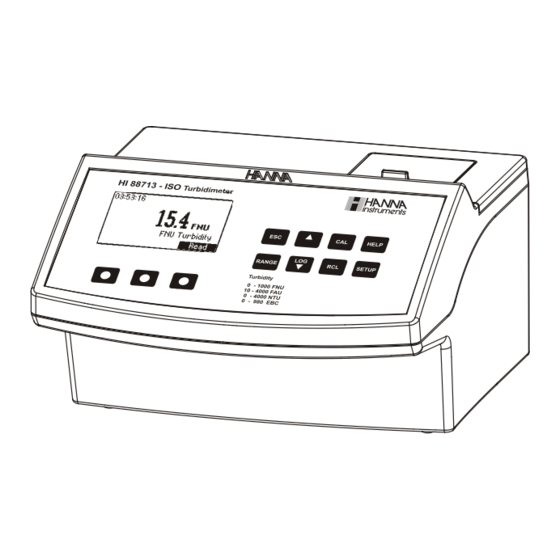
FUNCTIONAL DESCRIPTION INSTRUMENT DESCRIPTION HI 88713 - ISO Turbidimeter HELP RANGE SETUP Turbidity 0 - 1000 FNU 10 - 4000 FAU 0 - 4000 NTU 0 - 980 EBC POWER 12VDC 1) Liquid Crystal Display (LCD). The LCD has backlight for better visibility in dark environments. 2) Keypad. - Page 7 DISPLAY DESCRIPTION The display contains the following fields: 1) Current time 2) Functional keys 3) Selected mode 4) Measuring units 5) Measured value KEYPAD DESCRIPTION The keypad contains 8 direct keys and 3 functional keys with the following functions: Press to perform the function displayed above it. The function are screen releated. Press to exit the current screen.
-
Page 8: Specifications
SPECIFICATIONS FNU mode Range 0.00 to 9.99; 10.0 to 99.9; 100 to 1000 FNU Resolution 0.01; 0.1; 1 FNU Accuracy ±2% of reading plus straylight FAU mode Range 10.0 to 99.9; 100 to 4000 FAU Resolution 0.1; 1 FAU Accuracy ±10% of reading NTU ratio mode Range... -
Page 9: General Tips For An Accurate Measurement
GENERAL TIPS FOR AN ACCURATE MEASUREMENT The HI88713 is a highly accurate bench too turbidity meter. Special care must be taken during calibration and sample preparation to optimize the instrument performance and to fully benefit from its features. Is very important for the analyst to use proper measurement techniques for accurate, precise and repeatable readings. - Page 10 CUVETTE PREPARATION Whenever a cuvette is used, it must be clean inside and outside. When it is placed into the instrument, it must be dry outside, completely free of fingerprints or dirt. 10 ml If the cuvette is not indexed, use the factory marking to align the cuvette with the marking on the cuvette holder.
- Page 11 To further reduce the effect of glass imperfections, the cuvette can be indexed and use this new index as the position mark. For indexing one cuvette or matching multiple cuvettes, the continuous reading mode is suggested. In this mode multiple successive readings are taken without turning off the lamp. The turbidity is immediately displayed, reducing considerably the measurement time.
- Page 12 • Mark this position on the white band at the top of the cuvette with a water resistant pencil. • Always use this position to align the cuvette with the mark on the cuvette holder. MATCHING MULTIPLE CUVETTES Precise measurements require the use of a single cuvette. If it is not possible, cuvette selection and matching must be performed before taking measurements.
- Page 13 • Insert the second cuvette into the instrument and take a reading. • Open the instrument lid, slightly rotate the cuvette and take a new reading. • Repeat the last step for the second cuvette until the reading is within 0.01 FNU of the value obtained for the first cuvette.
- Page 14 • Application of a partial vacuum; • Addition of a surfactant, such as Triton X‑100; • Use of an ultrasonic bath; • Heating the sample. Sometimes it is necessary to combine two or more methods for efficient air bubble removal. Note: Each method can alter the sample turbidity, if misused, so they have to be used with caution.
-
Page 15: Startup
Insert the 12 Vdc power plug into its input on the back of the instrument. Switch on the instrument. On the LCD, the Hanna Instruments Logo will appear for a short time, followed by the main screen for turbidity measurements. -
Page 16: Range Selection
RANGE SELECTION The HI88713 bench‑top Turbidity meter has four measuring modes: FNU, FAU, NTU Ratio and NTU Non Ratio. When the instrument is in the main screen, the selected mode is displayed in the right RANGE side of the LCD, on the message line. To change the mode, press the RANGE key. -
Page 17: Help Mode
HELP MODE The HI88713 bench‑top Turbidity meter offers an interactive contextual help that assists the user at any moment. To access help screens, just press HELP. A screen with additional information will appear. To read all available information, scroll down or up text using the UP or DOWN key. - Page 18 • Replace the cap. • Wipe the cuvette thoroughly with a lint‑free cloth to remove any fingerprints, dirt or water 10 ml spots. • Apply silicone oil on the cuvette and wipe with a lint‑free cloth to obtain an even film over the entire surface of the cuvette.
- Page 19 • Press “Read” functional key and keep it pressed to take continuous readings. The display will show “READ” in the left side and blinking dashes. The dashes and light icon will appear during different measurement phases. The first value is displayed after 10 seconds and then a new reading is displayed each second as long as the “Read”...
-
Page 20: Calibration Procedure
UNITS CHANGE (only for NTU Ratio and NTU Non-Ratio modes) To change the units for NTU Ratio and Non‑Ratio modes, simply press the “Unit” functional key when a measurement is available. The EBC value is obtained by multiply with 0.245 the NTU value. CALIBRATION PROCEDURE The HI88713 Turbidity bench meter is supplied with 5 AMCO Hanna standards (<0.1 FNU, 15 FNU, 100 FNU, 750 FNU and 2000 NTU) that are specially designed for NTU ratio mode. - Page 21 CALIBRATION For best results, the measurement techniques must be followed during calibration. If formazin standards are used, mix the cuvettes gently for about 1 minute and then allow the standard to settle for 1 more minute before calibration. Calibration can be performed in up to five points, independently, for each mode. The calibration points are: FNU mode: 0, 15, 100, 750...
- Page 22 Note: The reading of the first point could be skipped for FNU and NTU modes by pressing “Skip” functional key. In this case, the 0.00 value will be used for calibration. • Place the cuvette for first calibration point: • <0.1 FNU (NTU) calibration cuvette for all modes except FAU mode.
- Page 23 • At this moment it is possible to exit calibration by pressing “End” functional key. • If the calibration is terminated, the display will briefly show “Store...” and the two point calibration is saved. The instrument returns to the main screen. THIRD CALIBRATION POINT •...
- Page 24 FOUR-POINT CALIBRATION • Remove the third standard cuvette. • Place the cuvette for third calibration point: • 750 FNU (NTU) calibration cuvette for NTU ratio mode. • 750 NTU formazin prepared standard for NTU non‑ratio and FNU modes. • 2000 NTU formazin prepared standard for FAU mode.
- Page 25 Note: If necessary, press UP or DOWN key to edit the calibration point value to match the exact value of the standard as measured with a reference turbidimeter. • Close the lid and press “Read” functional key. The display will show the value blinking and the light icon during measurement.
-
Page 26: Good Laboratory Practice (Glp)
GOOD LABORATORY PRACTICE (GLP) The HI88713 Turbidity bench meter has a built in complete GLP information. The calibration date and the calibration points are displayed in a comprehensive mode for each range. To display the GLP information, simply press CAL key. A screen with instrument serial number and with information about the calibration is displayed. -
Page 27: Log & Log Recall
LOG AND LOG RECALL The HI88713 Turbidity bench meter has a powerful log function that could store up to 200 records. Each record contains: • the measuring mode, • the reading value, • the measuring unit, • the date and time of the measurement, •... -
Page 28: Setup
SETUP The instrument’s parameters can be changed in the Setup mode. Some parameters affect the measuring sequence and others are general parameters that change the behaviour or appearence of the instrument. The setup mode may be accessed from the main screen by pressing the SETUP key. SETUP Press ESC or SETUP to return to the main screen. - Page 29 Date / Time This option is used to set the instrument’s date and time. Press “Modify” to change the date/time. Press “Left” or ”Right” functional key to highlight the value to be modified (year, month, day, hour, minute or second). Use the UP or DOWN key to change the value. Press “Accept”...
-
Page 30: Pc Interface
Beeper Option: Enabled or Disabled. This option is used to enable/disable the beeper. Press the “Enable” functional key to enable or disable this option. When enabled, a short beep is heard every time a key is pressed. A long beep alert sounds when the pressed key is not active or an error condition is detected. -
Page 31: Accessories
Damage due to accident, misuse, tampering or lack of prescribed maintenance is not covered. If service is required, contact your local Hanna Instruments Office. If under warranty, report the model number, date of purchase, serial number and the nature of the failure. If the repair is not covered by the warranty, you will be notified of the charges incurred. - Page 32 World Headquarters Hanna Instruments Inc. Highland Industrial Park 584 Park East Drive Woonsocket, RI 02895 USA www.hannainst.com Local Office Hanna Instruments Inc. Highland Industrial Park 584 Park East Drive Woonsocket, RI 02895 USA Phone: 800.426.6287 Fax: 401.765.7575 e‑mail: tech@hannainst.com MAN88713 06/18...
Need help?
Do you have a question about the HI88713-01 and is the answer not in the manual?
Questions and answers