
Related Manuals for Hanna Instruments HI 84532


Summary of Contents for Hanna Instruments HI 84532
- Page 1 Instruction Manual HI 84532 TITRATABLE ACIDITY MINITITRATOR & pH METER for Fruit Juice 1.800.561.8187 information@itm.com www. .com...
-
Page 2: Table Of Contents
ELECTRODE CONDITIONING AND MAINTENANCE ..............41 ACCESSORIES ........................42 WARRANTY ........................43 All rights are reserved. Reproduction in whole or in part is prohibited without the written consent of the copyright owner, Hanna Instruments Inc., Woonsocket, Rhode Island, 02895, USA. 1.800.561.8187 information@itm.com www. -
Page 3: Preliminary Examination
Please examine this product carefully. Make sure that the instrument is not damaged. If any damage occurred during shipment, please notify your Dealer. Each HI 84532 minititrator is supplied complete with: • HI 84532-70 Reagent Kit for titratable acidity in fruit juice • HI 1131B pH electrode • HI 7662-T Temperature probe •... -
Page 4: General Description
The HI 84532 is a low-cost, easy to use microprocessor-based automatic minititrator and pH meter designed for the rapid and accurate analysis of Total Titratable Acidity in fruit juice. The HI 84532 minititrator is a valuable tool because of its ability to eliminate subjective factors including color indicators, errors in mathematical calculations or erratic titrant additions from the measurement, it will quickly become a valuable acidity analysis tool of fruit juice. - Page 5 C d i c The HI 84532 minititrator uses a method based on the Official Methods of Analysis of AOAC International. The fruit juice is titrated with sodium hydroxide until the pH end point at 8.1.
-
Page 6: Specifications
SPECIFICATIONS Titrator Range Low range: 5 mL sample g/100 mL as citric acid: 0.10 - 2.00 %CA g/100 mL as tartaric acid: 0.11 - 2.35 %TA g/100 mL as malic acid: 0.10 - 2.09 %MA High range: 5 mL sample g/100 mL as citric acid: 1.00 - 10.00 %CA g/100 mL as tartaric acid: 1.17 - 11.72 %TA g/100 mL as malic acid: 1.05 - 10.47 %MA... -
Page 7: Principle Of Operation
The HI 84532 minititrator is designed to determine the acidity of fruit juices. The titration is displayed in % (g/100 mL) of the predominant acid (citric, malic or tartaric acid). -
Page 8: Functional Description
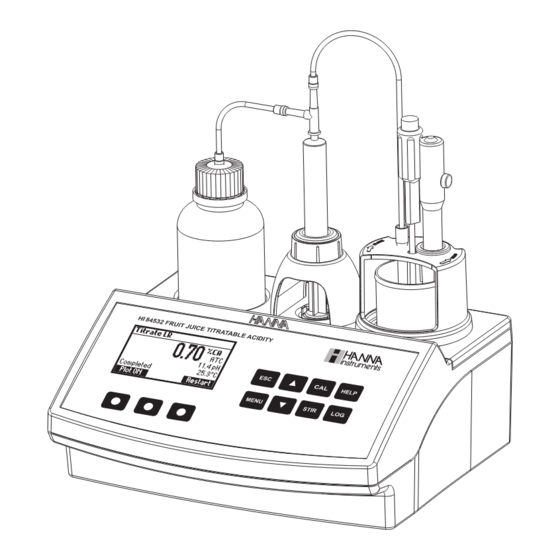
FUNCTIONAL DESCRIPTION OVERHEAD VIEW 1) Titrant bottle 2) Liquid Crystal Display (LCD) 3) Keypad 4) Electrode holder 5) Dispensing tube FRONT VIEW REAR VIEW 6) Temperature probe 7) pH Electrode 8) Electrode holder 9) Beaker 10) Power switch 11) USB connector (PC interface) 12) USB connector (Storage interface) 13) Power adapter 14) BNC electrode connector... - Page 9 KEYPAD FUNCTION ESC - used to leave the current screen and to return either to the previous screen or to the main screen. In Setup, exits a parameter without changing the value. - used to modify the parameters’ values, to scroll the information displayed while viewing a help screen or to move between the options from the instrument’s Setup CAL - used to access the Electrode and Pump calibration options HELP - used to access/exit the instrument’s contextual help...
-
Page 10: Titrator Startup
5) Stirrer and reading status 6) Main reading information 7) pH temperature compensation mode (Manual or Automatic) 8) Temperature reading DOSING PUMP The dosing pump is based on a valve that automatically moves the titrant between the titrant bottle and syringe when filling the syringe and between the syringe and sample when dispensing. -
Page 11: Setup Menu
SETUP MENU The titrator’s setup menu may be accessed from the main screen or titration screens (meter or titrator) by pressing the MENU key, then Setup. A list of setup parameters will be displayed with currently configured setting. While in the setup menu, it is possible to modify the instrument’s operation parameters. The ARROW keys permit the user to scroll the setup parameters. - Page 12 Use the ARROW keys to select the value. Press Select to confirm or ESC to return to the setup menu without saving the changes. pH Resolution 0.1 or 0.01. Press the displayed virtual option key to change the option. Temperature Unit °C, °F or K.
- Page 13 Press Format to cycle between the available date formats. Press to highlight the value to be modified. Use the ARROW keys to change the value. Press Accept to confirm the new value or ESC to return to the setup. Key Beep Select Enable to activate or Disable to deactivate the Key Beep function.
- Page 14 LCD Backlight Press Modify to change the backlight level. The default value is 3. Use the ARROW keys or to increase/ decrease the backlight level. Press Accept to confirm or ESC to return to the setup menu. Language Press the corresponding virtual option key to change the language.
-
Page 15: Guide To Display Codes
Restore Factory Settings Press Select to restore factory settings. Press Yes to confirm the restore process or No to return without restoring. Press ESC to return to the Setup mode. GUIDE TO DISPLAY CODES This screen appears when the instrument is turned on during the initialization process. - Page 16 This error message appears when the pump is not working properly. Check the tubing, valve and syringe. Press Restart to try again. This screen appears when the titrator is in calibration mode. Press Pump to calibrate Pump. Press Electrode to calibrate pH Electrode. PUMP CALIBRATION MESSAGES Pump calibration is initiated by pressing the Start key.
- Page 17 This screen appears when the stirrer is not working properly. Check the stir bar and beaker content. Press Restart to try again. This error message appears when the pump is not working properly. Check the tubing, valve and syringe. Press Restart to try again. pH CALIBRATION MESSAGES pH calibration mode.
-
Page 18: Electrode Preparation
The titration result, expressed as %CA, %TA or %MA is displayed automatically at the end of the titration. Press Restart to start a another titration or ESC to return to the main screen. This error message appears when the input reading (pH or temperature) exceeds the specified limits. -
Page 19: Electrode Calibration Procedure
4.01, 7.01, 8.20 and 10.01 pH. For a single point calibration any of the four buffers may be used, 8.20 pH is recommended. Note: The HI 84532 will not accept other pH buffers for calibration. • Pour small quantities of selected buffer solutions into clean beakers. For accurate calibration use two beakers for each buffer solution, the first one for rinsing the electrode and the second one for calibration. - Page 20 Point 1 calibration • The 8.20 buffer will be selected by default. If necessary, press the ARROW keys in order to select a different buffer value. • The (unstable measurement) symbol will be shown on the display until the reading becomes stable.
- Page 21 • If necessary, press the ARROW keys in order to select a different buffer value. • The (unstable measurement) symbol will be shown on the display until the reading becomes stable. • When the reading is stable and close to the selected buffer, the (unstable measurement) symbol will disappear and the Confirm key will become active.
- Page 22 • If the measured offset isn’t within the preset limits (±45 mV), the meter will display the message “Buffer Contaminated” alternatively with ”Electrode Dirty/Broken”. • If the computed slope isn’t within the preset limits, the meter will display the message “Wrong Slope”.
-
Page 23: Ph Buffer Temperature Dependence
Note: • To clear a previous calibration and to return to the default value, press Clear at any time after entering calibration mode. If Clear is invoked during the first calibration, point the instrument returns to the measurement mode. • The Clear key is displayed only if a previous calibration exists. pH BUFFER TEMPERATURE DEPENDENCE Temperature has an effect on pH. -
Page 24: Dosing Pump Installation
DOSING PUMP INSTALLATION To install the dosing pump follow the procedure below: • Extend the plunger on the 5 mL syringe to its maximum volume. • Place the syringe in the dedicated spot on the top of the meter (1). •... - Page 25 Note: • The aspiration tube must be inserted in the titrant bottle. The dosing tip must be placed over a rinse beaker. • Before starting the prime procedure, make sure you are using the appropriate titrant solution for the selected range. •...
-
Page 26: Pump Calibration Procedure
7 4 . • Verify the electrode has been calibrated in 8.20 pH buffer. • Ensure the pump is primed with the correct titrant for the selected range (HI 84532-50 Low Range Titrant or HI 84532-51 High Range Titrant). Sample preparation: Using a clean pipette to precisely... - Page 27 • Place the probe holder on the top of the beaker and secure it by turning clockwise. • Rinse the pH electrode with deionized water and immerse into the sample until the reference junction is completely submerged. Be sure that the tip of the electrode is not hitting the stir bar.
-
Page 28: Titration Procedure
5 0 . 7 4 . • Ensure the pump is primed with the correct titrant for the selected range (HI 84532-50 Low Range Titrant or HI 84532-51 High Range Titrant). Sample preparation: Using a clean pipette to precisely add the appropriate amount of sample... - Page 29 • Rinse the pH electrode with deionized water and immerse into the sample until the reference junction is completely submerged. Be sure that the tip of the electrode is not hitting the stir bar. • Insert the dosing tip into the titrant tube sleeve. IT IS CRITICAL THAT THE TIP BE IMMERSED APPROXIMATELY 0.25 CM (0.1") INTO THE SOLUTION BEING TITRATED.
- Page 30 • Press LOG to record the concentration value and the titration curve into the instrument’s memory. A message will be displayed for a few seconds indicating the amount of free log space. Up to 200 log samples can be recorded in the instrument’s memory.
- Page 31 VIEW/DELETE TITRATOR RECORDED DATA Press MENU key then Recall to access the titrator logs. When an external USB storage device is connected, the Export key is displayed. It saves the meter and titrator logs in two text format files on the storage device. Press Meter or Titrator to view the respective logs.
- Page 32 Press Plot to visualize the titration curve or ESC to return to the previous screen. On the titration curve, the end point volume and pH are displayed. The titration data (Total Titrant Volume on the x-axis and pH on the y-axis) can be scanned through with the dotted line by using the ARROW keys. To zoom on the titration curve press Zoom.
-
Page 33: Ph Measurement
If a calibration hasn’t been performed, the message “Not Calibrated” will be displayed. pH MEASUREMENT The HI 84532 can be used as a pH meter for direct measurements. Verify that the instrument has been calibrated before taking pH measurements. Set the instrument to pH meter. - Page 34 In order to take pH measurements, follow the next steps: • Submerge the pH electrode 2 cm (0.8’’) and the temperature probe into the sample to be tested and stir gently. Allow time for the electrode to stabilize. When the reading becomes stable, the (unstable measurement) symbol will disappear.
- Page 35 VIEW/DELETE RECORDED pH DATA To view or delete previously logged pH records, press MENU then Recall to access the pH logs. A list of records is stored in the pH log. When an external USB storage device is connected, the Export key is displayed. It saves the meter and titrator logs in two text format files on the storage device.
- Page 36 If Delete or Del.All is pressed the instrument will ask for confirmation. Press Yes to delete the record or No to return to the previous screen without deleting. Deleting a single record will renumber the list of records. If the pH log is empty, the message “No records available!” will be displayed. pH METER GLP INFORMATION The pH meter GLP screens displays the last pH calibration data.
-
Page 37: Pc Interface And Data Transfer
PC INTERFACE AND DATA TRANSFER Data stored on the meter with the LOG function during pH/mV measurement and titrations can be transferred from the meter to a USB stick using the Export function from the log recall menu. Two text files are transferred on the USB stick. These files can be used for further analysis on a PC. The logged data can also be transferred from the instrument to the PC using a USB cable. -
Page 38: Troubleshooting Guide
TROUBLESHOOTING GUIDE c e l o r t p i t / e s c x e s s e e v i y t r a e l t u l n o i . t f i t c e d o r r o f s e t... - Page 39 e t f t i t i t a r , n o e h t r t s n l p s i s y a o r B n e k e l e o r t c .
-
Page 40: Electrode Conditioning And Maintenance
ELECTRODE CONDITIONING AND MAINTENANCE STORAGE PROCEDURE To assure a quick response time, the glass bulb should be kept moist and not allowed to dry out. Replace the solution in the protective cap with a few drops of HI 70300 or HI 80300 Storage Solution. -
Page 41: Accessories
ACCESSORIES REAGENTS HI 84532-50 Titrant solution for Low Range (120 mL) HI 84532-51 Titrant solution for High Range (120 mL) HI 84532-55 Calibration Standard (230 mL) pH CALIBRATION SOLUTIONS HI 7004M Buffer solution pH 4.01 (230 mL) HI 7007M Buffer solution pH 7.01 (230 mL) HI 70082M Buffer solution pH 8.20 (230 mL) -
Page 42: Warranty
WARRANTY HI 84532 is guaranteed for two years against defects in workmanship and materials when used for it’s intended purpose and maintained according to instructions. Electrodes and probes are guaranteed for six months. This warranty is limited to repair or replacement free of charge. - Page 43 Local Sales and Customer Service Office MAN84532 02/13 Printed in ROMANIA 1.800.561.8187 information@itm.com www. .com...
Need help?
Do you have a question about the HI 84532 and is the answer not in the manual?
Questions and answers