Table of Contents
Advertisement
Advertisement
Table of Contents

Related Manuals for Hanna Instruments HI88703-02


Summary of Contents for Hanna Instruments HI88703-02
- Page 1 Instruction Manual HI88703 Turbidity Meter www.hannainst.com...
-
Page 2: Warranty
Damage due to accidents, misuse, tampering or lack of prescribed maintenance is not covered. If service is required, contact your local Hanna Instruments Office. If under warranty, report the model number, date of purchase, serial number and the nature of the problem. If the repair is not covered by the warranty, you will be notified of the charges incurred. -
Page 3: Table Of Contents
TABLE OF CONTENTS WARRANTY ..........................2 CERTIFICATION ........................2 PRELIMINARY EXAMINATION ....................4 GENERAL DESCRIPTION ......................4 ABBREVIATIONS ........................5 PRINCIPLE OF OPERATION .......................5 FUNCTIONAL DESCRIPTION ......................7 SPECIFICATIONS ........................9 GENERAL TIPS FOR AN ACCURATE MEASUREMENT..............10 START UP ..........................16 RANGE SELECTION ........................17 TUTORIAL MODE ........................17 HELP MODE .........................18 MEASUREMENT PROCEDURE FOR RATIO/NON RATIO TURBIDITY RANGE ........ -
Page 4: Preliminary Examination
GENERAL DESCRIPTION GENERAL DESCRIPTION HI88703 is a high accuracy, meter that benefits from Hanna Instruments’ years of experience as manufacturer of analytical instruments. The HI88703 is especially designed for water quality measurements, providing reliable and accurate readings on low turbidity. -
Page 5: Abbreviations
HI88703 has a user‑friendly interface with an easy to understand, graphical LCD. All messages are in plain text, easy to read and understand. Comprehensive contextual help is available at a simple key press. All messages and helps are available in several languages. Confirmation and error acoustic signals help the user during instrument operation. - Page 6 For the ratio turbidimeter range, the microprocessor of the instrument calculates the NTU value, from the signals that reaches the two detectors, by using an effective algorithm. This algorithm corrects and compensates for interferences of color, making the HI88703 instrument color‑compensated. The optical system and measuring technique compensate also for the lamp intensity fluctuations, minimizing the need of frequent calibration.
-
Page 7: Functional Description
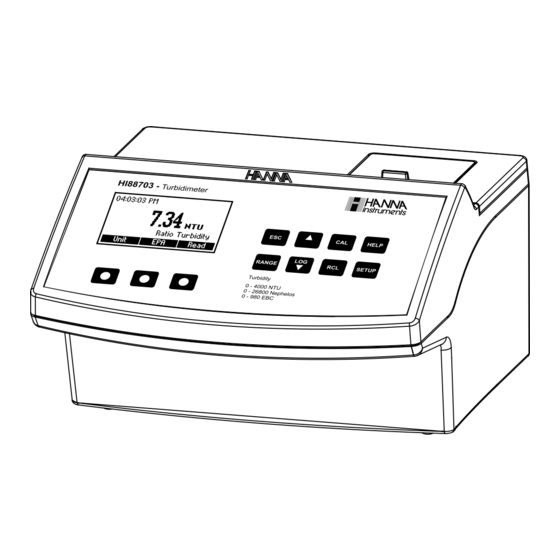
FUNCTIONAL DESCRIPTION INSTRUMENT DESCRIPTION 1) Liquid Crystal Display (LCD). The LCD has backlight for better visibility in dark environments. 2) Keypad. Splash proof resistant. 3) Cuvette Lid. Close the cuvette lid prior to start a measurement. 4) Lamp lid and the related fixing screw 5) USB connector 6) Fuse holder 7) Mains switch... - Page 8 DISPLAY DESCRIPTION The display contains the following fields: 1) The current time in selected format 2) Information related to the measurement 3) Functional keys 4) Currently selected parameters 5) Measuring units 6) Measured value KEYBOARD DESCRIPTION The keyboard contains 8 direct keys and 3 functional keys with the following functions: The function of each of the three functional keys depends on the name displayed on the LCD above them.
-
Page 9: Specifications
SPECIFICATIONS Range - non ratio mode 0.00 to 9.99; 10.0 to 40.0 NTU 0.0 to 99.9; 100 to 268 Nephelos 0.00 to 9.80 EBC Resolution - non ratio mode 0.01; 0.1 NTU 0.1; 1 Nephelos 0.01 EBC Range - ratio mode 0.00 to 9.99;... -
Page 10: General Tips For An Accurate Measurement
GENERAL TIPS FOR AN ACCURATE MEASUREMENT HI88703 is a highly accurate meter for turbidity. To meet the instrument’s performance and fully benefit of its features, it is very important for the analyst to use proper measurement techniques for accurate, precise and repeatable readings. Special care must be taken during sample preparation and handling. - Page 11 If the cuvette is not indexed, put the cuvette with the factory mark aligned with the sign on the instrument top. CUVETTE OILING To hide minor imperfections and scratches, the cuvettes should be oiled outside with the supplied silicone oil. This is very important, especially for low turbidity samples (< 1 NTU), otherwise scratches can contribute and alter turbidity readings.
- Page 12 For indexing one cuvette or matching multiple cuvettes, the continuous reading mode is suggested. In this mode multiple successive readings are taken without turning off the lamp. The turbidity is immediately displayed, reducing considerably the measurement time. Note: The instrument can not perform continuous readings if the average mode is on. In order to index a cuvette follow the next steps: •...
- Page 13 • Mark this position on the thicker white band on the top of the cuvette with a water resistant pencil. • Always use this position to align it with the sign on the instrument top. MATCHING MULTIPLE CUVETTES Precise measurements require the use of a single cuvette. If it is not possible, cuvette selection and matching must be performed before taking measurements.
- Page 14 • Insert the second cuvette into the instrument and take a reading. • Open the instrument lid, slightly rotate the cuvette and take a new reading. • Repeat the last step for the second cuvette until the reading is within 0.01 NTU of the value obtained for the first cuvette.
- Page 15 Sometimes it is necessary to combine two or more methods for efficient air bubble removal. Note: Each method can alter the sample turbidity, if misused, so they have to be used with caution. APPLICATION OF VACUUM Vacuum works by decreasing the atmospheric pressure. In this way the bubbles from the solution came out to the surface.
-
Page 16: Start Up
Connect the instrument to the mains with the provided power cord. Pay attention that the mains voltage match the value printed on the back of the instrument. Switch on the instrument. On the LCD, the Hanna Instruments Logo will appear for a short time, followed by the main screen for ratio turbidity measurements. -
Page 17: Range Selection
RANGE SELECTION The HI88703 instrument has two measuring ranges: Ratio Turbidity, Non Ratio Turbidity. When the instrument is in the main screen, the selected range is displayed in the right side of the LCD, on the message line. To change the range, press the RANGE key. When the display shows the Change parameter screen, press ... -
Page 18: Help Mode
or keys. Press the Support key to access a page with Hanna Instruments support centers and their contact details. Press the Accessories key to access a page with instrument accessories. - Page 19 • Wipe the cuvette thoroughly with a lint‑free cloth to remove any fingerprints, dirt or water spots. • Apply silicone oil on the cuvette and wipe with a lint‑free cloth to obtain an even film over the entire surface of the cuvette. Note: It is very important to oil the cuvette, especially for low turbidity values (<...
- Page 20 • Press the Read key and keep it pressed to take continuous readings. The display will show “READ” in the left side and blinking dashes. The dashes and lamp icon will appear during different measurement phases. The first value is displayed after 10 seconds and then a new reading is displayed each second as long as the Read key is kept pressed.
-
Page 21: Calibration Procedure For Ratio/Non Ratio Turbidity Range
HI88703 turbidimeter is supplied with 5 AMCO standards: <0.1 NTU, 15 NTU, 100, 750 NTU and 2000 NTU. The Hanna Instruments standards are specially designed for this instrument. Turbidity standards have a shelf life and should not be used after the expiration date. Alternatively, formazin standards can be used. - Page 22 FORMAZIN PREPARATION In order to prepare formazin 4000 NTU stock solution, follow the next procedure: Solution I : Dissolve 1.000 grams of hydrazine sulfate, (NH , in distilled, deionized water and dilute to 100 mL in a volumetric flask. Warning: Handle hydrazine sulfate with care because it is a carcinogen reagent. Avoid inhalation, ingestion, or skin contact.
- Page 23 Note: The reading of the first point can be skipped by pressing the Skip key. In this case, the 0.00 NTU point will be used for calibration. • Place the <0.1 NTU standard cuvette (or the cuvette with dilution water) into the holder and ensure that the cuvette mark is aligned with the sign on the instrument top.
- Page 24 THREE-POINT CALIBRATION (Ratio Turbidity only) To perform a three‑point calibration, continue the procedure with the following steps: • Remove the second standard cuvette. • Place the 100 NTU standard cuvette (or the third prepared formazin standard) into the holder, with the cuvette mark aligned to the sign on the instrument top.
- Page 25 FIVE-POINT CALIBRATION (Ratio Turbidity only) To perform a five‑point calibration, continue the procedure with the following steps: • Remove the fourth standard cuvette. • Place the 2000 NTU standard cuvette (or the fourth prepared formazin standard) into the holder, with the cuvette mark aligned to the sign on the instrument top.
-
Page 26: Good Laboratory Practice (Glp)
GOOD LABORATORY PRACTICE (GLP) The HI88703 has built in complete GLP information. The calibration date and the calibration points are displayed in a comprehensive mode for each range. To display the GLP information, simply press CAL key. A screen with instrument serial number and with information about the calibration is displayed. -
Page 27: Log And Log Recall
LOG AND LOG RECALL The HI88703 has a powerful log function that could store up to 200 records. Each record contains: • the measuring range, • the reading value, • the measuring units, • the date and time of the measurement, •... -
Page 28: Setup
SETUP In the Setup mode, the instrument’s parameters, can be changed. Some parameters affect the measuring sequence and others are general parameters that change the behaviour or appearence of the instrument. The setup mode may be accessed from the main screen by pressing the SETUP key. Press ESC or SETUP to return to the main screen. - Page 29 Date / Time This option is used to set the instrument’s date and time. Press the Modify to change the date/time. Press the functional keys to highlight the value to be modified (year, month, day, hour, minute or second).
-
Page 30: Lamp Replacement
Instrument ID Option: 0 to 9999. This option is used to set the instrument’s ID (identification number). The instrument ID is used while exchanging data with a PC. Press the Modify key to access the instrument ID screen. Press the or keys in order to set the desired value. Press the Accept key to confirm the value or ESC to return to the setup menu without saving the new value. -
Page 31: Fuse Replacement
Please refer to the HI92000 software to download the data from the instrument. To allow our users access to the latest version of Hanna Instruments PC compatible software, we made the products available for download at http://software.hannainst.com. Select the product code and click Download Now. - Page 32 World Headquarters Hanna Instruments Inc. Highland Industrial Park 584 Park East Drive Woonsocket, RI 02895 USA www.hannainst.com MAN88703 06/19 Printed in Romania...
Need help?
Do you have a question about the HI88703-02 and is the answer not in the manual?
Questions and answers