Advertisement
Quick Links
NOTE:
The cabinets with the same model numbers are interchangeable and can be used in either location where
Step 1:
• Slide base cabinets together (in the order as shown below) and level in place. With cabinets aligned together,
place the 1/4"-20x30mm joint connector bolt w/ Loctite through pre-drilled hole on the inside of one of the cabinets
making sure bolt is pushed as far as it can go. While holding the joint connector bolt flush to the cabinet, take a
1/4"-20x17mm joint connector nut and attach it to the end of the bolt (through the other base cabinet) turing it
clockwise until it's completely on. Use a 4mm Allen wrench or 4mm hex bit and a screw gun to tighten as needed.
• Repeat this for the (15) remaining attachment points.
iXB3112-1
wibenchmfg.com
that model number is needed.
Joint
connector
nut
iXB1150-1
Specifications are subject to change. Product
images are for illustrative purposes only and may
differ from the actual product.
Assembly Instructions
proper quantities are included. (See Part Identifier Key)
Any parts damaged during shipment must be reported
Joint
connector
bolt
iXB1150-1
507 E. Grant St. Thorp, WI 54771 • P - 800.242.2303
iXchange® Wall
Before you begin, please make sure all parts and
within 24 hours of receipt. To report information
regarding damages or if you have any questions,
please call 800.242.2303.
Tools Required
• Screw gun
• 4mm & 5mm Allen
wrench OR
• 4mm & 5mm hex bit
• #2 Phillips screwdriver
iXB3112-1
Item # 0600023
V022823 Version subject to change
SSW1001
1
Advertisement

Related Manuals for WB Manufacturing iXchange Wall SSW1001


Summary of Contents for WB Manufacturing iXchange Wall SSW1001
- Page 1 Assembly Instructions iXchange® Wall SSW1001 Before you begin, please make sure all parts and proper quantities are included. (See Part Identifier Key) Any parts damaged during shipment must be reported within 24 hours of receipt. To report information regarding damages or if you have any questions, please call 800.242.2303.
- Page 2 Assembly Instructions iXchange® Wall SSW1001 Step 2: • Place and center the LEFT base top (iXLBTop_59) on the farthest LEFT base cabinets (iXB3112-1) & (iXB1150-1). Align the threaded inserts in the bottom of the base top with the pre-drilled holes in the sub-tops of the base cabinets.
- Page 3 Assembly Instructions iXchange® Wall SSW1001 Step 3: • Place and center the RIGHT base top (iXRBTop_59) on the furthest RIGHT base cabinets (iXB1150-1 & iXB3112-1). Align the threaded inserts in the bottom of the base top with the pre-drilled holes in the sub-tops of the base cabinets.
- Page 4 Assembly Instructions iXchange® Wall SSW1001 NOTE: The cabinets with the same model numbers are interchangeable and can be used in either location where that model number is needed. Step 4: • Locate wall cabinet (iXW1180-1). Place it on the LEFT side of base top (iXLBTop_59) aligning the pre-drilled holes in the bottom of the wall cabinet with threaded inserts in the base top.
- Page 5 Assembly Instructions iXchange® Wall SSW1001 Step 5: • Locate the second wall cabinet (iXW1155-2). Place it to the right of wall cabinet (iXW1180-1) and on top of both base tops (iXLBTop_59 & iXRBTop_59). Align the holes of both wall cabinets while also aligning the pre-drilled holes in the bottom of (iXW1155-2) with threaded inserts in both base tops.
- Page 6 Assembly Instructions iXchange® Wall SSW1001 Step 7: • Locate the third wall cabinet (iXW1180-1). Place it to the right of wall cabinet (iXW1155-2) on top of base top (iXRBTop_59). Align the holes of both wall cabinets while also aligning the pre-drilled holes in the bottom of wall cabinet (iXW1180-1) with threaded inserts in the base top (iXRBTop_59).
- Page 7 Assembly Instructions iXchange® Wall SSW1001 Step 9: • Located finished wall panel (iXFEL). Align the threaded inserts in the panel to the pre drilled holes in cabinets (iXW1180-1) and (iXB3112-1) on the LEFT side of the iXchange® Wall. Bolt wall panel to cabinets using ¼”-20x30mm joint connector bolts.
- Page 8 Assembly Instructions iXchange® Wall SSW1001 Step 10: • Locate LEFT wall top (iXLWTop_60) and place on top of upper wall cabinets (iXW1180-1 & iXW1155-2) with the threaded inserts facing down. Align the threaded inserts with the pre-drilled holes in the sub-tops of both wall cabinets and bolt into place using ¼”-20x30mm joint connector bolts.
- Page 9 Assembly Instructions iXchange® Wall SSW1001 Step 11: • Locate RIGHT wall top (iXRWTop_60) and place on top of upper wall cabinets (iXW1155-2 & iXW1180-1) with the threaded inserts facing down. Align the threaded inserts with the pre-drilled holes in the sub-tops of both wall cabinets and bolt into place using ¼”-20x30mm joint connector bolts.
- Page 10 Assembly Instructions iXchange® Wall SSW1001 Step 12: • Locate the cork strip and double top track. Slide the cork strip into the channel on the front of the upper track. Cut to fit. Step 13: • There will be a double top track with 2” Forbo insert and a double bottom track with blade tray. (Both tracks will be pre-drilled.
- Page 11 Assembly Instructions iXchange® Wall SSW1001 Step 14: • Attach carriers to whiteboard panels and tighten jamb nut against carrier. Slide whiteboard panels onto the track from the open end. Use the front two channels if only using 2 boards. There will only be one panel per track.
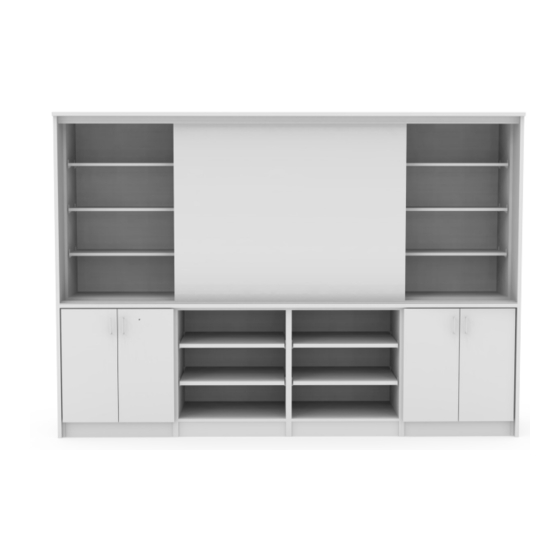
- Page 12 Assembly Instructions iXchange® Wall SSW1001 Step 17: • Attach bumpers to the end panels near lower track using 5/8” #8 truss head screws. Holes in bumpers will line up with pre-drilled holes in the end panels. Finished assembly of iXchange® Wall SSW0802-AL Specifications are subject to change.
- Page 13 Assembly Instructions iXchange® Wall SSW1001 Part Identifier Key NOTE: Some components may come with extra hardware (bolts/nuts). Discard extra hardware. Part # Description 0400236 ¼”-20x30mm joint connector bolt 04009023 ¼”-20x15mm joint connector bolt 0404229 ¼”-20x17mm joint connector nut Part # Description Qty.
- Page 14 Assembly Instructions iXchange® Wall SSW1001 Part Identifier Key Part # Description Qty. 0400684 118” 3 Track Upper w/Fascia & 2” Map Rail 0400685 118” 3 Track Lower w/Marker Tray 0400695 Carriers Hardware pack for iXchange Wall Bumpers and screws End stops and screws Map hooks Roller brackets Flat Head screws...
-
Page 15: Care And Maintenance
Assembly Instructions iXchange® Wall SSW1001 Care & Maintenance Storage Cabinet Surfaces A Few Notes of Caution: Acidic or abrasive cleaners can damage laminate surfaces; do Daily Care and Cleaning for Laminate Surfaces not use them. Drain cleaners containing lye will permanently damage the laminate surface. - Page 16 Assembly Instructions iXchange® Wall SSW1001 Care & Maintenance Whiteboard Surfaces Cabinet Hardware General Guidelines Door and Drawer Pulls/Handles: The manufacturing of the whiteboard recommends solvent- Pulls/Handles can easily be cleaned with a damp cloth or based dry-erase markers, instead of water-based or “low sponge and a mild soap or detergent, or all purpose cleaners.
Need help?
Do you have a question about the iXchange Wall SSW1001 and is the answer not in the manual?
Questions and answers