
Related Manuals for Dreame H12 Core


Summary of Contents for Dreame H12 Core
- Page 1 Dreame H12 Core Wet and Dry Vacuum User Manual The illustrations in this manual are for reference only. Please refer to the actual product.
- Page 2 FOR PURCHASING THIS DREAME WET AND DRY VACUUM. Registration Quick Start Welcome to register a Dreame account by scaning the QR code. You are available for the User Manual and Special Offers. With it you are obtaining a high quality product that is engineered for optimal performance.
-
Page 3: Important Safety Instructions
Important Safety Instructions Please read this manual carefully before use and retain it for future reference. When using an electrical appliance, basic precautions should always be followed, including the following: READ ALL INSTRUCTIONS BEFORE USING (THIS APPLIANCE). Failure to follow the warnings and instructions may result in electric shock, fire and/or serious injury. -
Page 4: Maintenance And Storage
Important Safety Instructions Maintenance and Storage • Prevent unintentional starting. Ensure the switch is in the OFF-position before picking up or carrying the appliance. Carrying the appliance with your finger on the switch or turning on the appliance may result in an accident. •... - Page 5 SAVE THESE INSTRUCTIONS For Household Use Only We, Dreame Trading (Tianjin) Co., Ltd., hereby declares that this equipment is in compliance with the applicable Directives, European Norms, and amendments. The full text of the EU declaration of conformity is available at the following internet address: https://global.dreametech.com...
-
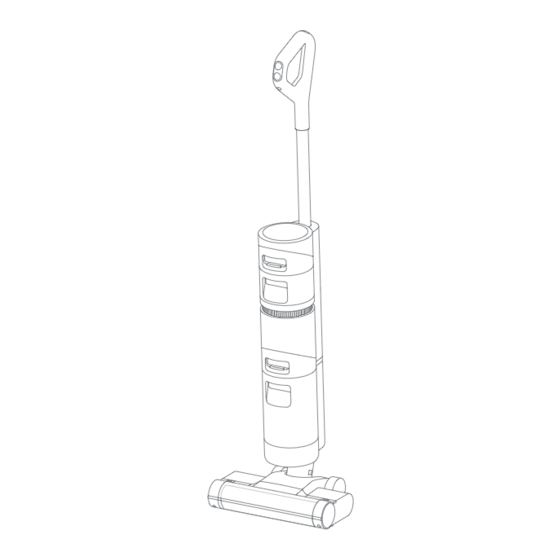
Page 6: Product Overview
Product Overview Packing List Charging Base Main Body Handle Cleaning Brush Power Adapter Multi-Surface Floor Cleaner Note: The images in this manual are for illustrative purposes only. The actual product may differ. - Page 7 Product Overview Vacuum Self-Cleaning Button Mode Switch Power Switch Aluminum Tube LED Display Screen Clean Water Tank Release Button Clean Water Tank Handle Voice Prompt Button Clean Water Tank Used Water Tank Release Button Used Water Tank Handle Used Water Tank Brush Roller Cover Release Buttons Roller Brush...
- Page 8 Product Overview Roller Brush Assembly Auxiliary Wheel Small Wheels Brush Roller Charging Base Charging Contacts Charging Port...
-
Page 9: Display Screen
Product Overview Display Screen Self-cleaning Mode Auto Mode Suction Mode Charging Indicator Battery Status/ Error Blocked Tube Insufficient Water in the Clean Water Tank Used Water Brush Roller Stuck Tank Full Voice Prompt Button Voice Prompt Button • Press briefly to activate voice prompt or adjust the volume •... -
Page 10: Installation
Installation Installing the Handle Insert the end of the handle vertically into the port on the top of the appliance as indicated until you hear a click. Note: To disassemble, extend a hard object into the hole on the back of the appliance to press in the contacts and pull the handle upwards at the same time. - Page 11 Charging Note: Fully charge the appliance before using it for the first time. 1. Place the charging base on the level ground against a wall. Connect one end of the power adapter to the charging base and another end to a home socket. 2.
-
Page 12: How To Use
How to Use Filling the Clean Water Tank Press the Clean Water Tank release button to remove the tank. Open the tank cover and fill the tank with clean water. Adding Cleaning Fluid For better cleaning performance, it is recommended to add 10 ml detergent with the bottle cap into the full Clean Water Tank, then shake gently and evenly for use. -
Page 13: Starting Cleaning
How to Use Starting Cleaning Gently step on the brush cover and recline the appliance backwards. Press the power switch to start/stop operating. <140° <40° Note: • Do not vacuum any foamy liquids. • If the appliance is in the upright position while working, the current task will be suspended. •... -
Page 14: Care And Maintenance
Care & Maintenance Tips: • Turn off the appliance before maintenance. Do not touch the power switch. • Replace parts if needed. The parts must be replaced by those available from the manufacturer or its service agent. • If the appliance is not used for an extended period, fully charge it, unplug the power plug, and store the appliance in a cool, low-humidity environment away from direct sunlight. - Page 15 Care & Maintenance Cleaning the Brush Cover 1. Press the brush roller cover release buttons inwards on both sides to remove the brush roller cover. 2. The brush cover can be rinsed with clean water or wiped with a dishcloth. Dry it completely before reuse.
-
Page 16: Cleaning The Brush Roller
Care & Maintenance Cleaning the Brush Roller 1. Press the brush roller release 2. Clear any hair and debris caught button and the handle of the brush on the brush roller with the provided roller will pop out. Pull the handle to cleaning brush. Rinse the brush roller take out the brush roller. - Page 17 Care & Maintenance Cleaning the Used Water Tank and the Filter 1. Press the Used Water Tank release 2. Take out the filter from the Used Water button to remove the tank. Tank cover. Remove the tank cover and pour out the used water. Filter Used Water Tank Cover...
- Page 18 Care & Maintenance Note: • When the filter is dirty and needs washing, rinse it with water. It must be completely dry before use. • Replacing the filter every 3 to 6 months is recommended. Cleaning the Tube and the Dirt Sensor Remove the Used Water Tank.
-
Page 19: Troubleshooting
Troubleshooting Error Possible Cause Solution The appliance is out of battery Fully charge its battery or its battery level is low. before use. The appliance is in the upright Recline the appliance position. backwards. Clear the blockage and wait Blockage activated overheat until the temperature returns protection mode. - Page 20 Troubleshooting Error Possible Cause Solution The Clean Water Tank is not properly installed in place, or Re-install or fill the Clean the water in the Clean Water Water Tank. No water is Tank is insufficient. coming out of the appliance. It takes 30 seconds to dampen Turn on the appliance and check again in 30 seconds.
- Page 21 Please contact customer service. Please use the original power Incompatible power E4/E5 adapter. If the problem persists, adapter contact customer service. Wait until the battery's temperature Battery overheating returns normal. For additional services, please contact us via aftersales@dreame.tech Website: https://global.dreametech.com...
-
Page 22: Specifications
Specifications Vacuum Model HHR22B Charging Time Approx. 5 hours Rated Voltage 21.6 V Charging Voltage 26 V Rated Power 200 W Rated Capacity 2300 mAh Used Water Tank Nominal Capacity 2500 mAh 500 mL Capacity Clean Water Tank 900 mL Capacity Power Adapter Average Active... - Page 23 Battery Disposal and Removal The built-in lithium-ion battery contains substances that are hazardous to the environment. Before disposing of the battery, make sure the battery is removed by qualified technicians and discarded at an appropriate recycling facility. — the battery must be removed from the appliance before it is scrapped; — the appliance must be disconnected from the supply mains when removing the battery;...
Need help?
Do you have a question about the H12 Core and is the answer not in the manual?
Questions and answers
The water is not going out from the appliance, the self cleaning option isn’t working, I **** getting an error message saying that I have to fill the water, but it has water
Water may not be dispensing from the Dreame H12 Core because the Clean Water Tank is either not installed correctly or does not have enough water. Ensure the Clean Water Tank is properly installed and filled.
The self-cleaning option is not working despite having water because the appliance must be charging, and the battery level must be above 20% to enable this function. Additionally, check if the Used Water Tank is full or not installed properly, and address these issues if needed.
This answer is automatically generated