Fluke 1630-2/1630-2 FC - Earth Ground Clamp Manual
- Quick reference manual (2 pages) ,
- User manual (30 pages) ,
- Calibration manual (22 pages)
Advertisement
Introduction
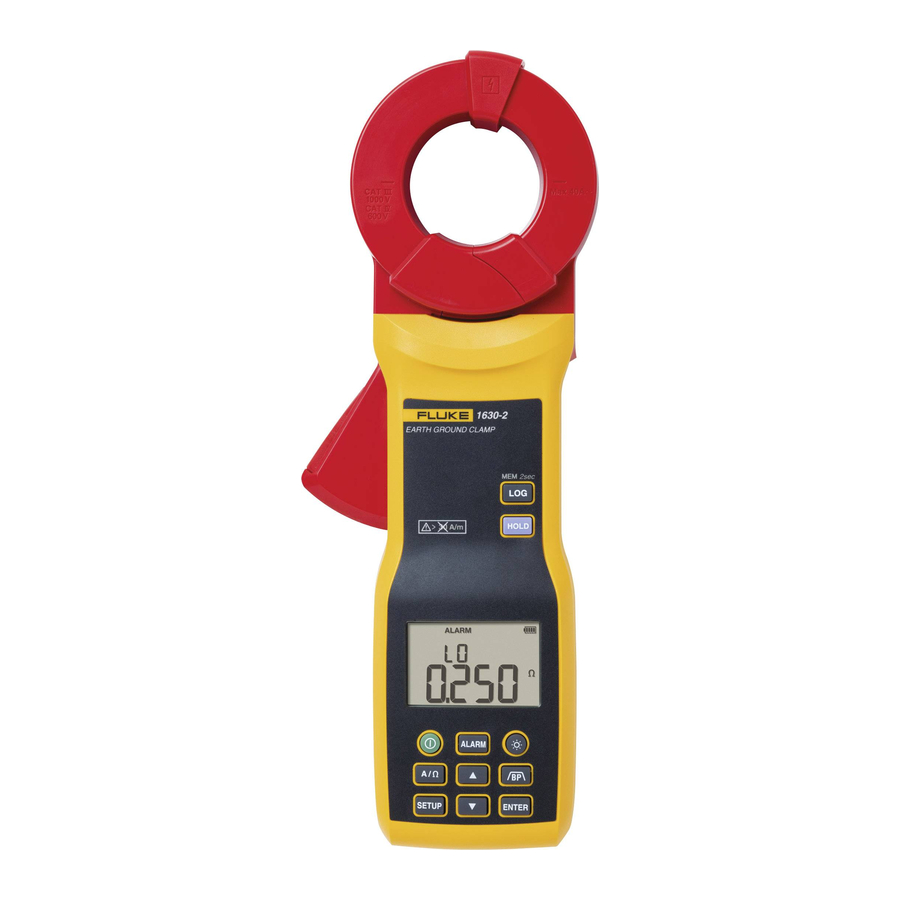
The Fluke 1630-2/1630-2 FC Earth Ground Clamp (the Product or Clamp) is a handheld, battery-operated clamp that measures the ground resistance without auxiliary ground rods and AC leakage current. The Clamp is used in multi-grounded systems without disconnecting the ground under test.
The Clamp supports these applications:
- Earth resistance and AC leakage current tests of high voltage pylons, buildings, cell phone substations, and RF transmitters
- Inspection of lightning protection systems
The 1630-2 FC supports the Fluke Connect Wireless System (may not be available in all regions). Fluke Connect is a system that wirelessly connects your Clamp with an app on your smartphone or tablet. The app shows the ground resistance measurements on your smartphone or tablet display. You can save these measurements and images to Fluke Connect Cloud storage and share with your team. For more information, see Fluke Connect Wireless System.
Your shipment includes:
- 1630-2 or 1630-2 FC Earth Ground Clamp
- AA alkaline batteries, IEC LR6 (x4, installed)
- Resistance test/check loop
- Safety Information and Quick Reference Guide (go to www.fluke.com to download the 1630-2/1630-2 FC Users Manual).
- Carrying Case
How to Contact Fluke
To contact Fluke, call one of the following telephone numbers:
- Technical Support USA: 1-800-44-FLUKE (1-800-443-5853)
- Calibration/Repair USA: 1-888-99-FLUKE (1-888-993-5853)
- Canada: 1-800-36-FLUKE (1-800-363-5853)
- Europe: +31 402-675-200
- Japan: +81-3-6714-3114
- Singapore: +65-6799-5566
- Anywhere in the world: +1-425-446-5500
Or, visit Fluke's website at www.fluke.com.
To register your product, visit http://register.fluke.com.
To view, print, or download the latest manual supplement, visit http://us.fluke.com/usen/support/manuals.
Safety Information
A  identifies conditions and procedures that are dangerous to the user.
A  identifies conditions and procedures that can cause damage to the Product or the equipment under test.

To prevent possible electrical shock, fire, or personal injury:
- Carefully read all instructions.
- Read all safety information before you use the Product.
- Do not alter the Product and use only as specified, or the protection supplied by the Product can be compromised.
- Do not use the Product around explosive gas, vapor, or in damp or wet environments.
- Before each use, examine the Product. Look for cracks or missing pieces of the clamp housing or output cable insulation. Also look for loose or weakened components. Carefully examine the insulation around the jaws.
- Comply with local and national safety codes. Use personal protective equipment (approved rubber gloves, face protection, and flameresistant clothes) to prevent shock and arc blast injury where hazardous live conductors are exposed.
- Use Product-approved measurement category (CAT), voltage, and amperage rated accessories (probes, test leads, and adapters) for all measurements.
- Do not use the Product if it is altered or damaged.
- Disable the Product if it is damaged.
- Do not use the Product if it operates incorrectly.
- Do not use the Product above its rated frequency.
- Limit operation to the specified measurement category, voltage, or amperage ratings.
- Do not touch voltages >30 V ac rms, 42 V ac peak, or 60 V dc.
- Hold the Product behind the tactile barrier.
- The battery door must be closed and locked before you operate the Product.
- Replace the batteries when the low battery indicator shows to prevent incorrect measurements.
- Remove the batteries if the Product is not used for an extended period of time, or if stored in temperatures above 50°C. If the batteries are not removed, battery leakage can damage the Product.
- Do not operate the Product with covers removed or the case open. Hazardous voltage exposure is possible.
- Repair the Product before use if the battery leaks.
- Use only specified replacement parts.
- Have an approved technician repair the Product.
- Remove the input signals before you clean the Product.
- Do not operate within external low frequency magnetic fields >30A/m.
Symbols used on the Product and in this manual are explained in Table 1.
Table 1. Symbols
| Symbol | Description | Symbol | Description |
 | WARNING. RISK OF DANGER. |  | Battery |
 | WARNING. HAZARDOUS VOLTAGE. Risk of electric shock. |  | Certified by CSA Group to North American safety standards. |
 | Consult user documentation. |  | Conforms to European Union directives. |
 | Application around and removal from uninsulated hazardous live conductors is permitted. |  | Conforms to relevant Australian EMC standards. |
 | Double Insulated |  | Certified by TÜV SÜD Product Service. |
 | Do not operate within external low frequency magnetic fields >30A/m. |  | Conforms to relevant South Korean EMC Standards. |
 | China metrology certification mark for measuring instruments manufactured in the People's Republic of China (PRC). | ||
 | Measurement Category III is applicable to test and measuring circuits connected to the distribution part of the building's low-voltage MAINS installation. | ||
 | Measurement Category IV is applicable to test and measuring circuits connected at the source of the building's lowvoltage MAINS installation. | ||
 | This product complies with the WEEE Directive marking requirements. The affixed label indicates that you must not discard this electrical/electronic product in domestic household waste. Product Category: With reference to the equipment types in the WEEE Directive Annex I, this product is classed as category 9 "Monitoring and Control Instrumentation" product. Do not dispose of this product as unsorted municipal waste. | ||
Before You Start
This section is information to know before you use the Clamp.
To prevent possible electrical shock, fire, or personal injury:
- For optimal readings, make sure the conductor is positioned between the alignment marks on the jaws.
- Make sure the jaws are perpendicular to the conductor.
- Do not use the HOLD function to measure unknown potentials. When HOLD is turned on, the display does not change when a different potential is measured.
- Replace the batteries as soon as the low battery indicator appears.
Power On/Off
The Clamp has a power on/off button:
- Push
![]() to turn on the Clamp.
to turn on the Clamp. - Push and hold
![]() >2 s. to turn off the Clamp.
>2 s. to turn off the Clamp.
If Auto-Off Power is turned on, the Clamp turns off after 20 minutes of no use. See Power Auto-Off for more information about how to set this feature.
Display Features and Controls
See Table 2 and Table 3 for the display features and button controls.
Table 2. Display Features
 | Item | Description | Item | Description |
| 1 | Fluke Connect | 10 | Measurement value or custom setting | |
| 2 | Hold | 11 | Ohms function | |
| 3 | ID# | 12 | Current in mA or A | |
| 4 | Alarm | 13 | Current type is AC | |
| 5 | Set Time | 14 | Memory in use | |
| 6 | Indicator for noise in ground electrode/rod | 15 | Filter is on (bandwidth 40 Hz to 70 Hz) | |
| 7 | Battery | 16 | Logging Interval settings | |
| 8 | Date/Time format | 17 | Jaws open | |
| 9 | Date/Time/ID number | 18 | Setting or explore for LOG |
Table 3. Controls
 | Item | Description |
| 1 | Jaw | |
| 2 | Tactile barrier | |
| 3 | Fluke Connect (radio) on/off | |
| 4 | Record measurements | |
| 5 | Hold the displayed value | |
| 6 | LCD | |
| 7 | Backlight | |
| 8 | Filter on/off | |
| 9 | Enter | |
| 10 | Value increment/decrement | |
| 11 | Change Clamp settings | |
| 12 | Select type of measurement | |
| 13 | Power on/off | |
| 14 | Alarm | |
| 15 | Jaw trigger | |
| 16 | Jaw trigger lock |
Setup
Push  to change these settings:
- Log interval
- Alarm threshold
- Time
- Clamp settings
Log Interval
The time interval for data logging is the time between measurements.
To set the log interval:

- Push
![]() until LOG INTERVAL shows in the display. See Figure 1.
until LOG INTERVAL shows in the display. See Figure 1.
The interval is shown in minutes: seconds format and is adjustable from 00:00 to 59:59. - Push
![]() to enable the change mode. The digits start to blink.
to enable the change mode. The digits start to blink.
 to enable the change mode. The digits start to blink.
- Push
![]() to increment/decrement the interval by 1 second.
to increment/decrement the interval by 1 second. - After you select the value, push
![]() until the digits stop blinking.
until the digits stop blinking. - Push
![]() to go back to the measurement mode.
to go back to the measurement mode.
 to increment/decrement the interval by 1 second.
 to go back to the measurement mode.
Alarm Threshold
In alarm mode, the display shows ALARM and the beeper sounds when the measurement is outside the set threshold. The Clamp compares the reading with the high and low values. If the reading is larger than the high value, the Clamp beeps and shows  on the display. If the reading is less than the low value, the Clamp beeps and
  shows on the display.
To set the alarm threshold:
- Push
![]() until ALARM shows in the display. See Figure 2.
until ALARM shows in the display. See Figure 2.

- Push
![]() to select the type as Amps HI, Amps LO, Ohms LO, or Ohms HI.
to select the type as Amps HI, Amps LO, Ohms LO, or Ohms HI. - Push
![]() to increment/decrement the value.
to increment/decrement the value. - Push
![]() to confirm the current input and move to the next setting.
to confirm the current input and move to the next setting. - Push
![]() to go back to the measurement mode.
to go back to the measurement mode.

Time/Clock
The Clamp has a time setting that is used as a timestamp for logged data.
To check or adjust the time setting:
- Push
![]() until TIME shows in the display. See Figure 3.
until TIME shows in the display. See Figure 3.

- Push
![]() until the digit you want to change starts to blink.
until the digit you want to change starts to blink. - Push
![]() to increment/decrement the value of the blinking digit.
to increment/decrement the value of the blinking digit. - After you select the value, push
![]() until the digits stop blinking.
until the digits stop blinking. - Push
![]() to go back to the measurement mode.
to go back to the measurement mode.

Clamp Settings
The Clamp has a Setup menu for these subfunctions:
- Backlight auto-off
- Power auto-off
- Firmware version
Backlight Auto-Off
A backlight on the display improves visibility in dim light. To conserve battery power, turn off the backlight.
To change the backlight option:
- Push
![]() until
until ![]() : shows on the display. See Figure 4.
: shows on the display. See Figure 4.

- Push
![]() to toggle the setting between on and off. The display updates to show the current setting:
to toggle the setting between on and off. The display updates to show the current setting: - On: backlight turns off after 2 minutes
- Off: backlight does not turn off
- Push
![]() to confirm the current input and move to the next setting.
to confirm the current input and move to the next setting. - Push
![]() to go back to the measurement mode.
to go back to the measurement mode.

Power Auto-Off
To save battery power, you can set the clamp to automatically turn off the power after 20 minutes of no use.
To change the Auto-Off option:
- Push
![]() until
until ![]() : shows on the display.
: shows on the display. - Push
![]() until
until ![]() : shows on the display. See Figure 5.
: shows on the display. See Figure 5.

- Push
![]() to toggle the setting between on and off. The display updates to show the current setting:
to toggle the setting between on and off. The display updates to show the current setting: - On: Clamp turns off after 20 minutes
- Off: Clamp does not turn off
- Push
![]() to confirm the current input and move to the next setting.
to confirm the current input and move to the next setting. - Push
![]() to go back to the measurement mode.
to go back to the measurement mode.
 : shows on the display.
Firmware Version
To view the firmware version for the Clamp:
- Push
![]() until
until ![]() : shows on the display.
: shows on the display. - Push
![]() until
until ![]() : and the version number shows on the display. See Figure 6.
: and the version number shows on the display. See Figure 6.

- Push
![]() to go back to the measurement mode.
to go back to the measurement mode.
 : and the version number shows on the display. See Figure 6.
How to Use the Clamp
This section is about how to set up the Clamp for Earth resistance tests, AC leakage current measurements, and the Fluke Connect Wireless System.
The Clamp includes a trigger lock on the trigger. Push the jaw trigger lock and trigger together to open the jaw.
Ground Resistance Measurements
The Clamp generates a voltage to the system under test and the induced current in the system is measured by the Clamp. The Clamp uses Ohm's Law (R=U/I) to automatically calculate the resistance measurement.
To check the Clamp before ground resistance measurements:
- Position the Jaw on the Standard Loop Resistance. See Figure 7.


- Verify that the display reading is within specification, see Table 4.
- If the reading is not within specification, clean the heads of the Jaw and repeat step 1 and step 2.
- If the reading is within specification, remove the Jaw from the Standard Loop Resistance. The Clamp is ready for a ground resistance measurement.
Table 4. Display Reading SpecificationsInput (Ω) Minimum Maximum 0.474 0.417 0.531 0.5 0.443 0.558 10 9.55 10.45 100 96.0 104.0
For ground resistance measurements:
- Open the jaw and make sure the jaw is free of dust, dirt, or any foreign substances.
- Turn on the Clamp.
- Push
![]() to select the Ω function.
to select the Ω function. - Attach the Clamp to the electrode or ground rod to be measured.
- Read the value of Rg (ground resistance) from the display. Figure 8 illustrates the ground resistance measurement principles.


Note
- If >3 A is found in the ground rod, NOISE shows on the display and the Clamp beeps. When noise is present, the Clamp reading is not valid.
- If the jaw assembly is opened during measurement,
![]() shows on the display.
shows on the display.
 shows on the display.
 AC Leakage Current Measurement
Based on the electromagnetic induction principle, the Clamp has a ring-shape current transformer comprised of a metal core and coil winding. The current transformer senses the magnetic field produced by the current or by the vector sum of the currents flowing in the conductor under test. The current transformer then produces a current proportional to the current flowing in the conductor.
For an AC leakage current measurement test:
- Open the jaw and make sure the jaw is free of dust, dirt, or any foreign substances.
- Turn on the Clamp.
- Push
![]() to select the A function.
to select the A function. - Attach the Clamp to the electrode, conductor, or ground rod for measurement. Figure 9 shows several connection types for an AC leakage current measurement.

- Read the value of the leakage current on the display.

Logging Measurements
The Clamp records data over time and saves >2000 measurements in memory at the set logging interval.
To start logging measurements, push  . The display shows
 ![]() to indicate that measurement logging is in progress See Figure 10.
to indicate that measurement logging is in progress See Figure 10.

Measurements are recorded at the sampling interval you specified. See Log Interval for more information.
Logging stops when:
- Clamp memory is full
- Clamp detects a low battery
- You push
![]() again
again
Note
If the sampling interval is set at 0 seconds, only one data point is recorded. To record the next data point, press again. The memory location is also displayed for about 1 second.
Hold
Push  to freeze the measurement value on the display.
Push again to continue and take measurements.
Filter
Push  to toggle the filter on and off in the leakage current measurement mode. When shows on the display, the clamp can isolate the 50/60 Hz fundamental frequency from the harmonics.
Fluke Connect Wireless System
The 1630-2 FC supports the Fluke Connect Wireless System (may not be available in all regions). Fluke Connect uses low-power 802.15.4 wireless radio technology to connect the Clamp with an app on your smartphone or tablet. The wireless radio does not cause interference with meter measurements.
The app shows measurements from the connected Clamp on your smartphone or tablet display, saves to Fluke Connect Cloud™ storage, and shares the information with your team.
Radio Frequency Data
Note
Changes or modifications to the wireless 2.4 GHz radio not expressly approved by Fluke Corporation could void the user's authority to operate the equipment.
For complete information about radio frequency data, go to www.fluke.com/manuals and search for "Radio Frequency Data Class B".
Fluke Connect App
The Fluke Connect app works with Apple and Android mobile products. The app is available for download to your smart device from the Apple App Store and Google Play.


To use Fluke Connect:
- Turn on the Clamp.

- Press
![]() to activate the radio on the Clamp.
to activate the radio on the Clamp. ![]() shows on the display.
shows on the display.

- On your smartphone, go to Settings > Bluetooth. Verify that Bluetooth is turned on.
![]()

- Go to the Fluke Connect App and in the list of connected Fluke tools, select 1630-2FC.
You can now take, save, and share measurements with the app. Go to www.flukeconnect.com for more information about how to use the app.


 to activate the radio on the Clamp.
  shows on the display.


Memory
You can log >2000 measurements in the Clamp memory.
View Memory
To view logged measurements in memory:
- Push and hold
![]() >2 s to go the view memory mode. The most recent logged measurement shows on the display with an ID#. See Figure 12.
>2 s to go the view memory mode. The most recent logged measurement shows on the display with an ID#. See Figure 12.


- Press
![]() to go to the next or previous ID# (memory location). The ID# rolls over when you reach the first or last record.
to go to the next or previous ID# (memory location). The ID# rolls over when you reach the first or last record. - Push
![]() to toggle the display to show the time or date for the logged measurement. See Figure 13.
to toggle the display to show the time or date for the logged measurement. See Figure 13.


Clear Memory
To clear the memory:
- In measurement mode, simultaneously push and hold
![]() .
. - Push
![]() to confirm and finish the clear action. The clamp automatically goes back to measurement mode.
to confirm and finish the clear action. The clamp automatically goes back to measurement mode.
Maintenance
To prevent a possible electrical shock, fire, or personal injury:
- Do not operate the Product with covers removed or the case open. Hazardous voltage exposure is possible.
- Repair the Product before use if the battery leaks.
- Use only specified replacement parts.
- Have an approved technician repair the Product.
- Remove the input signals before you clean the Product.
- Do not use the HOLD function to measure unknown potentials. When HOLD is turned on, the display does not change when a different potential is measured.
Clamp Care
To avoid damaging the Clamp, do not use aromatic hydrocarbons or chlorinated solvents for cleaning. These solutions will react with the plastics used in the Clamp.
Clean the case with a damp cloth and weak detergent. Do not use a solvent or cleaners with abrasives.
Battery Replacement
To avoid false readings that could lead to possible electric shock or personal injury, replace the batteries as soon as the low battery indicator  appears.
To replace the battery:
- Push and hold
![]() >2 s to turn off the Clamp.
>2 s to turn off the Clamp. - See Table 5 for details on how to replace the battery.
 >2 s to turn off the Clamp.
Parts and Accessories
Read this manual to make sure the Product is used correctly. If the Clamp does not turn on, check the battery.
Replacement parts and accessories are shown in Table 5. For more information about parts and accessories, see How to Contact Fluke.
Table 5. Accessories and Replacement Parts
 | ||
| Item | Description | Fluke Part or Model Number |
| 1 | AA Alkaline Battery, IEC LR6 (requires 4) | 373756 |
| 2 | Battery Door Assembly | 4779851 |
| 3 | Standard Loop Resistance | 4799496 |
Electrical Specifications
Maximum Voltage to Earth Ground: 1000 V
Battery Type: AA alkaline IEC LR6 (x4)
Battery Life: >15 hours in Ground Resistance measurement mode, with backlight turned off, and RF mode turned off
Frequency Range
Filter OFF: 40 Hz to 1 kHz
Filter ON: 40 Hz to 70 Hz
Ingress Protection: IEC 60529: IP30 with jaw closed
LCD
Digital Reading: 9999 counts
Refresh Rate: 4/second
Temperature
Operating: -10°C to +50°C
Storage: -20°C to +60°C
Operating Humidity:
Non condensing (<10°C)
≤ 90% RH (at 10°C to 30°C)
≤ 75% RH (at 30°C to 40°C)
≤ 45% RH (at 40°C to 50°C)
(noncondensing)
Altitude
Operating: 2000 m
Storage: 12 000 m
Reference Temperature: 23°C ±5°C (73°F ±9°F)
Temperature Coefficient: 0.15% x reading/ °C (<18°C or >28°C)
Overload Indication: OL
Data Logging Capacity: >2000 data points
Data Logging Interval: 1 second to 59 minutes and 59 seconds
Safety
General: IEC 61010-1: Pollution Degree 2 IEC 61557-1
Measurement: IEC 61010-2-032: CAT IV 600 V / CAT III 1000 V
Current Clamp for Leakage Current Measurements: IEC 61557-13: Class 2, ≤30 A/m
Resistance to Earth: IEC 61557-5
Effectiveness of the Protective Measures: IEC 61557-16: cutoff frequency 20 kHz (-3 dB)
Electromagnetic Compatibility (EMC)
International: IEC 61326-1: Portable Electromagnetic Environment CISPR 11: Group 1, Class B, IEC 61326-2-2
Group 1: Equipment has intentionally generated and/or uses conductively-coupled radio frequency energy that is necessary for the internal function of the equipment itself.
Class B: Equipment is suitable for use in domestic establishments and in establishments directly connected to a low voltage power supply network which supplies buildings used for domestic purposes.
Emissions that exceed the levels required by CISPR 11 can occur when the equipment is connected to a test object.
Korea (KCC): Class A equipment (Industrial Broadcast & Communications Equipment)
Class A: Equipment meets requirements for industrial electromagnetic wave equipment and the seller or user should take notice of it. This equipment is intended for use in business environments and not to be used in homes.
USA (FCC): 47 CFR 15 subpart B. This product is considered an exempt device per clause 15.103.
Wireless Radio
Frequency Range: 2412 MHz to 2462 MHz
Output Power: <10 mW
Radio Frequency Certification: FCC ID:T68-FBLE IC:6627A-FBLE
General Specifications
Conductor Size: 40 mm approximately
Dimensions (L x W x H): 283 mm x 105 mm x 48 mm
Weight: 880 g
Ground Loop Resistance
Frequency of measurement: 3.333 kHz.
| Range | Accuracy [1] ± (% of reading + Ω) |
| 0.025 Ω to 0.249 Ω | 1.5% + 0.020 Ω |
| 0.250 Ω to 0.999 Ω | 1.5% + 0.050 Ω |
| 1.000 Ω to 9.999 Ω | 1.5% + 0.100 Ω |
| 10.00 Ω to 49.99 Ω | 1.5% + 0.30 Ω |
| 50.00 Ω to 99.99 Ω | 1.5% + 0.50 Ω |
| 100.0 Ω to 199.9 Ω | 3.0% + 1.0 Ω |
| 200.0 Ω to 399.9 Ω | 5.0% + 5.0 Ω |
| 400 Ω to 599 Ω | 10.0% + 10 Ω |
| 600 Ω to 1500 Ω | 20.00 % |
| [1] Loop resistance with no inductance, conductor centered. | |
AC Leakage Current mA
True rms, crest factor CF ≤3
| Range | Resolution | Accuracy [1] ± (% of reading + mA) |
| 0.200 mA to 3.999 mA | 1 μA | 2.0% + 0.05 mA |
| 4.00 mA to 39.99 mA | 10 μ A | 2.0% + 0.03 mA |
| 40.0 mA to 399.9 mA | 100 μ A | 2.0% + 0.3 mA |
| 0.400 A to 3.999 A | 1 mA | 2.0% + 3 mA |
| 4.00 A to 39.99 A | 10 mA | 2.0% + 30 mA |
[1] Applies to signal frequency:
| ||
©2017 Fluke Corporation. All rights reserved.
Specifications are subject to change without notification.
All product names are trademarks of their respective companies.

Documents / Resources
References
![www.fluke.com]() Fluke Corporation: Fluke Electronics, Calibration and Networks
Fluke Corporation: Fluke Electronics, Calibration and Networks![www.fluke.com]() View all Fluke Products | Fluke
View all Fluke Products | Fluke![www.flukeconnect.com]() Fluke Connect tools and software for preventive maintenance and condition monitoring
Fluke Connect tools and software for preventive maintenance and condition monitoringFluke Registration
![us.fluke.com]() Fluke Manuals: Discontinued Legacy and Current Product Manuals | Fluke
Fluke Manuals: Discontinued Legacy and Current Product Manuals | Fluke![en-us.fluke.com]() Fluke Manuals: Discontinued Legacy and Current Product Manuals | Fluke
Fluke Manuals: Discontinued Legacy and Current Product Manuals | Fluke![play.google.com]() Google Play
Google Play![www.apple.com]() App Store - Apple
App Store - Apple
Download manual
Here you can download full pdf version of manual, it may contain additional safety instructions, warranty information, FCC rules, etc.
Advertisement


Need help?
Do you have a question about the 1630-2 and is the answer not in the manual?
Questions and answers