
Related Manuals for HMS LS7206


Summary of Contents for HMS LS7206
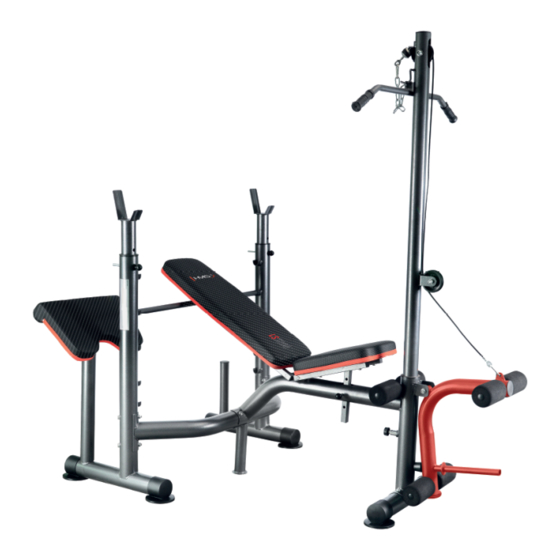
- Page 1 ŁAWKA POD SZTANGĘ – WEIGHT LIFTING BENCH – LAVICE POD ČINKU – TRAININGSBANK LS7206 INSTRUKCJA UŻYTKOWANIA – MANUAL INSTRUCTION – NÁVOD K OBSLUZE - BEDIENUNGSANLEITUNG...
-
Page 2: Uwagi Dotyczące Bezpieczeństwa
UWAGI DOTYCZĄCE BEZPIECZEŃSTWA Produkt ten przeznaczony jest wyłącznie do użytku domowego i zaprojektowano tak, aby zapewnić optymalne bezpieczeństwo. Powinny być przestrzegane następujące zasady: 1. Przed rozpoczęciem treningu skonsultuj się z lekarzem w celu stwierdzenia braku przeciwwskazań do korzystania ze sprzętu do ćwiczeń. Decyzja lekarza jest niezbędna w przypadku przyjmowania leków wpływających na pracę serca, ciśnienie krwi i poziom cholesterolu. -
Page 3: Lista Części
LISTA CZĘŚCI Nazwa Nazwa Prasa do wyciskania nogami Belka poprzeczna Pianka Ramie wspornika oparcia L/P Wyciąg górny Wspornik Uchwyt Ramie wspornika siedziska L/P Siedzisko Rama główna Oparcie Rama T Uchwwyt na drążek Rama przednia Drążek poprzeczny Stabilizator przedni Modlitewnik Rurka piankowa Rura pionowa L/P CZĘŚCI ZAMIENNE Nazwa... - Page 4 SCHEMAT MONTAŻ 1. Przymocuj rurę pionową (10) i belkę poprzeczną (11), przykręć je śrubam M10*90 i i nakrętkami M10. 2. Zamocuj ramę główną (15) belkę poprzeczną (11) wspornik (13) i przymocuj je śrubami M10*95 i nakrętkami M10. 3. Przymocuj stabilizator (18) do przedniej ramy(17), przykręć je śrubam M10*90 i i nakrętkami M10. 4.
-
Page 5: Zakres Stosowania
ZAKRES STOSOWANIA Ławka do ćwiczeń jest urządzeniem przeznaczonym do ćwiczeń mięśni brzucha ramion oraz klatki piersiowej. Ławka do ćwiczeń jest urządzeniem klasy H przeznaczonym wyłącznie do użytku domowego. Nie może być używany jako sprzęt terapeutyczny lub rehabilitacyjny. INSTRUKCJA ĆWICZEŃ Cykl ćwiczeń zapewni Ci polepszenie kondycji, rozbudowę mięśni, a w połączeniu z dietą i ograniczeniem kalorii pozwoli zgubić... - Page 6 Wyciskanie sztangi na stojąco Stań za ławką, ugnij nogi w kolanach, sztangę oprzyj na ramionach. Wykonuj przysiady trzymając sztangę jak na zdjęciu. Wyciskanie sztangielek Usiądź na siedzeniu ławki, łokcie oprzyj o modlitewnik, wyprostuj plecy. Zginaj ręce w łokciach unosząc sztangielki i prostuj tak jak na zdjęciu, ćwiczenie możesz także wykonywać...
-
Page 7: Important Safety Information
IMPORTANT SAFETY INFORMATION This product has been designed for home use only and built for optimum safety. Please note the following safety precautions: 1. Before starting any exercise program you should consult your doctor to determine if you have any physical or health conditions that could create a risk to your health and safety, or prevent you from using the equipment properly. -
Page 8: Maintenance
MAINTENANCE Your unit has been carefully designed to require minimum maintenance. To ensure this, we recommend that you do the following: Keep your unit clean by wiping sweat, dust or other residue off with a soft, clean cloth after each use ... - Page 9 SCHEME ASSEMBLY 1. Attach the vertical pipe (10) and the cross bar (11), screw them with M10*90 bolts and M10 nuts. 2. Attach the main frame (15), the crossbar (11), the bracket (13) and fasten them with M10*95 bolts and M10 nuts.
-
Page 10: Training Instruction
Exercises bench is use for abdominal, arms and lower body training. Bench is class H item. Unit is not intended for therapy or rehabilitation. TRAINING INSTRUCTION 1. Warm-Up To prevent injury and maximize performance we recommend that each workout period starts with a warm-up. We suggest you do the following exercise as the sketch map. - Page 11 Wide Stance Squats Take a wide stance with toes pointing out while holding a dumbbell with both hands. While keeping your back straight and head up, bend at the knees until your thighs are parallel with the floor or the dumbbell is just above the floor and not touching it.
-
Page 12: Bezpečnostní Předpisy
BEZPEČNOSTNÍ PŘEDPISY Výrobek je určen výhradně k domácímu použití a byl navržen tak, aby byla zajištěna maximální bezpečnost. Dodržujte následující rady: Před započetím tréninku se poraďte s lékařem za účelem vyloučení překážek ve využívání tohoto cvičebního zařízení. Rozhodnutí lékaře je nezbytné v případě užívání léků majících vliv na činnost srdce, tlak krve a hladinu cholesterolu. -
Page 13: Seznam Dílů
SEZNAM DÍLŮ Č. Popis Č. Popis Rám předkopávání Křížový rám Pěnový válec Rám zádové opěry Rám horní kladky Support Široký adaptér Rám sedáku Sedák Hlavní rám Zádová opěra Vzpěra sedáku Výsuvný stojan Přední rám Zarážka opěry Stabilizítor Bicepsová opěra Osa pěnových válců Rám stojanu NÁHRADNÍ... - Page 14 SCHEME MONTÁŽ 1. Připevněte svislou trubku (10) a příčný nosník (11) a upevněte je pomocí šroubů M10*90 a matic M10. 2. Připevněte hlavní rám (15) příčný nosník (11) podpěru (13) a upevněte je pomocí šroubů M10*95 a matic M10. 3. Připevněte stabilizátor (18) k přednímu rámu (17) a upevněte je pomocí šroubů M10*90 a matic M10.
- Page 15 Lavice pod činku je zařízením určeným k procvičování břišních, ramenních a prsních svalů. Lavice pod činku je zařízením třídy H určeným k domacímu použití. Není určeno k terapeutickým nebo rehabilitačním účelům. CVIKY Cyklus tréninků Vám zaručí zlepšení kondice, růst svalů a ve spojení s dietou a snížením počtu kalorií umožní shodit nadbytečná...
- Page 16 Zvedání činky ve stoje Stoupněte si za lavici, ohněte nohy v kolenou, hřídel si položte na ramena. Provádějte dřepy dle obrázku vlevo. Modlitebník Nastavte si správnou výšku tak, aby jste sedeli vzpřímeně. Prsními svaly se zapřete o modlitebním a lokty položte na opěrku. Začněte přitahovat činky směrem k sobě.
-
Page 17: Technische Daten
1. Vor dem Beginn des Trainings sollten Sie sich von Ihrem Arzt beraten lassen, ob es keine Gegenanzeigen für den Gebrauch des Trainingsgeräts gibt. Die Meinung des Arztes ist vor allem wichtig bei Personen, die Medikamente einnehmen, die Ihre Herzfrequenz, Ihren Blutdruck und Ihren Cholesterinspiegel beeinflussen. -
Page 18: Liste Der Teile
Beschichtung dieses Geräts beschädigen kann. Stellen Sie das Gerät an einem trockenen Ort, um es vor Feuchtigkeit und Korrosion zu schützen. LISTE DER TEILE Bezeichnung Stk. Bezeichnung Stk. Verbindungsrohr Querstange Rolle aus Schaumstoff Rahmen der Rückenlehne Rahmen für Klimmzugstange Stützrohr Klimmzugstange Rahmen des Sitzes Sitz... -
Page 19: Montage
SCHEME MONTAGE 1. Fixieren Sie das vertikale Rohr (10) an der Querstange (11) mittels Schrauben M10*90 und Muttern M10. 2. Befestigen Sie den Hauptrahmen (15) und die Querstange (11) am Stützrohr (13) mittels Schrauben M10*95 und Muttern M10. 3. Fixieren Sie das vordere Rohr (18) am vorderen Rahmen (17) mittels Schrauben M10*90 und Muttern M10. 4. - Page 20 ANWENDUNGSBEREICH Die Trainingsbank ist ein Gerät, das für Übungen der Bauch-, Schulter- und Brustmuskeln geeignet ist. Die Trainingsbank ist ein Gerät der Klasse H, daher ist es ausschließlich für den Heimgebrauch bestimmt. Es darf nicht als ein therapeutisches Gerät gebraucht oder zur Rehabilitation eingesetzt werden. TRAININGSANLEITUNG Übungseinheiten gewährleisten...
- Page 21 Kniebeugen mit Langhantel Stellen Sie sich hinter die Hantelbank. Beugen Sie Ihre Knie und lehnen Sie die Langhantel an Ihre Schultern. Führen Sie Kniebeugen durch und halten Sie die Langhantel so, wie auf dem neben stehenden Foto gezeigt wurde. Bizeps Curls mit Kurzhantel Setzen Sie sich auf die Hantelbank und legen Sie Ihren Ellenbogen auf den Curlpult.
-
Page 22: Karta Gwarancyjna
KARTA GWARANCYJNA Nazwa artykułu:…………………………………………………… Kod EAN:…………………………………………………………. Data sprzedaży:……………………………………………………. WARUNKI GWARANCJI: Sprzedawca w imieniu Gwaranta udziela gwarancji na terytorium RP na okres 24 miesięcy od daty sprzedaży. Gwarancja będzie respektowana przez sklep lub serwis po przedstawieniu przez klienta: - czytelnie i poprawnie wypełnionej karty gwarancyjnej z pieczątką sprzedaży oraz podpisem sprzedawcy, - ważnego dowodu zakupu sprzętu z datą... -
Page 23: Guarantee Card
GUARANTEE CARD Article name:………………………………………………………. EAN code:…………………………………………………………. Date of sale: ……………………………………………………….. GUARANTEE TERMS: The Seller provides guarantee on behalf of the Guarantor within the territory of the Republic of Poland for the period of 24 months from the date of sale: electric power assisted booster 24 months, charger 6 months. The Guarantee will be recognised by the shop or service centre after the client provides: - clearly and correctly filled-in guarantee card with the sale stamp and the seller’s signature - valid purchase confirmation for the equipment including the date of sale / bill, complained product. - Page 24 GARANTIEKARTE Artikelname:…………………………………………………………... EAN-Code:……………………………………………………………. Verkaufsdatum:………………………………………………………... GARANTIEBEDINGUNGEN: Der Verkäufer gewährt im Namen des Garanten eine Garantie für 24 Monate nach dem Verkaufsdatum auf dem Hoheitsgebiet der Republik Polen: Roller 24 Monate, Akku 6 Monate. Die Garantie wird von dem Laden oder dem Service nach Vorlage: - der leserlich und korrekt ausgefüllten Garantiekarte mit Verkaufsstempel und Unterschrift des Verkäufers, - eines gültigen Kaufnachweises für das Gerät mit dem Verkaufsdatum / Rechnung, der beanstandeten Ware durch den Kunden respektiert.
-
Page 25: Záruční List
ZÁRUČNÍ LIST Název produktu:…………………………………………………… EAN kód:………………………………………………………….. Datum prodeje:…………………………………………………….. ZÁRUČNÍ PODMÍNKY: Prodávající jménem Ručitele poskytuje záruku na území Polska po dobu 24 měsíců od data prodeje: skútr 24 měsíců, baterie po dobu 6 měsíců. Záruka bude respektována obchodem nebo servisem po předložení zákazníkem: - čitelně... - Page 26 IMPORTER: ABISAL Sp.Z.O.O., ul. Świętej Elżbiety 6, 41-905 Bytom SERWIS: ul. Pyskowicka 14, 41-807 Zabrze abisal@abisal.pl www.abisal.pl...
Need help?
Do you have a question about the LS7206 and is the answer not in the manual?
Questions and answers