Table of Contents
Advertisement
Available languages
Available languages
Quick Links
Advertisement
Table of Contents

Related Manuals for HMS LSS01


Summary of Contents for HMS LSS01
- Page 1 LSS01 LAVICE NA DŘEPY - SISSY SQUAT TRAINER NÁVOD K OBSLUZE - USER MANUAL...
- Page 2 Bezpečnostní pokyny 1. Před prvním použitím je potřeba seznámit se přesně s návodem a uschovat si jej do budoucnosti. 2. Mějte na paměti všechna upozornění a bezpečnostní opatření včetně montážních kroků. Stroj lze používat pouze k určenému účelu. 3. S ohledem na vlastní bezpečnost by měl být výrobek sestaven a používán v souladu s tímto návodem.
-
Page 3: Technické Specifikace
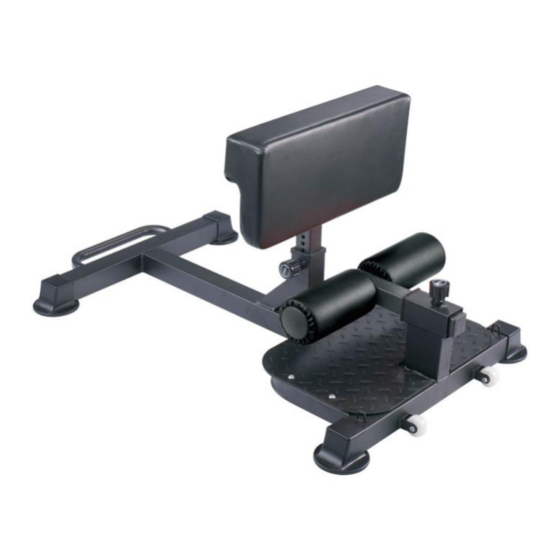
Technické specifikace Rozměry: 60 x 100 x 42/52cm Maximální hmotnost uživatele: 150 kg Hmotnost netto: 12,3 kg Hmotnost brutto: 14,8 kg Údržba Správná údržba přístroje výrazně ovlivňuje jeho životnost. Nesprávná údržba může běžecký pás poškodit nebo zkrátit jeho životnost. Všechny části musí být pravidelně kontrolovány a dotaženy. Opotřebované díly se musí okamžitě vyměnit. - Page 4 MONTÁŽ KROK 1: Otevřete balení a zkontrolujte, zda byly dodány všechny díly Č. Označení dílu Název dílu Počet TR01 Hlavní rám TR02 Opěra TR03 Šroub TR04 Koncovky TR05 Expandéry...
- Page 5 KROK 2: Instalace koncovek Podložky nasaďte na otevřené konce rámu. (Poznámka: rovnoběžně s podlahou). KROK 3: Montáž opěry 1. Povytáhněte hlavu šroubu. 2. Vložte konstrukci opěry do hlavního rámu. 3. Povolte hlavu šroubu.
- Page 6 KROK 4: Nastavení výšky opěry Zatáhněte za hlavu šroubu a nastavte pracovní výšku opěry. KROK 5: Nastavte pracovní polohu zarážky nohou.
-
Page 7: Safety Precautions
SAFETY PRECAUTIONS 1. Read this manual carefully before first using and retain it for future reference. 2. Observe all warnings and preacutions including assembly steps. Use it only for intended purpose. 3. Assemble and use it only according to this manual to assure your safety. Inform all other users about safe usage. -
Page 8: Maintenance
Maintenance Proper maintenance is very important to ensure a faultless and operational condition of the treadmill. Improper maintenance can cause damage to the treadmill or shorten the life of the product. All parts must be checked and tightened regularly. Worn out parts must be replaced immediately. Cleaning Regular cleaning of the striding belt ensures a long product life. -
Page 9: Assembly Instruction
ASSEMBLY INSTRUCTION STEP 1: Open the package to confirm the product components Parts number Name of the part Quantity TR01 Main frame TR02 Backrest TR03 Adjustable bolt TR04 Foot cover TR05 Pull the rope... - Page 10 STEP 2: Install 4 foot covers Cover the foot tube with four bottom legs (note that the four bottom cases are parallel to the ground). STEP 3: Install the backrest 1. Pull the plastic handle screw outward. 2. Put the backrest directly into the main frame. 3.
- Page 11 KROK 4: Dostosowanie wysokości After adjusting the proper height, fasten screw with plastic handle. STEP 5: Adjust the distance.
-
Page 12: Záruční List
ZÁRUČNÍ LIST Název produktu: EAN kód: Datum prodeje: ZÁRUČNÍ PODMÍNKY 24 měsíců pro Prodávající jménem Ručitele poskytuje záruku na území Polska po dobu 24 měsíců od data prodeje: domácí použití. Záruka bude respektována obchodem nebo servisem po předložení zákazníkem: čitelně a správně vyplněného záručního listu s razítkem a podpisem prodávajícího platného doklad o koupi produktu s datem prodeje (účtu) reklamovaného produktu Jakékoli závady a poškození... - Page 13 GARANTIEKARTE Artikelname: EAN-Code: Verkaufsdatum: GARANTIEBEDINGUNGEN 3. Der Verkäufer gewährt im Namen des Garanten eine Garantie für: 24 Monate für den Heimgebrauch. 4. Die Garantie wird von dem Laden oder dem Service nach Vorlage: der leserlich und korrekt ausgefüllten Garantiekarte mit Verkaufsstempel und Unterschrift des Verkäufers eines gültigen Kaufnachweises für das Gerät mit dem Verkaufsdatum / Rechnung/ der beanstandeten Ware...
- Page 14 IMPORTER: ABISAL SP. .Z.O.O., ul. Świętej Elżbiety 6, 41-905 Bytom Service: Pyskowicka 14, 41- 807 Zabrze abisal@abisal.pl www.abisal.pl...
Need help?
Do you have a question about the LSS01 and is the answer not in the manual?
Questions and answers