Table of Contents
Advertisement
Quick Links
Advertisement
Table of Contents

Related Manuals for Honeywell Thor VM1A


Summary of Contents for Honeywell Thor VM1A
- Page 1 Thor VM1A Vehicle-Mounted Computer powered by Android™ User Guide...
- Page 2 Disclaimer Honeywell International Inc. (“HII”) reserves the right to make changes in specifications and other information contained in this document without prior notice, and the reader should in all cases consult HII to determine whether any such changes have been made. HII makes no representation or warranties regarding the information provided in this publication.
-
Page 3: Table Of Contents
Product Service and Repair ....................ix Limited Warranty ........................ix Chapter 1 - About the Computer Features........... 1 About the Thor VM1A Vehicle-Mounted Computer............1 Model Overview..........................2 Features of the VM1A ........................2 Front View - Thor VM1A......................2 Back View - Thor VM1A...................... - Page 4 About the Audio Features ......................24 Adjust Speaker Volume .......................24 Audio Settings ........................24 About the Defroster........................25 Automatic mode........................25 Manual mode..........................26 Configure the Defroster in the Settings App ..............26 Defroster Parameters ......................26 Insert an SD Card.........................27 Equipment Required......................27 Installation Procedure......................27 Scanners............................29 Thor VM1A Vehicle-Mounted Computer...
- Page 5 About the Structure of the Settings App ..............43 About Network Communications ..................54 Connect to a Wi-Fi Network....................54 Connect to an Ethernet Network..................55 How to Connect to Virtual Private Networks...............56 About Wireless Security......................57 About Certificates........................57 About Bluetooth Communications ..................59 Thor VM1A Vehicle-Mounted Computer...
- Page 6 Enhanced Dock with Thor VX8/VX9 Screen Blanking ...........73 VMXD Enhanced Dock for Off-Vehicle Use ..............73 Features of the Dock........................74 Front View - Dock ........................74 Back View - Dock ........................74 Top View - Enhanced Dock ....................75 Dock I/O Pin Cover .......................76 Thor VM1A Vehicle-Mounted Computer...
- Page 7 RAM Clamp Mount........................86 RAM Plate Mount with RAM Ball..................87 Attach RAM Mount Ball to the Dock ................88 Attach Thor VM1A Assembly to RAM Mount ..............88 Install U Bracket Mount or Adapter ..................90 Install Table Stand ........................93 Place Thor VM1A in the Dock ....................95 About the 802.11 Remote Antenna ..................96...
- Page 8 About Software Updates and Cyber Security ..............133 Software Downloads ......................133 Install Software Updates with AutoInstall ..............134 Optional SD Card Method....................135 About the Honeywell Upgrader ................... 135 Install OTA Updates......................135 Restart (Reboot) the Computer................... 138 About an Enterprise Data Reset..................138 Before You Begin ........................
- Page 9 Dimensions..........................152 Thor VM1A ..........................152 VM1D Standard Dock .......................153 VM3D and VMXD Enhanced Dock................153 Environmental Specifications....................153 Thor VM1A and Dock......................153 Port and Connector Pinouts ....................154 Power Supply Connector ....................154 COM1 and COM2 Connector..................155 USB and USB1 Connector ....................156 USB Host/Client Y Cable....................156 USB Host to Scanner Cable....................157...
- Page 10 Thor VM1A Vehicle-Mounted Computer...
-
Page 11: Customer Support
Support to search our knowledge base for a solution or to log into the Technical Support portal. Product Service and Repair Honeywell International Inc. provides service for all of its products through service centers throughout the world. Go to sps.honeywell.com... - Page 12 Thor VM1A Vehicle-Mounted Computer...
-
Page 13: Chapter 1 - About The Computer Features
About the Thor VM1A Vehicle-Mounted Computer The Thor VM1A Vehicle-Mounted Computer (VMC) is a rugged, vehicle mounted computer powered by Android and capable of wireless data communications from a fork-lift truck or any properly configured vehicle. VM1A is built on the Mobility Edge™... -
Page 14: Model Overview
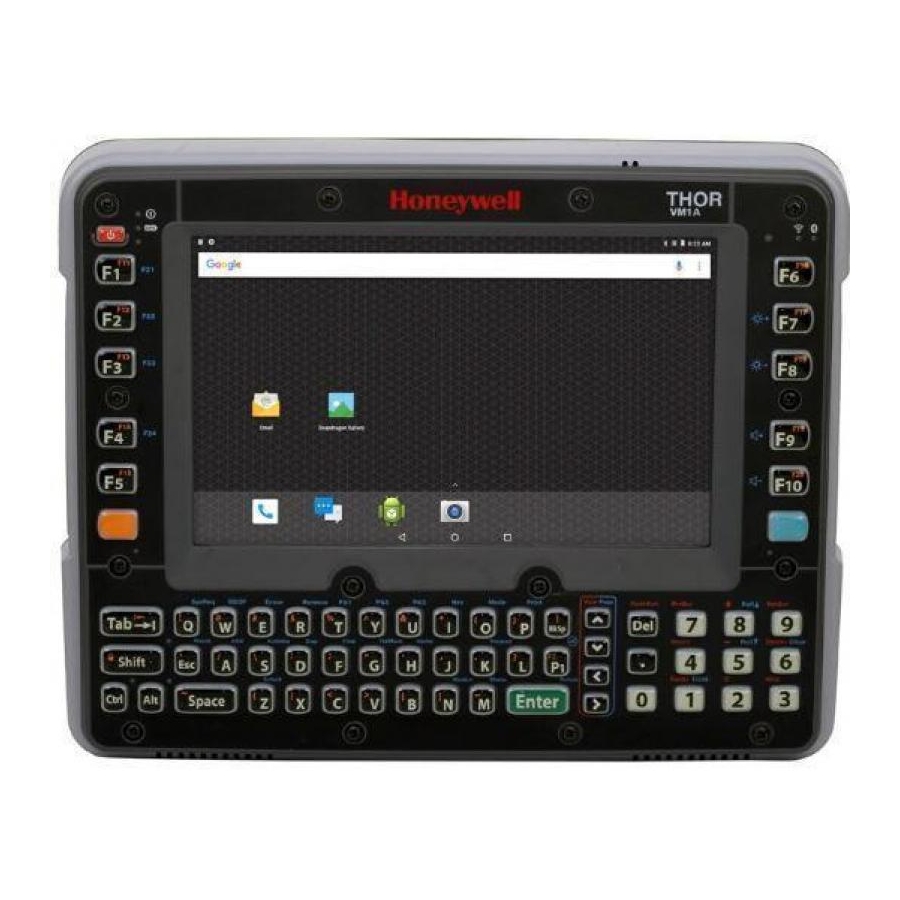
Customer-accessible SD™ slot for removable memory cards up to 512 GB (SDXC/SDHC/SDIO- compliant) Note: To learn more, see Specifications and Reference Materials beginning on page 149. Features of the VM1A Front View - Thor VM1A Power Microphone Button Ambient Light Sensor... -
Page 15: Back View - Thor Vm1A
Back View - Thor VM1A Antenna Connectors UPS Discharge Button Access SD Card Panel Access Panel Dock Contact Pads Provision for Laptop Security Cable Provision for Padlock Quick Release Handle Access Panels - Thor VM1A SIM Access Panel with Door... -
Page 16: Power Management Modes
Power Management Modes The Thor VM1A has three power modes: On, Sleep, and Off. On Mode When the computer is attached to vehicle power, external power supply, or is oper- ating from the UPS battery and the power button is pressed, the computer is in the On mode. -
Page 17: External Ac Power Supply
Charging is disabled if the temperature is outside of the 0° to 35°C safe charging range. In order to maintain UPS charge, the Thor VM1A should have power applied while the unit is within the safe charging range for at least an hour each day. -
Page 18: Backup Battery
(Display Off or Sleep mode). Backup Battery The Thor VM1A has a permanent Lithium battery installed to maintain time, date, and CMOS setup information for a minimum of 90 days. The lithium battery is not user serviceable and should last five years with normal use before it requires replacement. -
Page 19: Fuse
Caution: The UPS battery must be disconnected before you ship the Thor VM1A, Replace the UPS Battery, or Replace the Front Panel. Equipment Required The following equipment is user-supplied: • Torque tool capable of measuring inch pounds • #2 Phillips screwdriver bit Thor VM1A Vehicle-Mounted Computer... - Page 20 SIM label. 5. Locate the small push button. 6. Press the push button to disconnect the UPS. The UPS battery maintains its charge but is disconnected from the power circuitry of the computer. Thor VM1A Vehicle-Mounted Computer...
-
Page 21: Replace The Ups Battery
Torque tool capable of measuring inch pounds • #2 Phillips screwdriver bit Replacement Procedure Caution: Before replacing the Thor VM1A front panel, Disconnect the UPS Battery. 1. Place the VM1A on a clean, well-lit surface before performing the UPS battery replacement. - Page 22 Wiring UPS Battery Foam Pads Connector 8. Locate the retaining tab on the wiring connector for the UPS battery. Press on the tab and gently disconnect the UPS battery wiring. Thor VM1A Vehicle-Mounted Computer...
-
Page 23: About The Battery Status
Use the battery icon in the Status bar to see the charge level of your battery. If you want more detailed information on your battery, such as usage time, charge remaining on the battery, or battery health information, open the Settings app and tap Battery. Thor VM1A Vehicle-Mounted Computer... -
Page 24: Check The Battery Level And Usage
1. Swipe up from the bottom of the Home screen to access all apps. 2. Tap Settings 3. In the Network & internet section, tap the toggle button next to Airplane mode. An airplane icon appears in the status bar to indicate Airplane mode is turned On. Thor VM1A Vehicle-Mounted Computer... -
Page 25: Power On The Computer
Press the power button to turn the computer On. When the Welcome Screen is dis- played or an application begins, the power up sequence is complete. After initial power On, the computer can be configured to automatically power On. Power Management Modes for more information. Thor VM1A Vehicle-Mounted Computer... -
Page 26: Power Cable Cautions
Caution: Regularly inspect power cable for damage, especially in low temperature environments. Contact Technical Assistance replacement cable options. Power Cable Routing Power cable with right-angle connector Power cable with straight connector Avoid sharp bends in this area of the power cable Thor VM1A Vehicle-Mounted Computer... -
Page 27: Power Mode
Power Mode Select the desired power mode behavior. 1. Swipe up from the bottom of the Home screen to access all apps. 2. Tap Settings > Honeywell Settings > Power Mode. 3. Choose one of the following options: • AC/DC •... -
Page 28: Welcome Screen
Unlock the Screen The screen lock automatically activates every time the computer is turned On or when the computer wakes from sleep mode. • Swipe up from the lock icon at the bottom of the screen. Thor VM1A Vehicle-Mounted Computer... -
Page 29: Change The Screen Lock To Protect The Computer
3. Choose one of the following options: • To have the computer automatically adjust the brightness for your work environment, turn on the Adaptive brightness setting. You can tap Adaptive brightness to toggle the feature on or off. Thor VM1A Vehicle-Mounted Computer... -
Page 30: Screen Blanking
On. 1. Swipe up from the bottom of the Home screen to access all apps. 2. Tap Settings > Honeywell Settings > Zoomzone. Motion Detection Action Determine what to do when motion is detected: •... -
Page 31: Zoom Zone
Tap the Show Zoom Area button to show the currently selected zoom area. The selected area is highlighted in red. When finished, tap the back button Test Zoom Area Tap the Test Zoom Area button. • The zoom image is displayed. Thor VM1A Vehicle-Mounted Computer... -
Page 32: About The Keypad
USB Keyboard/Mouse A standard USB keyboard or mouse can be attached to the computer using the appropriate adapter cable. The VM1052CABLE USB Y cable attaches to the dock and provides a type A USB connector. Thor VM1A Vehicle-Mounted Computer... -
Page 33: Keyboard Leds
Pressing the Orange key followed by the Shift key places the system in Caps Lock mode. • To exit Caps Lock mode, press the Shift key again. Neither Orange Key or Caps Lock mode is invoked. Thor VM1A Vehicle-Mounted Computer... -
Page 34: System Leds
System State • Solid White • On, but in Sleep Mode • CPU temperature is less than -20°C. The unit must be moved to Blinking White an environment warmer than -20°C before it will boot up. Thor VM1A Vehicle-Mounted Computer... -
Page 35: Connection Leds
Indicates a ping response has been received within five times of the user specified response time. Indicates no connection to Host. Wi-Fi LED LED Behavior Status Solid White Indicates a connection with an IP address to an Access Point. Indicates no connection to an Access Point. Thor VM1A Vehicle-Mounted Computer... -
Page 36: About The Audio Features
Ring & notification volume Alarm volume Do Not Disturb Set app priority allowances, block visual disturbances, and set automatic rules. Shortcut to prevent ringing Press Power & Volume Up together. Options include: Vibrate or Mute. Thor VM1A Vehicle-Mounted Computer... -
Page 37: About The Defroster
Enable or disable audio sounds when you use the touch screen. About the Defroster Thor VM1A comes equipped with LCD window defroster to support extended use in freezers as well as transitions into and out of freezer areas. The defroster can be set to: •... -
Page 38: Manual Mode
Defroster Setting Description Defroster Enable or Disable the Defroster feature and temperature monitoring. Tap the switch button at the top of the screen to toggle the feature On or Off. The default is On. Thor VM1A Vehicle-Mounted Computer... -
Page 39: Insert An Sd Card
4. Using a #2 Phillips bit loosen the M3 screws and then remove the access panel with the SD label. This panel is on the left hand side when the computer is face down with the top away from the user. Thor VM1A Vehicle-Mounted Computer... - Page 40 7. Reattach the access panel, torquing the screws to 4-5 inch pounds. 8. If removed, reinstall the computer in the dock. 9. Press the Power button to turn on the computer. Thor VM1A Vehicle-Mounted Computer...
-
Page 41: Scanners
VM1A supports external scanners through USB, Serial Port, and Bluetooth. For more information: • Connect a Bluetooth Scanner for connecting Bluetooth Scanners • Connect a Tethered Scanner for connecting a scanner through the serial port • USB Scanner for connecting a scanner through USB Thor VM1A Vehicle-Mounted Computer... - Page 42 Thor VM1A Vehicle-Mounted Computer...
-
Page 43: Chapter 2 - About The User Interface And Applications
ABOUT THE USER INTERFACE AND APPLICATIONS Use this chapter to learn about the user interface and how to interact with the screen. You can also use this chapter to learn about the Honeywell applications on the computer. About the User Interface The Android operating system provides a touch-friendly and easy-to-navigate user interface. -
Page 44: Navigation Buttons
Pending alarm and Alarm is set Airplane mode is turned On. New email Bluetooth is turned On. Computer is connected to a PC with a SD card is full USB cable Synchronizing data Error with sync or sign-in Thor VM1A Vehicle-Mounted Computer... -
Page 45: Remap A Button Or Key
You can change the default function of the physical buttons and keys. 1. Swipe up from the bottom of the Home screen to access all apps. 2. Tap Settings > Honeywell Settings > Keyremap. 3. Tap the plus sign (+). 4. Press the button or key you want to remap. -
Page 46: Restore Default Button Action
To restore the button default action: 1. Swipe up from the bottom of the Home screen to access all apps. 2. Tap Settings > Honeywell Settings > Keyremap. 3. Tap the clean icon 4. Choose the remapped button(s) you want restored to the default setting. -
Page 47: Open Quick Settings
3. Swipe up from the bottom of the screen to access all apps. 4. Tap and hold the icon of the app you want to add. 5. Drag and drop the icon into position on the Favorites tray. Thor VM1A Vehicle-Mounted Computer... -
Page 48: Use Google™ Search
For example, you can slide a notification to the left until the Settings gear is revealed. • Double-tap Tap quickly twice on a web page, map, or other screen to zoom in. Double-tap again to zoom out. Thor VM1A Vehicle-Mounted Computer... -
Page 49: Set The Time Zone
4. Tap Time zone and choose the time zone for your location. Set PCAP Touch Screen Sensitivity Mode To set the PCAP touch screen sensitivity press the Blue Key + F6 to toggle between Normal Mode (stylus/finger/light glove) and Thick Glove Mode. Thor VM1A Vehicle-Mounted Computer... -
Page 50: About Honeywell Applications
Honeywell applications help you troubleshoot and connect your computer to other devices and networks. Some of the applications in this table are located in the Power Tools app. To learn more about Honeywell Power Tools, go to sps.honeywell.com to download the Dolphin Power Tools User Guide. -
Page 51: Applications You Can Download To The Computer
Applications You Can Download to the Computer You can download Honeywell applications to extend the capabilities of the computer. You may need to purchase a license to run some applications. To learn more about the applications described in this section and other Honeywell and select Software >... -
Page 52: About Uemconnect
You can also use Honey- well Launcher together with Honeywell Enterprise Browser to create a single-pur- pose device configuration. If Launcher is not included on your computer model, you can download a trial version of the software for evaluation. After the evaluation period expires, you need to purchase a license. - Page 53 5. Tap Developer options. Thor VM1A Vehicle-Mounted Computer...
- Page 54 Thor VM1A Vehicle-Mounted Computer...
-
Page 55: Chapter 3 - Configure The Computer
Note: The Settings app varies by computer model and OS version. You computer may not include all the features outlined in this section. When you open the Settings app, suggestions may appear at the top of the list. • to expand or collapse the suggestion list. Thor VM1A Vehicle-Mounted Computer... - Page 56 View the computer Bluetooth address. Connection preferences Bluetooth • Use Bluetooth - Turn the Bluetooth radio on or off. • Lists Bluetooth enabled devices in range when the radio is turned on. • Connect to a Bluetooth Device. Thor VM1A Vehicle-Mounted Computer...
- Page 57 Silences notifications for up to two hours. snoozing Notification dot on Displays a dot on the icon for an app with an active notification. app icon Blink light Enables a blinking light to display when a notification is received. Thor VM1A Vehicle-Mounted Computer...
- Page 58 Set the default on-screen text size. Display size Set the default size of items on your screen. Screen saver Set the screen saver. Lock screen Select what to show on the lock screen and when to display new notifications. Thor VM1A Vehicle-Mounted Computer...
- Page 59 Opt in or out of ad personalization features. When this is on, ads are personalized with the activity and information from your Google Account. Usage & diagnostics Automatically send diagnostic, device, and app usage data to Google. By default, this setting is turned off. Thor VM1A Vehicle-Mounted Computer...
- Page 60 In the Settings app, select Safety & Emergency to define emergency contact information Setting Description Emergency View or update medical information and emergency contacts. Information Emergency SOS Define Emergency SOS settings. Emergency Turn Emergency Location Service on or off. Location Service Thor VM1A Vehicle-Mounted Computer...
- Page 61 In the Settings app, select Accessibility to access screen readers, display settings, interaction controls, and audio & on-screen text features to improve accessibility levels. Setting Description ScanWedge Turn ScanWedge Accessibility on or off. Accessibility Touch Gesture Select to use Touch Gesture service to allow multi-touch gestures. Display Thor VM1A Vehicle-Mounted Computer...
- Page 62 • Shortcut from lock screen - Allow feature shortcut to turn on from the lock screen. Text-to-speech output Select and configure the preferred TTS, set language, speech rate and pitch of synthesized voice. Thor VM1A Vehicle-Mounted Computer...
- Page 63 Voice Wedge can be configured to take effect globally or only for an associated application. Web Applications Enables access for the Honeywell Mobility SDK for Web apps and lets you set a port. Thor VM1A Vehicle-Mounted Computer...
- Page 64 Description Wi-Fi Staging Use the Honeywell Wi-Fi Staging app to quickly set up new devices by configuring one device and using it to stage others. Wi-Fi Staging can also be used to enroll devices in an Mobile Device Management (MDM) system by connecting units to a specified network and downloading and installing the specified MDM client app.
- Page 65 Honeywell Android Extension version • Enabling Solution • Mobile Device Management • Touch Panel Version • AMSS • OS Extension SDK version • Second BLE version Build number The current OS version build number on the device Thor VM1A Vehicle-Mounted Computer...
-
Page 66: About Network Communications
To modify a network from your saved list, tap and hold the network name and select Modify. You can do this if you changed your network password. • To view a list of only your saved networks, tap Saved networks. Thor VM1A Vehicle-Mounted Computer... -
Page 67: Connect To An Ethernet Network
3. Tap Ethernet. The Ethernet connection screen shows the current Ethernet connection. By default, the computer assumes a DHCP connection, and that your network has assigned an IP address automatically. 4. (Optional) To assign a static IP address. Thor VM1A Vehicle-Mounted Computer... -
Page 68: How To Connect To Virtual Private Networks
4. Enter any necessary credentials when prompted. 5. Tap Connect. appears in the status bar and a notification is received. To disconnect from the VPN, tap the notification. Edit VPN Information Editing an existing VPN profile be done from the VPN screen. Thor VM1A Vehicle-Mounted Computer... -
Page 69: About Wireless Security
Wi-Fi Protected Access (WPA) • 802.1x Honeywell recommends WPA2 security with PSK (Personal) or 802.1x (Enterprise) key management. Before you set security, you need to enable the radio, set the date, and set the SSID on your computer. To use 802.1x security, you need to load a root certificate on your computer. - Page 70 4. Scroll to the bottom of the screen and tap Disable (for System certificates) or Remove (for User certificates). 5. Tap OK. Note: You can enable a disabled System certificate but if you remove a User certificate, you must install it again to enable it. Thor VM1A Vehicle-Mounted Computer...
-
Page 71: About Bluetooth Communications
1. Swipe up from the bottom of the Home screen to access all apps. 2. Tap Settings > Connected devices > Connection Preferences > Bluetooth. 3. Tap Device name. Type new name and then tap Rename. Thor VM1A Vehicle-Mounted Computer... -
Page 72: Rename Or Unpair A Paired Device
2. Tap Scanner Edge and then tap Pair BT Scanner. 3. Tap the menu icon 4. For Honeywell branded scanners tap Honeywell or for Intermec branded scanners tap Intermec. 5. Scan the Scan to connect barcode displayed on screen. Thor VM1A Vehicle-Mounted Computer... -
Page 73: Unpair A Paired Scanner
USB Troubleshooting • If you have a problem with your workstation computer recognizing the USB device, try downloading and installing the Honeywell-aidc-usb-driver. The driver is part of the Honeywell_Mobility SDK_Android software.zip file. To learn where to get the software, see Developer and Device Management Information on page 62. -
Page 74: Developer And Device Management Information
When Provisioning mode is turned off (disabled): • Configuration barcodes do not scan and process. • \honeywell\autoinstall folders are inaccessible. Note: To learn more about network and security for Honeywell computers with Android operating systems, go to sps.honeywell.com. Thor VM1A Vehicle-Mounted Computer... -
Page 75: Enable Or Disable Provisioning Mode
3. Tap the button to toggle the provisioning On or Off. About Wi-Fi Staging You can use the Honeywell Wi-Fi Staging app to quickly set up new devices by configuring one device and using it to stage others. Wi-Fi Staging can also be used to enroll devices in a Mobile Device Management (MDM) system by connecting units to a defined network and downloading and installing the MDM client app. - Page 76 Basic Configuration Basic configuration includes the most common system settings. 1. Tap Settings > Honeywell Settings > Wi-Fi Staging to launch the Wi-Fi Staging app on the server device. 2. Tap Basic Configs to start the configuration wizard. 3. Select system language. Tap to add a language.
- Page 77 Note: Do not change the default names of .xml files. For example, DeviceConfig.xml is acceptable, but DeviceConfig1.xml is not. 1. Choose one device to act as the server. 2. Tap Settings > Honeywell Settings > Wi-Fi Staging to launch Wi-Fi Staging on the server. 3. Tap Advanced Configs.
- Page 78 To start the Wi-Fi Staging client on an existing device: 1. Set up a server device (see page 63). 2. Tap Settings > Honeywell Settings > Wi-Fi Staging to turn on the client device and launch the Wi-Fi Staging app.
-
Page 79: Log Files
You can define either a spoken word or a key press as the trigger to launch Voice Wedge. 1. Select Settings > Honeywell Settings > Voice Wedge. 2. Tap Trigger Mode. 3. Tap Start Word to define a voice command as the trigger or Key to use a key press. -
Page 80: Associate Applications
Associate Applications By default, Voice Wedge is associated with all applications. You have the option to associate Voice Wedge with a single app. 1. Select Settings > Honeywell Settings > Voice Wedge. 2. Tap Effective Coverage. 3. Tap Single app. -
Page 81: To Use Voice Wedge In An App
2. Tap a data entry field in the app. 3. Say the defined Trigger start word or press the Trigger key. A message indicates, “Waiting for voice input...” 4. Speak normally into the device. The text will populate the selected field. Thor VM1A Vehicle-Mounted Computer... - Page 82 Thor VM1A Vehicle-Mounted Computer...
-
Page 83: Chapter 4 - About The Vm Docks
• I/O ports. • Strain relief provisions for cables. • Headset connection via an adapter cable. When a headset is not attached, the microphone and speakers are active. Thor VM1A Vehicle-Mounted Computer... -
Page 84: Dock Overview
USB2 port provides two USB host ports via an adapter cable Direct USB host type A connection Ethernet RJ-45 Ethernet connection on top of dock Audio Headset connection via an adapter cable Screen Blanking Supported via COM1 and COM2 connectors Ignition Control Supported Thor VM1A Vehicle-Mounted Computer... -
Page 85: Enhanced Dock With Thor Vx8/Vx9 Screen Blanking
Enhanced Dock with Thor VX8/VX9 Screen Blanking This dock is designed for use when the Thor VM1A is replacing a Thor VX8 or Thor VX9. This dock utilizes the existing vehicle wiring from the earlier computer and supports screen blanking through that wiring. -
Page 86: Features Of The Dock
Dock Contact Pads Back View - Dock The connectors on the back of the dock vary by dock model. Standard Dock RAM Ball Strain Relief Clamps Fuse COM 1 Power COM 2 Connector Power Switch Audio Thor VM1A Vehicle-Mounted Computer... -
Page 87: Top View - Enhanced Dock
Top View - Enhanced Dock Only the Enhanced Dock has these connectors on the top. The connectors are located behind the dust plugs. Note: Dock USB Client Port is not supported with VM1A computers. Dock USB Client Port Ethernet Thor VM1A Vehicle-Mounted Computer... -
Page 88: Dock I/O Pin Cover
VM1A cannot be removed from the dock. The pad- lock shackle must be smaller than 3/16” (4.76mm). A cable tie wrap can be used instead of a padlock, if desired. Thor VM1A Vehicle-Mounted Computer... -
Page 89: Laptop Security Cable
The external I/O connectors for the computer are located on the right side of the dock (when viewed from the back). • Power Supply Connector is on the left side of the dock (when viewed from the back). • Antenna connectors are located on the top rear of the computer. Thor VM1A Vehicle-Mounted Computer... -
Page 90: Serial Connector (Com1 And Com2)
Pin 9 is configured to provide +5V, 500mA for an external barcode scanner. • Connect Serial Device for more information. • If a COM port is not being used for a peripheral, it can be used for Screen Blanking Installation when the vehicle is in motion. Thor VM1A Vehicle-Mounted Computer... -
Page 91: Usb Connector(S)
The USB-2 connector is a D-15 female connector located on the back of the dock. See USB2 Connector for connector pinout detail. • Power the VM1A Off before attaching a cable to any port (serial, USB, Audio, etc.). Thor VM1A Vehicle-Mounted Computer... -
Page 92: Ethernet Connector
The Audio connector is a D-15 male connector located on the back of the dock. • Audio Connector for connector pinout detail. • A headset cable attaches to the Audio connector and provides a quick connect connection for a headset. See Connect Headset Cable for more information. Thor VM1A Vehicle-Mounted Computer... -
Page 93: Power Supply Connector
When the computer is ordered with internal antennas, the external antenna connectors are not used. 1. WI-FI (MAIN) (Red label) 802.11 Main External SMA Antenna Connector 2. WI-FI (AUX) (Yellow label) 802.11 Auxiliary External SMA Antenna Connector Thor VM1A Vehicle-Mounted Computer... - Page 94 The internal antennas are not user accessible. External Antennas The external antennas can be remotely mounted on the vehicle (VM1277AN- TENNA) or connected directly to the SMA connectors on the VM1A (VM2276AN- TENNA). See Mount the 802.11 Remote Antenna for instructions. Thor VM1A Vehicle-Mounted Computer...
-
Page 95: Chapter 5 - Mounting And Installing
The vehicle mount holds the dock and the VM1A attaches to the dock. The dock remains attached to the vehicle, however, the computer has a quick release located on the lower rear side that allows the computer to easily be removed from the dock. Thor VM1A Vehicle-Mounted Computer... -
Page 96: Select Mounting Location
VM1A in a vehicle. Install RAM Mount Install U Bracket Mount or Adapter to the vehicle Place Thor VM1A in the Dock. 3. Secure accessories, such as, a scanner holder, to either and integrated or remote mounting bracket. 4. Adjust the computer to the best viewing angle. -
Page 97: Install Ram Mount
For these nuts... Torque to 10-32 lock nuts 17-20in/lb (0-95 - 1.10 N/m) Note: Tools are not supplied by Honeywell. Step 3. Attach the base to the vehicle. RAM Ball Mount 1. Determine the position for mounting the RAM ball base. Be sure to position the RAM bracket to allow access to the switches and ports on the bottom of the computer. -
Page 98: Ram Clamp Mount
Position the lower clamp piece below the beam. Align the bolts with the holes in the lower clamp piece. Place the nylon locking nuts on the bolts and tighten the bolts. Thor VM1A Vehicle-Mounted Computer... -
Page 99: Ram Plate Mount With Ram Ball
(not included) or equivalent fasteners. (Drawing not to scale.) 176 mm 6.99” 76mm 2.99” 100mm 3.94” 200 mm 7.87” 3. If not already attached, attach the RAM ball to the RAM ball plate using three M6 nuts and washers. Thor VM1A Vehicle-Mounted Computer... -
Page 100: Attach Ram Mount Ball To The Dock
RAM ball base. Attach with four M5 screws, flat washers and lock washers. Attach Thor VM1A Assembly to RAM Mount 1. Slip the Size D RAM arm over the ball on the vehicle RAM mount (RAM Ball mount shown). - Page 101 Enhanced dock and either can be used to mount the scanner holder. (Some components omitted for detail clarity.) 2. Attach the RAM ball to the back of the scanner holder. Thor VM1A Vehicle-Mounted Computer...
Need help?
Do you have a question about the Thor VM1A and is the answer not in the manual?
Questions and answers
The on-screen keyboard pops up when the cursor is put into the data field- whether manual or auto tab after a scan, the keyboard comes up. This never used to happen and has just recently started. Can this feature of the on-screen keyboard displaying automatically be removed/reversed?
The context does not provide information on how to disable the automatic display of the on-screen keyboard on the Honeywell Thor VM1A.
This answer is automatically generated
I'm trying to turn off the airplane mode. When looking in settings there is no line to tap the airplane mode to turn it off as the guide says there is.
If there is no option in the settings to turn off Airplane mode on the Honeywell Thor VM1A, try the following steps:
1. Swipe up from the bottom of the Home screen to access all apps.
2. Tap Settings.
3. In the Network & internet section, look for the Airplane mode toggle.
4. If the toggle is missing, restart the device and check again.
5. If the issue persists, check if Provisioning mode is enabled by going to Settings > Honeywell Settings > Provisioning mode and turning it off.
6. If Airplane mode is still not available, consider resetting network settings or contacting support.
This answer is automatically generated