
Related Manuals for CYBEX gold CLOUD G


Summary of Contents for CYBEX gold CLOUD G
- Page 1 CLOUD G/CLOUD G LUX Infant Car Seat Owner’s Manual READ this Owner’s Manual carefully before first use, and keep it for future reference.
-
Page 2: Welcome To Cybex
Thank you for purchasing the CYBEX CLOUD G/CLOUD G LUX. We are proud to bring this German-engineered product to the United States and Canada. We hope the CLOUD G/CLOUD G LUX will make your child’s travel both safer and more pleasant, as well as make installation and use for you as simple as possible. - Page 3 G LUX correctly, even if the installation and use of this Infant Car Seat might seem simple and intuitive. Before the first use of the CYBEX CLOUD G/CLOUD G LUX Infant Car Seat, please make sure you have followed all the steps in the Safety Checklist on pg. 83.
-
Page 4: Table Of Contents
Welcome to CYBEX! ......................2 Registration and Recall Information .................6 Child Usage Guidelines ....................8 Premature Infant Use ....................10 Overview of the CLOUD G/CLOUD G LUX Infant Carrier ..........12 Overview of the CLOUD G/CLOUD G LUX Base ............14 Warnings ........................16 Infant Car Seat Features Rigid LATCH ......................28... - Page 5 Table of Contents FOR STEP-BY-STEP INSTRUCTION VIDEO ON INSTALLING THE CLOUD G/ CLOUD G LUX, SCAN THE QR CODE. Installing and Removing the Infant Carrier Installing the Base Using Rigid LATCH ..............38 Installing the Base Using Lap/Shoulder Belts ............42 Installing the Base Using Lap Belt Only ..............47 Installing the Infant Carrier Only Using Lap/Shoulder Belts ........52...
-
Page 6: Registration And Recall Information
Registration and Recall Information REGISTERING YOUR CHILD RESTRAINT PUBLIC NOTICE FOR CANADIAN CUSTOMERS Please complete the registration card that came with your child restraint and To register your child restraint, return the mail it in immediately or register online. registration card, call 1-877-242-5676, or http://register.cybex- register online at Child restraints could be recalled for safety... - Page 7 Registration and Recall Information CERTIFICATION Regulatory Notice: This Child Restraint system meets all applicable requirements of Federal Motor Vehicle Safety Standard (FMVSS) 213 and Canadian Motor Vehicle Safety Standards (CMVSS) 213 and 213.1. This restraint is certified for use only in passenger and multi-purpose passenger motor vehicles, buses, and trucks equipped with lap/shoulder belt systems.
-
Page 8: Child Usage Guidelines
Child Usage Guidelines WARNING! DEATH or SERIOUS INJURY can occur. This Child Restraint is designed for use by children in REAR-FACING MODE ONLY. To use this Child Restraint properly, children MUST meet the size and age requirements on the following pages. The American Academy of Pediatrics (AAP) recommends keeping children REAR-FACING for as long as possible, until they reach the maximum height or weight for their Child Restraint in REAR-FACING orientation.* Additionally, some states’... - Page 9 MUST DISCONTINUE use of this Child Restraint. After your child outgrows the CLOUD G/ CLOUD G LUX, keep your child REAR-FACING in a convertible or all-in-one car seat as long as the seat allows, according to the manufacturer's specifications, before turning them around to ride FORWARD-FACING.
-
Page 10: Premature Infant Use
Child Usage Guidelines Premature Infant Use Before using this Child Restraint for preterm or low birth weight infants, ensure the Child Requirements are met and follow the guidelines in this section. According to the National Highway Traffic Safety Administration (NHTSA), a properly installed Child Restraint reduces the risk of death by over 70% for infants involved in crashes. - Page 11 Child Usage Guidelines Premature Infant Use The AAP recommends that appropriate hospital staff observe your infant in the Child Restraint for a period of 90 to 120 minutes or the duration of travel, whichever is longer. This period of observation must be performed with the infant properly positioned as described in these instructions and with the Child Restraint placed at an angle that is approved for use in the vehicle.
-
Page 12: Overview Of The Cloud G/Cloud G Lux Infant Carrier
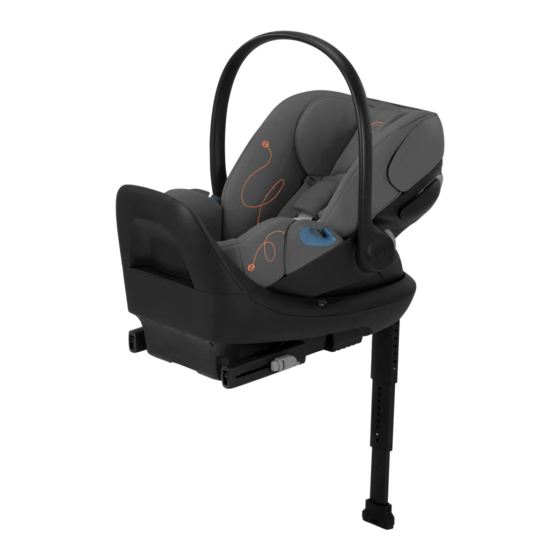
Overview of the CLOUD G/CLOUD G LUX Infant Car Seat Front View 1. Carry Handle 2. Headrest 3. Shoulder Pads (removable) 4. Chest Clip* 5. Infant Insert (removable) 6. Harness Adjustment Button 7. Harness Adjustment Strap 8. Buckle Pad 9. Harness Buckle 10. - Page 13 Overview of the CLOUD G/CLOUD G LUX Infant Car Seat Rear View 1. No Rethread Harness Adjuster Handle 2. Canopy (stored) 3. Recline Release Handle 4. Shoulder Belt Guide 5. Base/Stroller Release Button 6. L.S.P. (stored) 7. Carry Handle Adjustment Buttons (one on each side) 8.
-
Page 14: Overview Of The Cloud G/Cloud G Lux Base
Overview of the CLOUD G/CLOUD G LUX Base Top View 1. Integrated Anti-Rebound 2. Recline Foot Adjustment Handle 3. SafeLock Belt Tensioner 4. Rigid LATCH Connector 5. Rigid LATCH Adjustment Button 6. Rigid LATCH Indicator 7. Level Indicator 8. Load Leg (extended)* 9. - Page 15 Overview of the CLOUD G/CLOUD G LUX Base Bottom View 1. Load Leg (stored)* 2. Load Leg Release Button* 3. Load Leg Foot* 4. Leveling Foot (stored) 5. Rigid LATCH Release * CLOUD G LUX Base only...
-
Page 16: Warnings
WARNING! DEATH or SERIOUS INJURY can occur. AIRBAG WARNINGS Model year 2002 and newer vehicles, refer to your vehicle owner’s manual • DO NOT place a rear-facing before placing this restraint in a seating child restraint on a front seat position equipped with a side air bag. - Page 17 WARNING! DEATH or SERIOUS INJURY can occur. • NEVER install or use this child restraint A crash can cause damage to the child until you have read and understand the restraint that may not be visible. instructions in this manual, your vehicle •...
- Page 18 WARNING! DEATH or SERIOUS INJURY can occur. • ONLY place this child restraint in a • NEVER use this child restraint on boats, vehicle seating location allowed by the low speed vehicles (LSV), all-terrain vehicle manufacturer. To determine vehicles (ATV), golf carts, or any other allowable seating positions, refer to your non-certified application.
- Page 19 WARNING! DEATH or SERIOUS INJURY can occur. • NEVER install this child restraint in USAGE WARNINGS vehicle seats that face the rear or side of • ONLY USE with children who weigh the vehicle. between 1.8 and 15.8 kg (4 and 35 lbs) AND whose height between 43 and 81 cm (17 and 32 in).
- Page 20 WARNING! DEATH or SERIOUS INJURY can occur. • ALWAYS KEEP your child properly • BEFORE each use, ALWAYS CHECK secured in the Harness, especially when that the child restraint is tightly secured in outside the vehicle in Full Recline Mode. the vehicle seat and does not move more than 2.5 cm (1 in) in any direction when •...
- Page 21 LOAD LEG WARNINGS Base with the load leg. (CLOUD G LUX BASE ONLY) • NEVER allow children to play with the • NEVER install in a seating position where belt tensioner or the load leg.
- Page 22 WARNING! DEATH or SERIOUS INJURY can occur. • NEVER use the load leg to recline the car • NEVER USE accessories or parts with seat. The recline adjustment foot on the this child restraint other than those Base is intended to recline the seat. approved by CYBEX.
- Page 23 WARNING! DEATH or SERIOUS INJURY can occur. SEAT BELT WARNINGS • DO NOT use this Child Restraint in a vehicle • ALWAYS read your Retractor equipped with lap belts that vehicle owner's manual only lock during a sudden to determine what stop or crash (Emergency vehicle belts and Locking Retractor - ELR).
- Page 24 WARNING! DEATH or SERIOUS INJURY can occur. • DO NOT use this child restraint with If you have any of these types of vehicle inflatable seat belts. belt systems listed, these are SAFE to use to install your Child Restraint in the vehicle. •...
- Page 25 WARNING! DEATH or SERIOUS INJURY can occur. Lap Belt with Automatic Locking Lap/Shoulder Belt with Sliding Latch Retractor (ALR) Plate with Locking Retractor • The automatic • The latch plate slides locking retractor freely along the lap/ does not allow the shoulder belt.
- Page 26 WARNING! DEATH or SERIOUS INJURY can occur. LATCH and UAS are acronyms for Lower Anchors and Vehicle Top Tether Anchor Points Tethers for CHildren (USA) and Universal Anchorage System (Canada), and refer to a pair of fixed Lower Anchors (or bars) and a Top Tether Anchor that are built into your vehicle, in vehicles built after September 1, 2002.
- Page 27 WARNING! DEATH or SERIOUS INJURY can occur. • The LATCH/UAS system is intended to be used ONLY as described in these instructions. Refer to your vehicle Owner’s Manual for lower anchor bar positions in your vehicle. • In addition to these instructions, read and follow your vehicle owner’s manual regarding installation of the Child Restraint and LATCH/UAS.
-
Page 28: Infant Car Seat Features Rigid Latch
Infant Car Seat Features Rigid LATCH Rigid LATCH is a LATCH/UAS system that connects directly from the Infant Car Seat Base to the vehicle lower anchors with no LATCH/UAS straps. NOTE: Rigid LATCH ships already locked in the recline foot B position. -
Page 29: Safelock™ Belt Tensioner
Infant Car Seat Features SafeLock™ Belt Tensioner The CLOUD G/CLOUD G LUX Infant Car Seat Base is equipped with a SafeLock™ Belt Tensioner that achieves a quick and secure installation when using your lap/ shoulder or lap only vehicle belts. -
Page 30: Linear Side-Impact Protection (L.s.p.) System
• NEVER LIFT OR CARRY the child restraint using the L.S.P. device. The Linear Side-Impact Protection System (L.S.P.) is built into the CLOUD G/CLOUD G LUX. This system enhances the safety of your child in the event of certain side crashes. In order to achieve the best possible protective effect, extend the L.S.P. - Page 31 Infant Car Seat Features Linear Side-impact Protection (L.S.P.) To Extend the L.S.P. device, pull out the L.S.P. device on the side of the Infant Car Seat next to the vehicle door or panel. To Retract the L.S.P. device, depress the button, push the L.S.P.
-
Page 32: Full Recline Backrest
NEVER INSTALL this child restraint in a vehicle when the carrier is in Full Recline Mode. The CLOUD G/CLOUD G LUX Full Recline Backrest can be easily operated with one hand without having to take the child out of the carrier, and the extended leg rest allows the child to lie comfortably in an ergonomically correct position while the handle remains in the carrying position for easier mobility. -
Page 33: No Rethread Harness
Using the seat's No Rethread Harness, the headrest may be adjusted up and down through 12 positions to fit your baby. The CLOUD G/CLOUD G LUX is shipped in the lowest position with the Infant Insert (pg. 64) already in position. -
Page 34: Load Leg (Cloud G Lux Only)
Infant Car Seat Features Load Leg (CLOUD G LUX Only) The CLOUD G LUX Base is equipped with all the standard features shown on pgs. 28-29, and also includes a retractable load leg that helps minimize crash forces on a baby in a frontal crash. - Page 35 Infant Car Seat Features Load Leg (CLOUD G LUX Only) 3. Squeeze the Release Button on the Load Leg and extend the Foot until it rests flat on the vehicle floor. The indicator will turn GREEN. NOTE: There should NEVER be any space between the Load Leg Foot and the vehicle floor.
- Page 36 Infant Car Seat Features Load Leg (CLOUD G LUX Only) Storing the Load Leg When not using the load leg, it should be stored in the load leg storage area under the Base where it cannot be damaged. 1. Retract the Load Leg Foot until fully closed, then rotate back into the stored location.
-
Page 37: Sensorsafe™ Chest Clip (Cloud G Lux Only)
Infant Car Seat Features SensorSafe™ Chest Clip (CLOUD G LUX Only) The CLOUD G LUX is equipped with a SensorSafe chest clip that works with the SensorSafe mobile app which can be downloaded from The Apple App Store® or Google Play™.*... -
Page 38: Installing And Removing The Infant Carrier
Installing and Removing the Infant Carrier Installing with Base Using Rigid LATCH (Recommended Method) 1. Ensure Rigid LATCH is removed from storage and positioned for use (see pg. 28). 2. If equipped, unfold the Load Leg from underneath the Base. NOTE: If necessary, the Base may be installed with the Load Leg folded up underneath the Base. - Page 39 Installing and Removing the Infant Carrier Installing with Base Using Rigid LATCH (Recommended Method) 5. While holding Rigid LATCH, attach both connectors to the vehicle lower anchors. Each should make an audible CLICK! CLICK when attached. Make sure they are attached by pulling firmly on the connectors.
- Page 40 Installing and Removing the Infant Carrier Installing with Base Using Rigid LATCH (Recommended Method) 7. Push the Base until it rests flat against the vehicle seat back. 8. Grab the Base at the Belt Path and pull from side to side and front to back to make sure it is installed correctly.
- Page 41 Installing and Removing the Infant Carrier Installing with Base Using Rigid LATCH (Recommended Method) 9. Press the Release Button on the Load Leg (CLOUD G LUX models only) and extend it until the Foot makes firm contact with vehicle floor. Lock Leg into place using the first hole that will firmly lock it against the vehicle floor.
-
Page 42: Installing The Base Using Lap/Shoulder Belts
Installing and Removing the Infant Carrier Installing with Base Using Lap/Shoulder Belts WARNING! DEATH or SERIOUS INJURY can occur. NEVER install this child restraint using a non-locking vehicle lap shoulder belt. A locking clip must be used with a vehicle belt that DOES NOT LOCK. Call CYBEX Customer Care at 1-877-242-5676 to obtain a locking clip. - Page 43 Installing and Removing the Infant Carrier Installing with Base Using Lap/Shoulder Belts 4. Open SafeLock Belt Tensioner. 5. Route both vehicle belts under the SafeLock Belt Tensioner and through the blue belt guides on both sides of the Base. BUCKLE THE BELT. Make sure the belts lay flat and are not twisted.
- Page 44 Installing and Removing the Infant Carrier Installing with Base Using Lap/Shoulder Belts 6. On the buckle side, first lift up on the shoulder belt to remove slack in the lap belt. Then remove slack from the shoulder belt on the opposite side. At this point, only remove slack from the vehicle belts, being careful not to overtighten.
- Page 45 Installing and Removing the Infant Carrier Installing with Base Using Lap/Shoulder Belts 8. Grab the Base at the Belt Path and pull from side to side and front to back to make sure it is installed correctly. The Base should not move more than 2.5 cm (1 in) in any direction.
- Page 46 Installing and Removing the Infant Carrier Installing with Base Using Lap/Shoulder Belts 10. Check that the Recline 1.8 - 9 kg Angle remained in the (4 - 20 lbs) appropriate range for the 9 - 15.8 kg child's weight. If not, remove (20 - 35 lbs) Base, adjust recline angle Recline Indicator...
-
Page 47: Installing The Base Using Lap Belt Only
Installing and Removing the Infant Carrier Installing with Base Using Lap Belt Only 1. Ensure that Rigid LATCH is in the storage position and, if equipped, unfold the Load Leg from underneath the Base. 2. Position Base on a rear vehicle seat. NOTE: If necessary, the Base may be installed with the Load Leg folded up underneath the Base. - Page 48 Installing and Removing the Infant Carrier Installing with Base Using Lap Belt Only 4. Open SafeLock Belt Tensioner. 5. Route the vehicle lap belt under the SafeLock Belt Tensioner and through the blue belt guides on both sides of the Base.
- Page 49 Installing and Removing the Infant Carrier Installing with Base Using Lap Belt Only 6. On the buckle side, remove slack from the lap belt, being careful not to overtighten. The SafeLock Belt Tensioner will tighten the system fully. NOTE: After removing slack, secure the free end of the lap belt under the SafeLock Belt Tensioner.
- Page 50 Installing and Removing the Infant Carrier Installing with Base Using Lap Belt Only 8. Grab the Base at the Belt Path and pull from side to side and front to back to make sure it is installed correctly. The Base should not move more than 2.5 cm (1 in) in any direction.
- Page 51 Installing and Removing the Infant Carrier Installing with Base Using Lap Belt Only 10. Check that the Recline 1.8 - 9 kg (4 - 20 lbs) Angle remained in the appropriate range for the 9 - 15.8 kg (20 - 35 lbs) child's weight.
-
Page 52: Installing The Infant Carrier Only Using Lap/Shoulder Belts
Installing and Removing the Infant Carrier Installing the Infant Carrier Only Using Lap/Shoulder Belts WARNING! DEATH or SERIOUS INJURY can occur. • NEVER install this child restraint using a non-locking vehicle lap shoulder belt. A locking clip must be used with a vehicle belt that DOES NOT LOCK. Call CYBEX Customer Care at 1-877-242-5676 to obtain a locking clip. - Page 53 Installing and Removing the Infant Carrier Installing the Infant Carrier Only Using Lap/Shoulder Belts 3. Lift shoulder belt over handle and around Infant Carrier. Slide shoulder belt into the blue Shoulder Belt Guide A NOTE: Ensure that the shoulder belt is routed below the L.S.P.
- Page 54 NOTE: The CLOUD G/CLOUD G LUX is allowed to touch the vehicle seat(s) in front of it, as long the recline angle of the CLOUD G/CLOUD G LUX is not affected. FRONT OF VEHICLE LINE MUST BE LEVEL WITH GROUND...
- Page 55 Installing and Removing the Infant Carrier Installing the Infant Carrier Only Using Lap/Shoulder Belts Front of vehicle 8. Grab the Infant Carrier at the Belt Guides and pull from side to side and front to back to make sure it is installed correctly.
-
Page 56: Installing The Infant Carrier Only Using Lap/Shoulder Belts (Alternate)
Installing and Removing the Infant Carrier Installing the Infant Carrier Only Using Lap/Shoulder Belts (Alternate) Use this alternate installation method only when the preferred method found on page 52 does not work with your vehicle Lap and Shoulder belts. WARNING! DEATH or SERIOUS INJURY can occur. - Page 57 Installing and Removing the Infant Carrier Installing the Infant Carrier Only Using Lap/Shoulder Belts (Alternate) 3. LOCK your vehicle lap shoulder belt. Refer to your vehicle Owner's Manual for how your vehicle lap and shoulder belt locks. In many vehicles, you can switch the shoulder belt retractor into locking mode by pulling the shoulder belt out all the way.
- Page 58 LINE MUST BE LEVEL WITH GROUND WHEN INSTALLED WITHOUT BASE The CLOUD G/CLOUD G LUX is allowed to touch the vehicle seat(s) in front of it, as long the recline angle of the CLOUD G/CLOUD G LUX is not affected.
-
Page 59: Installing The Infant Carrier Without Base Using Lap Belt Only
Installing and Removing the Infant Carrier Installing the Infant Carrier Without Base Using Lap Belt Only WARNING! DEATH or SERIOUS INJURY can occur. • ALWAYS have the handle locked while using this child restraint in a vehicle. • NEVER recline back rest when using carrier in vehicle. 1. - Page 60 WHEN INSTALLED WITHOUT BASE front of it, as long the recline angle of FRONT OF VEHICLE the CLOUD G/CLOUD G LUX is not affected. LINE MUST BE LEVEL WITH GROUND WHEN INSTALLED WITHOUT BASE...
- Page 61 Installing and Removing the Infant Carrier Installing the Infant Carrier Without Base Using Lap Belt Only 6. Grab the Infant Carrier at the Belt Guides and pull from side to side and front to back to make sure it is installed correctly.
-
Page 62: Using The Infant Carrier
Using the Infant Carrier Harness Buckle To release Buckle Tongues, firmly press the red button on the Harness Buckle and pull the tongues out. CLICK! CLICK! To fasten, insert each Tongue into Buckle, listening for an audible CLICK. Pull on each to verify a secure connection. - Page 63 Using the Infant Carrier Harness Adjustment Loosen Harness by firmly pressing down the Harness Adjustment Button A while pulling forward on both straps B at shoulder A A B B level. Pull the Adjuster Strap C to tighten the Shoulder Straps. Handle Positions The Handle has four locked positions: To rotate the handle, squeeze BOTH...
- Page 64 Using the Infant Carrier Infant Insert The Infant Insert will help provide a better harness fit for smaller babies, as well as stability for the torso. We recommend using the Infant Insert until the baby weighs about 5 kg (11 lbs) or about 3 months.
- Page 65 Using the Infant Carrier Adjusting the Recline Angle for an Infant Carrier with No Base WARNING! DEATH or SERIOUS INJURY can occur. • It is very important for your child's safety that this child restraint be installed at the correct angle. Failure to properly recline the child restraint on the vehicle seat increases the risk of DEATH OR SERIOUS INJURY.
-
Page 66: Using The Infant Carrier With The Base
The CLOUD G/CLOUD G LUX is allowed to touch the vehicle seat(s) in front of it, as long as the recline angle 3. Install the Infant of the CLOUD G/CLOUD G LUX is not Carrier onto the affected. Base. An audible... - Page 67 Using the Infant Carrier with the Base Removing the Infant Carrier from the Base WARNING! DEATH or SERIOUS INJURY can occur. ALWAYS verify that the handle is LOCKED in the carrying position (see pg. 63) before lifting Infant Carrier by the handle. An unlocked handle could move unexpectedly, causing child to fall out.
- Page 68 Using the Infant Carrier with the Base Adjusting the Recline Angle with the Base WARNING! DEATH or SERIOUS INJURY can occur. • It is very important for your child's safety that this child restraint be installed at the correct recline angle. Before attaching the Infant Carrier to the Base, always check the Level Indicator for the correct recline angle range based on your child's weight.
- Page 69 Using the Infant Carrier with the Base Adjusting the Recline Angle with the Base Adjusting Recline Angle 1. Pull the Recline Foot Adjustment Handle to extend or retract the Leveling Foot until the Base is within the recommended range for your child. There are four recline positions.
-
Page 70: Securing The Child
Securing the Child WARNING! DEATH or SERIOUS INJURY can occur. • ALWAYS check the Harness Buckle to make sure it is securely latched. Failure to fasten and tighten the Harness system correctly with each use can result in DEATH or SERIOUS INJURY. - Page 71 Securing the Child 4. Pull Harness straps over each arm onto shoulders and around the hips. Make sure Buckle Pad and Harness Buckle are between the legs. CLICK! IMPORTANT: MAKE SURE Harness straps are AT OR JUST BELOW child's CLICK! shoulders.
- Page 72 Securing the Child 9. Position the center of the Chest Clip even with the child's armpits. Make sure the Shoulder Pads do not interfere with the placement of the Chest Clip. NOTE: If the Shoulder Pads don't allow a proper fit,they can be removed to provide more space for the Chest Clip.
-
Page 73: Using The Infant Carrier On Aircraft
DEATH or SERIOUS INJURY can occur. • The FAA recommends that children up to 18 kg (40 lbs) use a certified, harnessed child seat while traveling on an airplane. The CLOUD G/CLOUD G LUX is certified for aircraft use if used WITHOUT the Base. - Page 74 . recheck. 6. If using a CLOUD G LUX and your seat is equipped with SensorSafe, unfasten the chest clip. In order to comply with the FAA regulation for Portable Electronic...
-
Page 75: Removing And Replacing Seat Covers
Removing and Replacing Seat Covers WARNING! DEATH or SERIOUS INJURY can occur. • The integrated Harness System cannot be removed from the seat. NEVER remove or attempt to remove parts of the Harness System. • DO NOT damage, remove or dispose of any EPS foam. •... - Page 76 Removing and Replacing Seat Covers 3. If using the Infant Insert, simply remove it from the harness straps. 4. Pull headrest cover forward and unsnap the two snaps to remove it from the harness. 5. Unsnap the two snaps holding the canopy fabric and push canopy forward.
- Page 77 Removing and Replacing Seat Covers 6. Unsnap the three snaps from the top of the plastic shell. 7. Unsnap two dual action snaps at side of carrier. 8. Remove the backrest cover. NOTE: Be sure to remove the bottom corners of the backrest cover from the tabs on the inside of the seat before fully removing the cover.
- Page 78 Removing and Replacing Seat Covers 9. Place the Infant Carrier in Full Recline Mode (pg. 32), then pull the harness buckle out of the seat cover and remove the seat cover from around the Harness Adjuster. 10. Remove the seat cover from the carrier. NOTE: Be sure to remove the rear corners of the seat cover from the tabs on the inside of the seat before fully...
- Page 79 Removing and Replacing Seat Covers 2. Install the seat cover around the Harness Adjuster, then feed the harness buckle into the seat cover. 3. Replace the backrest cover, being sure to pull it over the tabs on the inside of the seat shell.
- Page 80 Removing and Replacing Seat Covers 5. Snap the three snaps at the top of the plastic shell. NOTE: You may need to lift up on the fabric around the edge of the shell to access these snaps. 6. With the canopy fully extended, snap the two snaps holding the canopy fabric in place.
- Page 81 Removing and Replacing Seat Covers 8. Reattach Infant Insert to harness if used. 9. Reattach two shoulder pads to harness. 10. Reconnect harness buckle and chest clip (see pg. 62).
-
Page 82: Care And Cleaning
Care and Cleaning IMPORTANT: NEVER use bleach, household cleaners, or solvents. DO NOT use lubricants of any kind. FOR INSTRUCTION VIDEO ON CARE AND CLEANING, SCAN THE QR CODE. Seat Cover, Shoulder Pads, Infant Insert Harness Buckle and Rigid LATCH Connectors •... -
Page 83: Safety Checklist
Is your child between 43 and 81 cm (17 attached to the Base? and 32 in) in height? If using the CLOUD G LUX Load Leg, is it Is the top of your child's head more than locked firmly against the vehicle floor? 2.5 cm (1 in) from the top of the Infant... -
Page 84: Resources
Make sure your CYBEX CLOUD G/ Please contact our Customer Care CLOUD G LUX is installed correctly by Department, where we have many Child using one of the following: Passenger Safety (CPS) Technicians on staff, with any questions you may have www.nhtsa.gov/cps/cpsfitting/index.cfm... - Page 85 Warranty IMPORTANT: Immediately register your CLOUD G/CLOUD G LUX so we can contact you in the unlikely event of a safety recall. Register online at http://register.cybex-online. com/us/carseats or mail in the separate registration card provided. LIMITED WARRANTY CYBEX warrants to the original consumer purchaser that this product will be free from defects in material and workmanship for two (2) years from the date of original purchase (the “Warranty Period”).
-
Page 86: Warranty
Warranty WARRANTY LIMITATIONS This warranty does not cover the effects of normal wear and tear or damages resulting from negligence, modification, improper installation, accidents, misuse or abuse of this product. It is expressly agreed that the obligations of CYBEX and the original consumer purchaser’s remedies under the limited warranty contained herein are exclusive and are strictly limited to the repair or replacement of the product. - Page 88 CYBEX Industrial Limited Suite 1222, 12/F | Leighton Centre | 77 Leighton Road | Causeway Bay | Hong Kong www.cybex-online.com Distributed in the United States by Columbus Trading Partners USA Inc. 1801 Commerce Drive | Piqua, OH 45356 | USA Tel: 1–877–242–5676 | e-mail: support.americas@goodbabyint.com | www.cybex-online.com ©...
Need help?
Do you have a question about the CLOUD G and is the answer not in the manual?
Questions and answers