Table of Contents
Advertisement
Available languages
Available languages
Quick Links
CYBEX Industrial Limited
Suite 1222, 12/F. | Leighton Centre | 77 Leighton Road | Causeway Bay | Hong Kong |
CLOUD Q with SensorSafe
WWW.CYBEX-ONLINE.COM
Distributed in the United States by Columbus Trading-Partners USA Inc.
Owner's Manual
560 HARRISON AVENUE | BOSTON, MA 02118
TOLL FREE: 1-877-242-5676 | E-MAIL: INFO.US@CYBEX-ONLINE.COM | WWW.CYBEX-ONLINE.COM
Manual del Propietario
READ this Owner's Manual carefully before first use, and keep it for future reference.
© 2015 CYBEX Industrial Limited All rights reserved. Printed in China. This product and its components are subject to change without notice.
Patents pending.
LEA este Manual del Propietario minuciosamente antes de usarlo y guarde para su futura referencia.
Advertisement
Chapters
Table of Contents

Related Manuals for CYBEX gold CLOUD Q with SensorSafe


Summary of Contents for CYBEX gold CLOUD Q with SensorSafe
- Page 1 CYBEX Industrial Limited Suite 1222, 12/F. | Leighton Centre | 77 Leighton Road | Causeway Bay | Hong Kong | CLOUD Q with SensorSafe WWW.CYBEX-ONLINE.COM Distributed in the United States by Columbus Trading-Partners USA Inc. Owner’s Manual 560 HARRISON AVENUE | BOSTON, MA 02118 TOLL FREE: 1-877-242-5676 | E-MAIL: INFO.US@CYBEX-ONLINE.COM | WWW.CYBEX-ONLINE.COM...
-
Page 2: Table Of Contents
WELCOME TO CYBEX! TABLE OF CONTENTS REGISTRATION AND RECALL INFORMATION ....3 USING THE INFANT CARRIER WITH THE BASE ....38 Welcome to the CYBEX family, Statistics show that over 72% of car seats are being used WARNINGS AND IMPORTANT SAFETY INFORMATION ..4 incorrectly! ATTACHING INFANT CARRIER TO BASE ........38 Thank you for purchasing the CYBEX Cloud Q. -
Page 3: Registration And Recall Information
REGISTRATION AND RECALL INFORMATION WARNING! DEATH or SERIOUS INJURY can occur. Please register your product immediately. You may complete the registration card that came with your child restraint and • READ this Owner’s Manual carefully manufacturer. Refer to your vehicle's mail it to us, or register online. - Page 4 WARNING! WARNING! DEATH or SERIOUS INJURY can occur. DEATH or SERIOUS INJURY can occur. of the vehicle itself; a child restraint will DEATH or SERIOUS INJURY may • NEVER LEAVE your child • If using a base, ALWAYS CHECK not protect a child when the vehicle occur.
- Page 5 WARNING! WARNING! DEATH or SERIOUS INJURY can occur. DEATH or SERIOUS INJURY can occur. cannot be secured tightly. A loosely CHECK that the child restraint is tightly • DO NOT USE this child restraint if • DO NOT USE this child restraint with installed child restraint will NOT secured in the vehicle seat and does it has been in a crash.
- Page 6 WARNING! WARNING! DEATH or SERIOUS INJURY can occur. DEATH or SERIOUS INJURY can occur. ADDITIONAL SAFETY using the carrier outside of the vehicle, lifting Infant Carrier by the handle. vehicle seat belts. They may create an ENTANGLEMENT HAZARD for any child especially when in the full recline An unlocked handle could move INFORMATION...
-
Page 7: Overview Of The Cloud Q Infant Carrier
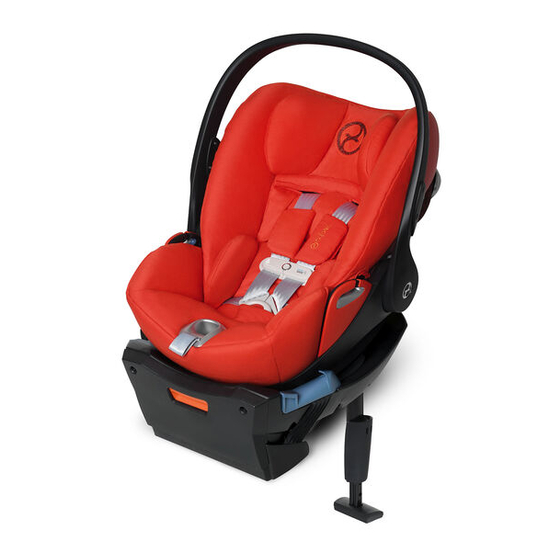
OVERVIEW OF THE CLOUD Q INFANT CARRIER OVERVIEW OF THE CLOUD Q INFANT CARRIER Recline Release Handle TOP VIEW BOTTOM VIEW Carry Handle No Rethread Harness Adjuster Shoulder Belt Guide Headrest L.S.P. device (stored) Shoulder Pads (removable) Base Attachment Rod Canopy (Stored position) SensorSafe Chest Clip L.S.P. -
Page 8: Overview Of The Load Leg Base Us
OVERVIEW OF THE LOAD LEG BASE US OVERVIEW OF THE LOAD LEG BASE US FRONT VIEW REAR VIEW Level Indicator (hidden) Locking Lever Level Adjustment Handle Infant Carrier Attachment Lock Belt Tensioning Plate Belt Tensioning Plate Leveling Foot Locking Lever Belt Guide Steel Chassis LATCH Connector Storage... -
Page 9: Unique Features Of The Cloud Q
UNIQUE FEATURES OF THE CLOUD Q CHILD SIZE REQUIREMENTS CYBEX LINEAR SIDE-IMPACT NO RETHREAD HARNESS PROTECTION (LSP) SYSTEM DO NOT USE THIS CHILD RESTRAINT IF YOUR CHILD The no rethread harness adjusts the DOES NOT MEET ALL OF THESE REQUIREMENTS: harness height through eleven positions A unique telescoping blocker arm, without the need for rethreading. -
Page 10: Using The Infant Carrier
USING THE INFANT CARRIER USING THE INFANT CARRIER HARNESS BUCKLE HANDLE POSITIONS To release Buckle Tongues, firmly press the red button on the The Handle has six LOCKED positions: Harness Buckle and pull the tongues out. 1. DRIVE position AND TRAVEL 2. -
Page 11: Adjusting The Seat
USING THE INFANT CARRIER USING THE INFANT CARRIER ADJUSTING THE SEAT SECURING THE CHILD The seat has a headrest that automatically adjusts the harness 1. Loosen Harness by firmly pressing down on height without the need to rethread it. The car seat may be the Harness Adjustment Button while pulling adjusted up and down through eleven positions to perfectly fit... -
Page 12: Adjusting The Recline Position
USING THE INFANT CARRIER USING THE INFANT CARRIER OUTSIDE OF THE VEHICLE ADJUSTING THE RECLINE POSITION 7. Pull up on Harness Straps to snug around the child's hips while holding the Harness Buckle in place. A new function of the Cloud Q is that it can be reclined to an almost 8. -
Page 13: Vehicle Seat Location Requirements
VEHICLE SEAT LOCATION REQUIREMENTS VEHICLE SEAT LOCATION REQUIREMENTS WARNING! DEATH or SERIOUS INJURY The Cloud Q is allowed to touch the vehicle seat(s) in front of it, as long as the recline angle of the Cloud Q is not affected. can occur The best position for the child restraint is one that is recommended by your vehicle Owner’s Manual, AND allows a proper and... -
Page 14: Using Latch
USING LATCH USING LATCH WHAT IS LATCH? CENTER SEATING POSITIONS LATCH is an acronym for Lower Anchors and Tethers for CHildren If your vehicle does not have Lower Anchors in the center seating and refers to a pair of fixed Lower Anchors (or bars) and a Top position, check your Vehicle Owner’s Manual to see if you are Tether anchor that are built into your vehicle. -
Page 15: Sensorsafe Tm Application
NOTES SENSORSAFE APPLICATION NEVER INSTALL or use this Child Restraint until you have read and understand the instructions in this manual AND in your vehicle Owner’s Manual . If there is a conflict between the two, the vehicle Owner’s Manual must be followed. -
Page 16: Removing And Storing Latch Connectors
REMOVING AND STORING LATCH CONNECTORS USING THE LOAD LEG TO REMOVE FROM STORAGE The Load Leg is an effective safety feature of the Cloud Q and using it is STRONGLY RECOMMENDED. However, if necessary To install the Base using LATCH, the Connectors must be (e.g. -
Page 17: Adjusting The Recline Angle Using The Base
ADJUSTING THE RECLINE ANGLE USING THE BASE INSTALLING THE BASE USING LATCH It is very important for your child's safety that this child 1. Remove LATCH anchors from storage. See page 29. restraint be installed at the correct recline angle. Before 2. -
Page 18: Using Latch
INSTALLING THE BASE USING LATCH INSTALLING THE BASE USING A LAP AND SHOULDER BELT 8. Press the Belt Tensioning Plate down with both 1. Unfold the Load Leg from underneath the Base. Automatic hands, where indicated, until it locks into place. The 2. -
Page 19: Using A Lap Belt Only
INSTALLING THE BASE USING A LAP AND SHOULDER BELT INSTALLING THE BASE USING A LAP BELT ONLY 8. Press the Belt Tensioning Plate down with both hands where indicated, 1. Unfold the Load Leg from underneath the Base. Automatic until it locks into place. The orange Locking Lever will rotate to the 2. -
Page 20: Using The Infant Carrier With The Base
INSTALLING THE BASE USING A LAP BELT ONLY USING THE INFANT CARRIER WITH THE BASE 8. Press the Belt Tensioning Plate down with both Automatic hands, where indicated, until it locks into place. The DO NOT turn ATTACHING INFANT CARRIER TO BASE orange Locking Lever will rotate to the CLOSE position automatically when the Plate is locked. - Page 21 INSTALLING INFANT CARRIER ONLY WITH A LAP/SHOULDER BELT INSTALLING INFANT CARRIER ONLY WITH A LAP/SHOULDER BELT 1. Position the infant carrier on a rear vehicle seat, with the 7. Make sure the vehicle is on level ground. Check the recline FRONT OF VEHICLE handle in the DRIVE position, with the foot end towards angle.
- Page 22 INSTALLING INFANT CARRIER ONLY WITH A LAP/SHOULDER BELT (ALTERNATE) INSTALLING INFANT CARRIER ONLY WITH A LAP/SHOULDER BELT (ALTERNATE) Use this alternate installation method only when the preferred 6. Check the recline angle. Adjust the seat angle until the method found on page 39 does not work with your vehicle Lap red Level Line on the Infant Carrier is level with the and Shoulder belts.
-
Page 23: Using The Linear Side-Impact Protection (Lsp)
INSTALLING THE INFANT CARRIER WITH A LAP BELT ONLY USING THE LINEAR SIDE-IMPACT PROTECTION (L.S.P.) 1. Position Infant Carrier on a rear vehicle seat, ALWAYS USE the L.S.P. device when the Infant Carrier is installed in an outer seating position, either WITH OR with handle in the DRIVE position, foot end firmly against the back of the vehicle seat. -
Page 24: Adjusting The Recline Angle Without The Base
ADJUSTING THE RECLINE ANGLE WITHOUT THE BASE USING THE INFANT CARRIER ON AIRPLANE It's very important for your child's safety that this child The FAA recommends that children up to 40 pounds restraint be installed at the correct angle. (18 kg) use a certified, harnessed child seat while travelling on an airplane. -
Page 25: Care And Cleaning
CARE AND CLEANING CARE AND CLEANING REMOVING THE SEAT COVER INSTALLING THE SEAT COVER SPOT CLEANING HARNESS STRAPS Reverse the removal instructions to reinstall the Seat Cover. Spot clean Seat Covers, Shoulder Pads, Buckle Pad, and the Sponge clean using warm water and mild soap. Air dry. Do not iron. The integrated Harness System cannot be removed Infant Insert as needed with a clean cloth using mild detergent and from the seat. -
Page 26: Safety Checklist
SAFETY CHECKLIST RESOURCES IF YOU NEED HELP... Did you read and understand this Owner’s Manual and all labels If you answered YES to all of these questions, you are good to RECYCLING found on this child restraint? go, and please DRIVE SAFELY! Please contact our Customer Care Department, where we have Once your seat has reached its expiration date, we recommend many Child Passenger Safety (CPS) Technicians on staff, with... -
Page 27: General Information About Sensorsafe
GENERAL INFORMATION ABOUT SENSORSAFE GENERAL INFORMATION ABOUT SENSORSAFE ™ ™ Secure your child into the child restraint as you would normally. The SensorSafe Receiver Plug • The SensorSafe Chest Clip is designed to go into a sleep mode after being clipped for 12 hours. ™... - Page 28 GENERAL INFORMATION ABOUT SENSORSAFE (CONT.) GENERAL INFORMATION ABOUT SENSORSAFE (CONT.) ™ ™ SensorSafe Technology ™ This equipment generates, uses, and can radiate radio frequency energy and, if not installed and used in accordance with the instructions, may cause harmful interference to radio communications. Questions? Comments?: However, there is no guarantee that interference will not occur in a particular installation.
- Page 29 USING SENSORSAFE USING SENSORSAFE ™ ™ 1. INSTALL THE SENSORSAFE RECEIVER. 3. CYCLE THE SENSORSAFE CHEST CLIP. ™ ™ Locate the 16PIN OBDII port in your vehicle. Refer to your vehicle owner’s manual for Your SensorSafe Chest Clip is designed to “go to sleep” if left ™...
- Page 30 USING SENSORSAFE (CONT.) USING SENSORSAFE (CONT.) ™ ™ REPLACING THE SENSORSAFE CHEST CLIP BATTERY. 4. Turn the male side of the Chest Clip over and loosen screws with a small Phillips screwdriver. Remove the cover 1. Loosen Harness by pressing Harness Release Button on the front of the Child Restraint and pulling forward on both Harness Straps.
- Page 31 WARRANTY WARRANTY LIMITATIONS IMPORTANT: Immediately register your Cloud Q so we can contact you in the unlikely event of a safety recall. This warranty does not cover the effects of normal wear and tear or damages resulting from negligence, modification, improper Register online at http://register.cybex-online.com/us/carseats installation, accidents, misuse or abuse of this product.
-
Page 32: Bienvenido A Cybex
¡BIENVENIDO A CYBEX! ÍNDICE ¡BIENVENIDO A CYBEX! ..............61 INSTALACIÓN DE LA BASE ..............92 Estimados padres de familia: Por favor lean y cumplan con estas instrucciones para instalar el REGISTRO E INFORMACIÓN DE RETIRO DEL PRODUCTO ..63 UTILIZANDO EL SISTEMA LATCH ............92 Cloud Q correctamente, aun cuando la instalación y el uso de este Muchas gracias por la compra del Cybex Cloud Q. -
Page 33: Registro E Información De Retiro Del Producto
ADVERTENCIA! REGISTRO E INFORMACIÓN DE RETIRO DEL PRODUCTO MUERTE o GRAVES LESIONES podrían ocurrir. Por favor, complete la Tarjeta de Registro que acompaña su Sistema de Sujeción Infantil y envíela por correo inmediatamente • LEA ESTE Manual del Propietario vehículo para obtener información o regístrese en línea. - Page 34 ADVERTENCIA! ADVERTENCIA! MUERTE o GRAVES LESIONES podrían ocurrir. MUERTE o GRAVES LESIONES podrían ocurrir. • La protección principal para los ocupantes sujeción infantil en un asiento del frente floja y debe estar colocada en una línea carga plegada por debajo de la Base. de un vehículo en un choque es la que tenga bolsa de aire activa.
- Page 35 ADVERTENCIA! ADVERTENCIA! MUERTE o GRAVES LESIONES podrían ocurrir. MUERTE o GRAVES LESIONES podrían ocurrir. • JAMÁS UTILICE este sistema de • ANTES de cada uso, VERIFIQUE infantil si ha estado involucrado en un • NO USE este sistema de sujeción infantil sujeción infantil en una ubicación de SIEMPRE que el sistema de sujeción choque.
- Page 36 ADVERTENCIA! ADVERTENCIA! MUERTE o GRAVES LESIONES podrían ocurrir. MUERTE o GRAVES LESIONES podrían ocurrir. • NO UTILICE este sistema de sujeción • UTILICE el Porta Bebé solamente en • REGISTRE este sistema de sujeción infantil. ESTRANGULACIÓN para cualquier niño que infantil si tiene algún daño o fractura.
-
Page 37: Vista General Del Porta Bebé Cloud Q
VISTA GENERAL DEL PORTA BEBÉ CLOUD Q VISTA GENERAL DEL PORTA BEBÉ CLOUD Q Botón de liberación de Asa de Acarreo VISTA DESDE VISTA DESDE reclinación LO ALTO ABAJO Un arnés ajustable que no Guía del Cinturón de Hombro necesita recolocar las correas Apoyo para la cabeza L.S.P. -
Page 38: Vista General De La Load Leg Base Us
VISTA GENERAL DE LA LOAD LEG BASE US VISTA GENERAL DE LA LOAD LEG BASE US VISTA DESDE LO ALTO VISTA DESDE Indicador de Nivel (oculto) ABAJO Palanca de Bloqueo Manija de Ajuste de Nivel Tope de Sujeción del Porta Bebé Placa Tensora de Cinturones Placa Tensora de Cinturones Pata Niveladora... -
Page 39: Características Únicas Del Cloud Q
CARACTERÍSTICAS ÚNICAS DEL CLOUD Q S REQUISITOS DE TAMAÑO DEL NIÑO EL BRAZO DE PROTECCIÓN LATERAL CONTRA UN ARNÉS AJUSTABLE QUE NO IMPACTOS LATERALES (LSP SYSTEM) NECESITA RECOLOCAR LAS NO UTILICE ESTE SISTEMA DE SUJECIÓN INFANTIL SI EL CORREAS NIÑO NO CUMPLE CON TODOS ESTOS REQUISITOS. Un brazo telescópico bloqueador combinado con una absorción de energía de espuma de Ajusta la Altura del Arnés sin ninguna... -
Page 40: Uso Del Porta Bebé
USO DEL PORTA BEBÉ USO DEL PORTA BEBÉ HEBILLA DEL ARNÉS ASA DE ACARREO Para liberar las lengüetas de la hebilla, presione firmemente el El Asa de Acarreo tiene cuatro posiciones bloqueadas: botón ROJO de la Hebilla del Arnés y jale las lengüetas. 1. -
Page 41: Para Ajustar El Asiento
USO DEL PORTA BEBÉ USO DEL PORTA BEBÉ PARA AJUSTAR EL ASIENTO ASEGURAR AL NIÑO 1. Afloje el arnés oprimiendo firmemente el Botón Ajustador El posicionador Cloud Q Perfect Positioner™ está conformado por un Apoyacabeza, un arnés ajustable que no necesita recolocar las mientras tira de ambas correas hacia adelante. - Page 42 USO DEL PORTA BEBÉ UTILIZANDO EL PORTADOR INFANTIL FUERA DEL VEHÍCULO 7. Tire hacia arriba de las Correas del Arnés para ceñirlas PARA AJUSTAR LA POSICIÓN RECLINABLE alrededor de las caderas del niño mientras sostiene en su lugar la Hebilla del Arnés. Una nueva función del Cloud Q es que permite cambiar a una 8.
-
Page 43: Requisitos De Ubicación En El Asiento Del Vehículo
REQUISITOS DE UBICACIÓN EN EL ASIENTO DEL VEHÍCULO REQUISITOS DE UBICACIÓN EN EL ASIENTO DEL VEHÍCULO ¡ ADVERTENCIA! MUERTE o GRAVES LESIONES podrían ocurrir El Cloud Q S puede tocar el respaldo del (los) asiento(s) en frente, siempre y cuando el ángulo de reclinación del Cloud Q no se vea afectado. -
Page 44: Que Es El Sistema Latch
USANDO EL SISTEMA LATCH USANDO EL SISTEMA LATCH ¿QUE ES EL SISTEMA LATCH? POSICIONES DEL ASIENTO CENTRAL LATCH es un acrónimo de Lower Anchors and Tethers for Children que quiere decir Si su vehículo no tiene Anclajes Inferiores en la posición de asiento ‘anclajes inferiores y correas de anclaje para niños’... -
Page 45: Aplicación Sensorsafe Tm
APLICACIÓN SENSORSAFE NOTAS NUNCA instale ni use este sistema de sujeción infantil hasta que lea y comprenda las instrucciones en este manual y en el manual del propietario del vehículo. Si la información de los dos manuales no concuerda, se debe seguir el manual del propietario del vehículo Este asiento funciona con la aplicación SensorSafe*, que se puede descargar de: App Store o Google Play... -
Page 46: Para Desmontar Y Almacenar Los Conectores Del Sistema Latch
PARA DESMONTAR Y ALMACENAR LOS CONECTORES DEL SISTEMA LATCH USANDO LA PATA DE CARGA PARA SACAR DE ALMACENAMIENTO La pata de carga es una medida de seguridad eficaz del Cloud Q y se RECOMIENDA SU USO. Sin embargo, si es necesario (por ejemplo, Para instalar la base usando LATCH, los conectores deben ser en una posición central con una joroba en el suelo), la base puede ser removidos de sus compartimientos de almacenamiento. -
Page 47: Ajuste Del Ángulo De Reclinación Usando La Base
AJUSTE DEL ÁNGULO DE RECLINACIÓN USANDO LA BASE INSTALACIÓN DE LA BASE UTILIZANDO EL SISTEMA LATCH 1. Saque los anclajes del sistema LATCH del lugar donde están Es muy importante para la seguridad del niño que el Sistema de guardados. Consulte la página 89. Sujeción Infantil quede instalado en el ángulo correcto. -
Page 48: Utilizando El Sistema Latch
INSTALACIÓN DE LA BASE UTILIZANDO EL SISTEMA LATCH INSTALACIÓN DE LA BASE UTILIZANDO DEL CINTURÓN DE REGAZO Y HOMBRO 8. Presione la Placa Tensora de Cinturones hacia abajo con 1. Extienda la Pata de Carga ubicada debajo de la Base. ambas manos, donde aparece indicado, hasta que quede Automático 2. - Page 49 INSTALACIÓN DE LA BASE UTILIZANDO DEL CINTURÓN DE REGAZO Y HOMBRO INSTALACIÓN DE LA BASE UTILIZANDO EL CINTURÓN DE REGAZO ÚNICAMENTE 8. Presione la Placa Tensora de Cinturones hacia abajo con ambas manos, 1. Extienda la Pata de Carga ubicada debajo de la Base. donde aparece indicado, hasta que quede bloqueada en su lugar.
-
Page 50: Uso Del Porta Bebé Con La Base
INSTALACIÓN DE LA BASE UTILIZANDO EL CINTURÓN DE REGAZO ÚNICAMENTE USO DEL PORTA BEBÉ CON LA BASE 8. Presione la Placa Tensora de Cinturones hacia abajo con PARA FIJAR EL PORTA BEBÉ A LA BASE Automático ambas manos, donde aparece indicado, hasta que quede NO girar bloqueada en su lugar. - Page 51 INSTALAR EL PORTA BEBÉ UTILIZANDO EL CINTURÓN DE REGAZO Y HOMBRO INSTALAR EL PORTA BEBÉ UTILIZANDO EL CINTURÓN DE REGAZO Y HOMBRO 1. Coloque el porta bebé el asiento posterior del vehículo, con el asa 7. Verifique el ángulo de reclinación. Ajuste el ángulo del asiento en la posición de MANEJAR, con la punta del extremo colocada hasta que la línea ROJA...
-
Page 52: (Método Alterno)
INSTALAR EL PORTA BEBÉ UTILIZANDO EL CINTURÓN DE REGAZO Y HOMBRO INSTALAR EL PORTA BEBÉ UTILIZANDO EL CINTURÓN DE REGAZO Y HOMBRO (MÉTODO ALTERNO) (MÉTODO ALTERNO) Utilice este método de instalación alterno solamente cuando el 6. Verifique el ángulo de reclinación. Ajuste el ángulo del asiento método preferido que aparece en la página 99 no funciona con hasta que la línea ROJA... -
Page 53: Uso De Protección Linear Contra Impactos Laterales
INSTALAR EL PORTA BEBÉ UTILIZANDO EL CINTURÓN DE REGAZO ÚNICAMENTE USO DE PROTECCIÓN LINEAR CONTRA IMPACTOS LATERALES (L.S.P.) 1. Coloque el Porta Bebé en un asiento posterior del vehículo con UTILICE SIEMPRE el dispositivo L.S.P. cuando el Porta Bebé la punta del extremo colocada firmemente contra el respaldo del esté... -
Page 54: Ajuste Del Ángulo De Reclinación Con Sin Base
AJUSTE DEL ÁNGULO DE RECLINACIÓN CON SIN BASE USO DEL PORTA BEBÉ EN UNA AERONAVE Es muy importante para la seguridad del niño que el Sistema La Administración Federal de Aviación de los Estados Unidos de Sujeción Infantil quede instalado en el ángulo correcto. recomienda que los niños de hasta 40 libras (18 Kg.) de peso utilicen un asiento infantil certificado provisto de arnés al viajar en una aeronave. -
Page 55: Cuidados Y Limpieza
CUIDADOS Y LIMPIEZA CUIDADOS Y LIMPIEZA se conectan a la concha de plástico y retirar la cubierta del PARA RETIRAR LA FUNDA DEL ASIENTO PARA SACAR MANCHAS CONECTORES DEL SISTEMA LATCH respaldo. 12. Recline totalmente el asiento, soltar los broches por debajo de Utilice un paño limpio usando detergente y agua para sacarle Limpie con esponja o lave a fondo con agua tibia los Conectores El sistema de arnés integrado no debe ser removido... -
Page 56: Lista De Puntos De Verificación De Seguridad
LISTA DE PUNTOS DE VERIFICACIÓN DE SEGURIDAD RECURSOS SI NECESITA AYUDA Leyó y entendió completamente este Manual ¿Es la fecha de hoy anterior a la fecha señalada como “No Asegúrese de que el asiento infantil ha sido instalado del Propietario y todas las etiquetas colocadas utilizar después de”... - Page 57 INFORMACIÓN GENERAL ACERCA DE SENSORSAFE INFORMACIÓN GENERAL ACERCA DE SENSORSAFE Abroche al niño en el sistema de sujeción infantil como lo haría normalmente. El enchufe del receptor • El clip para el pecho SensorSafe está diseñado para entrar en modo de suspensión después de estar SensorSafe monitorea el transmisor del clip para el pecho y el vehículo.
-
Page 58: Información General Acerca De Sensorsafe Tm
INFORMACIÓN GENERAL ACERCA DE SENSORSAFE (CONT.) INFORMACIÓN GENERAL ACERCA DE SENSORSAFE (CONT.) Tecnología SensorSafe™* Este equipo genera, usa y puede irradiar energía de radiofrecuencia y, si no se instala y usa de acuerdo con las instrucciones, puede causar interferencia perjudicial en las comunicaciones de radio. No obstante, ¿Preguntas? ¿Comentarios?: no hay garantía de que no se producirá... - Page 59 USO SENSORSAFE USO SENSORSAFE 1. INSTALE EL RECEPTOR SENSORSAFE 3. REALICE UN CICLO DEL CLIP PARA EL PECHO SENSORSAFE Localice el puerto 16PIN OBDII . Consulte el manual del propietario de su vehículo para obtener información sobre su ubicación. Enchufe el receptor SensorSafe El clip para el pecho SensorSafe está...
-
Page 60: Using Sensorsafe Tm
USO SENSORSAFE (CONT.) USING SENSORSAFE (CONT.) CÓMO REEMPLAZAR LA BATERÍA DEL CLIP PARA EL PECHO SENSORSAFE. 4. Voltee el lado macho del clip para el pecho y afloje los tornillos con un desarmador Phillips pequeño. Retire la cubierta 1. Presione el botón de liberación del arnés en la parte delantera del sistema de sujeción infantil y jale ambas correas del arnés hacia adelante para aflojarlo. -
Page 61: Warranty
GARANTÍA LIMITACIONES DE LA GARANTÍA IMPORTANTE: Registre de inmediato su asiento Cloud Q para que podamos ponernos en contacto con usted en el caso poco Esta garantía no cubre los efectos del uso y desgaste normal o probable de una orden de retirar el producto por cuestiones los daños que resulten por negligencia, modificación, instalación de seguridad.
Need help?
Do you have a question about the CLOUD Q with SensorSafe and is the answer not in the manual?
Questions and answers