
Related Manuals for Hanna Instruments HI6421


Summary of Contents for Hanna Instruments HI6421
- Page 1 INSTRUCTION MANUAL HI6421 Advanced Dissolved Oxygen Benchtop Meter Hanna Instruments Inc., 584 Park East Drive, Woonsocket, RI 02895 USA www.hannainst.com...
-
Page 2: Table Of Contents
All rights are reserved. Reproduction in whole or in part is prohibited without the written consent of the copyright owner, Hanna Instruments Inc., Woonsocket, Rhode Island, 02895, USA. Hanna Instruments reserves the right to modify the design, construction, or appearance of its products without advance notice. -
Page 3: Preliminary Examination
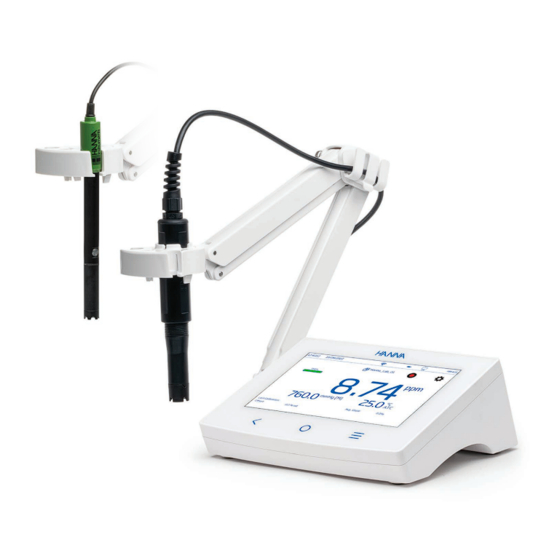
Preliminary Examination 1. PRELIMINARY EXAMINATION HI6421 is an advanced dissolved oxygen benchtop meter with a large touchscreen display and streamlined design. HI6421is delivered with either an optical dissolved oxygen probe (HI7641133) or a polarographic probe (HI764833). Benchtop models HI6421‑01 US power plug HI6421‑02... -
Page 4: User Interface - Icons
User Interface – Icons 3. USER INTERFACE – ICONS Capacitive keys Description Back – return to a previous hierarchical menu level Home – access to measurement screen & configured profile Menu – access to Users, System Settings, Measurement Settings, Log Recall, Help Main menu Description Users –... - Page 5 User Interface – Icons Log recall Description Table view, function active / not selected Graph view, function active / not selected Information view, function active / not selected General Description Profile Background operation in progress Alarm enabled Stability / Autohold indicator Unstable Stable Autohold...
-
Page 6: General Description & Intended Use
General Description & Intended Use 4. GENERAL DESCRIPTION & INTENDED USE HI6421 is an advanced benchtop meter with a capacitive display, comprised of a housing and an integrated dissolved oxygen (DO) measurement module. ® Compact and easy to operate, HI6421... -
Page 7: Main Features
General Description & Intended Use Capacitive touchscreen with multi‑touch support The benchtop unit has a 7‑inch color display with 800×480p resolution. The capacitive, multi‑touch screen supports video playback and data plotting. 4.1. MAIN FEATURES Measurement & Calibration • Measure DO expressed as: ›... -
Page 8: Specifications
Specifications 5. SPECIFICATIONS 5.1. INSTRUMENT 0.0 to 600.0 % saturation Range 0.00 to 90.00 mg/L (ppm) concentration 0.1 % saturation Resolution 0.01 mg/L (ppm) Accuracy Refer to probe used Points One or two points at 100.0 % (8.26 mg/L) and 0.0 % (0.00 mg/L) Automatic Type Manual (user entered value in % saturation, mg/L, or ppm) - Page 9 9 Specifications Range −20.0 to 120.0 °C; −4.0 to 248.0 °F; 253.2 to 393.2 K Resolution 0.1 °C / 0.1 °F / 0.1 K Temperature* Accuracy Refer to probe used Compensation Automatic or Manual Temperature user calibration 1 point, configurable Manual Salinity Compensation...
-
Page 10: Optical Probe (Hi7641133)
Specifications 5.2. OPTICAL PROBE (HI7641133) 0.0 to 500.0 % saturation Range 0.00 to 90.00 mg/L (ppm) concentration 0.1 % saturation Resolution Dissolved 0.01 mg/L (ppm) Oxygen ±1.5 % of reading ± 0.01 mg/L (ppm) for 0.00 to 20.00 mg/L (ppm) ±5 % of reading for 20.00 to 50.00 mg/L (ppm) Accuracy ±1.5 % of reading ±... -
Page 11: Polarographic Probe (Hi764833)
11 Specifications 5.3. POLAROGRAPHIC PROBE (HI764833) 0.0 to 300.0 % saturation Range 0.00 to 45.00 mg/L (ppm) concentration Dissolved 0.1 % saturation Resolution Oxygen 0.01 mg/L (ppm) Accuracy ±1.5 % of reading ±1, least significant digit Range 0.0 to 50.0 °C / 32.0 to 122.0 °F / 273.2 to 323.2 K Resolution 0.1 °C / 0.1 °F / 0.1 K Temperature Accuracy... -
Page 12: Functional & Lcd Description
Functional & LCD Description 6. FUNCTIONAL & LCD DESCRIPTION 6.1. MAIN UNIT Front View 1. LCD display 3. Home key 2. Back key 4. Menu key LCD Description 14:17:32 26/01/2023 Admin Concentration 8.74 Autohold 25.5 760.0 mmHg ° C Last Calibration 26/01/2023 14:14:53 % Sat % Sat 100.0... - Page 13 13 Functional & LCD Description Status Area 10:23:14 09/16/2022 Admin Continuously displayed after powering the unit, status area runs horizontally across the top of the LCD screen. • Top left – current time & date System Measurement • Middle – connectivity status Log Recall Users Help Settings...
-
Page 14: Probes
Functional & LCD Description 6.2. PROBES HI7641133 Optical Probe 1. Cable 2. Cable relief 3. Probe body 4. Temperature sensor 5. Optical window 6. Embedded O sensitive luminophore with oxygen‑permeable black protective layer 7. Smart Cap 8. DIN Connector DETAIL A 1. Alignment key 2. -
Page 15: Getting Started
15 Getting Started HI764833 Polarographic Probe 1. Cable 2. Cable relief 3. Probe body 4. Temperature sensor 5. Ag/AgCl anode and reference 6. Glass insulator / platinum cathode 7. Oxygen permeable PTFE membrane 8. Screw cap 9. O‑ring seal 10. DIN Connector HI76483 Clark‑Type Polarographic probe has a thin, 12 mm (0.47”) design that allows for convenient measurement in narrow vessels such as test tubes, wine bottles, and Biological Oxygen Demand (BOD) bottles. -
Page 16: Using The Adapter
Getting Started Cable holder clip The holder is delivered with a cable holder clip (attached) that secures several cables whilst allowing them to move freely with the arm motion. 1. To open the latch, press the clip inward while pulling up the latch. 2. - Page 17 17 Getting Started Using the Optical Probe 1. Squeeze to depress the two locking wings. Push the adapter up to remove. 2. Align the flat surface on the probe with the snap fit guides on the adapter. 3. Push the probe in. 4.
-
Page 18: Using The Holder
® Hanna aims to ensure meter compatibility with USB printers but can not ensure compatibility with all models. HI6421 can print directly to certain models of USB‑dedicated printers with PCL printer language capability. Printer components and requirements • Printer, PCL driver compatible •... -
Page 19: Language And Regional Preferences
19 Getting Started 7.5. POWERING THE UNIT, SELECTING OPERATING LANGUAGE AND REGIONAL PREFERENCES 1. Connect the power adapter (included) to 24 V power socket located on rear panel of meter. 2. Connect power adapter to wall outlet. 3. Press the black ON/OFF power button. At start up, the meter briefly displays the initialization screen. -
Page 20: System Menu Items
System Menu Items 8. SYSTEM MENU ITEMS (Menu key) to access System Menu screen. Note: Once multiple users are set up users must have previously logged in to access System Menu. 10:23:14 09/16/2022 Admin System Measurement Users Log Recall Help Settings Settings Display Brightness System Menu capacitive icons Symbol... - Page 21 21 System Menu Items On first access, “Admin” is the default user name and no password is required. Default options are updated from the Users menu. Function Administrator* Standard User Enable account creation – Reset password – Delete account – Assign administrator rights –...
- Page 22 System Menu Items 12. Tap again to add additional user information. The present Users information screen will open. There are 4 information boxes (part of log records if desired) that may be filled with credentials. The user may also fill out FTP details. 12:40:12 09/16/2022 Users...
- Page 23 23 System Menu Items Configure user settings Name, Password, assigned avatar color, Full Name, information fields, FTP‑dedicated fields, Email Address • To edit option, tap field and use the on‑screen keypad to input information. • Use the FTP dedicated fields and e‑mail address for file transfer of logged data. Note: Entering a valid e‑mail address is required for file sharing.
-
Page 24: System Settings
System Menu Items 8.2. SYSTEM SETTINGS System Settings is the second item under the System Menu. Network, Connect & Print, System tabs permit users to navigate system settings and operations, configure network connection and architecture, connectivity and printing services, change system settings, and view meter information. - Page 25 25 System Menu Items Network Data sharing options: Ethernet, Wi‑Fi, or Disabled With connection established, IP assignment can be set as: • Dynamic – IP Address, Gateway, Netmask, DNS Server are auto assigned • Static – network details are entered manually Input network information 1.
- Page 26 System Menu Items • Sending emails: log file transfer via email. Note: Email address is entered under User. Printer Supported printer types: Standard, Thermal • Select Standard Format to print on an international (ISO) or North American (ANSI) paper size standard. • Select Receipt Format to configure information to be printed on a receipt format. Print document options: Network, USB Printer, Flash Drive •...
- Page 27 27 System Menu Items System Options: Time, Date, Language, Meter ID, Decimal Separator, Backlight Saver, Beepers, Startup Tutorial, Factory Settings, Reset User Note: Use the scroll bar to view or select from entire settings list. Time & Date to enable (disable): • Set Automatically (meter must be connected to the internet) ` Direct selection from scrollable list of options ` UTC options: from UTC 00:00 to UTC+14:00...
- Page 28 System Menu Items (or corresponding tab) to enable (disable) following settings: Decimal Separator: comma or period, depending on regional preference Backlight Saver: enabled, 1 to 60 minutes (or disabled) If the backlight turns off after the set period of time, tap screen to turn it back on. Beeper: Key, Alarm, Stability When enabled, an audible signal alerts users in the event of a wrong key press, an alarm condition, or the stability threshold being exceeded.
- Page 29 29 System Menu Items Reset User Option restores default settings for this user. All user specific data is permanently deleted, with the exception of username, password, and sensor calibration. Log files and configured profiles are permanently deleted. When option invoked, the instrument asks for confirmation. Info Info displays meter, channel, and Wi‑Fi information.
-
Page 30: Measurement Settings
System Menu Items 8.3. MEASUREMENT SETTINGS Measurement Settings is the third item under the System Menu and allows setting calibration, reading, temperature, view, alarms, logging, and measurement profile options. Note: This function can also be accessed from the Measurement screen directly. 10:23:14 09/16/2022 Admin System... -
Page 31: Log Recall
31 System Menu Items Automatic Temperature Source Manual Temperature Unit °C, °F, K Temperature Manual −20.0 to 120.0 °C; −4.0 to 248.0 °F; 253.2 to 393.2 K User Temperature Calibrate Calibration Clear View View Type Basic, Simple GLP, Full GLP, Graph, Table High / Low DO 0.0 to 600.0 % Sat Alarms... - Page 32 System Menu Items • A log (file) can store 1 to 50 000 records i.e. saved measurement data points. • A single user can store a maximum of 1 000 000 data points. • Removing or deleting logs frees up log space for additional log files. View Data can be viewed, plotted (graph), or tabulated (complete with date, time, notes).
- Page 33 System Menu Items icon and scroll through USER, LOG, INSTRUMENT, CHANNEL, GLP DATA information. Select (Deselect) All To export to a USB‑A flash drive: (Log Recall) to access the Log Recall. 1. Tap 2. Tap Select All button to select all log files. With all files selected, tap Delete to empty the log or tap Share to transfer data.
- Page 34 5. Transfer completion is confirmed and the instrument returns to Log Recall screen. HI6421 can act as an FTP server (host) or client. Meter has to be connected to the internet and Allow FTP access to meter enabled. See System Settings section, Connect & Print tab.
- Page 35 System Menu Items How to connect the meter to an FTP server and share logs 1. In Users menu, type selected server’s IP address, username, and password. 2. From System Menu, tap . Log Recall screen opens up. 3. Select file(s) for transfer. 4.
- Page 36 System Menu Items Email Meter has to be connected to the internet and Enable sending emails enabled (see System Settings, Connect & Print section). to access the Users menu and input email address. 1. From System Menu, tap to access Log Recall. 2.
- Page 37 System Menu Items Web server Any browser can be used to access the web server and download log files. Meter has to be connected to the internet and Enable meter web server enabled (see System Settings, Connect & Print section). Note: Both the meter and the device the browser is accessed from have to be connected to the same network.
-
Page 38: Help
System Menu Items 8.5. HELP Help is the fifth item under the System Menu. • Tap to access support and navigate through an overview of system’s main functions. 10:23:14 09/16/2022 Admin Measurement System Users Log Recall Help Settings Settings Display Brightness • Tap video to play (stop) video‑supported segments: ` 1.5. -
Page 39: Measurement & Probe Setup Menu
Measurement & Probe Setup Menu 9. MEASUREMENT & PROBE SETUP MENU From the Measurement screen, tap to access system and measurement configuration tabs. Alternatively, tap (Menu key) then 12:40:12 10/01/2023 Admin Hanna_01 8.74 Stable 760.0 25.0 mmHg ° C 9.1. CALIBRATION Options: Last Calibration, Standard Entry Type, Calibration Reminder, User Pressure Calibration Last Calibration: calibrate or clear a previous calibration Standard Entry Type... -
Page 40: Reading
Measurement & Probe Setup Menu 9.2. READING Options: Stability Criteria, Unit, Reading Mode, Pressure Source, Pressure, Pressure Unit, Salinity, Salinity Unit Stability Criteria Options: Accurate, Medium, Fast Allows users to set the stability criterion based upon the setting selected. While the measurement is changing, the stability indicator is shown partially ( );... -
Page 41: Temperature
41 Measurement & Probe Setup Menu 12:40:12 10/02/2023 Admin Hanna_01 8.74 Autohold 760.0 25.0 ° C mmHg Last Calibration 02/02/2023 Avg. Slope: 100.0% O set: 0.0 % sat Pressure Source, Value, Unit Users can configure the meter‑integrated barometer. Note: The meter’s integrated barometer may be calibrated under Calibration tab. Source must be set to Automatic. •... -
Page 42: View
Measurement & Probe Setup Menu Temperature Unit: Celsius, Fahrenheit, Kelvin degrees User Temperature Calibration: Calibrate or Clear (with Automatic Temperature Source selected only) New temperature calibration procedure 1. Tap Calibrate. 2. Place the probe and a reference thermometer into a stirred container of water. Allow for the reading to stabilize. - Page 43 Measurement & Probe Setup Menu Basic Screen displays the measured values, measurement unit, stability and temperature compensation status / source. 12:40:12 10/01/2023 Admin Hanna_01 8.74 Stable 760.0 25.0 mmHg ° C Simple GLP Simple GLP screen displays: last calibration date and time, offset value, and average slope (as well as data displayed in Basic screen).
- Page 44 Measurement & Probe Setup Menu Full GLP Full GLP screen displays: probe symbol, calibration information , and temperature source (as well as data displayed in Simple GLP screen). 14:17:32 26/01/2023 Admin Hanna_01 8.74 Autohold 760.0 25.5 mmHg ° C 26/01/2023 14:14:53 Last Calibration % Sat % Sat...
-
Page 45: Alarms
Measurement & Probe Setup Menu Table When Table is selected, the measured values are displayed tabulated (complete with date, time, and notes made during logging). The newest data is displayed on the top of the table. 9.5. ALARMS Options: High/Low DO value, High/Low Pressure, High/Low Temperature Users can set the threshold limits for the measured parameters. -
Page 46: Logging
Measurement & Probe Setup Menu 9.6. LOGGING Options: Logging Type, Sampling Period, File Name, Log Note, Log Info, Sample ID Logging Type • Automatic: data is logged automatically at predefined time intervals (i.e. Sampling Period). ` A file name is automatically generated, complete with year/month/day, and log starting time (e.g., 20220329_085101‑do_auto.CSV). -
Page 47: Profiles
Measurement & Probe Setup Menu Sample ID Manual and autohold samples can be labelled with a numerical ID (increments with each new sample logged), a text label, or a text label with numerical ID. With Increment selected: 1. Tap Sample ID. 2. -
Page 48: Calibration
The accuracy of dissolved oxygen measurement is directly related to the sensing surface cleanliness and calibration technique. Oily coatings and biological contaminations are the primary cause of calibration drift. A standard solution or a reference DO meter may be used to compare readings during calibration. HI6421 HI6421P support: •... - Page 49 Calibration 1. Remove the shipping cap. 2. Slide the O‑ring on the probe tip. Do not roll or twist the O‑ring. 3. Use syringe to sparingly lubricate the O‑ring with grease. Avoid getting grease or fingerprints onto the optical window. 4.
-
Page 50: Do Calibration
Calibration 10.2. DO CALIBRATION Guidelines • Rinse the probe with purified water. • Shake any remaining solution off the probe. No droplets should remain on the DO sensor sensing surface. • For measurements across a temperature gradient (when water temperature is drastically different from the standard), allow the probe to reach thermal equilibrium before conducting calibrations or making measurements. - Page 51 51 Calibration 6. Wait for “Stable” to appear before confirming the standard. After the reading has stabilized, tap Confirm Standard. The calibration point is added to the tray. 7. Tap Save. The meter returns to Measurement screen. Single‑Point Calibration at 0 % Saturation (0 mg/L) or 100 % Saturation (8.26 mg/L) Follow steps steps 1‑5 under two‑point calibration.
-
Page 52: Pressure Compensation
Measurement 10.3. PRESSURE COMPENSATION Both concentration (mg/L and ppm) and % saturation values vary with pressure. Automatic Pressure Source • Select Automatic under Pressure Source to use meter’s integrated barometer. Manual Pressure Source 1. Use a reference barometer to obtain the true local barometric pressure reading source. Note: Do not use the weather‑reported barometric pressure readings as local references as readings are corrected for altitude and only show sea‑level values. -
Page 53: Measurement Tips
Measurement • Set Salinity value if measuring ocean or brackish water samples. • Carefully lower the probe into sample so no trapped air bubbles at the Cap. • Routinely inspect the probe for biofouling. Routinely clean off the probe with clean water (between measurements). -
Page 54: Direct/Autohold Readings
Logging 11.4. DIRECT/AUTOHOLD READINGS Direct / Autohold reading is a reading mode located under the Reading tab and identified by icon on the meter. When selected, the meter will wait until stability criteria is met and once met it will hold the value and display icon. -
Page 55: Automatic Logging
55 Logging Three logging types are available: Automatic, Manual, and Autohold. Automatic logging • Readings are logged ( ) at predefined period intervals. Sampling interval options range from 1 second to 180 minutes. • Records are continuously added to it until the session stops. •... -
Page 56: Manual Logging
Logging 6. During active logging, users can track and log notes. To add a new log note: • Tap • Use on‑screen keypad to enter text. • Tap to log entered note. Log Recall view and .CSV log indicate the added log notes. Autohold with Automatic logging 1. -
Page 57: Autohold Logging
57 Logging Autohold with Manual logging 1. Select Direct/Autohold in the Reading Mode (Reading tab). 2. Select Manual under Logging Type (Logging tab). The meter will find a measurement to hold once the meter meets its stability criteria. symbol is displayed. Autohold 3. -
Page 58: Maintenance
Maintenance .CSV file format naming convention Files within a data package have the measurement unit automatically included in the file name. Manual or Autohold logged files retain the distinction between different reading modes in the file name. Users have the option to input file name: •... - Page 59 Maintenance Cleaning the Smart Cap • Use a mild detergent and a soft‑bristled toothbrush to clean. • Rinse with water after cleaning and dry with a laboratory tissue. • Hydrate in purified water before use. Note: Smart Caps need to be replaced every year. Smart Cap Replacement ®...
-
Page 60: Polarographic Probe (Hi764833)
Maintenance Smart Cap Replacement Procedure 1. Turn off the meter and unplug the probe. Note: Verify time and date are properly set on the meter, prior to new cap initialization. 2. Clean off the probe body and dry off with cloth. 3. -
Page 61: Error Messages
61 Error Messages Membrane Cap Replacement New probe: unscrew the shipping cap and save. Probe in use: unscrew the old cap. 1. Take one O‑ring and one membrane cap and position the O‑ring (1) in the cap (2). 2. Rinse the membrane cap with electrolyte and discard. 3. -
Page 62: Abbreviations
Abbreviations 16. ABBREVIATIONS Comma‑Separated Values File Transfer Protocol Good Laboratory Practice Manual Temperature Compensation Nitrile Butadiene Rubber Polyetherimide PMMA Polymethyl Methacrylate PTFE Polytetrafluoroethylene Standard Temperature and Pressure 17. ACCESSORIES DO SOLUTIONS HI7040L Zero oxygen solution set, 500 mL + 12 g HI7041S Refilling electrolyte solution, 30 mL OTHER ACCESSORIES... -
Page 63: Certification
If service is required, contact your local Hanna Instruments office. If under warranty, report the model number, date of purchase, serial number (see engraved on the bottom of the meter) and the nature of the problem. -
Page 64: Regulatory Notices For The Wi-Fi Module
Regulatory Notices for the Wi‑Fi Module REGULATORY NOTICES FOR THE WI‑FI MODULE United States (FCC) FCC ID: 2ADHKATWINC1500. This device complies with Part 15 of the FCC Rules. Operation is subject to the following two conditions: (1) this device may not cause harmful interference, and (2) this device must accept any interference received, including interference that may cause undesired operation.
Need help?
Do you have a question about the HI6421 and is the answer not in the manual?
Questions and answers