
Related Manuals for LELY ASTRONAUT A3


Summary of Contents for LELY ASTRONAUT A3
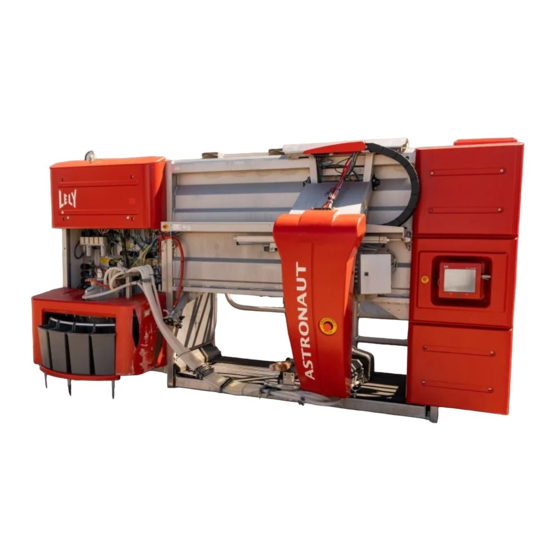
- Page 1 Lely Industries N.V. Dairy Equipment ASTRONAUT A3 Milking Robot Operator Manual D-H001.0609EN English Original...
-
Page 3: Trademarks, Copyright And Disclaimer
Cosmix, Discovery, E-link, Fertiliner, Gravitor, Grazeway, Hubble, Lely Center, Lelywash, Luna, Pura, Shuttle, T4C, Time for Cows and Viseo are registered trademarks of the Lely Group. The right of exclusive use belongs to the companies of the Lely Group. All rights reserved. The information given in this publication is provided for information purposes only and does not constitute an offer for sale. -
Page 5: List Of Included Amendments
LIST OF INCLUDED AMENDMENTS Issue Date Chapter(s) Remarks (yy/mm) 0609 Initial Issue... -
Page 7: Preface
All information in this manual has been compiled with care. Lely shall not be liable for errors or faults in this manual. The recommendations are meant to serve as guidelines. All instructions, pictures and specifications in this manual are based on the latest information that was available at the time of publication. -
Page 8: Registration
The Type and Serial Number Plate is attached to the right front (RH models) or left front (LH models) of the Astronaut milking robot. Always include the type and serial numbers of your milking robot when you contact your local Lely service provider or order spare parts. Type and Serial Number Plate We suggest you complete the table below with the type and serial numbers of your milking robot. -
Page 9: Maintenance Authorization
• Product Specialist (certification valid for one year). During training, a trainee is permitted to work for up to a maximum of six months on an ASTRONAUT A3 Milking Robot in the presence of a certified technician. When the training program is completed successfully, Lely issue a certificate and a service pass to the technician. -
Page 10: Local Maintenance Contact Number
Local Maintenance Contact Number We suggest you write the telephone number and email address of your local maintenance contact in the table below. This makes sure you can easily find the information. Telephone number email address... -
Page 11: Table Of Contents
Table of Contents Trademarks, Copyright and Disclaimer List of Included Amendments Preface Manual Contents Applicability Registration VIII Maintenance Authorization Local Maintenance Contact Number Introduction Milking Robot 1.1.1 Box 1.1.2 Machine Room 1.1.3 Robot Arm Assembly 1.1.4 X-link Control Panel Tank Room Office Compressor Safety... -
Page 12: Milking Robot
Emergency Stop Buttons Specifications Milking Robot 3.1.1 Dimensions and Weight 3.1.2 Operation Area Compressor Unit 3.2.1 Type 3.2.2 Dimensions and Weight 3.2.3 Output Description and Operation Introduction Description 4.2.1 Milking Robot 4.2.2 Udder and tail shaving 4.2.3 Operator Interfaces 4.2.4 Cleaning System 4-12 4.2.5 Alarm System 4-14... - Page 13 6.9.2 Change Sample Rack 6-11 6.9.3 Stop Sampling 6-11 6.10 Alarm Handling 6-13 6.10.1 Clear Active Alarms 6-13 6.10.2 Suppress Active Alarms 6-13 6.11 Cleaning System 6-14 6.11.1 X-link 6-14 6.11.2 CRS+ 6-17 6.12 Milking 6-18 6.12.1 First Milking 6-18 6.12.2 Interrupt a Visit 6-19 6.12.3 Interupt Pre-Treatment...
- Page 14 7.19 Examine the vacuum pump oil level 7-22 7.20 Measure the Temperature of the Hot Cleaning Water 7-23 7.21 Measure the Concentration of Astri®-L 7-24 7.22 Replace the Filter Element of the Single Filter 7-25 7.23 Replace the Filter Element of the Twin Filter 7-27 7.24 Replace the Teat Cup Liners...
- Page 15 11.1.6 RH Width Dimensions (Metric) 11-4 11.1.7 RH Length Dimensions (Imp) 11-4 11.1.8 RH Width Dimensions (Imp) 11-5 Spare Parts 12-1 12.1 Tools and Equipment 12-1 12.2 Consumable Materials 12-2 12.3 Spare Parts 12-3 Glossary of Terms 13-1 Index 14-1...
-
Page 17: Box
INTRODUCTION The Astronaut milking robot is part of an automated milking system that milks, feeds, and monitors the health of cows. The milking system also examines the quantity and quality of the milk received from the cows, and if necessary, it separates milk that is contaminated or not to the correct standard. A transmitter on each cow enables the system to identify the cow via a unique number, and a management system maintains specific records for each cow. -
Page 18: Machine Room
The feed assembly is installed at the front of the box and also contains the antenna that identifies the cow to the milking system. 1.1.2 Machine Room The machine room is installed at the rear of the box. The machine room contains most of the parts of the milking, cleaning and control systems. -
Page 19: Tank Room
The X-link is connected to the T4C Network and communicates with the management system and the CRS+. Tank Room The tank room contains the system that makes sure the milk is stored correctly. The tank room has two primary parts: •... - Page 20 KEY: 1. Box - 2. Feed Assembly - 3. Entrance/Exit Gates - 4. Robot Arm - 5. Weighbridge - 6. X-link - 7. Machine Room Astronaut Milking Robot (LH Model) Introduction...
- Page 21 KEY: 1. Box - 2. Machine Room 3. - Entrance/Exit Gates - 4. Weighbridge - 5. X-link - 6. Robot Arm - 7. Feed Assembly Astronaut Milking Robot (RH Model) Introduction...
- Page 22 Introduction...
-
Page 23: Safety
SAFETY Introduction The safety alert symbol identifies important safety messages on your ASTRONAUT A3 Milking Robot and in the manual. When you see this symbol, be alert to the possibility of personal injury or death. Follow the instruction of the safety message. -
Page 24: General Safety
Make sure EVERYONE who operates, maintains or works near the milking robot obeys the safety precautions. Do not risk injury or death by ignoring good safety practices. • Astronaut A3 owners must train operators before they operate the milking robot. This training must be repeated at least annually •... -
Page 25: Operating Safety
Do not look directly into the laser light • Keep the working area as clean and as dry as possible • Contact your nearest Lely service provider if you have any questions • Review safety related items with all operators frequently (annually). 2.3.5 Maintenance Safety •... - Page 26 Chemical Hazards (Swallowing/Burning) Chemical Hazards Symbol (except Canada and USA) Chemical Hazards Symbol (Canada and USA) May cause serious burns to fingers or hands. WARNING Obey all applicable health and safety rules. Avoid contact between the cleaning agent and your skin or eyes. Wear gloves, safety goggles and protective clothing.
- Page 27 Stop the milking robot, turn off electrical power at the master panel and wait WARNING for all moving parts to stop before doing maintenance, adjustment or repair. Disconnect and switch off the main electrical power switch. Laser Light Hazard Type one Laser Light Hazard Symbol (except Canada and USA) Type two Laser Light Hazard Symbol (except Canada and USA) Laser Light Hazard Symbol (Canada and USA) Class 2 laser product.
- Page 28 No Admittance for Unauthorized Persons No Admittance for Unauthorized Persons Symbol Only persons who have read and understood all applicable safety instructions WARNING are permitted to enter the area. Pinching Hazard Pinching Hazard Symbol (except Canada and USA) Pinching Hazard Symbol (Canada and USA) Danger of being pinched by moving parts.
- Page 29 Pressure Limit Pressure Limit Symbol Make sure the pressure limit shown on the decal is not exceeded. Too high pressure CAUTION may cause injury to persons and/or damage to equipment. Temperature Hazard Type One Temperature Hazard Symbol (except Canada and USA) Type Two Temperature Hazard Symbol (except Canada and USA) Temperature Hazard Symbol (Canada and USA) Do not touch the cleaning system components until they have cooled.
-
Page 30: Maintenance Of Safety Decals
• Replace safety decals that are missing or are illegible • Safety decals can be purchased from your local Lely service provider. 2.4.3 Installation of Safety Decals 1. Make sure the installation surface is clean and dry. - Page 31 Position of Emergency Stop Buttons LH Model Position of Emergency Stop Buttons RH Model Safety...
- Page 32 2-10 Safety...
-
Page 33: Specifications
SPECIFICATIONS Milking Robot 3.1.1 Dimensions and Weight • Height: 229 cm (90.16 in) • Length: 423 cm (166.54 in) • Width: Arm extended: approx. 198 cm (77.95 in) Arm retracted: approx. 180 cm (70.87 in). • Weight: approx. 1550 kg (3410 lb.). Refer to the Diagrams in Chapter 10 for the complete dimensions of the milking robot. - Page 34 Specifications...
-
Page 35: Description And Operation
ASTRONAUT A3 milking system operate together to milk a cow. The information in this chapter is for operators of the ASTRONAUT A3 milking system. Refer to the Corrective Maintenance Manual for a complete description of the ASTRONAUT A3 milking system. - Page 36 Example of the Connection of the Parts of the ASTRONAUT A3 Milking System 1 = Milking Robot, 2 = T4C Network, 3 = PC, 4 = Alarm Box (separate or integrated), 5 = CRS+, 6 = Milk Storage Tank, 7 = Milk Delivery System...
-
Page 37: Description
Description 4.2.1 Milking Robot The milking robot works at optimum efficiency if the cows are milked several times a day. To make sure the milking robot is used to its full capacity, the milking robot is animal friendly and becomes a familiar object within the herd. - Page 38 CRS+ The CRS+ controls and monitors the milking system. The keypad enables the user to give commands to the milking system, change values, and navigate through the CRS+ menu that is shown on the display panel. The display panel also shows reports and alarms. CRS+ Interface CRS+ Keypad The keys on the keypad have the following functions:...
- Page 39 The ESC key To leave the menu and to step up in the menu structure. The RMO key To empty the milk tank. The RESET alarms key To reset alarms. The PROG key To change the filter in the twin filter. The USER key To define specific output settings.
- Page 40 In this manual the arrow up and arrow down are not shown, the menu is extended and all the options are shown. Example menu Option 1> Option 2 Option 3 Option 4 Option 5 In this manual the following annotation is used when the operator must select Sub 2: Example menu >...
- Page 41 X-Link Touchscreen Navigation in the X-Link Menu When you navigate through the X-Link menu, selected items are displayed as follows: • Selected tabs: come to the front • Selected menu items: change to a blue rectangle with text • Selected buttons: appear pushed in. Pop-up Windows The following table gives the names of the pop-up windows and a description of their function.
- Page 42 Name Description Interrupt To interrupt the pre-treatment of the udders. pre-treatment Interrupt connection To interrupt the connection of the teat cups to the cow. cups Interrupt milking To interrupt the milking of the cow. Continue milking To continue the milking process after you interrupted it. Prolong Milking To extend the duration of the milking.
- Page 43 Settings Tab Settings Tab name: This tab contains system settings that operators and maintenance personnel can change. There are two submenus: • Settings • Advanced settings. Operators must not change settings in the submenu Advanced settings. CAUTION The Settings submenu includes: •...
- Page 44 System Tab System Tab name: This tab shows the components used in the milking robot. It also contains the menus to put the milking robot into and out of operation, and move the robot arm to the home position. T4C Tab Tab name: This tab enables the operator to communicate with the T4C software.
- Page 45 If the operator does not confirm the alarms the buzzer is automatically enabled again. • Extra cleaning This button starts an extra main cleaning, a Lely wash, short rinse, sTDS cleaning, Astri -L, Astri -LIN or ®...
-
Page 46: Cleaning System
-cid' or 'Astri -lin'. ® ® ® Lely wash Process During a Lely wash, the following messages are displayed on the Tab [ ] in the frame Cleaning: • On the first line: The status is: 'Lelywash'. • On the second line: The status is: 'Milk cup flush' •... - Page 47 • On the third line: The status is: Astri or 'Astri -cid' or 'Astri -lin'.. ® ® ® Cleaning with a cleaning agent (Astri®-L) at a temperature of more than 40 °C CAUTION (104 °F) may cause equipment damage. The teat cup tops are cleaned and the installation is rinsed with cold or lukewarm water (and Astri®-L cleaning agent, if necessary).
-
Page 48: Alarm System
Main Cleaning Process During a main cleaning, the following messages are displayed on the Tab [ ] in the frame Cleaning: • On the first line: The status is: 'Cluster cleaning'. • On the second line: The status is: 'Milk cup flush' The status is: 'Blow empty milk' The status is: 'Pre rinse' The status is: 'Main wash'... - Page 49 The alarm system combines the following functions: • Collection of active alarm messages • Makes alarms audible by buzzer, and also speech message by phone • Makes alarms visible on the display panels • Identifies alarm priorities • Resets alarms •...
- Page 50 Alarm as shown on the CRS+ display Type of alarm CRITICAL ALARM Airpressure too low shortly NORMAL ALARM Boiler not empty after cleaning NORMAL ALARM Cleaning temp. not reached NORMAL ALARM Cow (tag <UL1>) identified, no data avb. NORMAL ALARM Cow (tag <UL1>) leaves box before end of visit NORMAL ALARM Cow (tag <UL1>) too long in box...
- Page 51 Alarm as shown on the CRS+ display Type of alarm NORMAL ALARM Time out startup comp. <P1> NORMAL ALARM Time out startup by user (<US1> Sec.) NORMAL ALARM Visit cow needs supervision CRITICAL ALARM Airpressure too low shortly CRITICAL ALARM CRS+: Time out communication Astronaut <US1>...
- Page 52 Alarm as shown on the CRS+ display Type of alarm NORMAL ALARM Failure data exchange T4C NORMAL ALARM All buckets M4Use filled NORMAL ALARM Tank cleaning does not start NORMAL ALARM Buffer vessel full Critical alarms always generate a telephone call during the day and the night. This Note: cannot be changed.
- Page 53 The screen shows an example. Note: Alarm History All alarms and phone calls are stored in CRS+. On the CRS+: > > Main Menu Alarm system History of alarms 01/30 CRS+ Phone line unavailable 12/24 CRS+ External alarm The screen shows an example. Note: Range: 0 ...
- Page 54 4-20 Description and Operation...
-
Page 55: Installation
INSTALLATION There is no installation information in this manual. Installation... - Page 56 Installation...
-
Page 57: Operating Instructions
OPERATING INSTRUCTIONS Start the System System 1. Select Tab [ Restart 2. In the field Robot operation, select [ 3. Wait for a maximum of 10 seconds, then make sure: 1. The following pop-up windows appear: Choose startup mode Calibration robotarm. 2. -
Page 58: Calibrate The Robot Arm
Calibrate the Robot Arm 1. Select the pop-up window: Calibration robotarm. Start 2. Select [ 3. Make sure: • The robot arm moves up, out, up again and then forward to the limits of all the cylinders • The robot arm stops at the fully forward position. Accept 4. -
Page 59: Start The Milking Robot
Start the Milking Robot 1. Select the pop-up window Choose startup mode. 2. Select one of the following modes: Normal Short rinse Empty boiler 3. Select [ 4. Make sure all components have the status Running. Operating Instructions... -
Page 60: Put The Milking Robot In Operation
Put the Milking Robot In Operation Process 1. Select the Tab [ 2. If the text is Out of operation: 1. Select: 2. If the button changes to and then to , the milking robot is in operation. 3. If the button only changes to and the text in the field Progress is Cleaning in progress, select and make sure the button changes to... -
Page 61: Take The Milking Robot Out Of Operation
Take the Milking Robot Out of Operation It is possible to take the milking robot out of operation with the X-link (page 6-5) or the CRS+ (page 6-5). 6.5.1 Take the Robot Out of Operation (X-link) When the milking robot is in operation: 1. -
Page 62: Extra Feed
Extra feed 6.6.1 Switch on Extra Feed On the X-Link: 1. Select: 2. The button changes to [ ] and the milking robot gives extra feed every 20 seconds. 3. When a new cow is recognized or 10 portions are given, the button changes to [ ] and the extra feed stops. -
Page 63: Empty The M4Use Buckets
Empty the M4Use buckets On the X-Link: 1. Select: 2. A popup window appears with the text The following buckets are free/in use: Empty all 3. If there is information in the lines 1, 2, 3 and 4, and every M4Use bucket is empty, select [ 4. -
Page 64: Empty The Milk Tank
Empty the milk tank 1. Make sure the milk hose from the milk tanker is connected to the milk tank. 2. On the CRS+ select: > > > Main Menu Settings Cleaning system settings Milk reception 3. Identify the configuration of the system. 4. -
Page 65: Sampling
Sampling 6.9.1 Preparation 1. Select: < Sampling 2. A new tab [ ] opens. 3. In the field Sampling device, Use shuttle, select [ Next 4. Select [ Open 5. When the screen changes to Connect the Shuttle now, when finished press next, select [ ] in the field Valve sampling. - Page 66 2. Type the correct value in the calculator. ENTER 3. Select [ 16. Make sure the value in the field No. of empty bottles for alarm is correct. 17. If necessary: Change 1. Select [ 2. Type the correct value in the calculator. ENTER 3.
-
Page 67: Change Sample Rack
6.9.2 Change Sample Rack On the X-Link: Sampling 1. Select Tab [ 2. Select Change in the field Progress. 3. When the screen changes to Sample rack, Current rack number: Change 1. Select [ 2. Type the correct value in the calculator. ENTER 3. - Page 68 Sample Unit 6-12 Operating Instructions...
-
Page 69: Alarm Handling
6.10 Alarm Handling 6.10.1 Clear Active Alarms On the CRS+: 1. Select: > > Main Menu Alarm system Clear alarm list ENTER 2. Press [ If the cause of the alarm is removed, a reset on the milking robot will also clear the Note: alarm on the CRS+. -
Page 70: Cleaning System
6.11 Cleaning System 6.11.1 X-link Start Main Cleaning with X-link 1. Select: < 2. A pop-up window appears with the text The following types of cleaning can be started manually. 3. In the field Main cleaning, select: Automatic Start Astri®-LIN Main Cleaning (X-link) 1. - Page 71 Request a Main Cleaning with Astri®-CID by X-link 1. Select: < 2. A pop-up window appears with the text The following types of cleaning can be started manually. 3. In the field Main cleaning, select: Astri®-cid Rinse the Milkline (X-link) 1.
- Page 72 2. A pop-up window appears with the text The following types of cleaning can be started manually. 3. In the field Local, select: Short rinse Start a Lelywash (X-link) 1. Select: < 2. A pop-up window appears with the text The following types of cleaning can be started manually. 3.
-
Page 73: Crs
6.11.2 CRS+ Start Automatic Main Cleaning (CRS+) 1. Select: > > Main Menu Cleaning system Start maincleaning Enter 2. Press [ Start Astri®-LIN Main Cleaning (CRS+) 1. Select: Main Menu > Cleaning system > Start main Cleaning Hypo Enter 2. Press [ Start Astri®-CID Main Cleaning (CRS+) 1. -
Page 74: Milking
6.12 Milking 6.12.1 First Milking If a cow enters the box for the first time, no teat coordinates are known in the system. Note: 1. When the cow goes into the box and is recognized, and the pop-up window Presence of user is needed because: appears, select [ 2. -
Page 75: Interrupt A Visit
6.12.2 Interrupt a Visit Process 1. Select Tab [ Interrupt visit 2. In the field Progress, select [ 3. When the pop-up window Confirm user interruption of this visit appears: Failed Succeeded 1. In the field Visit is:, select [ ] or [ Stop 2. -
Page 76: Prolong Milking
6.12.5 Prolong milking Process 1. Select Tab [ Prolong milking 2. In the field Milking select [ Prolong 5 min 3. When the pop-up window appears, select [ 6.12.6 Interrupt Post Treatment Process 1. Select Tab [ Interrupt post treatment 2. -
Page 77: Preventive Maintenance
PREVENTIVE MAINTENANCE Preventive Maintenance Schedule The following table shows the preventive maintenance schedule for the ASTRONAUT A3 Milking Robot defined by Lely. Preventive maintenance must also be done as specified by local regulations. The frequencies of the tasks shown in the table are the minimum frequencies Note: recommended. - Page 78 Maintenance Tasks Frequencies Hours Day Week Month Year Operating Milkings Hours Examine Concentration of Astri®-L (page 7-23) Examine the Teat Cup Liners (page 7-20) Replace the Teat Cup Liners (page 8-10 silicon 10.000 7-27) rubber 2500 Test the Temperature of the Hot Cleaning Water (page 7-22) Examine the Compressor and Air Dryer (page 7-10)
-
Page 79: Clean The Bleed Holes
Clean the Bleed Holes 1. Take the milking robot out of operation with the X-link (page 6-5). 2. Move the Robot Arm to the Service Position. 3. Clean the bleed hole (1) in each teat cup with the bleed hole needle. 4. -
Page 80: Clean The Outside Of The Teat Cups
Clean the Outside of the Teat Cups Do not use a high pressure cleaner to clean the teat cups. Damage to the teat cups CAUTION may occur. 1. Take the milking robot out of operation with the X-link (page 6-5) 2. -
Page 81: Clean The Robot Arm And The Box
Clean the Robot Arm and the Box Do not use a high pressure cleaner when you clean the robot arm and the box.The CAUTION robot arm contains many electronic parts. A high pressure cleaner may cause damage to these parts. 1. -
Page 82: Clean The Stds Screen
Clean the sTDS Screen 1. Take the milking robot out of operation with the X-link (page 6-5). 2. Move the Robot Arm to the Service Position. Only clean the sTDS screen with Astri®-TDS. The use of other fluids can cause CAUTION damage to the sTDS screen. -
Page 83: Clean The X-Link Touch Screen
Clean the X-link Touch Screen 1. Select: < 2. Clean the X-link touch screen with a soft lint-free cloth made moist with warm water. 3. Press one of the three black buttons on the X-link below the touch screen to enable the touch screen. Preventive Maintenance... -
Page 84: Clean The Vacuum Pump
Clean the Vacuum Pump During operation the temperature of the surface of the vacuum pump may be more CAUTION than 70 ºC (158 ºF). Make sure the vacuum pump is cool before you do maintenance on the vacuum pump. 1. Take the milking robot out of operation with the X-link (page 6-5). 2. - Page 85 23. Use a rubber hammer to remove the pump housing. 24. Make sure the blades, the housing and the front cover are clean and free of damage. 25. If necessary, clean the parts. 26. Install the pump housing, if necessary use a rubber hammer. 27.
- Page 86 42. Select: Test Tab [ [Vacuum pump] In the field Vacuum pump, select [ 43. Pull the cover down to close the multiple function box. 44. Use a screwdriver to turn the locks (1) and (2) 90° clockwise. 45. Put the milking robot in operation with the X-link (page 6-3). Closed Multiple Function Box 7-10 Preventive Maintenance...
-
Page 87: Examine The Air Compressor And The Air Dryer
Examine the Air Compressor and the Air Dryer 1. Select: Test Tab [ Facilities 2. In the field Air supply, compare the Temperature dewpoint value with the Temperature environment value. 3. If the environment temperature is higher than the dew point temperature, call your local service organization. -
Page 88: Examine The Alarms
Examine the alarms 1. Examine the attention alarms on the X-link, T4C or the CRS+ as follows: On the X-Link: Indications 1. Select Tab [ On the T4C system: 1. Refer to the T4C manual. On the CRS+: 1. Select: Main Menu >... -
Page 89: Examine The Cleaning Brushes
7.10 Examine the Cleaning Brushes 1. Take the milking robot out of operation with the X-link (page 6-5). 2. Move the Robot Arm to the Service Position. 3. Examine the cleaning brushes and make sure they are clean and not damaged. 4. -
Page 90: Feed Funnel
7.11 Feed funnel 1. Take the milking robot out of operation with the X-link (page 6-5). 2. Select: Test Tab [ [Box] [Gates]. Open 3. In the field Gates, select Exit gate, [ 4. Go into the box via the exit gate. 5. - Page 91 Feed Funnel Attachment Points Preventive Maintenance 7-15...
-
Page 92: Examine The Twin Tubes
7.12 Examine the Twin Tubes 1. Take the milking robot out of operation with the X-link (page 6-5). 2. Move the Robot Arm to the Service Position. 3. Select: Test Tab [ [Mothership] [Cups]. 4. In the field Tilt cups, select: Straight LF [ Straight... - Page 93 Preventive Maintenance 7-17...
-
Page 94: Examine The Attention List
7.13 Examine the Attention List 1. Examine the attention list on the X-link or the T4C as follows: On the X-Link: 1. Select the Tab [ On the T4C system: 1. Refer to the T4C manual. - Cows with a milking interval of more than 10 hours must be guided into the milking Note: robot. -
Page 95: Examine The Quantity Of Astri®-Cid
7.14 Examine the Quantity of Astri®-CID The red hose goes to the Astri®-CID container. Note: 1. Open the doors of the machine room. 2. Make sure there is sufficient Astri®-CID in the container and the hose is sufficiently into the liquid to suck correctly. - Page 96 2. Make sure there is sufficient Astri®-UC in the container and the hose is sufficiently into the liquid to suck correctly. 3. If necessary, replace the container with a full one when the level is too low. 4. Close the doors of the machine room. 7-20 Preventive Maintenance...
-
Page 97: Examine The Teat Cup Liners
7.18 Examine the Teat Cup Liners 1. Take the milking robot out of operation with the X-link (page 6-5). 2. Move the Robot Arm to the Service Position. 3. Examine the teat cup liners for dirt and damage. 4. If necessary, replace the teat cup liners (page 7-27). 5. -
Page 98: Examine The Vacuum Pump Oil Level
7.19 Examine the vacuum pump oil level 1. Refer to the vacuum pump manual for details. 7-22 Preventive Maintenance... - Page 99 7.20 Measure the Temperature of the Hot Cleaning Water 1. Install a thermometer at the end of the milk delivery line (near the milk tank) where the water goes into the sewer. 2. Do a hot cleaning of the system. 3.
-
Page 100: Measure The Concentration Of Astri®-L
7.21 Measure the Concentration of Astri®-L 1. Select: Test Tab [ [Cleaning] [Pre treatment]. 2. In the field Brush cleaning, select [ 3. Put a large cup below the roller rinse sprayer and collect almost half a cup of Astri®-L water. 4. -
Page 101: Replace The Filter Element Of The Single Filter
7.22 Replace the Filter Element of the Single Filter 1. Select: 2. When the pop-up window with the text Continue milk filter exchange> opens, select [ 3. A pop-up window opens with the text The milk filter is being prepared for exchange and the button changes to [ 4. - Page 102 18. The pop-up window closes and the button changes to [ 7-26 Preventive Maintenance...
-
Page 103: Replace The Filter Element Of The Twin Filter
7.23 Replace the Filter Element of the Twin Filter 1. On the CRS+: 1. Press: ENTER 2. Hold the filter housing and remove the cap. 3. Remove the filter housing. 4. Remove the filter sock and the spring from the filter housing. 5. -
Page 104: Replace The Teat Cup Liners
7.24 Replace the Teat Cup Liners 1. Take the milking robot out of operation with the X-link (page 6-5). 2. Move the Robot Arm to the Service Position. 3. Select: Test Tab [ [Mothership] [Cups]. 4. In the field Tilt cups, select: Straight LF [ Straight... - Page 105 20. Screw the teat cups into the milk cups. 21. Put the milking robot in operation with the X-link (page 6-3). 22. Start a Short Rinse (X-link) (page 6-15). Install Liner in Teat Cup Preventive Maintenance 7-29...
-
Page 107: Corrective Maintenance
CORRECTIVE MAINTENANCE Replace the Cleaning Brushes 1. Take the milking robot out of operation with the X-link (page 6-5). 2. Move the Robot Arm to the Service Position. 3. Loosen the two screws. 4. Remove the two brushes from the shaft. 5. -
Page 108: Replace A Twin Tube
Replace a Twin Tube 1. Take the milking robot out of operation with the X-link (page 6-5). 2. Move the Robot Arm to the Service Position. 3. Select: Test Tab [ [Mothership] [Cups] Straight LF [ Straight LR [ Straight RF [ Straight RR [... - Page 109 20. Carefully position the mothership cover on the mothership. 21. Tighten the two bolts (3) and (4). 22. Install the screw (1) and the locking pin (4). 23. Make sure the tubes and the cables are in the correct position and install the between cover. 24.
- Page 110 Mothership Cover Corrective maintenance...
-
Page 111: Shorten A Twin Tube
Shorten a Twin Tube 1. Take the milking robot out of operation with the X-link (page 6-5). 2. Move the Robot Arm to the Service Position. 3. Select: Test Tab [ [Mothership] [Cups] Straight LF [ Straight LR [ Straight RF [ Straight RR [... -
Page 113: Test And Adjustment
TEST AND ADJUSTMENT Test the Save-Life Switch 1. On the CRS+, make sure a main cleaning is not being prepared. 2. If a main cleaning is being prepared, wait until the main cleaning is complete before you continue this procedure. 3. - Page 114 Closed Multiple Function Box Test and Adjustment...
-
Page 115: Adjust The Service Positions
Adjust the service positions 9.2.1 Adjust the Home Position 1. Select: Test Tab [ [Robot arm] Home 2. In the field Set position, set the values for the X position, Y position and the Z position. Move robotarm 3. Select [ ] to move the arm to the set position.. -
Page 116: Adjust The Service-3 Position
9.2.4 Adjust the Service-3 Position 1. Select: Test Tab [ [Robot arm] Service-3 2. In the field Set position, set the values for the X position, Y position and the Z position. Move robotarm 3. Select [ ] to move the arm to the set position.. 4. -
Page 117: Adjust The Acid:hypo Ratio
Adjust the ACID:HYPO ratio On the CRS+: 1. Select: Main Menu > Settings > Cleaning system settings > Main cleaning > Ratio Acid:Hypo arrow up arrow down 2. Use the buttons to adjust the value. Enter 3. Press [ Adjust the Quantity of Pre-treatments 1. -
Page 118: Adjust The Milk Separation Settings For Calving Cows
Adjust the Milk Separation Settings for Calving Cows On the T4C: 1. Select tab Calendar. 2. Select tab Farm. 3. Select the applicable cow from the list. 4. In the field Expected action, select Calve. 5. Click Execute. 6. When the form appears, type all necessary data in the form. 7. -
Page 119: Troubleshooting
TROUBLESHOOTING 10.1 The Milk is Moving Up and Down/ Is Not Transported 1. Clean the Bleed Holes (page 7-2). 10.2 Brushes Are Dirty After Cleaning 1. Increase the quantity of pre-treatments. 2. Clean cubicles and passages. 3. Use more litter. 4. -
Page 120: Troubleshooting Flowcharts
10.3 Troubleshooting Flowcharts 10.3.1 Alarms and Phone Calls Initial call delay passed? Dial phone number Response time-out during call starts counting Response say "Press 1 to play message" time-out during call passed? Key 1 pressed wait 2 seconds Messages > 1 say "Number of alarm messages"... -
Page 121: Diagrams
DIAGRAMS 11.1 Milking Robot 11.1.1 LH Length Dimensions (Metric) Length Dimensions Diagrams 11-1... -
Page 122: Lh Width Dimensions (Metric)
11.1.2 LH Width Dimensions (Metric) Width Dimensions 11.1.3 LH Length Dimensions (Imp) Length Dimensions 11-2 Diagrams... -
Page 123: Lh Width Dimensions (Imp)
11.1.4 LH Width Dimensions (Imp) Width Dimensions 11.1.5 RH Length Dimensions (Metric) Length Dimensions Diagrams 11-3... - Page 124 11.1.6 RH Width Dimensions (Metric) Width Dimensions 11.1.7 RH Length Dimensions (Imp) Length Dimensions 11-4 Diagrams...
- Page 125 11.1.8 RH Width Dimensions (Imp) Width Dimensions Diagrams 11-5...
- Page 126 11-6 Diagrams...
- Page 127 SPARE PARTS The information in this chapter will be included in a later issue of this manual. 12.1 Tools and Equipment Name Part Number Quantity Remarks Spare Parts 12-1...
- Page 128 12.2 Consumable Materials Name Part Number Quantity Remarks 12-2 Spare Parts...
- Page 129 12.3 Spare Parts Name Part Number Quantity Remarks Spare Parts 12-3...
- Page 130 12-4 Spare Parts...
- Page 131 Segregation gate: A gate (controlled by the milking robot) that controls the direction of the cows when they leave the milking robot approx: approximately T4C: Lely Time 4 Cows Farm Management Astronaut: Lely Astronaut A3 milking robot Software cm: centimeter...
- Page 132 13-2 Glossary of Terms...
- Page 133 Consumable Materials • 12-2 INDEX CORRECTIVE MAINTENANCE • 8-1 CRS+ • 4-4, 6-17 CRS+ Keypad • 4-4 CRS+ Menu • 4-5 Adjust the ACID Date and Time Tab • 4-10 HYPO ratio • 9-5 Description • 4-3 Adjust the Home Position • 9-3 DESCRIPTION AND OPERATION •...
- Page 134 INTRODUCTION • 1-1 7-29, 8-1, 8-3, 8-5, 9-1 Laser Light Hazard • 2-5 Quick-Launch Buttons Tab • 4-10 Lely wash • 4-12 LH Length Dimensions (Imp) • 11-2 LH Length Dimensions (Metric) • 11-1 Replace a Twin Tube • 7-16, 8-2, 8-5 LH W idth Dimensions (Imp) •...
- Page 135 Suppress Active Alarms • 6-13 Switch off Extra Feed • 6-6 Switch on Extra Feed • 6-6 System Tab • 4-10 T4C Tab • 4-10 Take the Milking Robot Out of Operation • 6-5 Take the Robot Out of Operation (CRS+) • 6-5 Take the Robot Out of Operation (X-link) •...
- Page 136 14-4 Index...
Need help?
Do you have a question about the ASTRONAUT A3 and is the answer not in the manual?
Questions and answers