Advertisement
Quick Links
Advertisement

Subscribe to Our Youtube Channel
Related Manuals for Infineon TLE8082ES


Summary of Contents for Infineon TLE8082ES
- Page 1 TLE8082ES + TLE8080EM Evaluation board Getting Started...
-
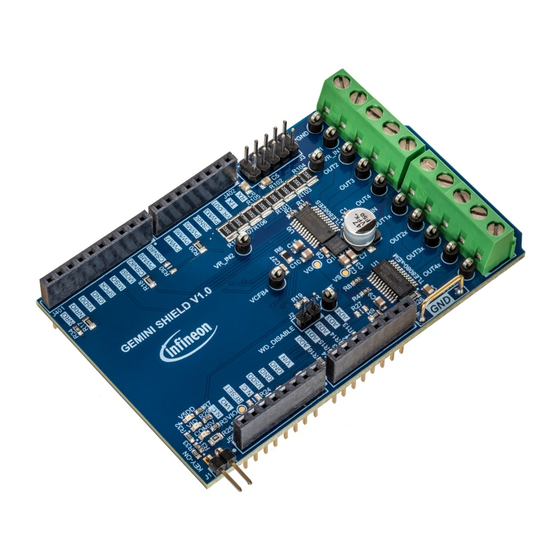
Page 2: Evaluation Board Overview
Evaluation board Overview 2021-04-28 Copyright © Infineon Technologies AG 2021. All rights reserved. - Page 3 12V at Vin disable Note: 2 pins are out of TLE8080EM original Arduino Form watchdog Factor TLE8082 TLE8080 TLE8082 TLE8080 To low side terminal of LOADs To low side terminal of LOADs 2021-04-28 Copyright © Infineon Technologies AG 2021. All rights reserved.
- Page 4 NOTE for ShieldBuddy setup 12V input plug Set Jumper to VDC option to supply the Evaluation board and ShieldBuddy from 12V input plug (VIN voltage domain) 2021-04-28 Copyright © Infineon Technologies AG 2021. All rights reserved.
- Page 5 Obtain the official Arduino IDE or any other Arduino IDE you prefer e.g. Visual Studio Code incl. PlatformIO – Note: this guide and the UM refer to the Standard Arduino IDE › Integrate the XMC platforms to your Arduino IDE, see link 2021-04-28 Copyright © Infineon Technologies AG 2021. All rights reserved.
- Page 6 – FreeEntryToolchain to use Aurix microcontrollers – ShieldBuddy platform to integrate the ShieldBuddy to your Arduino IDE – Note: Further details can be found in the ShieldBuddy getting started guide 2021-04-28 Copyright © Infineon Technologies AG 2021. All rights reserved.
- Page 7 › Please take care that the correct COM port has been selected › NOTE: check the Windows device manager to identify the correct COM port in case of doubts 2021-04-28 Copyright © Infineon Technologies AG 2021. All rights reserved.
- Page 8 Info note for ShieldBuddy If your PC does not detect the ShieldBuddy as COM port, select following option in your Windows device manager 2021-04-28 Copyright © Infineon Technologies AG 2021. All rights reserved.
- Page 9 Library needed to be included before compile/download Install the EveryTimer Library (Tools → Manage Libraries) to use the XMC sketch 2021-04-28 Copyright © Infineon Technologies AG 2021. All rights reserved.
- Page 10 PWM channels 80ch1/3 adjustable upload Overview as shown on the right pops up VRS adjust Send “s 1” to the terminal to switch on according output stages of TLE8080/2 others 2021-04-28 Copyright © Infineon Technologies AG 2021. All rights reserved.
- Page 11 Overview as shown on the right pops up Set the status of the output stages Example: Send “82com 0” to deactivate the communication supply domain of TLE8082 VRS menu for TLE8080 Supply and Afterrun configuration Diagnosis readout 2021-04-28 Copyright © Infineon Technologies AG 2021. All rights reserved.
- Page 12 Read registers of TLE8080/82 The EC bitfield should read as 000b for successful servicing 2021-04-28 Copyright © Infineon Technologies AG 2021. All rights reserved.
- Page 13 SW package basic › TLE8080EM watchdog (WD) has been disabled on HW (with jumper) › TLE8082ES window watchdog (WWD) is being serviced continuously via SPI (mandatory for its channel(s) activation and to put device into AfterRun state successfully) › XMC setup: TLE8082ES Channel 1/2 default operation parameters are –...
Need help?
Do you have a question about the TLE8082ES and is the answer not in the manual?
Questions and answers