
Related Manuals for Stealth Products Simple Solutions Tray


Summary of Contents for Stealth Products Simple Solutions Tray
- Page 1 Alternative Drive Controls Simple Solutions Tray Owner’s Manual - Maintenance Guide Simple Solutions Tray...
-
Page 2: Table Of Contents
Table of Contents Customer Satisfaction ..............i General ......................i Important Information............... ii-iii Warranty .......................ii Supplier Reference..................ii Warning Labels..................iii Limited Liability..................iii Testing ......................iii Design and Function ................ 1 Intended Use....................1 Features......................1 Mounting..................... 1 Parts and Accessories ..............2 Parts and Accessories Breakdown ............. 2 Installation Instructions .............. -
Page 3: Customer Satisfaction
For further assistance, or more advanced applications, please contact your supplier or Stealth Products at (512) 715-9995 or toll free at (800) 965-9229. -
Page 4: Important Information
Warranty Our products are designed, manufactured, and produced to the highest of standards. If any defect in material or workmanship is found, Stealth Products will repair or replace the product at our discretion. Any implied warranty, including the implied warranties of merchantability and fitness for a particular purpose, shall not extend beyond the duration of this warranty. -
Page 5: Warning Labels
Stealth Products does not hold responsibility for final integration of final assembly of product to end user. Stealth Products is not liable for user death or injury. Testing Initial setup and driving should be done in an open area free of obstacles until the... -
Page 6: Design And Function
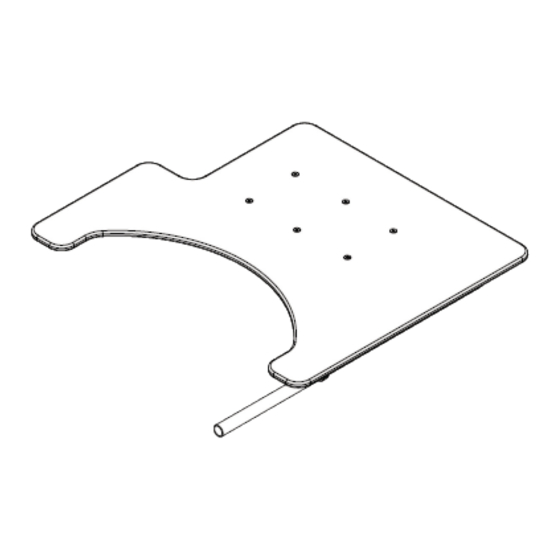
Design and Function Intended Use The Simple Solutions Tray eliminates the need for a user to pull under a table to participate in independent 'activities of daily life'. Mounting screws are flush to the surface of the tray to provide a flat writing and work surface for the user. The tray can also be used as a support device to help users maintain their posture and/or support their arms. -
Page 7: Parts And Accessories
Parts and Accessories Parts and Accessories Breakdown A typical Simple Solutions Tray package comes with: 1. Tray • Composed of shatter-resistant polycarbonate material with better impact resistance and light transmission than most glass. Polycarbonate is safe, durable and lightweight. 2. Swing Away Hardware •... -
Page 8: Installation Instructions
Use only the screws provided in the package. Required Tools Use the proper tools to install and adjust the Simple Solutions Tray to the desired position for the user. Ensure all torque specifications are followed. The tools needed to complete the installation of the Simple Solutions Tray are as... -
Page 9: Installing The Tray
Installation Instructions Installing the Tray Step One: Place the plastic tray over the track mounts. Align the holes of the plastic tray with the holes in the track mounts. Step Two: Using the 3mm hex key, tighten the M5 x 0.8 x 20mm Flat Head screws to the secure the tray to the hardware. -
Page 10: Depth Adjustment
Installation Instructions Depth Adjustment Step One: Loosen the stop collar using a 3mm hex key. Step Two: Slide the tray to the correct position for the user. Lock using the latch. Step Three: Slide the stop collar against the clamp to prevent unintentional movement of the tray. -
Page 11: First Time Use
• Can the user safely operate all controls with minimal effort? Conditions of Use The Simple Solutions Tray is intended for use as installed by the dealer, in accordance to the installation instructions in this manual. • The foreseen conditions of use are communicated by the dealer or service technician to the user and/or attendant during the first time use. -
Page 12: Safety
Safety General Safety Guidelines WARNING The edge of the tray should not be used as an armrest, as it can cause soreness to the user's forearms. WARNING The tray should be removed during operation or transportation of the chair. WARNING Care should be taken, when swinging the tray to the side, not to strike the user as it can lead to injury for the user or damage to the tray. -
Page 13: Maintenance
Maintenance Cleaning • Wash the Simple Solutions Tray with a mild soap or detergent using a clean sponge or soft cloth. • Rinse the tray well with clean water. • Do not scrub or use brushes or abrasive cleansers with this product. -
Page 14: Notes
Notes... - Page 15 Notes...
- Page 16 © 2021, Stealth Products, LLC Warranty Information Home Page Online User Manual Stealth Products, LLC · info@stealthproducts.com · www.stealthproducts.com (800) 965-9229 | (512) 715-9995 | 104 John Kelly Drive, Burnet, TX 78611 P144D562R3 Simple Solu�ons Tray.afpub Dec 6, 2022...
Need help?
Do you have a question about the Simple Solutions Tray and is the answer not in the manual?
Questions and answers