Advertisement
Installation
Instructions
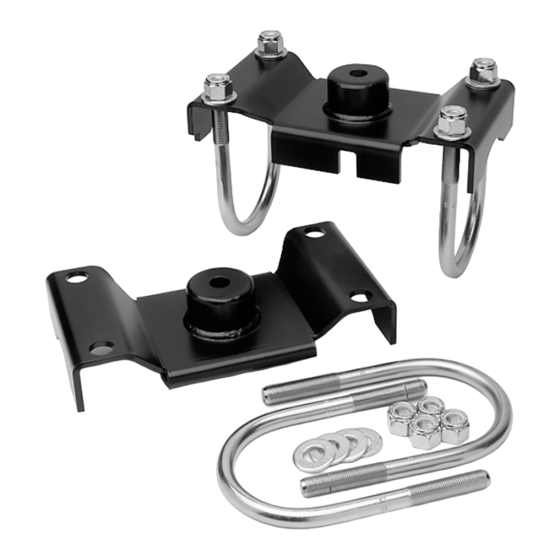
Product: Adjustable Rear Spring Mounts
Part Number: PN 2400
Application: Jeep Wrangler JK, 2007+ (rear)
Welcome
CONGRATULATIONS on your purchase
of new JKS Adjustable Spring Mounts! At JKS
Manufacturing, we are committed to providing
you with the best products available and your
satisfaction is our first priority.
PLEASE READ these Installation Instructions
carefully, and save them for future reference,
as they contain important installation and
Maintenance information.
JKS Adjustable Spring Mount Installation
Tools Required
Hydraulic Floor Jack and Jack Stands
Metric/Standard Socket Wrench Set
Torque Wrench
Tape Measure
Die Grinder with Cut-Off Wheel
(for removing factory spring mounts)
Grinding Wheel
Satin Black Spray Paint
Angle Measuring Tool
Anti-Seize Lubricant *
Factory Service Manual (recommended)
* Asterisk denotes tools that are not required for some
applications. Thoroughly read instructions first to
determine which tools will be required for your
application.
Installation
1. REMOVE REAR TRACKBAR AND
COIL SPRINGS
Raise and support the vehicle chassis with jack
stands positioned in front of the rear lower
suspension arm brackets.
Raise and support the rear axle housing with a
hydraulic jack to relieve tension from the track
bar mounting hardware.
Remove the rear track bar mounting hardware
from the axle and chassis brackets. Retain
original hardware and remove rear track bar
from vehicle.
Remove the rear stabilizer bar drop link
mounting hardware from the axle housing.
Disconnect drop links from axle and retain
original hardware.
Remove the lower mounting hardware from the
shock absorbers and disconnect shocks from
axle brackets. Retain original hardware.
Lower the rear axle housing until the coil
springs are free from the upper spring mounts.
Remove coil springs from vehicle.
PN 2400
2. REMOVE FACTORY SPRING
MOUNTS FROM AXLE
Inspect the factory spring mount on the axle
housing. Locate the areas that are welded to
the axle tube.
Cut the factory spring mount off of the axle
housing. Use care to avoid cutting into the axle
tube. HINT: A die grinder with cut-off wheel is
useful for cutting off the factory spring mount.
Remove any remaining spring mount material
from the axle housing until surface of axle tube
is smooth. HINT: A grinding wheel is useful for
removing remaining spring mount material.
Locate the long factory weld on front (driver
side) of rear axle tube.
On outboard side (closest to tire) of weld, grind
off 2" of material until smooth and flush with
surrounding area.
With the factory spring mounts removed and the
long factory weld shortened, paint bare metal
on axle tube to prevent corrosion.
Page 1 of 2
Advertisement
Table of Contents

Related Manuals for JKS PN 2400


Summary of Contents for JKS PN 2400
- Page 1 CONGRATULATIONS on your purchase Remove the rear stabilizer bar drop link of new JKS Adjustable Spring Mounts! At JKS mounting hardware from the axle housing. Disconnect drop links from axle and retain Manufacturing, we are committed to providing On outboard side (closest to tire) of weld, grind original hardware.
- Page 2 © 2009 JKS Manufacturing, Inc & Aftermarketing, LLC as illustrated above. On driver side of Revision Date 1/8/2009 vehicle, notch in Adjustable Spring Mount bracket will line up with the track bar bracket as illustrated below.
Need help?
Do you have a question about the PN 2400 and is the answer not in the manual?
Questions and answers