Table of Contents
Advertisement
Quick Links
INSTRUCTIONS
Welcome
CONGRATULATIONS on purchasing a set of new
Quicker Disconnects™ from JKS Manufacturing. We
are committed to providing you with the best products
available and your satisfaction is our first priority.
PLEASE READ these Installation Instructions careful-
ly, and save them for future reference, as they contain
important installation and maintenance information.
Tools Required
Metric/Standard Socket Wrench Set
Torque Wrench
Medium Strength Threadlocker
#1 Philips Screwdriver or Small Punch
Angle Measuring Tool
15/16" Open-End Wrench
Grease Gun with Zerk Fitting Coupler
Wheel Bearing Grease
7/32 Drill Bit
Drill
Factory Service Manual (recommended)
* Asterisk denotes tools that are not required for some applica-
tions. Thoroughly read instructions first to determine which tools
will be required for your application.
JKS Quicker Disconect Installation
517-278-1226 • jks@sporttruckusainc.com • www.jksmfg.com
491 W. Garfield Avenue, Coldwater, MI 49036
Product: Quicker Disconnects™
Part Number: JKS3100 - JKS3104
Applications: Grand Cherokee WJ, 1999-2004
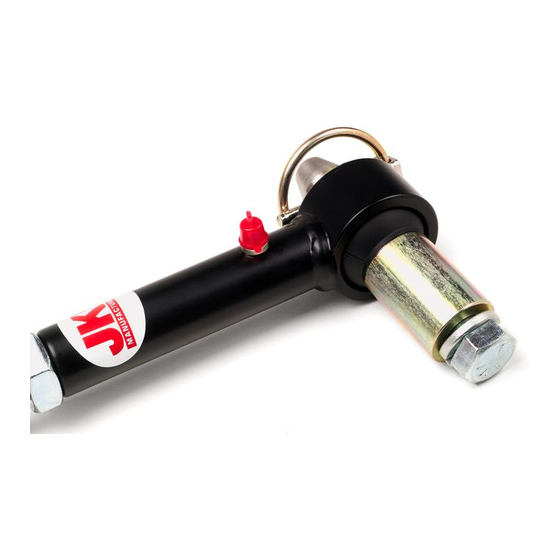
Description
A
1/2" x 1-1/4" NF GR5 Bolt
B
Spherical Bushing
C
Stainless Steel Post
D
Click Pin
E
Press-In Grease Zerk
F
Grease Zerk Cap
G
Upper Male Threaded End
H
Lower Female Threaded End
I
1/2" Lock Washer
J
OE Bracket Spacer
K
1/2" x 2-1/2" NF GR5 Bolt
L
5/8" Jam Nut
JKS3100 - JKS3104
Parts
Page 1
Advertisement
Table of Contents

Related Manuals for JKS Quicker Disconnects


Summary of Contents for JKS Quicker Disconnects
- Page 1 491 W. Garfield Avenue, Coldwater, MI 49036 Welcome Parts CONGRATULATIONS on purchasing a set of new Quicker Disconnects™ from JKS Manufacturing. We are committed to providing you with the best products available and your satisfaction is our first priority. PLEASE READ these Installation Instructions careful- ly, and save them for future reference, as they contain important installation and maintenance information.
- Page 2 NOT COMPATIBLE WITH aftermarket swaybars. ally does not relate to personal injury, although damage Install product with Original Equipment swaybar only. to your JKS product or other property may result if you fail to follow instructions. SOME VEHICLES MAY REQUIRE extended front brake hoses or other modifications to compensate for additional suspension travel.
- Page 3 Brakelines must be secured and retain some slack throughout range of suspension travel. Check after installation of Quicker Disconnects™ & use longer DOT approved brakelines if necessary. Installation ‰ 1. REMOVE ORIGINAL EQUIPMENT (OE) SWAYBAR LINKS ...
- Page 4 Click Pin will “snap” against the shaft of pin. When installed backwards, the ring does not fit snugly against shaft. Adjust the length of your Quicker Disconnects until swaybar is at the Ideal Angle or within Acceptable Range. Vehicle must be at normal ride height and located on level ground.
- Page 5 It is important to lubricate Quicker Disconnects fre- quently for the first three (3) months after installation to evacuate contaminants that may build up during break-in period. After break-in period, Quicker Disconnects should be lubricated regularly as part of vehicle maintenance schedule.
Need help?
Do you have a question about the Quicker Disconnects and is the answer not in the manual?
Questions and answers